Setting Up Planned Overtime Features
To set up planned overtime, use the Overtime Limit (TL_OT_SETUP) and the Workgroup (TL_WKG_MAIN_PNLGRP) components. Use the TL_WKG_MAIN_PNLGRP component interface to load data into the tables for this component.
This section discusses optional features of the overtime request transactions.
|
Page Name |
Definition Name |
Usage |
|---|---|---|
|
TL_OT_SETUP |
Define overtime limits for a set of TRCs. Also identify the TRCs for which you want to track overtime balances. You must define the value list that includes the TRCs first. |
|
|
TL_OT_VAL_LIST_SEC |
Displays the Time Reports Codes (TRCs) that make up a selected value list. |
|
|
TL_WRKGRP_PNL |
Assign an overtime limit definition to a workgroup. |
To establish overtime limits or maintain overtime balances by period, you create value lists to identify the sets of Time Reporting Codes (TRCs) to which the limits or balances apply. For example, to limit the combined number of overtime hours permitted for TRC1 and TRC2, you create a value list that includes these two TRCs.
Use the Value List page to create one or more value lists for your overtime TRCs.
Important! Because you assign overtime limits to workgroup, be sure that the TRCs in your value lists are also included in the workgroup's TRC program.
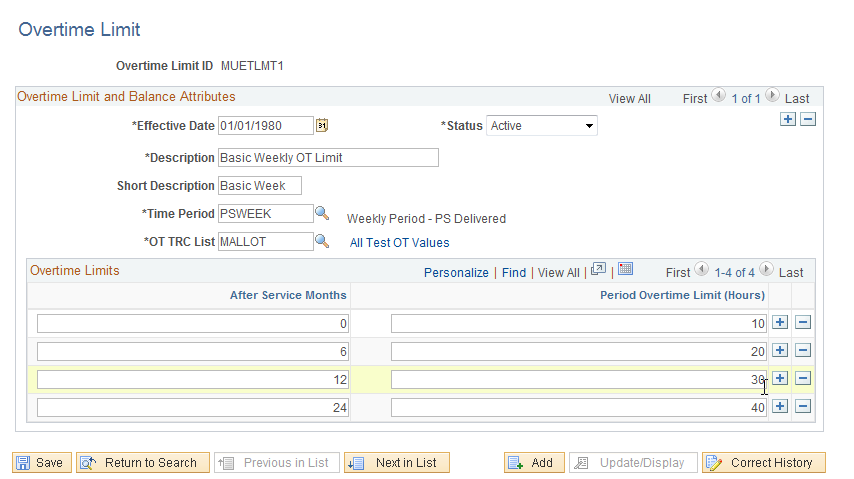
Use the Overtime Limit page (TL_OT_SETUP) to define overtime limits for a set of TRCs. Also identify the TRCs for which you want to track overtime balances. You must define the value list that includes the TRCs first.
Navigation:
This example illustrates the fields and controls on the Overtime Limit page. You can find definitions for the fields and controls later on this page.
Field or Control |
Description |
|---|---|
Overtime Limit ID |
Displays the unique ID for the overtime limit definition. IDs can contain up to eight alphanumeric characters. |
Overtime Limit and Balance Attributes
Complete the following fields to designate the TRCs for which you want to set overtime limits and/or track overtime balances.
Field or Control |
Description |
|---|---|
Status |
Select the status of the Overtime Limit ID: Active or Inactive. Note: You cannot inactivate an overtime limit definition that is associated with an active workgroup. To inactivate the limit definition, first remove it from the Workgroup page. (You can query the Workgroup table to find out which workgroups are associated with an overtime limit definition). |
Time Period |
Select the time period for managing overtime limits and balances. For example, if you select monthly, the system tracks the number of overtime hours for the month. If you also set a limit of 10 hours, this limit applies to each month. Repeating and complex time periods are not allowed. |
OT TRC List |
Select the value list that includes the overtime TRCs for which you are defining limits and/or tracking balances. |
View List |
Click to view the list of TRCs that are members of the value list selected in the OT TRC List field. |
Overtime Limits
Define the overtime limits in this group box. If you base overtime limits on months of service, add a row for each term of service that has a different overtime limit.
Field or Control |
Description |
|---|---|
After Service Months |
To base overtime limits on an employee's number of months of service, enter the number of months here. Enter whole numbers only. If you do not want to link overtime limits to months of service, leave the default value of 0 (zero) in this field. Note: The system refers to the employee's Service Date on the Employment record to determine months of service. Because service dates can be defined for employees only, the system cannot calculate overtime balances or apply overtime limits for non-employees. |
Period Overtime Hours Limit |
Enter the maximum number of overtime hours that employees are allowed to work during the time period defined in the Time Period field. If you entered a non-zero value in the After Service Months field, the limit you enter here represents the number of overtime hours permitted for employees who have met the service requirement. If you entered zero in the After Service Months field, the limit you enter here applies to all employees. |
Example 1: Defining Overtime Limits without Service Dates
Assume that employees can work a maximum of 25 hours of overtime each month. The values you enter are as follows:
|
After Service Months |
Period Overtime Hours Limit |
|---|---|
|
0 |
25 |
Example 2: Defining Overtime Limits with Service Dates
Assume that employees must complete 12 months of service before working any overtime and after that can work a maximum of 20 hours of overtime each month. After 24 months of service, employees can work a maximum of 50 hours of overtime each month. In this case, the values that you enter are as follows:
|
After Service Months |
Period Overtime Hours Limit |
|---|---|
|
12 |
20 |
|
24 |
50 |
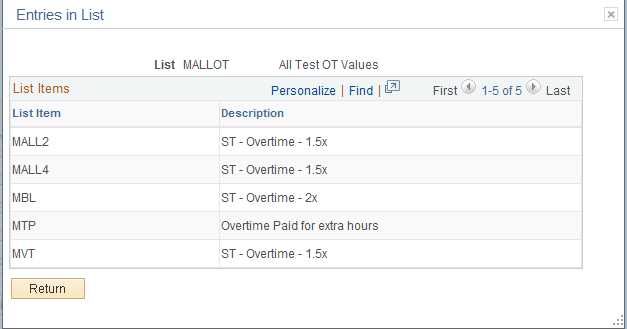
Use the Overtime TRC Value List page (TL_OT_VAL_LIST_SEC) to displays the Time Reports Codes (TRCs) that make up a selected value list.
Navigation:
Click All Test OT Values on the Overtime Limit page.
This example illustrates the fields and controls on the Overtime TRC Value List page. You can find definitions for the fields and controls later on this page.
Field or Control |
Description |
|---|---|
Value Group |
Displays the names of TRCs within the value list selected in the OT TRC List field on the Overtime Limit page. |
Use the Workgroup page (TL_WRKGRP_PNL) to assign an overtime limit definition to a workgroup.
Navigation:
In the Overtime Limit ID field (within the Compensation Controls group box), select the ID for the overtime limit definition that applies to the members of the workgroup.
Note: Overtime limit assignments are effective-dated. A workgroup can have more than one effective-dated row of overtime limits.
Time and Labor uses workflow functions, such as approvals workflow. Approvals workflow takes a request entered by an employee and routes it to an approver to accept or deny. If the request is denied, the system notes that the request was denied. Employees and managers can view the approval status of some requests with self-service transactions.
Note: For Request Overtime, the employee's manager is the only person who is required to approve overtime requests.
To enable workflow:
Ensure that the appropriate roles are associated with user profiles.
Roles define what the user can and can't access in the system. Use the Roles page in the User Profiles component to review the roles and update as necessary. Manager profiles should include roles for Manager and Worklist User. Employee profiles should include an Employee role. Instructions for using the Roles page are provided in the PeopleTools 8.52: Security Administration PeopleBook.
Specify which types of routings each role user can receive.
Use the Workflow page in the User Profiles component to specify where the system can deliver work items: to a worklist or an email mailbox. For Time and Labor, worklist, email, or both are appropriate for managers; email is appropriate for employees. Instructions for using the Workflow page are provided in the PeopleTools 8.52: Security Administration PeopleBook.
Define the rules for workflow notifications by SetID.
Use the System Workflow Rules page to define how users are to receive notifications: email, worklist, both, no notification, or user-defined preference. The system can notify employees by email when a request is submitted, approved, or denied; it can notify managers by worklist, email, or both when requests are submitted for approval.
Note: Oracle PeopleSoft delivers Notification Composer Framework to manage the setup and administration of all notifications in one central location.
Once you have adopted the Notification Composer feature, you must use it to create new notifications and manage your existing notifications.
Notifications delivered with HCM Image 47 or later must use Notification Composer.
For more information about Notification Composer Framework, see Understanding Notification Composer.
Procedures are provided in the PeopleSoft HCM Application Fundamentals PeopleBook and the PeopleTools 8.52: Workflow Technology PeopleBook.
Activate workflow for the HCM system, if not already activated.
Use the Worklist System Defaults page and the Workflow User Preferences page.
Procedures are provided in the PeopleSoft HR Application Fundamentals PeopleBook.
See the product documentation for PeopleTools: Workflow Technology.