Setting Up Context Definitions
This section discusses how to:
Set up a context definition.
View the record tree.
Copy a context definition.
|
Page Name |
Definition Name |
Navigation |
Usage |
|---|---|---|---|
|
Context Definition |
SCCFP_CNTXT_DFN |
|
Identify the field names and formats to use for converted data and the staging tables in which to place the converted data and hold for processing. |
|
Record Tree |
SCCFP_TREE_RECPRVW |
|
View the record tree to determine the hierarchical layout of the staging tables. |
|
Copy Context Definition |
SCCFP_CPY_CNTXT |
|
Copy an existing context definition with a new definition name. |
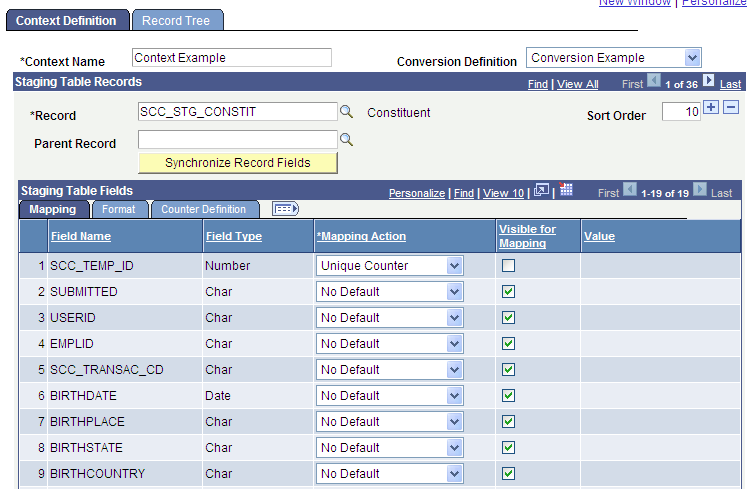
Access the Context Definition page ().
This example illustrates the fields and controls on the Context Definition page (1 of 2). You can find definitions for the fields and controls later on this page.
This example illustrates the fields and controls on the Context Definition page (2 of 2). You can find definitions for the fields and controls later on this page.
Field or Control |
Description |
|---|---|
Context Name |
Enter a name for this set of staging tables. |
Conversion Profile |
Enter the field conversion profile to associate with this context. You can enter the profile here or on the File Mapping Definition page when you map the files. If you enter a profile here, it appears as the default profile on the File Definition page. You can change it on the File Mapping Definition page. The conversion profile entered on the File Mapping Definition page takes precedence. |
Staging Table Records
Field or Control |
Description |
|---|---|
Record |
Enter the staging table to use. When you enter a table name, the system displays the fields from that table. Add as many staging tables as needed for this conversion context. |
Sort Order |
Enter the order in which the table should appear in the hierarchy of staging files for mapping. |
Parent Record |
Enter the name of this staging table's parent record, if any. |
Synchronize Record Fields |
Click to compare fields in the staging table to fields in the target table. If the fields in the tables are different, the system adds and deletes fields in the staging table until it contains only the fields that are in the target table. The changes are for the staging table as associated with this context definition only. The system displays a message indicating the changes made to the record. Important! You must perform a thorough impact analysis when applying any software updates in order to identify delivered record definitions that are being referenced by current File Parser definitions. Note: If changes are made to the record, it is required that you click this button in order to successfully run the File Parser process. |
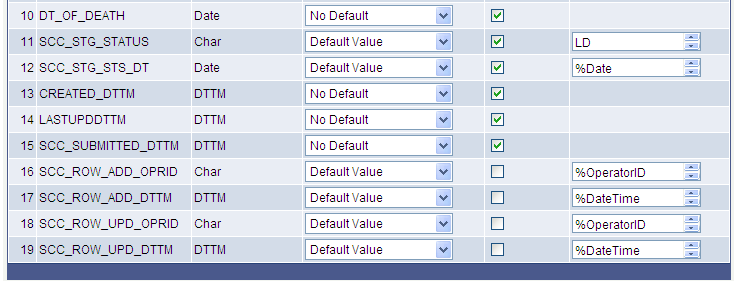
Staging Table Fields - Mapping Tab
Field or Control |
Description |
|---|---|
Field Name |
The system lists each field in the specified staging table. When you synchronize the tables, the system updates the list to include only the synchronized fields. |
Mapping Action |
Enter the value to use for this field. Values are: Default Value: Enter a hard-coded value set for this field, including any variables that are supported. Supported variables include %Date, %DateTime, %OperatorID, %EmployeeID, %MapID (the current file parser map ID), %MapName (the current file parser map name), %FileName, and a number representing the file row number. Inherit from Parent: Enter the value from the field of the same name on the parent record. No Default: Enter no value. The field must be mapped from the File Mapping Definition component. Process Instance: Use the current process instance. Sequence: Enter a numerical sequence that is incremented by one for each record inserted. Unique Counter: Use the next number from the supplied counter record or field pair. Calculated: Define a user-written PeopleCode application class to calculate the field value. Examples of calculated mapping include concatenation of fields, unique sequencing, and deriving the field value from other staged values (for instance, establishing an External Org ID based on an incoming CEEB code, subject description, activity description, and so on). For more examples, see Creating Calculated Mapping Application Class Objects. When you select Calculated, the Calculated Field Application Class tab appears. Specify the application class details on this tab. Important! Do not base calculated field values on other calculated fields. |
Visible for Mapping |
Select this check box for the field to be available on pages in the File Mapping Definition component. If a field is premapped and the user should not change the mapping, clear the check box to prevent it from appearing on pages in the File Mapping Definition component page. |
Value |
The corresponding hard-coded value appears when the Mapping Action field is set to Default Value. |
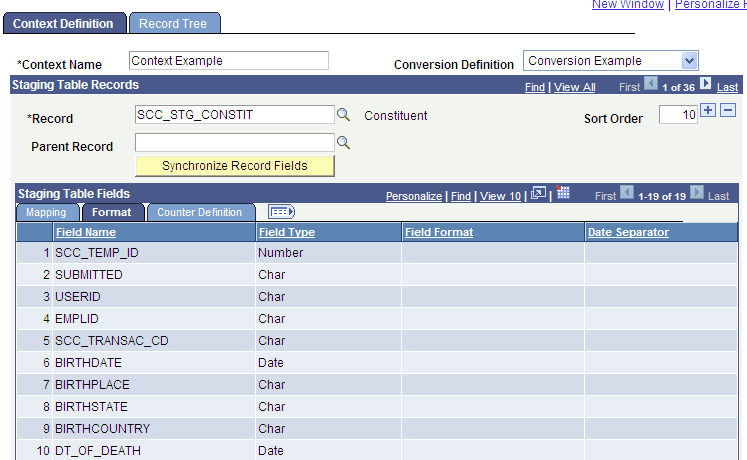
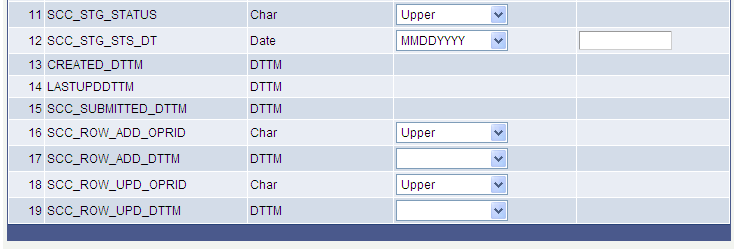
Staging Table Fields - Format Tab
The Format tab is available only if Date or Number is selected for one or more field types.
Access the Context Definition page - Format tab.
This example illustrates the fields and controls on the Context Definition page - Format tab (1 of 2). You can find definitions for the fields and controls later on this page.
This example illustrates the fields and controls on the Context Definition page - Format tab (2 of 2). You can find definitions for the fields and controls later on this page.
Field or Control |
Description |
|---|---|
Field Format |
This field appears if formatting options exist. Enter the format to use for the field value. Each field has options relevant to that data type. For example, a date type format can be DDMMMYY, DDMMMYYYY,DDMMYY, and so on. A character type format uses the case controls Lower, Proper, and Upper. |
Date Separator |
This field appears only for date fields. Enter the separator, if any, to use to separate day month and year in whatever date format you enter. For example, if you enter a format of MMDDYYYY and a separator of /, the value might be 06/25/2007. The system ignores leading zeros when a separator is used. If a separator is not used, leading zeros are required. |
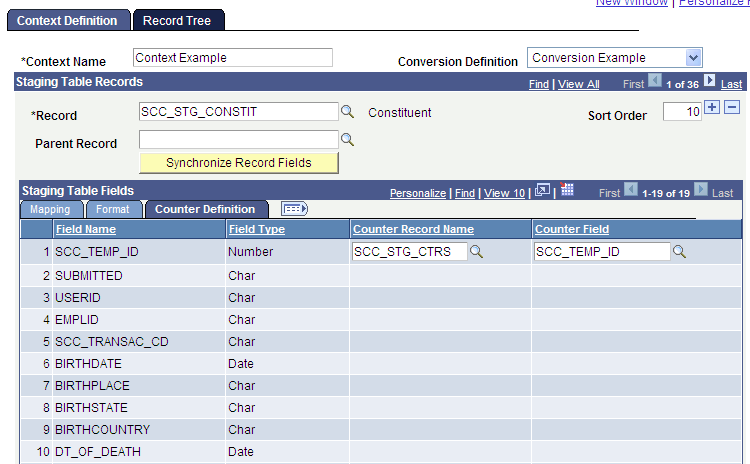
Staging Table Fields - Counter Definition Tab
The Counter Definition tab is available only if a Mapping Action of Unique Counter is selected for one or more field types.
Access the Context Definition page - Counter Definition tab.
This example illustrates the fields and controls on the Context Definition page - Counter Definition tab (1 of 2). You can find definitions for the fields and controls later on this page.
This example illustrates the fields and controls on the Context Definition page - Counter Definition tab (2 of 2). You can find definitions for the fields and controls later on this page.
Field or Control |
Description |
|---|---|
Counter Record Name and Counter Field |
Enter the record (table) and field from which to take the next sequential number. |
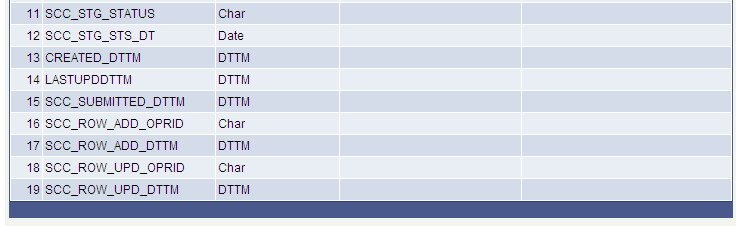
Staging Table Fields - Calculated Field Application Class Tab
The Calculated Field Application Class tab is available only if Calculated is selected as the Mapping Action for one or more fields.
Access the Calculated Field Application Class tab.
This example illustrates the fields and controls on the Context Definition page - Calculated Field Application Class tab. You can find definitions for the fields and controls later on this page.
Supply the name of your Application Package in the Root Package ID column. Prompt values will then become available for the Qualified Package/Class Path and Application Class ID columns. Select the class path and path ID that reflect the calculation that you want to associate with the Record/Field Context Definition.
The PeopleCode application class for a calculated field should not be dependent on any other calculated field.
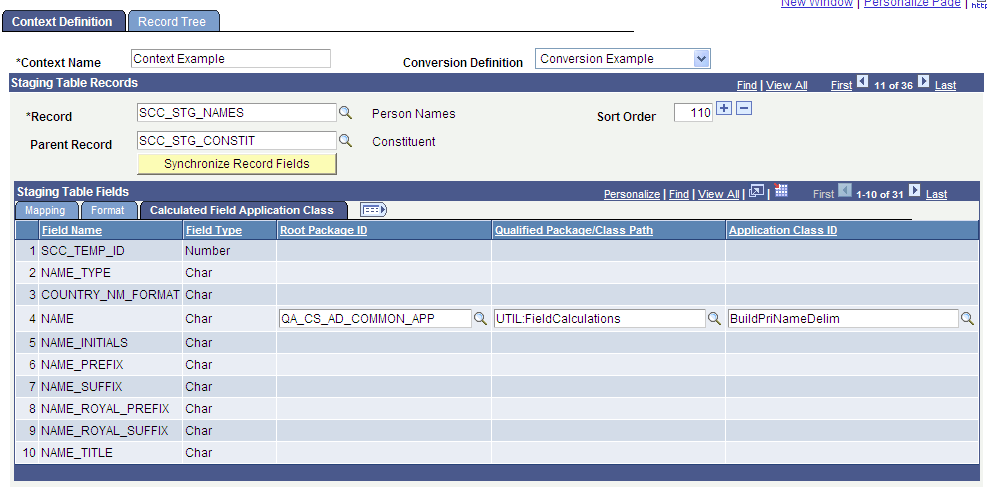
Access the Record Tree page ().
This example illustrates the fields and controls on the Record Tree page (1 of 2). You can find definitions for the fields and controls later on this page.
This example illustrates the fields and controls on the Record Tree page (2 of 2). You can find definitions for the fields and controls later on this page.
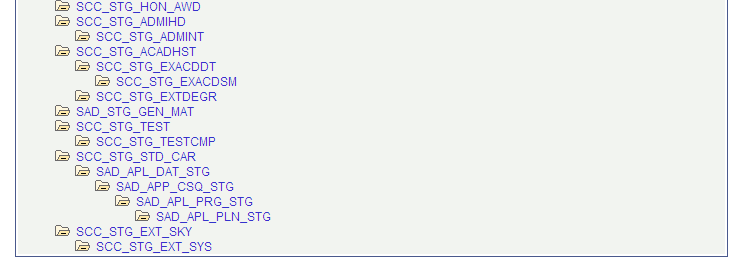
Staging Table Mapping Tree
Click the Refresh Layout Tree link to view the hierarchy of staging tables for this conversion. Review the tree to verify that the records are in the correct parent-child order.
Refresh the layout tree after you add staging tables or change the sort order.
Access the Copy Context Definition page ().
You can copy an existing context definition and save it with a different name. You can then change the new context definition as necessary.
On the search page, select the context definition to copy. Then, enter the name of the new context definition and save the page. To edit the new definition, access it from the Context Definition page.