Managing Department Security
The application pages discussed in this documentation are provided in order to support department security use in the system. One example of where department security is required is Service Indicator setup and functionality.
See Setting Up Service Indicator Codes and Reasons.
The following topics provide an overview of the data permission security by department security trees and discuss how to manage tree-based data permission.
Note: After you assign a row security permission list to a user, you must run the Refresh SJT_OPR_CLS process.
Note: If you implement Campus Solutions and a separate instance of PeopleSoft Human Capital Management, read the relevant documentation about CS-HCM Integration to understand the setup, functional, and technical implementation considerations.
See:
Monitoring Integrations Using the Integrity Utility
Information Center: CS-HCM Integration for PeopleSoft Enterprise Campus Solutions in My Oracle Support (ID 2091799.2).
Each security set has a tree-based security access type. Tree-based security access types use department security trees to set up a hierarchy of your departments and enable you to use this hierarchy to simplify data assignment.
You use PeopleSoft Tree Manager to build a hierarchy of department security for an organization. A security tree provides a graphic means to grant and restrict access to data. The security tree does not have to represent your organization's hierarchy exactly, although it is usually very close.
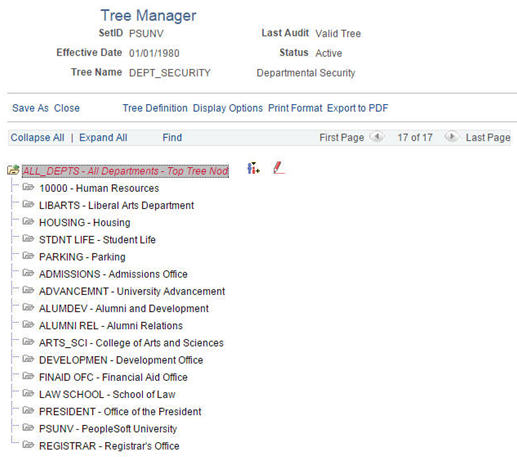
To grant a row security permission list access to a group of departments, you grant access to the department to which all of those departments report. You can restrict access to individual departments or to a group of departments if you need to. This is an example of a department security tree for the PSUNV set ID:
This example illustrates the fields and controls on the Tree Manager Page. You can find definitions for the fields and controls later on this page.

Using this security tree you could, for example, grant a row security permission list access at the top level for ‘ALL_DEPTS’ and allow access to everyone in all the child department entities.
You also manage the security at a more granular by restricting permission list access only to a subset of the child departments in this tree. For example a row security permission list may only grant access to the Parking and Student Life departments.
Note: You can only grant tree-based data permission to row security permission lists.
Before you work with data security and PeopleSoft Tree Manager, make sure that data is defined in the PeopleSoft Campus Solutions control tables.
Warning! Before you create or modify a security tree, it is recommended that you review PeopleTools: Tree Manager documentation for a detailed discussion of using Tree Manager because this section does not provide a complete overview of the application. Security is an important component of your system, and it is crucial that you understand all aspects of PeopleSoft security and its tools before you implement it.
Security Trees and Departments
For the purpose of building department security trees, PeopleSoft defines all entities in an organization—from companies to departments—as departments. The department data is created and stored in the Departments component (DEPARTMENT_TBL), which you can access from PeopleSoft Tree Manager or the Set Up Common Objects menu. You assign security access based on these departments so define each entity in your organization in the Departments component so that you can add its department ID code to the security tree.
Trees are built with levels and nodes:
Levels are the levels of the hierarchy.
Nodes, representing organizational entities, are added at different levels to indicate their place in the hierarchy.
For example, the first level of your tree might be the company level. The second level might be the regional level. A node that is added at the first level is a company-level node and represents the company department. A node that is added at the second level is a regional-level node and represents a regional department, such as an office. The first node in your organization is the root node. This is the highest node in the hierarchy. All other nodes (departments) report up to the root node.
Access to data is based on the hierarchy that you create. If you grant access to a department, you also grant access to each department that reports to that department.
Security Trees and Effective Dates
Department security trees are called DEPT_SECURITY. Security trees are uniquely identified by their set ID and effective date.
You can create future-dated trees to reflect a change in your reporting structure and you may want to grant access using the newer tree (or, perhaps, to a historical tree).
When you assign data to a permission list on the Security by Dept Tree page select the date as of which you want the trees to be effective. When you add a row in the Define Security Profile grid on the Security by Dept Tree page and select the set ID of the security tree, the system references the security tree that is effective as of the date you selected in the As of Date for the Trees field.
For example, it is now April, 2015 and you have created a future-dated security tree for the PSUNV set ID dated January 1, 2016. You wish to try out the data permission using the new tree. On the Security by Dept Tree page, enter January 1, 2016 (or a higher date; the date does not have to be the exact effective date of the tree) in the As of Date for the Trees field. Add a row in the Define Security Profile grid and select the PSUNV set ID. The system displays January 1, 2016 in the Effective Date field in the grid and uses the future-dated tree to enforce data permission for that permission list.
When the future-dated tree becomes effective, the system does not automatically update the security profiles of permission lists referencing the old tree. For example, on January 1, 2016, the system continues to use the previous PSUNV tree to enforce data permission for all the permission lists that were referencing it.
To update the permission lists so that they reference the new tree, enter the Security by Dept Tree page, enter the date January 1, 2016, and click the Refresh Tree Effective Date button. The system then updates the effective dates of all the trees referenced by that permission list to the dates the trees effective as of January 1, 2016.
|
Page Name |
Definition Name |
Navigation |
Usage |
|---|---|---|---|
|
Tree Manager |
PSTREEMGR |
|
Set up or modify department security trees using PeopleSoft Tree Manager. |
|
Security by Dept Tree |
SCRTY_TABL_DEPT |
|
Grant tree-based department data access to row security permission lists. |
|
Refresh Row Security Operator |
SCRTY_OPR_RC |
|
Refresh some or all of the data in the SJT_CLASS_ALL table to capture changes to permission lists that were not automatically loaded into the table. |
|
Scrty Oprcls Rc (Security Operator Class) |
SCRTY_OPRCLS_RC |
|
Refresh some or all of the data in the SJT_OPR_CLS to capture the current relationship between user profiles and permission lists. |
Access the Tree Manager page ().
You must run the Refresh SJT_CLASS_ALL process whenever you set up or modify a tree.
Creating Security Trees Manually
The steps for creating a tree manually are described in PeopleTools: Tree Manager. When you create a security tree, enter the following data on the Tree Definition and Properties page (PSTREEDEFN):
Field or Control |
Description |
|---|---|
Tree Name |
Enter DEPT_SECURITY. |
Structure ID |
Select DEPARTMENT. PeopleSoft delivers the system with this structure ID set up. |
Description |
Enter a description of the tree. |
Set ID |
Select the set ID of the departments that you are adding to the tree. |
Effective Date |
Enter the date that the tree becomes effective. Add only the departments that are effective on or before this date. |
Status |
Select the status of the tree. |
Category |
Select the category of the tree. |
Use of Levels |
Select one of the following options:
|
All Detail Values in this Tree |
Leave blank. |
Allow Duplicate Detail Values |
Leave blank. |
Once you have created the basic tree structure, you begin to add nodes. In a security tree, each node represents a business entity in your organization. You define nodes on the Departments component, creating a department for each business entity in your organization.
You must have a node for every department in the set ID. You can add nodes to your trees as you add departments to your organization.
To add a new, future-dated department in order to maintain data security for people added to the new departments, create a future-dated security tree. This enables you to add people to the new department before it becomes effective and still be able to control access to their data in the present.
Creating Security Trees Automatically
You can create a security tree using an existing organizational structure. Use the following Structured Query Report (SQR) procedure to import the existing hierarchy and build your security tree. You import your department data into a temporary Department Table, and the system uses that data to build the security tree.
To set up a hierarchy of departmental entities and build your data security tree automatically:
Import the entity data.
Import the entity data into the temporary table R_PER507 using the PeopleSoft Import utility, a Structured Query Report (SQR), or another batch facility. You load department data into this temporary table, so before you use this utility, you must establish the reporting hierarchy for all the departments in your organization. To do this, use the REPORTS_TO_DEPT field in the R_PER507 temporary table. The table looks like DEPT_TBL, but it includes the following additional columns:
Column
Description
SETID_RPDEPT
Specifies the set ID of the department that a particular department reports to. In addition to the other Department Table data, you must load data into this column.
REPORTS_TO_DEPT
Specifies department that a particular department reports to. In addition to the other Department Table data, you must load data into this column.
ORGCODEFLAG
Indicates whether the department is selected for processing as of a particular date. The system populates this column based on your department data and the REPORTS_TO_DEPT field values.
ORGCODE
Designates the position of the department in the hierarchy. The system populates this column based on your department data and the REPORTS_TO_DEPT field values.
TREE_LEVEL_NUM
Temporary work column.
PARENT_NODE_NUM
Temporary work column.
TREE_NODE_NUM
Temporary work column.
TREE_NODE_NUM_END
Temporary work column.
Set up the reporting hierarchy.
Run PER507 to set up the reporting hierarchy of your tree. This utility determines whether a department is active or inactive as of the date that you enter when you run the utility, and populates the ORGFLAG column in R_PER507 accordingly. The utility creates a structured organization code based on the REPORTS_TO_DEPT field values that you loaded and populates ORGCODE accordingly. This utility uses the ORGCODE values to set up the department hierarchy.
Build the department security tree.
Run PER508 to build your DEPT_SECURITY tree. The effective date of the tree is the latest effective date of the departments that were processed in step 2.
Note: To set up multiple trees to represent security or organizational structures at different points in time, perform step 2 for each tree, setting the As of Date each time, and perform this step again.
Transfer department data into the department component.
Run PER509 to transfer the information that you set up in R_PER507 into DEPT_TBL. You cannot view or update the Department component until you run this utility.
Renumber and insert numbered gaps in the security tree.
Run PTUGAPTR.SQR to renumber the nodes in your tree and insert numbered gaps between the nodes.
Modifying Security Trees
You can modify an existing tree by changing either the nodes or the levels. When you modify a security tree, the tree node numbers usually change, so you need to refresh the numbers. You also need to run the Refresh SJT_CLASS_ALL process to update the data access profiles and security join tables.
Renumbering Gaps in Security Trees
PeopleTools assigns each node a number and reserves a series of unused numbers, called gaps, which the system uses to make changes to sections of a security tree. When you move a node, the system renumbers the nodes that appear to the right of the node that you moved (the children of the node that you moved). When you save changes to a tree, the system saves only the parts of the tree that have changed.
To refresh the unused numbers in the gaps between nodes, run the PTUGAPTR.SQR utility. Refresh unused numbers when:
You load your security tree structure.
You modify your security tree.
An error message tells you to gap your tree.
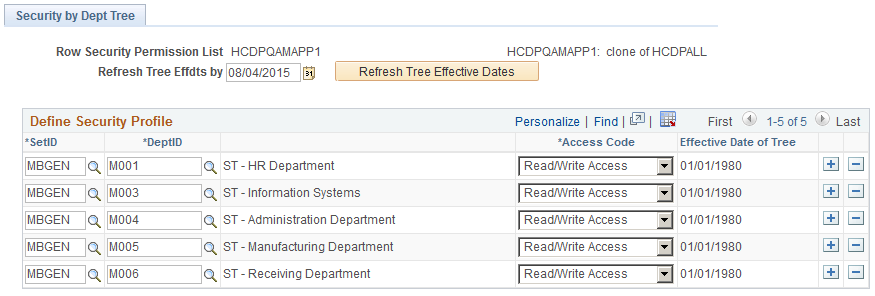
Access the Security by Dept Tree page ().
This example illustrates the fields and controls on the Security by Department Tree Page. You can find definitions for the fields and controls later on this page.

Field or Control |
Description |
|---|---|
Refresh Tree Effdts by (refresh tree effective dates by) |
The system references the trees that are effective as of this date when you select a tree set ID in the Define Security Profile grid. Select a date in the future to reference a future-dated tree. For example, to use the department security trees that are current as of today's date, enter today's date in this field. |
Refresh Tree Effective Dates |
Select to refresh the trees listed in the Define Security Profile grid to trees that are effective as of the date in the As of Date for Trees field. Note: To ensure that your row security permission lists use the current trees you must enter the appropriate as of date and click this button whenever you create a more recent version of a set ID's security tree. |
Define Security Profile
Field or Control |
Description |
|---|---|
Set ID and Dept ID (set ID and department ID) |
Enter the tree set ID and the ID of the department that you are granting access to. The row security permission list has access to each department ID that reports up to this one on the security tree (unless you specify otherwise) so you don't have to select each department ID individually. |
Access Code |
Indicate what kind of access the row security permission list has to the data for this department ID. To restrict access to one or more departments that report up to a department ID that you've granted access to, insert a row and select the restricted department's ID and then select an Access Code of No Access. You need to restrict access explicitly only for department IDs that report up to the department ID to which you want to grant access. Otherwise, the row security permission list doesn't have access to a department unless it or the department to which it reports has been granted access on this page. |
Effective Date of Tree |
Displays this set ID's tree effective date. Make sure that the effective date of the tree is accurate. The system does not update the effective date automatically if you make a newer version of a tree. To update trees, enter the date as of which the tree is effective in the Refresh Tree Effdts by field and click the Refresh Tree Effective Dates button. |
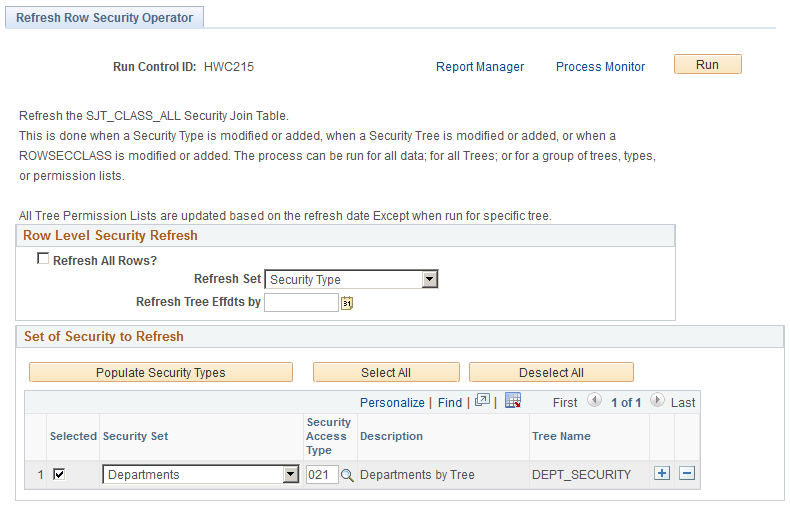
Access the Refresh Row Security Operator page ().
This example illustrates the fields and controls on the Refreshing Row Level Security Operator Page. You can find definitions for the fields and controls later on this page.

Field or Control |
Description |
|---|---|
Refresh All Rows |
Select to refresh every row in SJT_CLASS_ALL. Deselect to refresh selected rows. The system displays the Refresh Set field. |
Refresh Set |
Select the set of rows to refresh. The system displays the Set of Security to Refresh grid. You can select to refresh:
|
Refresh Tree Effdts by (refresh tree effective dates by) |
Select the date as of which you are refreshing the table. The process refreshes the table with the security data that is effective as of this date. |
Set of Security to Refresh |
Select the values to refresh. For example, if you've modified a row security permission list, rather than refreshing the entire table, select Permission List in the Refresh Set field and select the permission list you modified here. If you've modified a specific tree, select Specific Tree in the Refresh Set field and select the setIDs to refresh for that tree. |
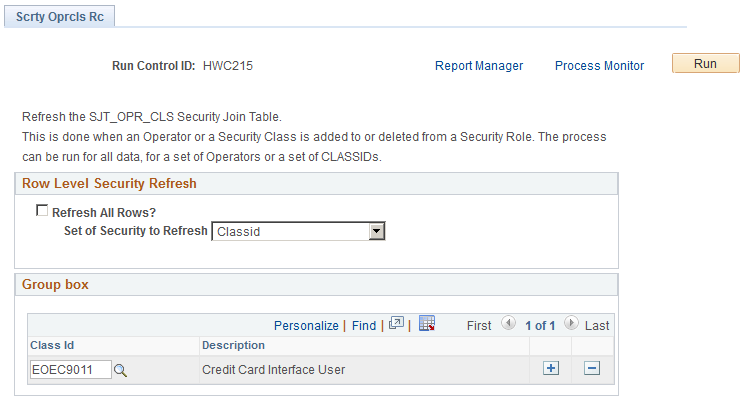
Access the Scrty Oprcls Rc (Security Operator Class) page ().
This example illustrates the fields and controls on the Scrty Oprcls Rc (Security Operator Class) page. You can find definitions for the fields and controls later on this page.

The Refresh SJT_OPR_CLS process refreshes SJT_OPR_CLS as of the system date.
Field or Control |
Description |
|---|---|
Refresh All Rows |
Select to refresh every row in SJT_OPR_CLS. Deselect to refresh selected rows. The system displays the Set of Security to Refresh field. |
Set of Security to Refresh |
Select the set of rows to refresh. You can select to refresh:
|