Integrating Person Data
This section discusses how to:
Understand person data integration.
Review integrated person data.
Understand the business process.
Understand external Search/ Match integration.
Use external Search/Match to integrate with external systems.
Configure the Last Employee ID Assigned number.
Publish and subscribe to person data.
Configure web services for person data.
Understand Person Data FullSync and Sync Service Operations and Handlers.
Note: These topics describe integration processes between CS release 9.2 and HCM 9.1/9.2.
Note: Documentation relevant to Campus Solutions and Human Capital Management integration is available on My Oracle Support (ID 2091799.2).
Oracle provides the tools that allow you to directly integrate person data between CS and HCM systems. The suite of person attributes is transferred primarily by the PERSON_BASIC_SYNC message. The data that comprises the message includes the core person data historically contained in PERSON_BASIC_SYNC, plus CS extension data (such as FERPA) contained in the PERSON_SA message and global subrecords. Ethnicity and diversity information are also part of the integrated person data set. Subscription handlers enable inbound person additions and updates in both CS and HCM. PERSON_BASIC_SYNC can also subscribe to incoming person data from an external source.
Direct integration between CS and HCM requires only the use of Integration Broker to enable and orchestrate the integration. No additional integration mechanism is required.
CS also subscribes to the WORKFORCE_SYNC message to bring job data (mastered in HCM) into CS for those CS processes that require it (such as assigning an instructor to a class).
In general, the following key person bio-demo and other data are synchronized between the systems. The delivered integrations include data fields for country localizations and other personal attributes which may or may not be used in your implementation.
Names
Addresses
Phones
Emergency Contacts
Email Addresses
National IDs
Gender
Birth date
Date of Death
Marital Status
FERPA Flag
Disability
Ethnicity/Diversity
Citizenship
Passport
Visa/Permits
Job
HR Operator Defaults
User Profiles
In the distinct ownership model, the following person bio-demo data is fetched from one system to the other as part of the External Search/Match process:
EmplID
Names
Addresses
Phones
Email Addresses
National IDs
FERPA Flag
VA Benefit
In a CS-to-HCM integrated environment, the person record is physically separated, but institutions have the choice to synchronize all person data with HCM, or none of it. Some institutions may want to separate not just their data but their business processes to more closely reflect policies of data ownership between student and human resources administration on campus.
CS supports three models of person data integration between CS and HCM: Owner/Subscriber, Subscriber-Only and Distinct Ownership. Institutions can use the tools described in this documentation to configure the integration to reflect their business needs.
Owner-Subscriber
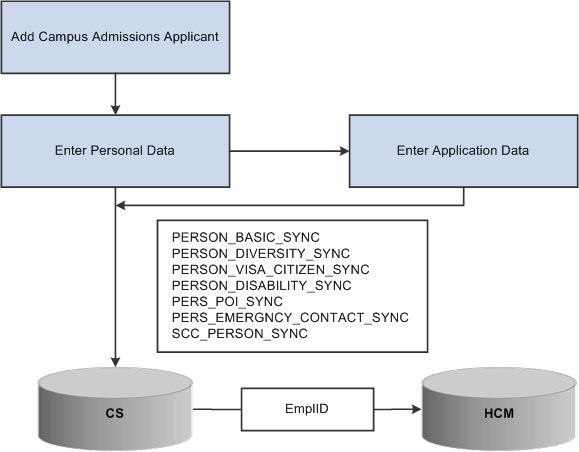
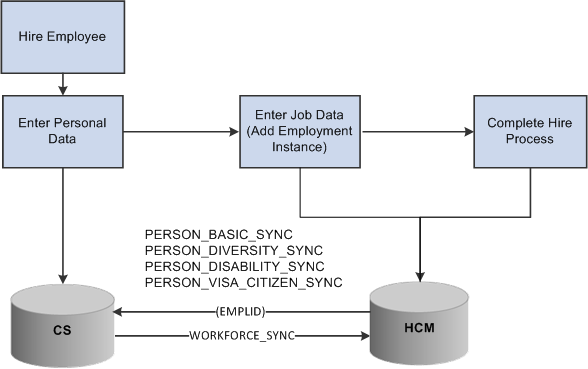
In an owner-subscriber integration model, one system is defined as the system of record and the other system subscribes to its person data messages. All EmplIDs exist and are in sync in both databases. For example, if CS is defined as the owner for adding and updating person data, the HCM system subscribes to the person messages; integration setup feeds person data additions and updates to HCM. The end-user experience can be managed via a portal or related content to navigate a combination of CS and HCM menus and pages.
This workflow depicts the process of adding an Admissions applicant in CS.
This workflow depicts the process of hiring an employee in HCM.
Subscriber Only
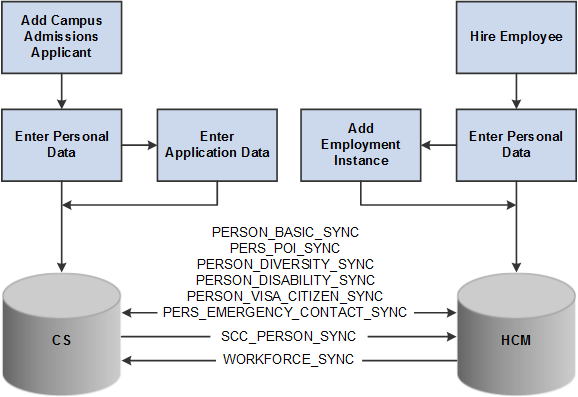
In a subscriber-only integration model, both systems are defined as system of record and integrations are configured to allow both systems to publish and subscribe to person data messages. All EmplIDs are populated to both systems and are kept in sync.
This workflow depicts the process of adding an Admissions applicant or employee in the Subscriber-only model.
Distinct Ownership
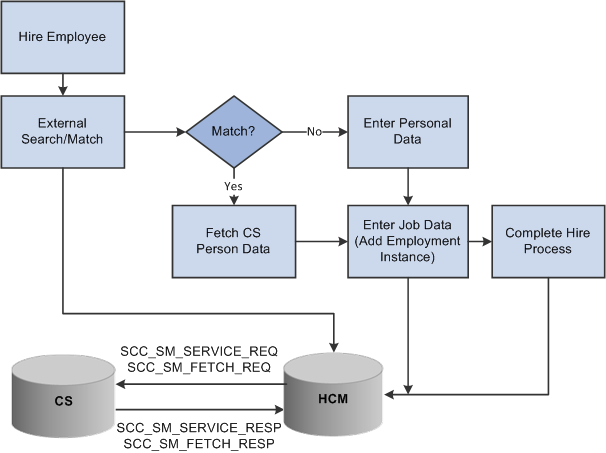
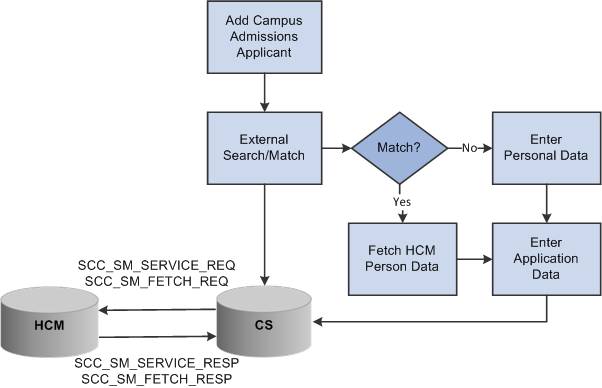
In a distinct ownership integration model, person data is added and updated in the appropriate CS or HCM system (as determined by the business processes of your institution; for example, employees are added and maintained in HCM). External Search/Match then becomes the method used in each system to ensure that users do not create duplicate records on campus. For example, as an employee is added to HCM, External Search/Match determines whether that new employee is already a student in CS with an EmplID and other bio-demo data housed in the CS system. If so, a "fetch" process can pull that EmplID and person data to HCM, ensuring that the individual retains a single unique ID on campus. Thereafter, each system must be manually updated, with no further integration between them.
This workflow depicts the process of adding an employee in HCM using External Search/Match to CS.
In an integrated, separate-instance environment using the distinct ownership model, users who want to maintain a single EmplID must use External Search/Match in each system to ensure the creation of unique person records. Initially, users use positive External Search/Match results to locate and add person data from the external system (such as a CS user searching against HCM); subsequently, person updates must be done manually in both instances to avoid becoming out of sync.
In the distinct ownership integration model, External Search/Match is the tool used to ensure that only unique EmplIDs are added to any system. With distinct ownership, people are added in either the CS or HCM system (as appropriate); both systems use External Search/Match to search for possible duplicate records so only unique IDs are shared between the databases. However, both databases must be running in order for External Search/Match to work.
External Search/Match can search against HCM to identify potential duplicate person records as well as carry EmplIDs throughout a business process.
See also:
Setting Up External Search/Match Functionality
This workflow depicts the process of adding an admissions applicant in CS using External Search/Match.
You need to review and update the Last Employee ID Assigned numbers on your systems to ensure EMPLID values are assigned in proper ranges and to prevent data integrity problems with conflicting EMPLID values being assigned.
In an owner/subscriber configuration, the database instance that is the system of record for personal information is responsible for assigning the next EMPLID value.
In a subscriber-only configuration, both databases assign EMPLID values. Determine the range of EMPLID values that can provide the maximum number of new persons expected to be added to each system over its lifetime. For example, you may anticipate more new persons to be added first to your CS system, therefore set the Last Employee ID Assigned value in the CS instance to a value that will allow for the most growth over time.
This step should be done with careful evaluation of the EMPLID number strategy you have implemented. Consider the following:
Do you have custom EMPLID assignment routines that are used to set the next ID number?
Do your users have established business practices that reserve certain number ranges?
Which system is expected to typically create the most new persons?
To update the Last ID Assigned, navigate to This navigation is the same for both CS and HCM.
On the Last ID Assigned page, update the Last Employee ID Assigned field to the number desired.
See:
In an owner-subscriber integration approach, the following messages move data asynchronously from the owner to the subscriber:
PERSON_BASIC_SYNC
PERSON_DIVERSITY_SYNC
PERSON_VISA_CITIZEN_SYNC
PERSON_DISABILITY_SYNC
PERS_POI_SYNC
PERS_EMERGNCY_CONTACT_SYNC
SCC_PERSON_SYNC
The WORKFORCE_SYNC message integrates job data between the two systems; where necessary, from HCM to CS.
Minimum setup information must be available and loaded from your HCM system to your CS system for implementation. This should be completed before any transactional data syncs are performed. The values defined in these setup tables are key to person bio-demo data integrity. Oracle recommends that your setup tables be mastered in the HCM instance.
Incremental Synchronization
Data in the supporting tables in your system of record may change over time after the initial loading of setup, transactional data, and security data. Use incremental sync (Sync) services to send this information from your system of record to your subscribing target system to maintain data integrity.
An incremental sync captures data that was created, added, changed, or deleted in the system of record since the last synchronization. It uses the captured data to overwrite the same data in the subscribing system, thereby refreshing the subscribing system so that both systems have the same data.
After the initial fullsync data loads have completed in your subscribing target system, you may inactivate the associated fullsync services, and then activate the appropriate incremental Sync services to keep your systems updated.
Manual Entry Data Load
You can, if necessary, enter data manually into your CS and HCM systems. However, it would be tedious, time consuming, and possibly introduce typographical errors. Oracle does not recommend this method for most data elements unless required to load a small amount of data.
Transactional Data Loading Sequence
For all owner/subscriber configurations, person transactional information must be available and loaded from your system of record to your subscribing system for implementation. Oracle recommends that CS be the system of record for Person data. Your HCM system should remain the system of record for all HCM Workforce and other HR related transactional data.
Note: Carefully plan your requirements for the initial load of transaction data for your specific implementation. If you are doing a new install of HCM, you need to load this transaction data as part of your implementation. Customers upgrading to HCM 9.1 or HCM 9.2 from a combined HCM and CS 9.0 database will already have the proper transaction data in place in both systems.
The following table lists the required integration, indicates the type of service recommended, and the order in which you must load transactional table data into your HCM system.
Person Transaction Data Campus Solutions to HCM
|
Integration Name |
HCM Table |
|---|---|
|
PERSON_BASIC_FULLSYNC.VERSION_4 |
PERSON PERS_DATA_EFFDT PERS_DATA_USF* PERS_NID NAMES ADDRESSES EMAIL_ADDRESSES PERSONAL_PHONE PERS_SMOKER* PERSON_BRA* PERS_DATA_BRA* PERS_DATA_CAN PERS_DATA_CHE* PLACE_ORIG_CHE* PERS_HUKOU_CHN* PERS_DATA_DEU* NATIONALITY_GER* PERS_DATA_ESP* PERSON_FRA* PERS_DATA_FRA* PERS_DATA_IND* PERS_DATA_ITA* PERS_DATA_JPN* PERS_DATA_MEX* PERS_DATA_USA PERS_DATA_FPS* PERSON_SA |
|
PERS_EMERGNCY_CONTACT_FULLSYNC |
EMERGENCY_CNTCT EMERGENCY_PHONE |
|
PERS_POI_FULLSYNC.VERSION_1 |
PER_POI_TYPE PER_POI_SCRTY PER_POI_SCR_DT PER_POI_TRANS |
|
PERSON_DISABILITY_FULLSYNC.VERSION_2 |
DISABILITY ACCOM_REQUEST DISABILITY_FRA* DISABILITY_GER* DISABILITY_CHE* DISABILITY_ESP* DISABILITY_BRA* DISABILITY_NLD* DISABILITY_NZL* |
|
PERSON_DIVERSITY_FULLSYNC.VERSION_2 |
DIVERSITY DIVERS_ETHNIC DIVERS_RELIGION* |
|
PERSON_VISA_CITIZEN_FULLSYNC1.VERSION_1 |
CITIZENSHIP CITIZEN_PSSPRT |
|
PERSON_VISA_CITIZEN_FULLSYNC2.VERSION_1 |
VISA_PMT_DATA VISA_PMT_SUPPRT |
*Existing CS functionality does not populate these tables. Depending on your use of HCM functionality, the records marked with an asterisk may not have data present at the time the fullsync is published.
This section provides a summary of Person Data FullSync and Sync Service Operations and Handlers, and discusses how to:
Configure Integration Broker Gateway and Nodes.
Configure PERSON_BASIC_SYNC Service.
Note: These instructions describe the setup of CS 9.2 and HCM 9.1/9.2 databases.
Configuring the Integration Broker Gateway and Nodes
To configure the Integration Broker Gateways and Nodes in your CS and HCM databases:
Set the Service Configuration in the HCM database.
Configure the Gateway in the HCM database.
Configure the default local node in the HCM database.
Configure the HCM Gateway in the CS database.
Configure the CS node in the HCM database.
Configure the default LOCAL node in the CS database.
Configure the HCM node in the CS database.
Update the HCM Gateway nodes in the HCM database.
Update the HCM Gateway nodes in the CS database.
Update the Single Sign-on nodes.
Test Nodes.
Setting the Service Configuration in the HCM database.
Navigate toand set up the following:
Field or Control
Description
Service Namespace
http://xmlns.oracle.com/Enterprise/HCM/services
Schema Namespace
http://xmlns.oracle.com/Enterprise/Tools/schemas
Target Location
http://machinename:port/PSIGW/PeopleSoftServiceListeningConnector
Service System Status
Production
Configuring the Gateway in the HCM database.
Navigate:
Select Integration Gateway ID = LOCAL.
Set URL = http://machinename:port/PSIGW/PeopleSoftServiceListeningConnector/databasename.
Click the Load Gateway Connectors button. Save after it loads 9 connectors
Click the Ping Gateway button. If successful, it displays an Active status.
Configuring the default local node in the HCM database.
Navigate to
Select the default local node and set up the following:
Field or Control
Description
Set Descr
HCM Instance
Authentication Option
Password
Node Password
PS
Default User ID
PS
Click the Connectors tab and set the following:
Field or Control
Description
Gateway ID
LOCAL
Connector ID
PSFTTARGET
Click the Portal tab and set up the following:
Field or Control
Description
Tools Release
8.54.xx
Set Application Release
HCM
Content URI Text
http://machinename:port/psc/databasename
Portal URI Text
http://machinename:port/psp/databasename
Note: Use <CTRL>+J keys to see the tools release string.
Click the WS Security tab and set the following:
Field or Control
Description
Authentication Token Type
None
Encrypted
Disable the check box.
Save.
Configuring the HCM Gateway in the CS database.
Navigate to and select .Add a New Value.
Set the following:
Field or Control
Description
Integration Gateway ID
<Gateway Name for HCM>
URL
http://machinename:port/PSIGW/PeopleSoftListeningConnector/databasename
Click the Load Gateway Connectors button. It should load 9 connectors. Save.
Click the Ping Gateway button.
If successful, it displays an Active status.
Configuring the CS node in the HCM database.
Navigate to and set up the following:
Field or Control
Description
Add Node
Name of CS Node
Set Descr
CS Instance
Set Authentication Option
Password
Node Password
PS
Default User ID
PS
Click the Connectors tab and set up the following:
Field or Control
Description
Gateway ID
LOCAL
Connector ID
PSFTTARGET
Click the Portal tab and set up the following:
Field or Control
Description
Tools Release
8.54.xx
Set Application Release
CS release version
Content URI Text
http://machinename:port/psc/databasename
Portal URI Text
http://machinename:port/psp/databasename
Click the WS Security tab and set the following:
Field or Control
Description
Authentication Token Type
None
Encrypted
Disable the check box.
Click Save.
Configuring the default LOCAL node in the CS database.
Note: The gateway used by this node is the HCM gateway. Node passwords must be consistent between the CS and the HCM databases.
Navigate:
Select the default local node and set up the following:
Field or Control
Description
Description
Set Descr = CS Instance
Authentication Option
Password
Node Password
PS
Default User ID
PS
Click the Connectors tab and set up the following:
Field or Control
Description
Gateway ID
Gateway Name for HCM instance
Note: This is not the local gateway.
Set Connector Id
PSFTTARGET
Click the Portal tab and set up the following:
Field or Control
Description
Tools Release
8.54.xx
Set Application Release
CS release version
Content URI Text
http://machinename:port/psc/databasename
Portal URI Text
http://machinename:port/psp/databasename
Click the WS Security tab and set the following:
Field or Control
Description
Authentication Token Type
None
Encrypted
Disable the check box.
Click Save.
Configuring the HCM node in the CS database.
Note: Each node is defined twice – once in each database. They should each use the same gateway.
Navigate to
Field or Control
Description
Add Node
Name of HCM Node
Set Descr
HCM Instance
Set Authentication Option
Password
Node Password
PS
Default User ID
PS
Click the Connectors tab and set up the following:
Field or Control
Description
Gateway ID
Gateway Name for HCM instance
Note: This is not the local gateway.
Set Connector Id
PSFTTARGET
Click the Portal tab and set the following:
Field or Control
Description
Tools Release
8.54.xx
Set Application Release
HCM release version
Content URI Text
http://machinename:port/psc/databasename
Portal URI Text
http://machinename:port/psp/databasename
Click the WS Security tab and set the following:
Field or Control
Description
Authentication Token Type
None
Encrypted
Disable the check box.
Click Save. A Node Saved message box appears. Click OK.
Updating the HCM Gateway nodes in the HCM database.
Both CS and HCM database nodes should point to the same Gateway. The specific Gateway should also have both nodes listed in the Gateway Advanced Properties.
Navigate:
Select gateway LOCAL.
Click the Gateway Setup Properties link and set the following:
Field or Control
Description
User ID
administrator
Password
Enter a password.
Click OK.
In the Gateway Default App. Server frame, set the App Server URL to ' //machinename:port.
Note: Your port must match the one specified in your HCM application server.
Enter the appropriate User ID and password.
Set the tools release to 8.54.xx.
Make sure both the HCM and CS nodes are in the PeopleSoft Nodes tab. Ping the HCM node. It should be successful.
Click Return.
Updating HCM Gateway nodes in the CS database.
Follow the process outlined in Step 8 to update the HCM Gateway node in the CS database.
Updating the Single Sign-on nodes in both CS and HCM databases.
Single Sign-on is used in this recommended configuration.
Navigate:
Ensure that both the default local node and the other node you are using are listed.
Testing Nodes.
Both nodes must be 'pingable' from each database. On each database,
Navigate:
Enter the node name and click the Ping Node button. It should respond successfully.
Configuring the PERSON_BASIC_SYNC Service
The PERSON_BASIC_SYNC service is the primary integration point for syncing core personal data between your CS and HCM systems. The following tasks detail how to configure the PERSON_BASIC_SYNC service to publish from your CS system and subscribe in the target HCM system.
Owner/Subscriber: If you implement the owner/subscriber model, you can configure your PERSON_BASIC_SYNC service to publish from your primary CS system to your target HCM system.
Subscriber Only: If you implement the subscriber–only model, you can configure the PERSON_BASIC_SYNC service in both your CS and HCM systems to publish and subscribe.
Note: The source and target database configuration tasks described are for CS 9.2 (source) and HCM 9.1/9.2 (target) databases on PeopleTools 8.54.xx.
Configuring Campus Solutions as the Source Database
Update security by adding the Service Operation(s) to your primary permission list.
Navigate to .
Select the relevant permission list from the search dialog box.
Select the Web Services tab.
Enter the corresponding Service(s) for the Service Operation(s) you want to use.
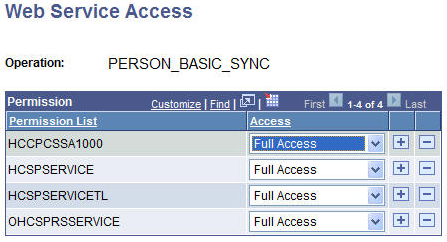
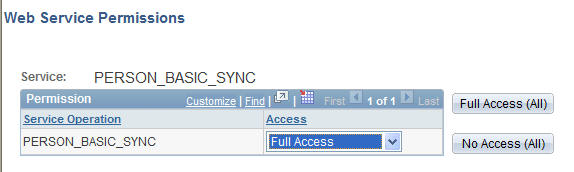
Click the Edit link and select Full Access to provide access to the relevant Service Operation(s) listed on the Web Service Permissions secondary page.
This graphic provides an example of the Web Service Access page for the PERSON_BASIC_SYNC operation.
Activate Service Operations and Create Routings in CS.
Navigate to .
Select PERSON_BASIC_SYNC from the search dialog box.
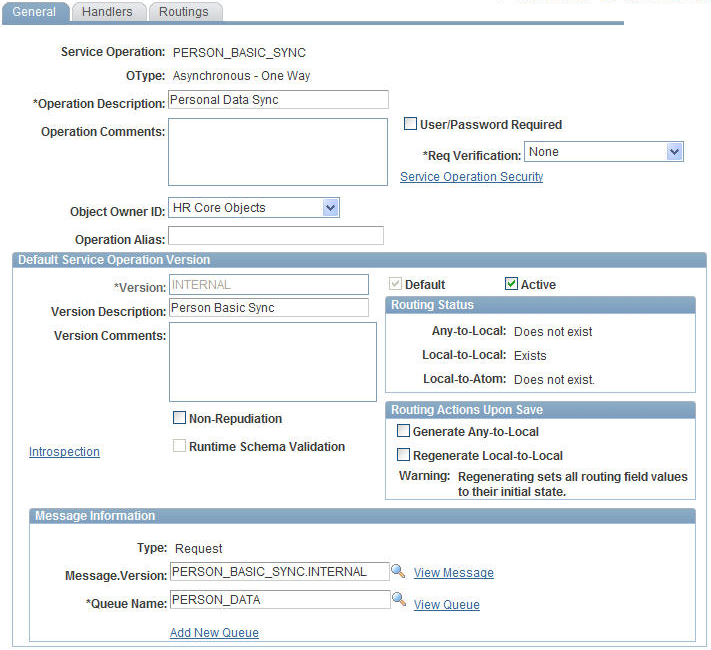
This example illustrates the fields and controls on the PERSON_BASIC_SYNC service operation page. You can find definitions for the fields and controls later on this page.

Check the Active check box on the General tab.
Make note of the Queue Name field, as you need to verify that the PERSON_DATA Queue is in Running status later.
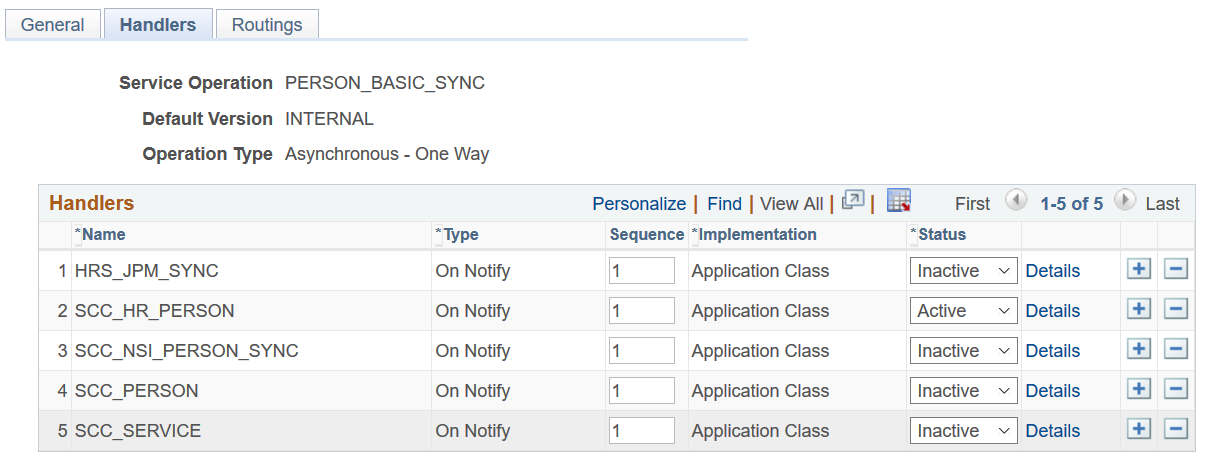
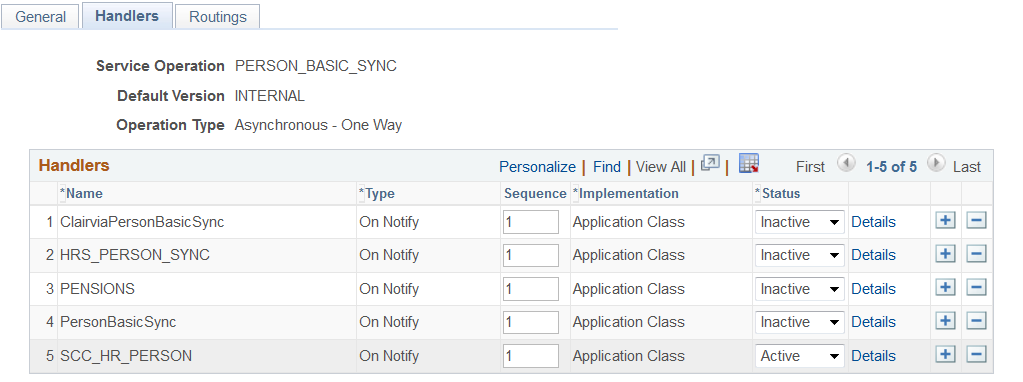
Click the Handlers tab. Set the SCC_HR_PERSON handler to Active.
This example illustrates the fields and controls on the PERSON_BASIC_SYNC Handlers page.
Click the Routings tab and add a new routing for the Service Operation by entering a value in the Routing Name field and clicking the Add button.
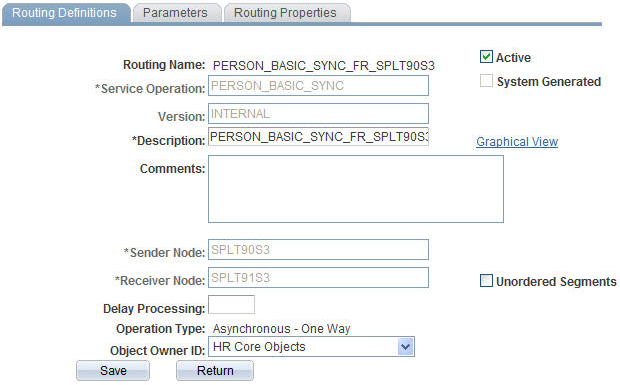
This example illustrates the fields and controls on the Routings page for PERSON_BASIC_SYNC.
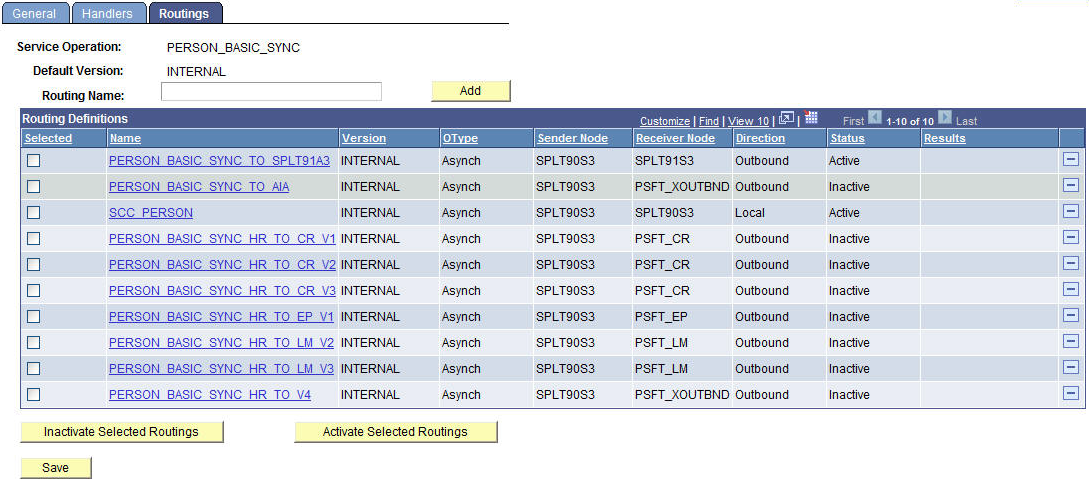
Define a Sender Node and a Receiver Node on the Routings Definition page of the Routings component.
This example illustrates the fields and controls on the PERSON_BASIC_SYNC routing definition page. You can find definitions for the fields and controls later on this page.
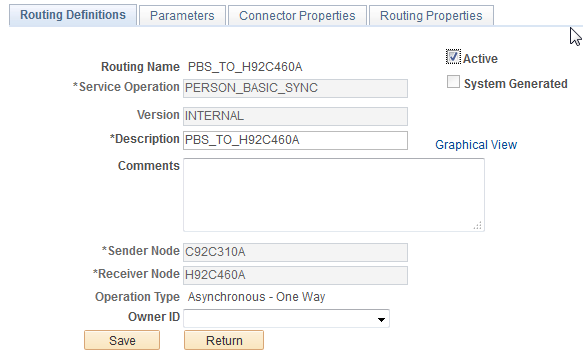
Verify that the Active check box is checked.
Click the Parameters tab and set up the following:
This example illustrates the fields and controls on the PERSON_BASIC_SYNC Routing Parameters page. You can find definitions for the fields and controls later on this page.
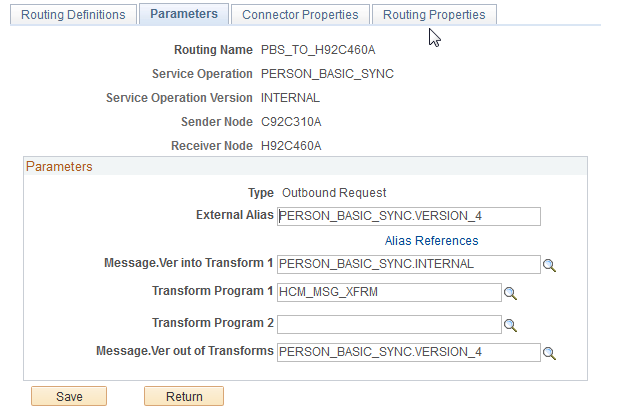
Field or Control
Description
External Alias
Enter the external alias; for example, PERSON_BASIC_SYNC.VERSION_4.
Message.Ver into Transform 1
For example, PERSON_BASIC_SYNC.INTERNAL.
Transform Program
For example, HCM_MSG_XFRM.
Message.Ver out of Transforms
For example, PERSON_BASIC_SYNC.VERSION_4.
Click Save at the bottom of the Parameters page to save the routing.
Click Return at the bottom of the Parameters page to return to the Service Operation setup page.
Click Save at the bottom of any page in the Service Operations component to save the Service Operation.
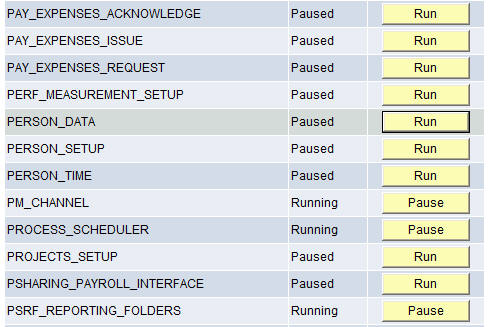
Activate Message Queue.
Navigate to .
Scroll down the page until you find the relevant PERSON_DATA Queue Name.
Review the queue Status and activate the queue by clicking Run, if needed. The queue status should be set to Running before leaving this page.
This example illustrates queue status for PERSON_DATA.
Configuring HCM as the Target Database
Update security by adding the service operation to the required user’s permission list.
This example illustrates the fields and controls on the Web Service Permissions page for the PERSON_BASIC_SYNC service.
Navigate to .
Select the relevant permission list from the search dialog box (primary permission list for the user).
Click the Web Services tab.
Enter the corresponding Service(s) for the Service Operation(s) you want to leverage.
Click the Edit link and add access to the relevant Service Operation(s) listed on the Web Service Permissions secondary page.
Click OK to return to the Web Services page.
Click Save to save the updated Permission List.
Activate Service Operation(s) and Create Routing(s) and Subscription Handler in HCM:
Navigate to .
Select PERSON_BASIC_SYNC from the search dialog box.
Check the Active check box on the General tab.
Make note of the Queue Name field, as you need to verify that the PERSON_DATA Queue is in Running status later.
This example illustrates the fields and controls on the General page for the PERSON_BASIC_SYNC service operation in HCM.
Click the Handlers tab. Set the SCC_HR_PERSON handler to Active.
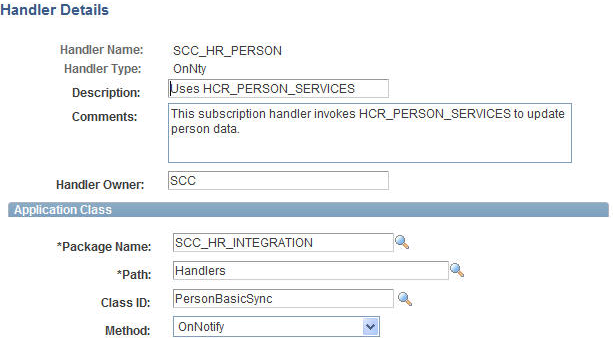
This example illustrates the fields and controls on the Handlers page for the PERSON_BASIC_SYNC service operation in HCM.
This example illustrates the fields and controls on the Handler Details page for the SCC_HR_PERSON handler in HCM.
Select the Routings tab and add a new routing for the Service Operation by entering a value in the Routing Name field and clicking the Add button.
This example illustrates the fields and controls on the Routings page for the PERSON_BASIC_SYNC service operation in HCM.

Enter the CS Sender Node and an HCM Receiver Node on the Routings Definition page of the Routings component.
Verify that the Active check box is checked.
This example illustrates the fields and controls on the Routing Definitions page for the PERSON_BASIC_SYNC service operation in HCM.
Select the Parameters tab and set the following:
This example illustrates the fields and controls on the routing Parameters page for the PERSON_BASIC_SYNC service operation in HCM.
Field or Control
Description
External Alias
Enter the external alias; for example, PERSON_BASIC_SYNC.VERSION_4.
Message.Ver into Transform 1
For example, PERSON_BASIC_SYNC.INTERNAL.
Transform Program
For example, HCM_MSG_XFRM.
Message.Ver out of Transforms
For example, PERSON_BASIC_SYNC.VERSION_4.
Click Save at the bottom of the Parameters page to save the routing.
Click Return at the bottom of the Parameters page to return to the Service Operation setup page.
Click Save at the bottom of any page in the Service Operations component to save the Service Operation.
This example illustrates Integration Broker inbound request routing for PERSON_BASIC_SYNC.
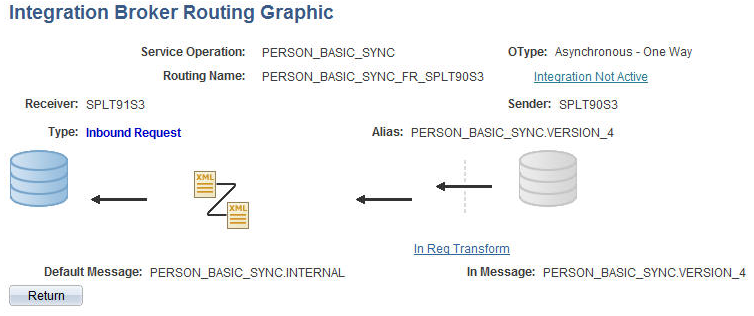
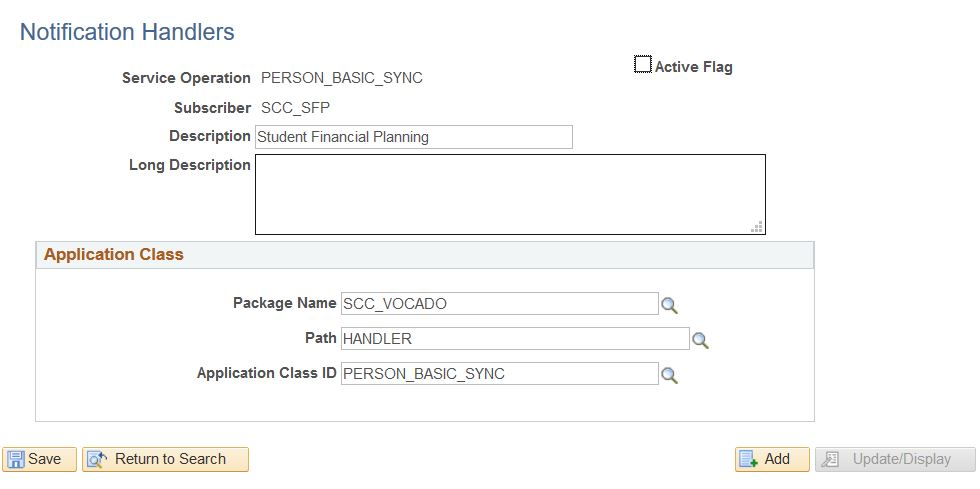
CS/SFP Integration:
When PERSON_BASIC_SYNC is subscribed (local-to-local routing), it
runs a subscription handler that invokes a POST FasStudentUpdateEvent
to SFP. The Notification Handler SCC_SFP must be
set to Active.
Notification handler for biographic or demographic updates
The following table summarizes the FullSync and Sync Service Operations, and the Subscription Handler that you should use to configure your CS-HCM person bio-demo data integrations.
|
Service Name |
Queue |
Subscription Handler App Package |
|---|---|---|
|
PERS_POI_FULLSYNC.VERSION_1 |
PERSON_DATA |
PersPoiFullSync PERSPOIFULLSYNC/PersPoiFullSync/OnNotify |
|
PERS_POI_SYNC.VERSION_1 |
PERSON_DATA |
PersPoiSync PERSPOISYNC/PersPoiSync/OnNotify |
|
PERSON_BASIC_FULLSYNC.VERSION_4 |
PERSON_DATA |
PersonBasicFullsync PERSON_BASIC_FULLSYNC/PersonBasicFullSync/OnNotify |
|
PERSON_BASIC_SYNC.VERSION_4 |
PERSON_DATA |
SCC_HR_PERSON SCC_HR_PERSON/PersonBasicSync/OnNotify |
|
PERSON_DISABILITY_FULLSYNC.VERSION_2 |
PERSON_DATA |
ONNOTIFY PERSON_DISABILITY_FULLSYNC/PersonDisabilityFullsync/OnNotify |
|
PERSON_DISABILITY_SYNC.VERSION_2 |
PERSON_DATA |
ONNOTIFY PERSON_DISABILITY_SYNC/PersonDisabilitySync/OnNotify |
|
PERSON_DIVERSITY_FULLSYNC.VER SION_2 |
PERSON_DATA |
PersonDiversityFullSync PERSON_DIVERSITY_FULLSYNC/PersonDiversityFullsync/On Notify |
|
PERSON_DIVERSITY_SYNC.VERSION_2 |
PERSON_DATA |
PersonDiversitySync PERSON_DIVERSITY_SYNC/PersonDiversitySync/OnNotify |
|
PERSON_VISA_CITIZEN_FULLSYNC1.VERSION_1 |
PERSON_DATA |
ONNOTIFY PERSON_VISA_CITIZEN_FULLSYNC1/PersonVisaCitizenFullSync1/OnNotify |
|
PERSON_VISA_CITIZEN_FULLSYNC2.VERSION_1 |
PERSON_DATA |
ONNOTIFY PERSON_VISA_CITIZEN_FULLSYNC2/PersonVisaCitizenFullSync2/OnNotify |
|
PERSON_VISA_CITIZEN_SYNC.VERSION_2 |
PERSON_DATA |
ONNOTIFY PERSON_VISA_CITIZEN_SYNC/PersonVisaCitizenSync/OnNotify |
|
WORKFORCE_FULLSYNC.VERSION_3 |
PERSON_DATA |
WorkforceFullSync WORKFORCE_FULLSYNC/WorkforceFullSync/OnNotify |
|
WORKFORCE_SYNC.VERSION_3 |
PERSON_DATA |
WorkforceSync WORKFORCE_SYNC/WorkforceSync/OnNotify |