Setting Up Self-Service Features for Academic Advisement
To set up self-service Academic Advisement features, use the Academic Advising setup (SAA_SS_RPT_OPT) component.
This section discusses how to define Academic Advisement setup and Advising Notes Categories and Subcategories.
|
Page Name |
Definition Name |
Navigation |
Usage |
|---|---|---|---|
|
Academic Advising Setup |
SAA_SS_RPT_OPT |
|
Enable self-service features and define behavior for self-service Academic Advisement functionality. |
|
Note Category Table |
SAA_NOTE_TYPE_TBL |
|
Update and maintain Advising Notes categories, and category access controls. |
|
Note Subcategory Table |
SAA_NOTE_STYPE_TBL |
|
Update and maintain Advising Notes subcategories. |
|
Note Category User Access |
SAA_NOTE_USER_ACX.GBL |
|
View and maintain access to advising note categories for individual users.. |
Access the Academic Advising Setup page ().
This example illustrates the fields and controls on the Academic Advising Setup page . You can find definitions for the fields and controls later on this page.

Field or Control |
Description |
|---|---|
Enable real-time processing |
Select to instruct the system to automatically generate an advisement report when students access the My Academic Requirements page, the Fluid Academic Progress Summary, and the Academic Progress and Course Requirement Alerts pages. Use the radio buttons to indicate that your institution wants to use real-time processing with or without synchronization options (also referred to as triggers). If you enable real-time processing and select Always refresh, then the system regenerates a report when the student accesses My Academic Requirements, Search by My Requirements, or Plan by My Requirements. That is, the report is regenerated regardless of whether anything changed on the student's record. The Always Refresh setting works in conjunction with the Wait before next refresh on the Fluid Academic Progress Summary, Academic Progress and Course Requirement Alerts pages. Select Display Refresh Link in Fluid to display a link on the Fluid Academic Progress Summary, Academic Progress and Course Requirement Alerts pages for the user to refresh Academic Advising report data. The link display is based on the value of the Wait before next refresh setting. You can set a value between 0.0 to 999.9 hours, where 0 hours ensures that the link is always displayed, and 0.1 hours would mean a waiting period of six minutes between two refresh actions. The Wait before next refresh setting controls the wait period for both the Always Refresh and Refresh Button options in the Fluid pages. Note: On the administrative side, the system also regenerates the report if the user accesses a previously run report and, from the Report Request page, clicks the View Report link. Select the Create Report if Not Run check box to generate an advisement report if a matching report does not already exist. This feature applies to both classic self service and the Fluid user interface. |
Advisor access obeys security |
Select to use the Advisement Report Security component to manage advisors' ability to view the advisement reports of their advisees in self service. By default, this check box is cleared, and advisors may view all advisement reports that have been generated for their advisees, regardless of their institution. Remember that the advisement reports that advisors access from My Advisees are those defined in the Student Academic Requirement Report field on the Academic Institution 7 page. |
Enable the course what-if option |
Select to enable students to run a course what-if scenario in self-service using the What-If Report – Create What-if Scenario (SAA_SS_WHATIF) page. Clear the check box to disable this ability. |
Student What-If Career Requirement Term |
This field is for use with the What-If Report – Create What-if Scenario page, which a student can use to define a what-if career scenario and generate a what-if advisement report based on his or her what-if career, program, plan, or subplan. The field values here affect what requirement term value or values the student sees in the Catalog Year field on the What-If Report – Create What-if Scenario page. Use Career Requirement Term Only is the default value. By default, the term value that the Catalog Year field displays on the Create What-if Scenario page is the student’s career requirement term. If a student has no career requirement term, the field displays the student’s primary program requirement term. With this selection, the Catalog Year field is not editable by the student. If you want to enable students to change the Catalog Year field value (that is, the career requirement term value to be used in the what-if audit), select the Use Term Table Setup field value. You can then define valid begin and end dates on the Term Table page. With this option, you control (using begin and end dates) the (requirement) terms available to the students when they define their what-if career scenario. |
Advising Notes
Field or Control |
Description |
|---|---|
Enable Category Access Control |
Select the Enable Category Access Control check box to enable the Advising Notes Access Control feature. |
Enable Advisor Action Items |
If enabled, the Action Items region is displayed and the column is included in Advising Notes lists. This is an initial setup value because turning off this feature would make existing data inaccessible. |
Enable Advisor Notifications |
If enabled, the notify advisee button is displayed. |
Enable Advisee Note Updates |
If enabled, the update note button is displayed. Disabling Advisee Note Updates disables all the following advisee features:
|
Notify on Create |
If selected, the advisee is notified when an advising
note is created for him or her.
|
Notification Method
Field or Control |
Description |
|---|---|
Notification Framework |
Select this method to notify the advisee using the
Notification Framework.
|
Push Notification |
Select this method to notify the advisee through the application in the form of alerts. |
Use these pages to view and define Advising Note categories for your institution. You can create long and short descriptions for each category and change its active status. Use the Access Control page to set up access to a particular note category for primary permission lists, roles and individual user IDs.
Access the Note Category Table page ().
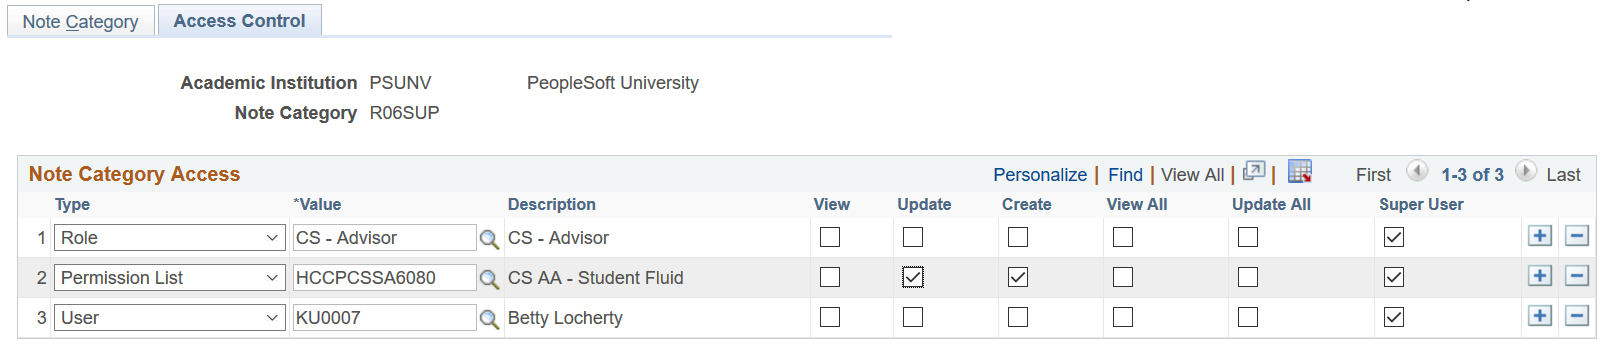
This example illustrates the fields and controls on the Access Control page. You can find definitions for the fields and controls later on this page.
Field or Control |
Description |
|---|---|
Type |
Select a control based on type: Role, User or Permission List. |
Value |
Select a value based on the selected type. |
View |
Select to allow users to view notes created by themselves or assigned to them in this note category. |
Update |
Select to allow users to view and update notes created by themselves or assigned to them in this note category. |
Create |
Select to allow users to create notes in this note category. |
View All |
Select to allow users to view all notes created by any user in this note category. |
Update All |
Select to allow users to view and update all notes created by any user in this note category. |
Super User |
Select to allow users to view and update all notes created by any user in this note category. A super user can also change categories, update Note Item text and delete notes in this note category. |
Use this page to view and define Advising Note subcategories for your institution. Subcategories are child values of Note categories. You can create long and short descriptions for each subcategory and change its active status.
Access the Note Subcategory Table page ().
Use this page to view and maintain user-based advising note category access for a single user, and view access inherited from their primary permission list and roles.
Access the Note Category User Access page ().
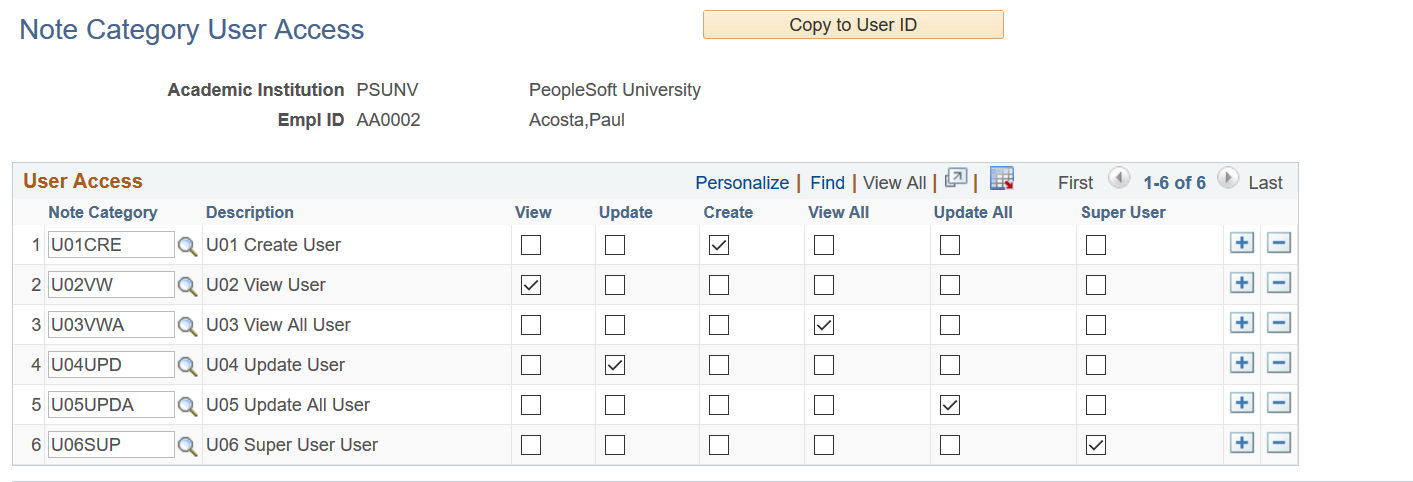
This example illustrates the fields and controls on the Note Category User Access page (1 of 2). You can find definitions for the fields and controls later on this page.
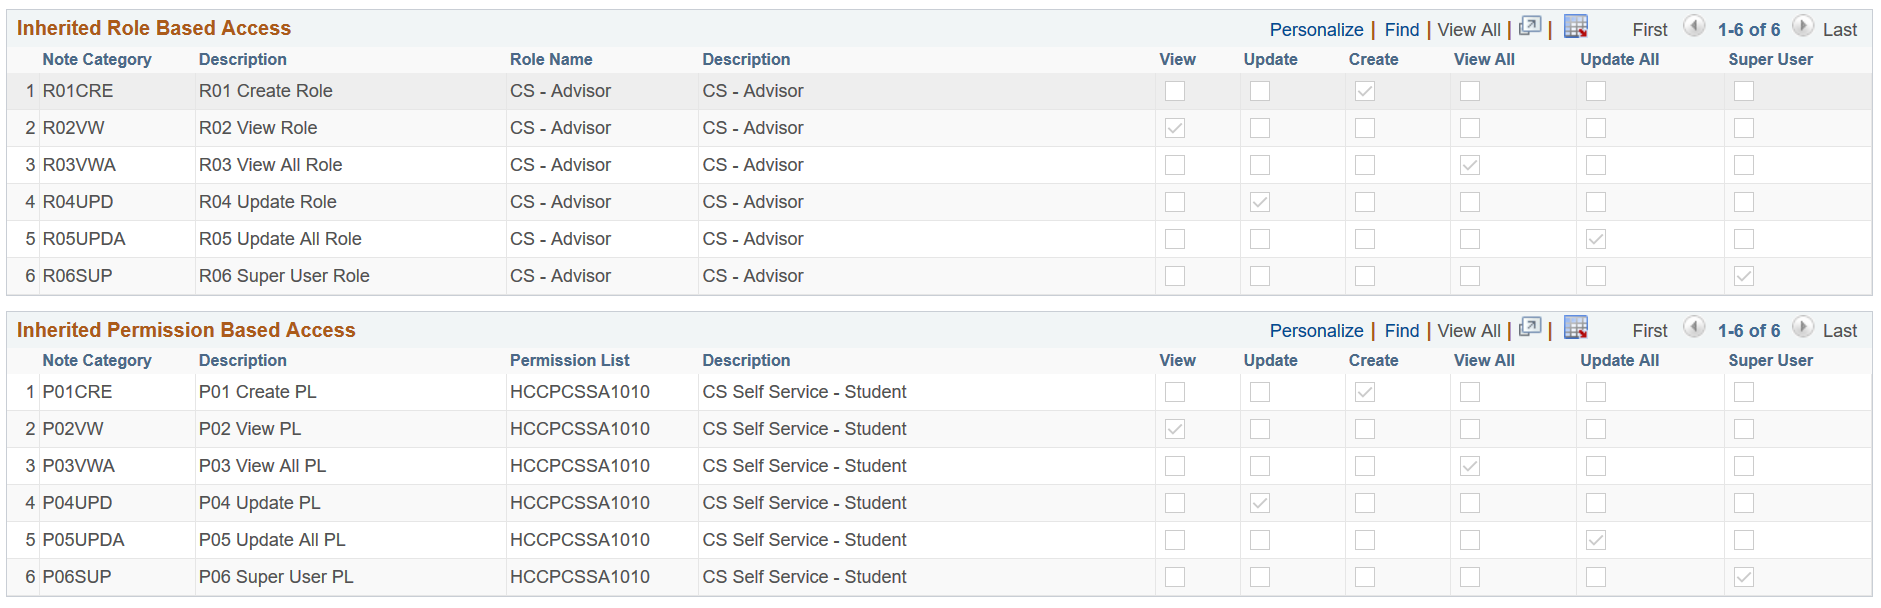
This example illustrates the fields and controls on the Note Category User Access page (2 of 2).
Field or Control |
Description |
|---|---|
User Access |
Add, update or delete User-based access control records. These records are the same as those in the Note Category Table–Access Control page. |
Copy to User ID |
Click the button to copy Note Category User Access records from one User ID to another. Existing values, if any, are overwritten. |
Inherited Role Based Access |
View Note Category Access inherited by the user based on PeopleSoft security roles. This data can only be edited on the Note Category Table–Access Control page. |
Inherited Permission List Based Access |
View Note Category Access inherited by the user based on PeopleSoft security permission lists. This data can only be edited on the Note Category Table–Access Control page. |
When a user has multiple access records for the same Note Category, privileges assigned to the separate records are combined to give the most extensive access. For example, if the user has inherited a Note Category with Permission List access enabled for Update All, and User-based access to the same Note Category with Update All disabled, the system applies the Update All privilege for that note category.
Note: Permission List refers to the primary Permission List on the User profile.