Defining Academic Institutions
To set up academic institutions, use the Academic Institution Table component (INSTITUTION_TBL).
An academic institution is an entity, such as a university or college, that runs independently from other like entities and has its own set of rules and business processes. Typically, you define just one academic institution, but you can define as many as you need. Throughout Campus Solutions, you use academic institutions as a key value to group data into tables and to search those tables for data to extract.
This section lists prerequisites and discusses how to:
Define the name and location of academic institutions.
Set academic institution defaults and options.
Set additional institution defaults and options.
Activate instructor workload.
Set repeat checking controls.
(AUS, CAN, NZL, NLD) Activate other Student Administration features.
Identify self-service report types.
Enable Program Enrollment and Activity Management defaults.
Map affiliation codes to administrator roles.
You must decide whether you want a single- or a multi-institution structure. Set up separate academic institutions only if the entities function as distinctly separate schools. Each academic institution must have these characteristics:
Separate schedule of classes.
Course catalogs are shared among institutions.
Independent statistics and transcripts.
Students who do not normally enroll in classes from one academic institution while attending another academic institution.
For example, although you might have a law school that is a separate entity in many ways, the law students might sometimes enroll in graduate courses as part of their law careers.
Also, before establishing academic institutions, define these items:
SetIDs
A setID is used throughout Campus Solutions as a substitute for an academic institution or a student financials business unit. Instead of keying a number of tables by academic institution or business unit, the tables are keyed by setID, which enables institutions to share common codes, structures, and facilities.
Grading schemes
Grading schemes are the rules that the academic institution uses for assigning and converting grades.
Country codes
Country codes enable you to define the address for the academic institution in the address format appropriate for the country in which the academic institution is located.
|
Page Name |
Definition Name |
Navigation |
Usage |
|---|---|---|---|
|
Academic Institution 1 |
INSTITUTION_TABLE |
|
Define the name and location of the academic institutions. |
|
Academic Institution 2 |
INSTITUTION_TABLE1 |
|
Set academic institution defaults for transfer credit processing and for courses. |
|
Academic Institution 3 |
INSTITUTION_TABLE3 |
|
Set additional academic institution defaults and options for attendance tracking, cohort reporting, academic shifts, National Student Clearinghouse (NSC) reporting, and interoperability for learning management systems (LMS). |
|
Academic Institution 4 |
INSTITUTION_TABLE4 |
|
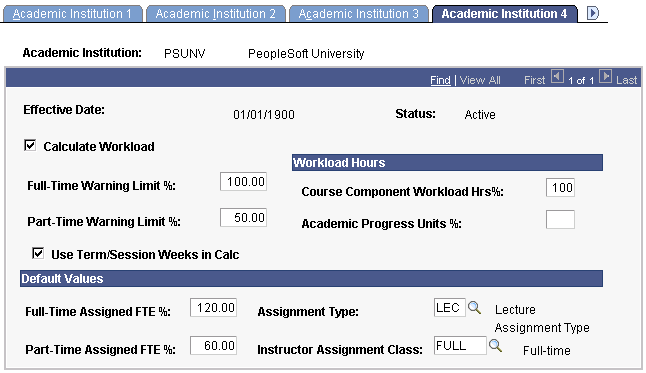
Activate the Instructor Workload feature and establish high-level limits, workload preferences, and default values for instructor workload at the institution. |
|
Academic Institution 5 |
INSTITUTION_TABLE5 |
|
Set repeat checking controls for academic institutions. The academic institution level is the highest level of control for the automatic Repeat Rule Checking COBOL/SQL process (SRPCERPT). |
|
Academic Institution 6 |
SSR_INST_FEATURES |
|
Set up student administrative functionality that can be selected or cleared, such as Canadian Reporting. |
|
Academic Institution 7 |
SAA_INST_RPT_SETUP |
|
Identify the advisement report types to be used in self service and the Fluid interface. |
|
Academic Institution 9 |
SSR_INST_PE |
|
Enable Program Enrollment and Activity Management defaults. |
|
Academic Institution 10 |
SSR_ADMN_TYPAFL |
|
Map affiliation codes to administrator roles. |
|
Schools |
HC_P_SCHOOL_TABLE_GBL |
|
Define codes for specific schools. The school codes that you enter here are also available for tracking similar information either in Employee Data or in Training pages. |
|
Majors |
HC_P_MAJOR_TABLE_GBL |
|
Define codes for areas of study most commonly associated with school degrees or certificates. |
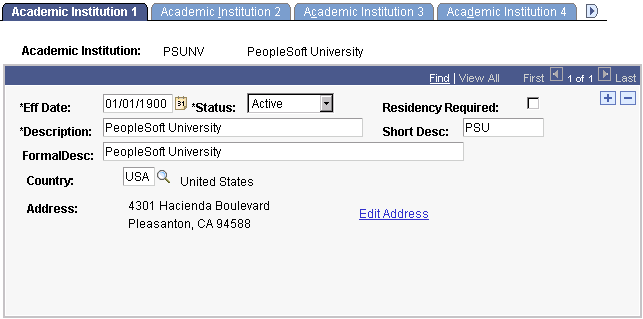
Access the Academic Institution 1 page ().
This example illustrates the fields and controls on the Academic Institution 1 page. You can find definitions for the fields and controls later on this page.
Field or Control |
Description |
|---|---|
Residency Required |
Select to require residency data for students. Your selection appears in the Residency Required field on the Academic Program page for all academic programs within this academic institution. You can modify the selection for specific academic programs. When you attempt to activate a student into a term, the Term Activation SQR process (SRTRMAC) checks whether a student's academic program requires that the student have residency data in the system. If it does and the student does not have residency data in the system, the Term Activation process does not activate the student into the term. This inactivation subsequently blocks the student from class enrollment and tuition calculation. |
Country |
Enter the country where this academic institution is located. Exit the field to populate the page with variable address fields. The address fields that appear depend on the country selected. Enter the primary location of this academic institution into the applicable fields. |
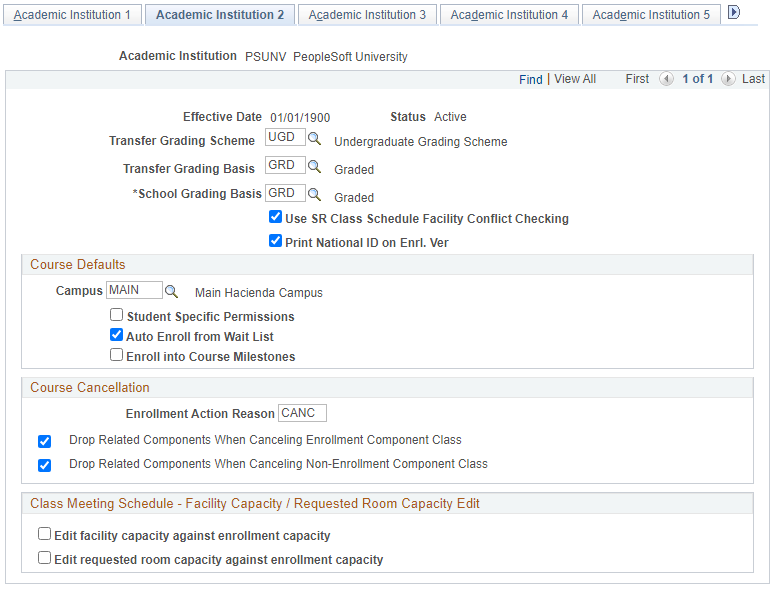
Access the Academic Institution 2 page ().
This example illustrates the fields and controls on the Academic Institution 2 page. You can find definitions for the fields and controls later on this page.
Field or Control |
Description |
|---|---|
Transfer Grading Scheme |
Enter the default grading scheme that applies to courses that students transfer from external organizations to this academic institution. Your selection appears in the Grading Scheme field on the Organization Affiliation page, based on the academic institution that you enter on that page. |
Transfer Grading Basis |
Enter the default grading basis that applies to courses that students transfer from external organizations to this academic institution. Your selection appears in the Grading Basis field on the Organization Affiliation page, based on the academic institution that you enter on that page. |
School Grading Basis |
Currently not in use. |
Use SR Class Schedule Facility Conflict Checking |
Select to indicate that the system uses internal facility conflict checking functionality for all campuses at this academic institution. The system checks for facility conflicts whenever a facility is booked for a class on the Meetings page or the Exam page of the schedule of classes components. The check box value migrates from the Installation page to the Academic Institution 2 page to the Campus Table page. The system uses the value on the Campus Table page during processing. Clear this check box on the Campus Table page to use an external facility conflict checking process. Note: This check box has no relation to the Check for Facility Conflict check box on the Facility Table page, which controls whether you can schedule multiple events in the same facility. |
Print National ID on Enrl. Ver (print national ID on enrollment verification) |
Select to have the system display the student's national ID on the enrollment verification report. The system selects this check box by default. |
Course Defaults
Use this group box to set default values for the course catalog and schedule of classes pages. These default values simplify data entry. You can override these default values for individual courses and classes.
Field or Control |
Description |
|---|---|
Campus |
Enter the default campus for all courses within this academic institution. The campus value appears by default in the course catalog and the schedule of classes. Note: If this academic institution generally offers the same courses at more than one campus, you should not enter a value for a default campus because courses defined for a particular campus can be scheduled only for that same campus. |
Student Specific Permissions |
Select to have all classes scheduled at this academic institution require that you generate permissions for students to enroll in classes. This check box value migrates to the Basic Data page of the Schedule New Course component, where it can be overridden. Student-specific permissions require that you generate permissions for individual students. |
Auto Enroll from Wait List |
Select to have the system automatically enroll students from wait lists into classes whenever space becomes available in the classes and the wait list process is run. This check box value migrates to the Enrollment Control page of the Schedule New Course component, where it can be overridden. |
Enroll into Course Milestones |
Select this check box to enable a course milestone to be created when a student enrolls in a class for which the milestone is selected on the Course/Milestone Link page in the Course Catalog. The Enroll into Course Milestones check box must also be selected on the Academic Career Table 2 page. |
Course Cancellation
Field or Control |
Description |
|---|---|
Enrollment Action Reason |
Enter the default enrollment action reason that the system posts to enrolled students' records whenever a class is canceled. |
Drop Related Components When Canceling Enrollment Component Class |
This check box is selected by default. Clear this check box if you do not want to drop related components when you cancel the enrollment component of a multiple component class. |
Drop Related Components When Canceling Non-Enrollment Component Class |
This check box is selected by default. Clear this check box if you do not want to drop related components when canceling a non-enrollment component of a multiple component class. |
Class Meeting Schedule - Facility Capacity / Requested Room Capacity Edit
Use this region to set whether to show a warning or rejection message when the schedule or enrollment capacity exceeds the requested facility or room capacity limit. When you add the facility to the Meetings page, CS looks at the information in this table to determine whether to show a warning or rejection message.
Field or Control |
Description |
|---|---|
Edit facility capacity against enrollment capacity |
Select this option to decide whether you want to display a warning or rejection message when the enrollment capacity for classes or sections exceeds facility capacity. |
Edit requested room capacity against enrollment capacity |
Select this option to decide whether you want to display a warning or rejection message when the enrollment capacity for classes or sections exceeds room capacity. |
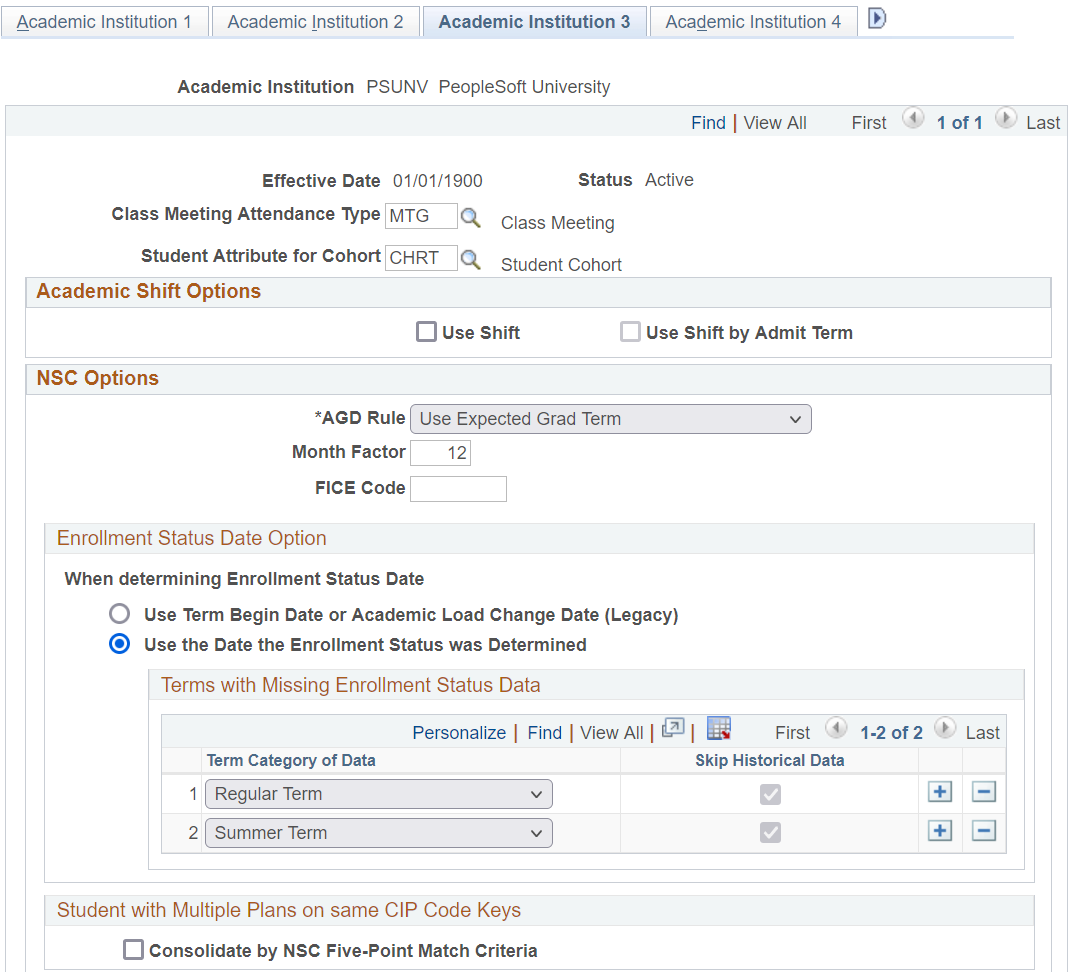
Access the Academic Institution 3 page ().
This example illustrates the fields and controls on the Academic Institution 3 page 1 of 2. You can find definitions for the fields and controls later on this page.
This example illustrates the fields and controls on the Academic Institution 3 page 2 of 2. You can find definitions for the fields and controls later on this page.
Attendance and Cohort Defaults
Field or Control |
Description |
|---|---|
Class Meeting Attendance Type |
Enter the default attendance type that this academic institution uses for generating attendance rosters. The attendance type indicates the type of attendance roster, such as Class Meeting, Conference, Field Trip, Instructor Consultation, or Study Group. When you generate attendance rosters, the system uses this default attendance type, along with the fields that you have selected for this attendance type, to create the requested attendance rosters. After you generate the attendance rosters, you can change the attendance type for individual class meetings. When you define the possible attendance rosters and applicable fields for each course component (through the Components page of the Course Catalog component), define all possible scenarios. Defining all possible scenarios ensures proper attendance roster generation if you decide at a later date to modify the class meeting attendance type for this academic institution. This field is required for attendance roster batch generation. |
Student Attribute for Cohort |
Enter a default student attribute for cohort. Student attributes (such as cohort) are attached to a student's program record on the Student Attributes page in the Student Program/Plan component. If a student has an attribute on the Student Attributes page equal to the one set here, the Consolidate Academic Statistics COBOL SQL process (SRPCCONP) writes this common student attribute to the student's consolidated academic statistics record, which you can then prompt against for reporting purposes. The Consolidate Academic Statistics process searches for only the student attribute that you specify here. If the process does not find this student attribute on the student's program record, then the process does not include a student attribute for cohort on the student's consolidated statistics record. If the process finds multiple occurrences of this student attribute on the student's program record, then it writes the one with the lowest primacy number to the student's consolidated statistics record. |
Academic Shift Options
Use this group box to define whether Academic Shift functionality is used across the institution.
Field or Control |
Description |
|---|---|
Use Shift |
If you select this check box, the Academic Shift field appears on various pages in Admissions and Student Records, such as the Application Program Data page and Student Program page. The values available in the field are those that have been defined on the Academic Shift page. |
Use Shift by Admit Term |
If you also select this check box, the values available in the Academic Shift field are those that have been defined on the Academic Shift page and then mapped to an admit term on the Academic Shift Mapping page. |
See Mapping Academic Shifts to Admit Terms
NSC Options
Use the NSC Options group box to define how the NSC Extract SQR process (SRNSLCEX) calculates a student's anticipated graduation date (AGD) and to define the default Federal Interagency Committee on Education (FICE) code that is in the NSC extract for this academic institution.
Field or Control |
Description |
|---|---|
AGD Rule (anticipated graduation date rule) |
Indicate how you want the NSC Extract process to determine a student's AGD. By reporting a student's AGD to the NSC, the NSC can provide this critical information to lending institutions so that they know when to begin collecting loans from students. Any modification to these translate values requires a substantial programming effort. Values are: Use Expected Grad Term: Select to have the NSC Extract process use the end date of the term that a student is expected to graduate as the basis for a student's AGD. Define a student's expected graduation term on the Student Program page. Use Term End Date: Select to have the NSC Extract process use the end date of the term that the institution is reporting to the NSC as the basis for a student's AGD. |
Month Factor |
Enter the number of months that you want the NSC Extract process to add to the date determined by the AGD rule when the process calculates a student's AGD. For example, use the term end date plus a month factor of 12 to report to the NSC that a student's anticipated graduation date is a year beyond the end date of the term that the institution reports to the NSC. |
FICE Code (Federal Interagency Committee on Education code) |
Enter the default FICE code that you want to appear in the NSC extract for this academic institution. This value appears on the NSC page, where you can override it for each branch code of an academic institution. |
|
Enrollment Status Date Option |
These options control how the process determines the enrollment status effective date. Selecting:
|
|
Terms with Missing Enrollment Status Data |
The values you define here serve as a list of term categories where the process should ignore any Student Consolidated Statistics period data (STDNT_CONS_STAT/ SSR_STD_CON_ST2) that doesn't have a term enrollment status when recalculating a student’s program enrollment status date.
|
|
Student with Multiple Plans on same CIP Code Keys |
By default, the Consolidate by NSC Five-Point Match Criteria check box isn't selected. When not selected, there is no change in the way CIP codes/NSC attributes are handled. Each NSC eligible active plan is reported regardless of match on the criteria listed. But potential duplicates will be identified. When this check box is selected, the Consolidated Statistics process will use NSC five-point matching criteria when evaluating student plan data to consolidate plans. If the process finds two or more active plans where all of these items match, then those plans will be reported as a single program under one CIP code, using the earliest program start date/enrollment status effective date:
|
|
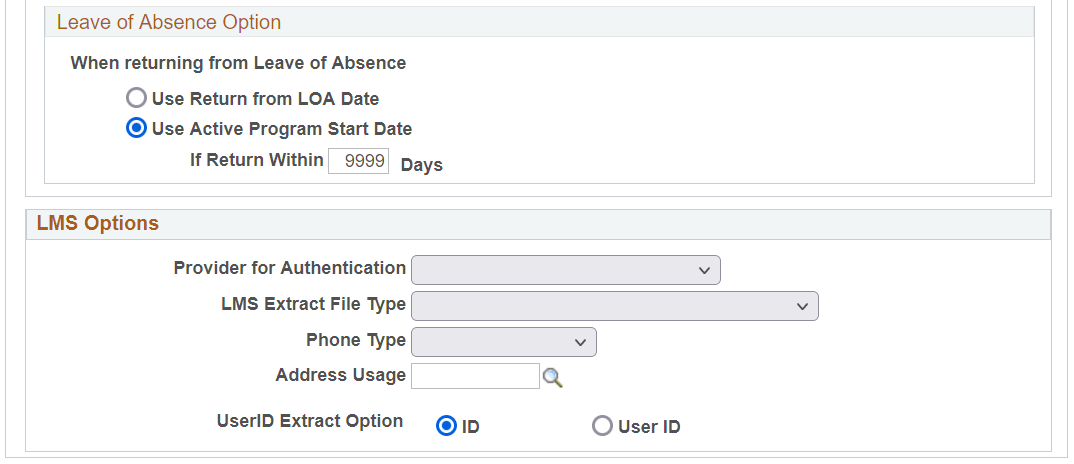
Leave of Absence Option |
These options control how the process reports program start date for when a student returns from a leave of absence, that is, where program stack has been placed in leave of absence status and subsequently reactivated using a "return from leave of absence" program action. Selecting:
|
LMS Options
Use the LMS Options group box to specify LMS file type default values and personal data extract parameters.
Field or Control |
Description |
|---|---|
Provider for Authentication |
If all or most of the classes are LMS classes requiring self-service user authentication, select a provider for authentication. The provider serves as a high-level default. When this field is blank on the Components page of the Course Catalog component, the value entered on the Institution page is provided by default from the schedule of classes if a class is scheduled. Providers are defined on the LMS Provider Setup page. |
LMS Extract File Type (learning management systems extract file type) |
Select an LMS file type of Blackboard CourseInfo 4, WebCT API Input Format, or XML V1.01 that serves as a high-level default when all or most of the classes are LMS classes. When the field is blank on the Components page of the Course Catalog component, the value selected here appears on the schedule of classes if a class is scheduled. Any modification to these translate values requires a substantial programming effort. |
Phone Type and Address Usage |
Select a phone type and address usage to specify demographic information for the Person object. If you select the People option on the LMS Extract Output page, the values selected here determine which phone and address information is exported. Because phone numbers and addresses are stored as separate records in Campus Community, you may actually choose to retrieve an individual's work phone number and home address. Remember that if the phone type that you specify is not found for the individual, no phone number is extracted. This functionality is different from that of an address, where you can specify an address usage or preferred selection order that causes the first one found to be extracted. With a phone type, you can select only one choice; therefore, make it a target that is likely to be found for every person object in the extract process. You should select a voice line because the system automatically extracts fax lines in addition to whatever you select here. |
UserID Extract Option |
Identify whether the LMS extract should use the student or instructor's EmplID or UserID. |
Access the Academic Institution 4 page ().
This example illustrates the fields and controls on the Academic Institution 4 page. You can find definitions for the fields and controls later on this page.
For information about the Academic Institution 5 page
Access the Academic Institution 6 page ().
This example illustrates the fields and controls on the Academic Institution 6 page. You can find definitions for the fields and controls later on this page.
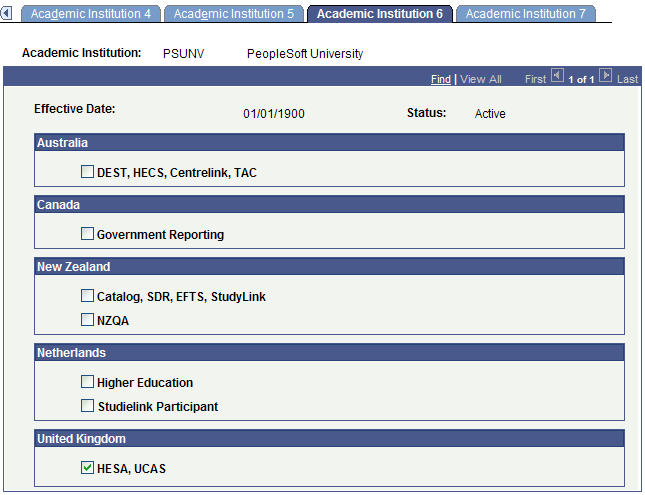
Important! To use country-specific functionality in the system, you must also activate the country's features on the Installation Student Administration setup page for setID-based functionality.
Field or Control |
Description |
|---|---|
Australia |
Select to enable Australian DEST, HECS, Centrelink, and TAC functionality. (Department of Industry, Innovation, Science, Research and Tertiary Education (DIISRTE) was previously known as DEEWR and before that, as DEST.) |
Canada |
Select to enable Canadian government reporting. |
New Zealand |
Select to enable New Zealand Catalog, SDR, EFTS, StudyLink, and NZQA functionality. |
Netherlands |
Select to enable Netherlands Higher Education functionality. |
Studielink Participant |
Select to activate all online Studielink behavior. |
United Kingdom |
Select to enable the United Kingdom specific fields in the system for an academic institution. |
Access the Academic Institution 7 page ().
This example illustrates the fields and controls on the Academic Institution 7 page. You can find definitions for the fields and controls later on this page.
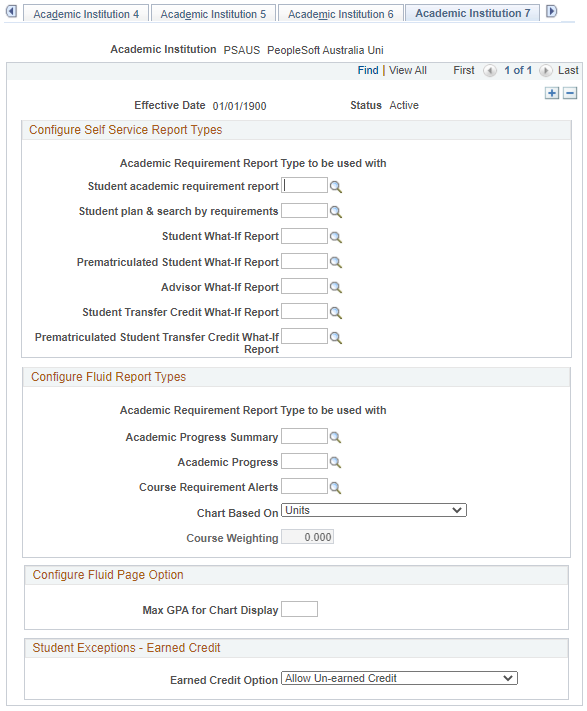
Configure Self Service Report Types
Field or Control |
Description |
|---|---|
Student academic requirement report |
Enter the type of report to be used in the My Academic Requirements feature. This field prompts on advisement report types that do not have the Include What-If Information or Include Planned Courses check boxes selected. |
Student plan & search by requirements |
Enter the type of report to be used on the My Planner and Search by My Requirements features. This field prompts on advisement report types that have the Include Planned Courses check box selected. |
Student What-If Report |
Enter the type of report to be used on the What-If Report. This field prompts on any advisement report type that has the Include What-If Information check box selected. |
Prematriculated Student What-If Report |
If you want to enable prematriculated students, such as prospects and applicants, to run a what-if advisement report using the What-If Report – Create What-if Scenario (SAA_SS_WHATIF) page, enter the advisement report type to be used. This field prompts on any advisement report type that has the Include What-If Information check box selected. |
Advisor What-If Report |
If you want to enable academic advisors or administrators to generate what-if advisement reports for prospective or active students using the What-If Report – Create What-if Scenario self-service page, enter the advisement report type to be used. This field prompts on any advisement report type that has the Include What-If Information check box selected. |
Student Transfer Credit What-if Report |
If you want to enable active students to generate what-if advisement reports from the Evaluate My Transfer Credit – Generate a What-If Advisement Report (SS_TRCR_AA_RQST) page, enter the advisement report type to be used. This field prompts on any advisement report type that has the Include What-If Information check box, the Include Completed Transfer Models check box, and the Include Self-Reported Transfer Models check box selected. Because the report type entered here is specifically for use with the Evaluate My Transfer Credit component, you must select the Include Completed Transfer Models and Include Self-Reported Transfer Models check boxes in addition to the Include What-If Information check box. |
Prematriculated Student Transfer Credit What-If Report |
If you want to enable prematriculated students to generate what-if advisement reports from the Evaluate My Transfer Credit – Generate a What-If Advisement Report self-service page, enter the advisement report type to be used. This field prompts on any advisement report type that has the Include What-If Information check box, the Include Completed Transfer Models check box, and the Include Self-Reported Transfer Models check box selected. Because the report type entered here is specifically for use with the Evaluate My Transfer Credit component, you must select the Include Completed Transfer Models and Include Self-Reported Transfer Models check boxes in addition to the Include What-If Information check box. |
Configure Fluid Report Types
Field or Control |
Description |
|---|---|
Academic Progress Summary |
Enter the type of report to be used in the Academic Progress Summary feature. This report should contain unit based requirements that will populate the pie chart in the Academic Progress tile and Academic Progress Summary page. |
Academic Progress |
Enter the type of report to be used in the Academic Progress feature. This can be the Institution's standard advising report or a simplified report created to be used with the Academic Progress page. |
Course Requirement Alerts |
Enter the type of report to be used in the Course Requirement Alerts feature. This report should contain requirements that make up the bulk of the students courses. Courses that students are enrolled in, do not meet any course requirements and are within the drop period will be displayed in the Course Requirement Alerts page. |
Chart Based On |
Select the type of requirement based on which, the Academic Progress Summary chart is generated. Options are Units, Courses, and Units and Courses. |
Course Weighting |
You can update this field only if Units and Courses is selected as the basis for creating the Academic Progress Summary. Enter a numeric value (NNN.NNN) to indicate the weighting to be assigned to a course. Use this field to give the course requirements the same weighting as unit requirements. For example, if the majority of your institution’s courses are each worth 3.00 units, the course weighting should be 3.00. Therefore, if the Course Weighting is set to 3.00; and a student has 30 Unit requirements with 18 complete and 6 in progress, and 10 Course requirements with 4 complete and 1 in progress, the courses are multiplied by the weighting value and then added to the units. This student’s Academic Progress summary would appear as follows: Total requirements= 30 units + (10 courses * 3.00 weighting) = 60 Completed requirements= 18 units + (4 courses * 3.00) = 30 Requirements in-progress= 6 units + (1 course * 3.00) = 9 Incomplete requirements= 6 units + (5 courses * 3.00) =21 The Academic Progress Summary chart would indicate 50% Complete, 15% In Progress and 35% Incomplete. |
Configure Fluid Page Option
Field or Control |
Description |
|---|---|
Max GPA for Chart Display(maximum grade point average for chart display) |
Enter the maximum grade point average to be used in the GPA charts appearing on the Academic Progress page (for example, 4.0). |
Configure Student Exceptions - Earned Credit
|
Field or Control |
Description |
|---|---|
|
Earned Credit Option |
Select:
|
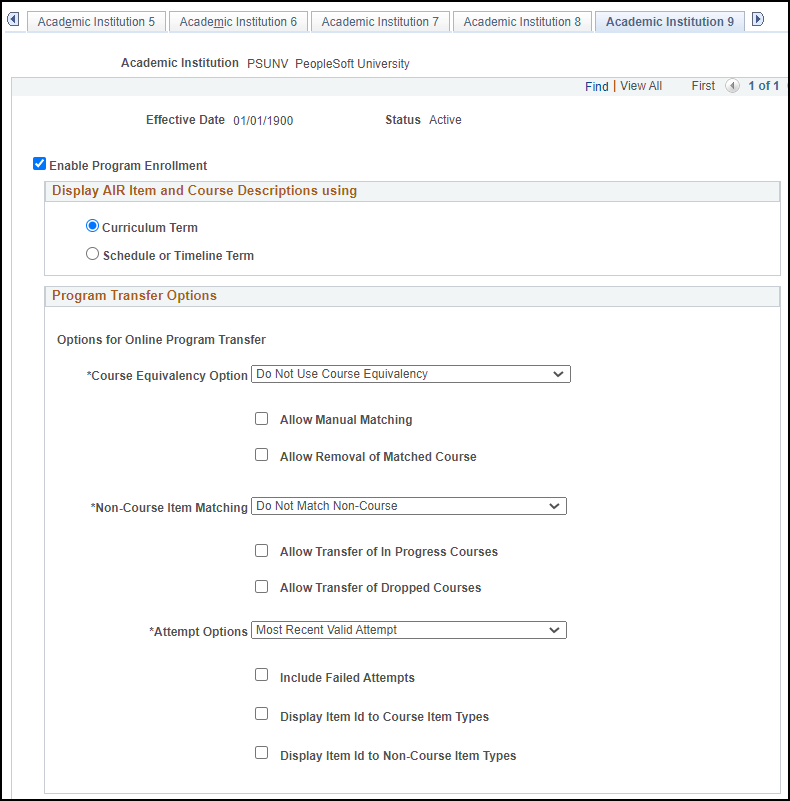
Access the Academic Institution 9 page ().
This example illustrates the fields and controls on the Academic Institution 9 page 1 of 2. You can find definitions for the fields and controls later on this page.
This example illustrates the fields and controls on the Academic Institution 9 page 2 of 2. You can find definitions for the fields and controls later on this page.
Field or Control |
Description |
|---|---|
Enable Program Enrollment |
Select this check box to enable the use of Program Enrollment fields on the Admissions Application and Student Program/Plan components, and also enable AIR mapping. See Adding New Applications Manually |
Display AIR Item and Course Description Options
You can choose which term you want to use to display Academic Item Registry (AIR) Items and Course Descriptions.
Field or Control |
Description |
|---|---|
Curriculum Term |
Select this option if you want the Academic Progress Tracker (APT) Admin page and all Program Enrollment Self Service pages to use descriptions from AIR Item or course based on the Curriculum term. |
Schedule or Timeline Term |
Select this option if you want the Academic Progress Tracker (APT) Admin page and all Program Enrollment Self Service pages to use descriptions from AIR Item or course based on timeline or scheduled term. |
Program Transfer Options
Use this region to identify how courses and academic items are matched when transferring student programs.
The settings here determine how APT program transfers are facilitated. See Managing APT Program Transfer.
Field or Control |
Description |
|---|---|
Course Equivalency Option |
If you select:
|
Allow Manual Matching |
Select if you want to manually match an equivalent course. This is used together with Course Equivalency Option. |
Allow Removal of Matched Course |
Select if you want to remove a matching course that exists in the source APT and destination APT. This is used together with Course Equivalency Option. |
Non-Course Item Matching |
If you select:
|
Allow Transfer of In Progress Courses |
Select to allow the transfer of in-progress courses to the destination APT. |
Allow Transfer of Dropped Courses |
Select to allow the transfer of dropped courses to the destination APT. |
Attempt Options |
Select a value to specify which academic item attempts to transfer to the destination APT. An academic item attempt is considered valid if Include in Calculation is selected on the APT Items page, Academic Item Attempt region.
|
Include Failed Attempts |
This option is used together with Attempt Options. Select to transfer failed attempts to the destination APT. |
Display Item ID to Course Item Types |
Select to add the course item’s ID to the Transfer Action description on the APT Transfer page. |
Display Item ID to Non-Course Item Types |
Select to add the non-course item’s ID to the Transfer Action description on the APT Transfer page. |
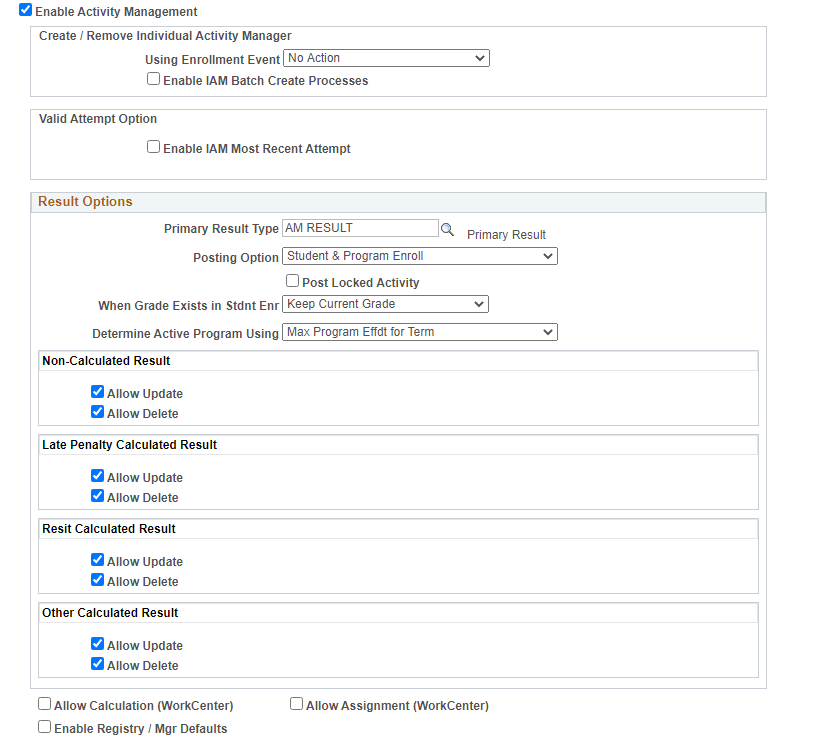
Activity Management
Field or Control |
Description |
|---|---|
Enable Activity Management |
Select this check box to turn on the features used by Activity Management. When you select this check box, the Create / Remove Individual Activity Manager and Result Options sections appear. See Setting Up Activity Management Throughout Campus Solutions |
Create/Update Individual Activity Manager
This group box determines how schools will create Individual Activity Managers (IAMs) for students. Two options are available that can either work independently or together based on the needs of the institution. Select the Use Enrollment Event option to create and edit IAMs at the point of the enrollment transaction. Another option is to create IAMs in batch at a later point in the enrollment period.
Field or Control |
Description |
|---|---|
Using Enrollment Event |
Institutions can use this setting to control how to create and edit student IAMs based on a student's enrollment. Options include Create and Remove, Remove Only, and No Action. Select Create and Remove when IAMs will be generated on initial enrollment and updated when a student drops or swaps. Select Remove Only when the initial generation will be done in batch (which requires enabling the batch process) and any subsequent drops and swaps will be automatically updated. Select No Action to create and edit no IAMs automatically from a student's enrollment; drops and swaps will not be updated. |
Enable IAM Batch Create Processes |
Select this check box to enable the run controls for the IAM Gen Using Student Enroll and IAM Gen Using APT (EOC) batch processes. Institutions should enable the batch processes if they want to generate IAMs for a group of students either from class enrollment or for an exam-only course (EOC). Use the following scenarios to determine the IAM settings:
|
Activity Result Defaults
Field or Control |
Description |
|---|---|
Primary Result Type |
Indicate the result type that will be used to capture the overall course result. Each assessed activity of a course will have a result for this result type, either manually input or calculated. This result type will populate automatically for each activity of a course on the result roster. A primary result type is required for Activity Management. |
Posting Option |
Indicate to which record(s) you want to post the AM primary result. After the course result is entered or calculated in Activity Management you will use the IAM Result Posting process to post the result to the student's Academic Progress Tracker and student enrollment record. This setting defaults to the IAM Result Posting process. The options include:
When you select Student and Program Enroll or Program Enroll, you can set how to determine the effective date of the active program using the Determine Active Program Using field. |
Post Locked Activity |
If this checkbox is selected, Locked (IAM Locked and Course locked) activity results are posted through IAM Batch result posting. |
When Grade Exists in Stdnt Enr |
When posting to the student's enrollment record you must indicate what should occur if a grade already exists on STDNT_ENRL. The options include:
|
Determine Active Program Using |
Depending on the posting option you select, you can set how to determine the effective date of the active program by selecting Current System Date or Maximum Program Effective Date for Term (Max Program Effdt for Term). |
Allow Calculation (WorkCenter) |
Select this check box to enable IAM calculations in the Activity Management WorkCenter that allow faculty and exam staff to invoke the calculation process for the primary result type. |
Allow Assignment (WorkCenter) |
Select this check box to allow faculty and exam staff to assign activities to students from the Activity Roster. |
Enable Registry/Mgr Defaults |
Select this check box to enable defaults that can be entered for all values within the Registry and Activity/Section Managers. When you select this check box, the Activity Management Defaults section appears. |
Activity Management Defaults
Field or Control |
Description |
|---|---|
Enable Career Defaults |
Indicate if the defaults are applicable at the academic career level. If selected the values defined here can be overridden on the academic career table. When selected the Activity Management Default page is enabled in the Academic Career Table component. |
Enable Academic Org Defaults |
Indicate if the defaults are applicable at the academic organization level. If selected the values defined here can be overridden on the academic organization table. When selected the Activity Management Default page is enabled in the Academic Organization Table component. |
For information on setting up anonymous grading, see Setting Up Anonymous Grading.
Content Options
Field or Control |
Description |
|---|---|
Result Scale |
Define the result scale to default to the Activity Registry. |
Passing Mark/Grade |
Define the minimum mark and/or grade to default to the Activity Registry. |
Service Impact |
Define the service impact to default to the Activity Registry. |
Attendance Tracking Options
Field or Control |
Description |
|---|---|
Track Using |
Indicate the attendance requirement to default to the Activity Registry. |
Required Attendance/Allowed Absences |
Indicate the attendance requirement to default to the Activity Registry. |
Forms of Identification
Field or Control |
Description |
|---|---|
Form of Identification |
Define the forms of identification(s) to default to the Activity Registry. |
Required |
Select to indicate the form of identification is required and is defaulted to the Activity Registry. |
Access the Academic Institution 10 page ().
This example illustrates the fields and controls on the Academic Institution 10 page. You can find definitions for the fields and controls later on this page.
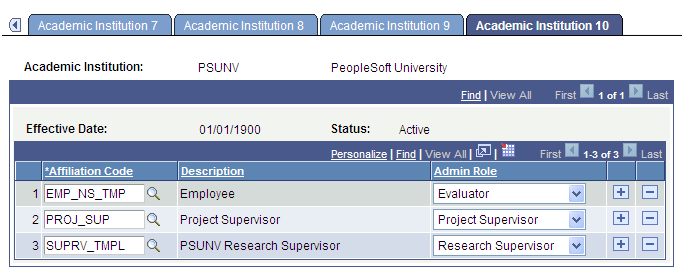
Use the Academic Institution 10 page when you define administrators for Research Tracking, Academic Project Management, and Evaluation Management features.
After you set up your Affiliation codes, map the root affiliations to Research Supervisor, Project Supervisor, and Evaluator roles on this page.
Research Supervisor role is for research administrators. Project Supervisor role is for administrators of student academic projects. Evaluator role is for evaluation committee members.
See Understanding Affiliations Setup
Field or Control |
Description |
|---|---|
Affiliation Code |
Select a code from those that you defined on the Definition page in the Affiliation Setup component. The available affiliation codes are those which are effective (based on the institution’s effective date) and for which the Root Indicator check box is selected in Affiliations setup. The child affiliations of the root affiliation or the root affiliations if no children exist are then available in the Administrator Type field on the Administrator Profile Management page. |