Setting Up Business Units
To set up business units, use the SF Business Unit component (BUSINESS_UNIT_SF).
This section provides an overview of business units and discusses:
The SF business unit is the framework that controls all processing within the Student Financials application. Each business unit can have its own set of business rules. For example, you might have different campuses that operate independently from each other financially. By setting up different business units, you can define just what you need. You must set up at least one business unit.
|
Page Name |
Definition Name |
Navigation |
Usage |
|---|---|---|---|
|
General 1 |
BUS_UNIT_TBL_SF |
|
Define basic business unit parameters. |
|
General 2 |
BUS_UNIT_TBL_SF2 |
|
Define additional business unit parameters. |
|
Posting Setup |
BUS_UNIT_TBL_SF14 |
|
Define posting parameters. |
|
Commit Options |
BUS_UNIT_TBL_SF10 |
|
Define committal and approval options. |
|
Collections |
BUS_UNIT_TBL_SF7 |
|
Define collection rules. |
|
Refund Setup |
BUS_UNIT_TBL_SF3 |
|
Define basic refunding rules. |
|
Refund Approval |
BUS_UNIT_TBL_SF20 |
|
Define refund approval parameters. |
|
Counters |
BUS_UNIT_TBL_SF8 |
|
Define auto-numbering sequences. |
|
Taxes |
BUS_UNIT_TBL_SF19 |
|
Define tax parameters for students from Canada, Australia, and New Zealand and tax calculation options. |
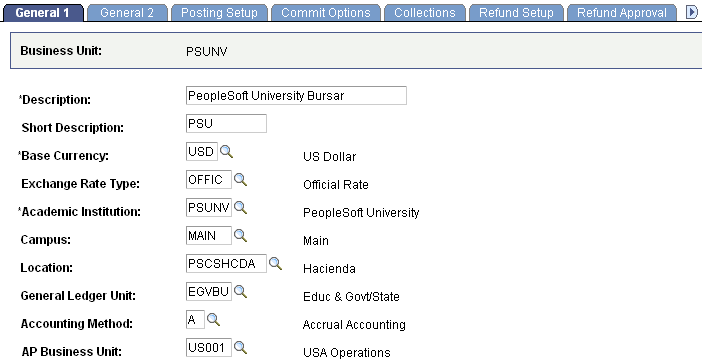
Access the General 1 page ().
This example illustrates the fields and controls on the General 1 page. You can find definitions for the fields and controls later on this page.
Field or Control |
Description |
|---|---|
Base Currency |
Confirm or select the base currency that you want this business unit to use. The default value is the base currency selected for the institution in . You can override the base currency for each business unit. |
Exchange Rate Type |
Select the exchange rate type that you use to convert other currency types to the base currency. The exchange rate type is necessary for the posting of charges. Note: You define exchange rate types on the Currency Rate Type field (same navigation as above). |
Academic Institution |
Identify the academic institution that contains the SF business unit. |
Campus |
Enter the appropriate campus for the SF business unit. |
Location |
Enter the appropriate location for the SF business unit. |
General Ledger Unit |
If your institution uses PeopleSoft Financials, select the general ledger unit that receives information from the SF business unit. Otherwise, leave this field blank. |
Accounting Method |
Select your institution's accounting method: Accrual, Cash, or Modified Cash accounting. |
AP Business Unit |
Select the business unit with which your system interacts when processing refunds through the accounts payable department. |
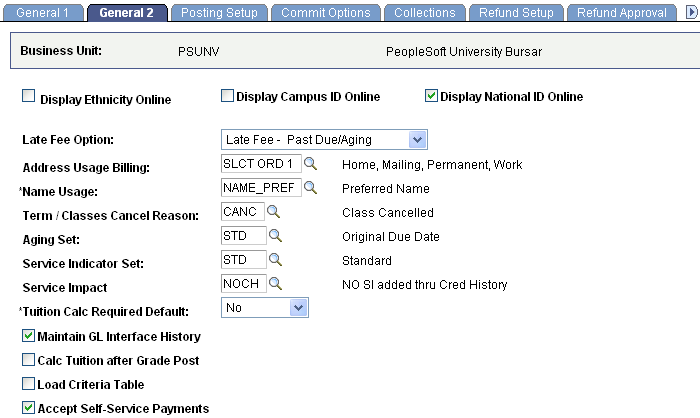
Access the General 2 page ().
This example illustrates the fields and controls on the General 2 page. You can find definitions for the fields and controls later on this page.
Field or Control |
Description |
|---|---|
Display Ethnicity Online |
Select this option if you want the student's ethnicity to appear on the Academic Information page. |
Display Campus ID Online |
Select this option if you want the campus ID to appear on the Academic Information page. The campus ID identifies the campus, not the student. |
Display National ID Online |
Select this option if you want the student's national ID (for example, social security number) to appear on the Academic Information page. |
Late Fee Option |
Select one of two Late Fee - Billing methods: Late Fees - Bill Request Nbr or Late Fees - Past Due/Aging. Late Fees run control pages use this option to verify that the correct process is used before processing. You can use two distinct processes to calculate late fees. One method is based on the account aging or the due date. The other method is based on a billing request number using the amount billed as a basis. |
Address Usage Billing |
Select a default address usage type to use when you generate customer bills. |
Name Usage |
Select a default name usage type. |
Term/Class Cancel Reason |
Select a term/class cancellation code that you want to use as the default reason when you run the Term/Class Cancellation process. |
Aging Set |
Select the aging set that the system uses by default for the Assign Collector process. |
Service Indicator Set |
Select the service indicator set to use. This service indicator set must include all service indicators that you want to use for credit history processing. |
Service Impact |
Select the service impact to use to stop a service indicator from being placed by the credit history process. This is a default value that isx used when credit history is called from the self-service pages. |
Tuition Calc Required Default (tuition calculation required default) |
Select Yes if you want the Tuition Calc Required flag set automatically when a student is activated in a term. Use this option if you want tuition to be calculated on Anticipated Units. Select No if you do not want the Tuition Calc Required flag set automatically when a student is activated in a term. Use this option if you want tuition fees calculated only after enrollment activity (Bill Units). |
Maintain GL Interface History |
Select this option if you want the system to maintain general ledger interface history. This selection is required for you to use the Back Out GL Interface functionality. |
Calc Tuition after Grade Post (calculate tuition after grade post) |
Select this option if you want the Tuition Calc Required flag to be set to Yes whenever student grades are posted or changed through the Grade Roster page. Note: This check box does not affect the Tuition Calc Required flag being set to Yes when grades are posted or changed through the Enrollment pages. |
Load Criteria Table |
Select this option if you want the criteria tables (for example, Career, Program, Fee Triggers, and so on) to be loaded into working storage at the beginning of the Tuition Calculation process. If you are using a large number of waiver criteria, fee triggers, and criteria for tuition groups, selecting this option can improve Tuition Calculation process performance. Note: If more than 1000 total criteria values exist, this option must not be selected. Working storage is currently limited to 1000 maximum values. |
Accept Self-Service Payments |
Per SF business unit, select this option to allow students to make payments through self service. When you select this option, it appears on the page. |
Access the Posting Setup page ().
This example illustrates the fields and controls on the Posting Setup page. You can find definitions for the fields and controls later on this page.
QUICK_POST_TBL Purge Control
Student Post (Quick Post) and Corp Post transactions are recorded in the Quick Post table. These entries can be consolidated into posting groups using the Purge QUICK_POST_TBL process. The options in this group box create entries in the Group Control record that enable you to easily track Student Post transactions.
Field or Control |
Description |
|---|---|
Origin ID |
Select the origin ID that you want the system to use when consolidating transactions into posting groups. |
Group Type |
Select the group type that you want the system to use when consolidating transactions into posting groups. |
Credit Processing
Set the conditions that you want the system to use when credits (payments) are posted on an account.
Field or Control |
Description |
|---|---|
Item Tree Name |
Select the name of the item type tree that contains all of the item types that you use for transactions. This tree also controls item type security. |
Default Term Control |
Select how you want to determine the term that the system uses as the default if a charge or payment is entered without specifying a term:
Note: Values for this field are delivered with your system as translate values. Do not modify these values in any way. Any modifications to these values require a substantial programming effort. Warning! Your selection of a default term control can affect how payments are processed. When either of the enrollment term selections are used, the actual term value may vary from student to student. The actual term value used becomes the value of the current term for payment processing. |
Move Initial Payment |
Select to move all payments in excess of charges to the account specified for excess payments. If the option is not selected, excess payments show as a credit balance on the charge account. |
Excess Payment Account |
Select a default account that you want to use for payments that are received in excess of charges. |
Move Initial Waiver |
Select this check box only if you need to move all waivers posted through Student or Group Post that are in excess of charges to the account specified for excess waivers. Using the tuition calculation process for waivers should never create a waiver with a credit balance. Oracle recommends that you don’t select this option when waivers are calculated and posted using the tuition calculation process. To post unique and discretionary waivers, see Assigning Student Waivers. |
Excess Waiver Account |
Select a default account that you want to use for waivers that are posted to an account in advance of charges. This feature can also be used as an option for waivers that are posted in excess of charges. Warning! Oracle doesn’t recommend using this option. Waivers should rarely, if ever, be applied to students’ accounts by any means other than the tuition calculation process. Waivers posted using the Student Post or Group Post processes may not be adjusted properly and may not be applied according to the payment applier rules. For example, a waiver that exceeds student charges is a stipend and it may be considered taxable income by the governing tax authority. Tuition calculation is a self-correcting process; it ensures that no more than 100% is ever waived. If you use Student or Group Post, you’re removing this protective measure. When a waiver is posted in excess of charges, it doesn’t appear in box 1 on the US tax form 1098–T or the Canadian tax form T2202. For information about posting discretionary waivers that don’t fit your standard waiver setup or criteria, see Assigning Student Waivers. Use that feature instead of Student Post or Group Post. |
Move Initial Financial Aid |
Select to move all financial aid payments in excess of eligible charges to the account specified for excess financial aid. If this option is not selected, excess financial aid payments show as a credit balance on the charge account. |
Excess FA Account (excess financial aid account) |
Select a default account that you want to use for financial aid that is posted to an account in excess of eligible charges. |
Disbursement Date Item |
Select to display each disbursement of a financial aid award in a single term of the same Item Type as a separate line item on a student's account. This setting is applicable only to Item Types with a Classification of Financial Aid. Warning! If you don't select this option, Financial Aid disbursements won't correctly reverse disbursements when multiple disbursements exist within a term if adjustments are made to the award. Note: Student Financial Planning Integration This setting must be selected to ensure SFP Disbursements have a 1:1 relationship with CS PAYMENT_ID_NBR. To ensure the 1:1 relationship, all of the following must be true:
Warning! Don't change this setting after you begin posting Financial Aid awards. |
Reference Number Posting Usage
This group box provides additional options for the posting of debits and payments.
Field or Control |
Description |
|---|---|
Ref Debit Item Flag (reference debit item flag) |
Select to have the option of associating a reference number with charge items. For example, you could use a parking ticket number as a reference on a parking fine charge. Each charge item with a reference number is displayed separately on the Charge Detail page. |
Ref Item Payment Flag (reference item payment flag) |
Select to have the option of associating a payment with a particular charge by using the reference number. For example, if you use a parking ticket number as a reference number on a parking fine charge, you can use that same ticket number to tie the payment to the specific charge. Note: The Ref Debit Item Flag check box must be selected for you to use the Ref Item Payment Flag option. |
Ref Excess Payment Flag (reference excess payment flag) |
Select this option to have payments made in excess of a particular charge applied to other charges with the same reference ID. Note: The Move Initial Payment check box must be selected for you to use the Ref Excess Payment Flag. |
Third Party Contract Options
This group box provides an additional option for Third Party Contract functionality.
Field or Control |
Description |
|---|---|
Track Charges by Due Date |
Select this check box if you want to be able to track the student's due and billing date in the Third Party Contract process. The check box is cleared by default. |
Access the Commit Options page ().
This example illustrates the fields and controls on the Commit Options page. You can find definitions for the fields and controls later on this page.
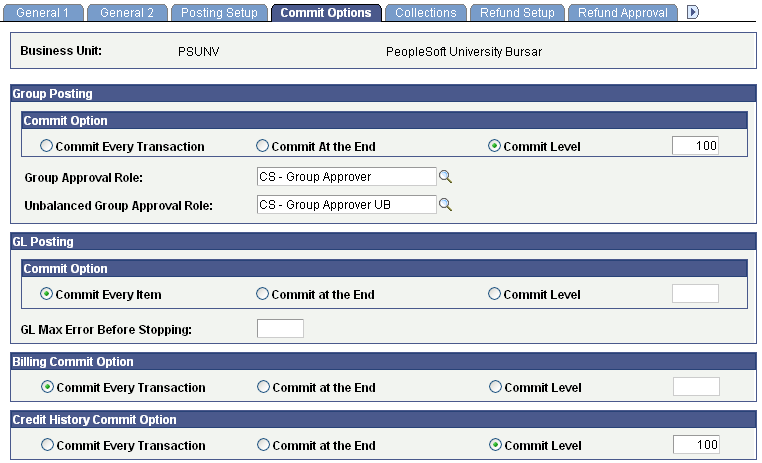
Important! The selections that you make in this page have a specific effect on processing. Consult your IT staff and system administrators to determine the optimum selections for your processing needs.
See the product documentation for PeopleTools: Workflow Technology.
Group Posting
Set the levels at which group post transactions are committed to the database.
Field or Control |
Description |
|---|---|
Commit Every Transaction |
Select to commit each transaction when it is processed. |
Commit At the End |
Select to commit all the transactions that are contained in the batch being processed at the conclusion of that batch process. |
Commit Level |
Select to commit a specified number of transactions during background processing. For example, if you enter 100 in the Commit Level field, when you run a batch process the system processes 100 transactions and then commits them to the database until the batch is complete. At the end of a batch process, the system commits all remaining transactions even if the number of transactions is less than the number in the Commit Level field. |
Group Approval Role |
Select the role of the person or persons who can approve the group. |
Unbalanced Group Approval Role |
Select the role of the person or persons who can approve an out-of-balance group. |
GL Posting
Set the levels at which general ledger transactions are committed to the database.
Field or Control |
Description |
|---|---|
Commit Every Item |
Select to commit each transaction when it is processed. |
Commit at the End |
Select to commit all the transactions that are contained in the batch being processed at the conclusion of that batch process. |
Commit Level |
Select to commit a set number of transactions during background processing. |
GL Max Error Before Stopping (general ledger maximum error before stopping) |
Enter the maximum number of errors that you want the system to allow before stopping transaction processing. |
Billing Commit Option
Set the levels at which billing transactions are committed to the database.
Field or Control |
Description |
|---|---|
Commit Every Transaction |
Select to commit each transaction when it is processed. |
Commit at the End |
Select to commit all the transactions that are contained in the batch being processed at the conclusion of that batch's process. |
Commit Level |
Select to commit a set number of transactions during background processing. Enter a commit level in the field to the right of this option. |
Credit History Commit Option
Set the levels at which Credit History process transactions are committed to the database.
The functionality of Credit History commit options is similar to other commit options on this page.
Define the rules governing how your business unit handles receivables collection.
Specify the business unit rules governing how the system handles refunds.
Set refund approval levels for student and organization refunds.
Access the Counters page ().
This example illustrates the fields and controls on the Counters page. You can find definitions for the fields and controls later on this page.
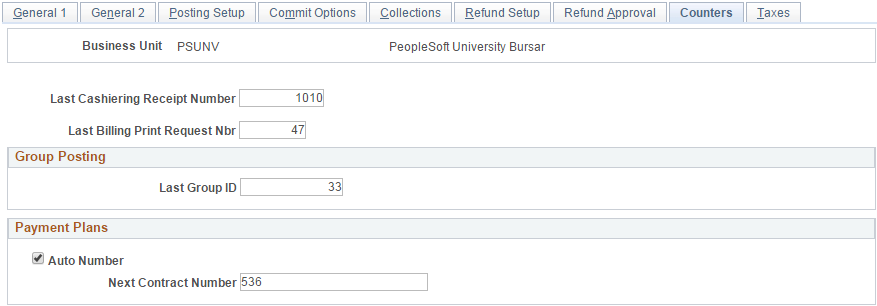
With the exception of payment plans, the counter number fields on this page automatically display the last number used. You can specify a number with which you would like the sequence numbering to begin. For example, if you want cashiering receipt numbers to begin at 1,000, enter the number 999 in the Last Cashiering Receipt Number field. The system automatically assigns the number 1,000 to the first receipt produced and increments all receipts by 1 thereafter.
Field or Control |
Description |
|---|---|
Last Cashiering Receipt Number |
If you want to change the starting point of the numbering sequence for cashiering receipts, enter a number that is one less than the number that you want to begin with. |
Last Billing Print Request Nbr (last billing print request number) |
If you want to change the starting point of the numbering sequence for billing requests, enter a number that is one less than the number that you want to begin with. |
Group Posting
Field or Control |
Description |
|---|---|
Last Group ID |
If you want to change the starting point of the numbering sequence for posting group ID numbers, enter a number that is one less than the number that you want to begin with. |
Payment Plans
Field or Control |
Description |
|---|---|
Auto Number |
Select if you want the system to automatically generate sequential contract numbers for payment plan contracts. |
Next Contract Number |
If you want to change the starting point of the numbering sequence for payment plan contract numbers, enter the contract number that you want to begin with. Unlike the previous counters, the Next Contract Number field displays the next number in the sequence. |
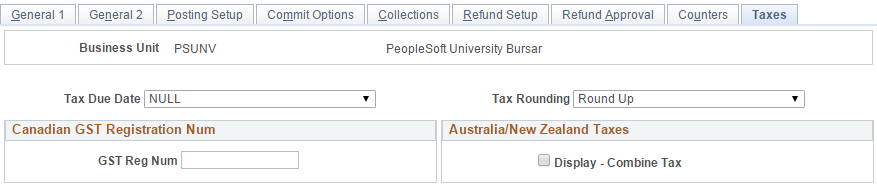
Access the Taxes page ().
This example illustrates the fields and controls on the Taxes page. You can find definitions for the fields and controls later on this page.
Field or Control |
Description |
|---|---|
Tax Due Date |
Select a Tax Due Date option to control when taxes that are associated with charges are considered due. Options are: Charge Due Date: Select to make taxes due on the same date as the corresponding charge. Charge Effective Date: Select to make taxes due on the date that the corresponding charge becomes effective. This date may be different from the due date of the charge. Null: Select if you do not want the system to automatically assign a due date. This setting leaves open the option of assigning a due date at a later point (for example, through the Billing process). This is the default setting. Posting Date: Select to make tax charges due immediately on the date that the corresponding charge is posted. |
Field or Control |
Description |
|---|---|
Tax Rounding |
This option controls how taxes are adjusted at the half-cent point. Different taxing authorities have different rules for how adjustments must be made. Determine the requirements for your institution before selecting an option. Rounding affects only tax amounts that are calculated to the exact half-cent point. Options are: No Rounding: Select to truncate the calculated tax amount to the full-cent value. This option effectively eliminates any fraction of a cent. For example, 3.769 USD would be truncated to 3.76 USD. Fractions are never rounded up. Round Down: Select if you want taxes that calculate to the half-cent point or less to be reduced to the nearest full-cent value. For example, 3.765 USD would be reduced to 3.76 USD. Round Up: Select if you want taxes that calculate to the half-cent point or more to be increased to the nearest full-cent value. For example, 3.765 USD would be increased to 3.77 USD. Student Financials rounds based on the third decimal place of a number. |
Canadian GST Registration Num
Field or Control |
Description |
|---|---|
GST Reg Num |
Enter the GST (Goods and Services Tax) registration number that is assigned to this business unit. The system uses this value for any receipts and invoices that are specifically designed to include the GST registration number when GST is assessed. |
Australia/New Zealand Taxes
Field or Control |
Description |
|---|---|
Display − Combine Tax |
Select to display transactions with tax included (summed). The default setting (check box cleared) displays taxes as a separate line item. |