Setting Up Institution Sets
Institution sets are used in self service for classic and Fluid user interfaces.
This section provides an overview of institution sets and discusses how to:
Define basic institution set parameters.
Define self-service electronic payments (ePayments) for institution sets.
Define self-service business units for institution sets.
Important! PeopleSoft Business Interlinks is a deprecated product. The Business Interlinks class currently exists for backward compatibility only. For new integrations, use Integration Broker instead.
An institution set enables you to define parameters for the PeopleSoft Student Financials self-service pages on classic and Fluid user interfaces, and for self-service ePayment usage for one or more business units in an institution.
Institution sets hide the complexity of multiple business units from the student, and enable students to access information and pay charges toward multiple business units. Institutions with only one business unit can preserve their single-unit character by attaching only one business unit to their institution set.
You must set up an institution set and attach it to each student for any self-service features to function. You attach the institution set to students through the User Profile process in PeopleSoft Campus Community or individually through Student Financials Security.
|
Page Name |
Definition Name |
Navigation |
Usage |
|---|---|---|---|
|
General Options |
INSTITUTION_SET_01 |
|
Define basic institution set parameters. |
|
Electronic Payments |
SSF_INST_SET_03 |
|
Define parameters of electronic payments. |
|
Institution Set Privacy Policy |
SSF_INST_SET_04 |
Click the Privacy Policy link on the Electronic Payments page. |
Define a privacy policy for your institution. |
|
Business Units |
INSTITUTION_SET_02 |
|
Define business unit parameters. |
Access the General Options page ().
Field or Control |
Description |
|---|---|
Base Currency |
Select the type of currency that you want to use for your credit card transactions. The default value for this field is the base currency from SF Business Unit setup. |
Self Service Options
Field or Control |
Description |
|---|---|
Accept Self Service Payments |
Select to accept self-service payments over the internet. This selection is specific to this institution set, not to the SF business units that are attached on the Business Units page. Selecting this option requires that you attach at least one SF business unit that is defined to accept self-service payments. |
Accept Miscellaneous Purchases |
Select to allow students to select and purchase items or services. This flag controls whether the Accept Miscellaneous Purchases option appears in the Other Financial drop-down list in Student Center and whether the link appears at the bottom of the Account Inquiry page. Note: This is not used in Fluid functionality. |
Allow Payment Plan Enrollment |
Select to allow students to enroll in payment plans. This flag controls whether the Payment Plan option appears in the Other Financial drop-down list in Student Center and whether the link appears at the bottom of the Account Inquiry page. Note: This is not used in Fluid functionality. |
Display 1098–T Self Service |
Select to display and to allow access to the 1098-T Self Service option for students in this institution set. This check box controls whether the 1098-T option appears in the other financial drop-down list box in Student Center and whether the link appears at the bottom of the Account Inquiry page. Note: This is not used in Fluid functionality. |
Display Student Permissions |
U.S. Department of Education regulations require that federal financial-aid awards be used to pay only allowable charges for the period of enrollment covered by the aid year in which those funds were awarded. Regulations require schools to collect individual authorization from a student to allow funds to pay for nonallowable charges such as library fines and parking fees or for charges for the prior year immediately preceding the current aid year. Select to allow access to the Grant Student Permissions option for students in this institution set. The student cannot revoke permission using Self Service; only the administrator can do this. Note: This is not used in Fluid functionality. |
Grant Student Permissions |
Select to display and to allow access to the Grant Permissions option for students in this institution set. This check box appears only if the Display Student Permissions check box is selected. Note: This is not used in Fluid functionality. |
Tuition Calc Required (tuition calculation required) |
Select if you want the system to automatically calculate tuition whenever a student accesses the Account Inquiry component or the Make a Payment component. The system calculates tuition in self service only if the following four conditions are met:
Note: The system does not automatically calculate tuition when a student accesses the Student Center. In addition, tuition calculation is never invoked from the Student Services Center or Student Services Center (Student). Therefore, consider selecting the Display Tuition Calc Message check box so that the student knows that the balance that appears on the Student Center might not reflect recent changes and the student has to access the Account Inquiry page for the updated balance. Consider your use of the Tuition Calc Required check box carefully. Requiring tuition calculation uses a great deal of system processing resources, but account balances might not otherwise reflect recent changes. |
Days in future for 'due now' |
Based on the number of days you enter here, the system controls the due now and future due dollar amounts displayed on the Student Center page as well as on the Account Inquiry - Account Summary page. The formula used to calculate the due now amount is any charges incurred through the current date plus the number of days specified in this field. The formula used to calculate the future due amount is any charges incurred after the current date plus the number of days specified in this field. Any charges incurred through the current date plus the number of future days entered in this field controls both the amount due now and the future due amount. Enter the number of future days. For further information, refer to the Example of How the Days in Future Field Is Calculated documentation. |
Display Tuition Calc Message |
Select to display the following tuition calculation messages for students:
|
Manage My Bank Accounts |
Select to enable the Manage My Bank Accounts component in classic Self Service. Students use the component to set up and maintain their bank account details in the classic user interface. Note: This is not used in Fluid functionality. |
Allow Change in Country |
Select to allow students to set the country and currency of their bank account in the Manage My Bank Accounts Self Service page. Otherwise, the country is derived from the Installation Table: Settings and Defaults page, and the currency is derived from the SF Institution Set setup. This check box is available only when you select the Manage My Bank Accounts check box. By default, Allow Change in Country is deselected. See: Note: This is not used in Fluid functionality. |
Direct Deposit Enrollment |
If you select this check box, the Enroll in Direct Deposit component is available in Self Service. Students use the component to enroll in direct deposit and specify how refunds are distributed between their bank accounts. Note: This is not used in Fluid functionality. |
Example of How the Days in Future Field Is Calculated
This table is an example of how charges and payments are displayed, based on what you define in the Days in future for 'due now' field:
|
Charge |
Date Incurred |
Amount |
|---|---|---|
|
Tuition |
July 1, 2006 |
1,000.00 USD |
|
Fee |
September 5, 2006 |
50.00 USD |
|
Room |
November 1, 2006 |
500.00 USD |
If the current date is September 1, 2006, and you enter 35 in the Days in future for 'due now' field, then the due now charges will equal 1,050.00 USD and the future due will equal 500.00 USD.
If the current date is October 1, 2006, and you enter 35 in the Days in future for 'due now' field, then the charges due now will equal 1,550.00 USD, and the future charges will equal zero.
Fluid Options
Use this grid to enable and set up Direct Deposit Enrollment in Fluid user interface.
Field or Control |
Description |
|---|---|
Direct Deposit Enrollment |
Select to allow students to enroll in direct deposit using Fluid user interface. If you select this check box, make sure the following fields are deselected and fields with values should be blank:
|
Allow Change in Country |
Select to allow students to set the country and currency of their bank account using Fluid user interface. Otherwise, the country is derived from the Installation Table: Settings and Defaults page, and the currency is derived from the SF Institution Set setup. |
Allow Revocation |
Select to allow students to delete a bank account that has been set up for direct deposit using Fluid user interface. When you select this, a Revoke Direct Deposit button appears on the Direct Deposit page. |
See Managing Financial Accounts Using PeopleSoft Fluid User Interface.
Account Inquiry
The selections made in this group box determine what students see in the Account Inquiry self-service component (SSF_SS_ACCT_SUMM) on classic and Fluid user interfaces. For instance, if you clear the Display Account Activity check box, students do not see the activity page. Check boxes that are indented below a check box refer to more specific options related to the display feature on that page.
Note: Pending Financial Aid isn't displayed in CS Self Service (Classic, Fluid and Student Center) if you have integrated with Oracle Student Financial Planning (SFP) for financial aid processing. The display of Pending Financial Aid is dependent on the record PS_STDNT_AWRD_DISB which is populated for CS Financial Aid, but not for SFP.
Field or Control |
Description |
|---|---|
Display Account Activity |
Select to display the Account Activity page, including charges, payments, financial aid, and refunds for the student. The activity is controlled by filter options on the activity page—the system displays six months of activity by default. Note: This is not used in Fluid functionality. |
Display Charges Due |
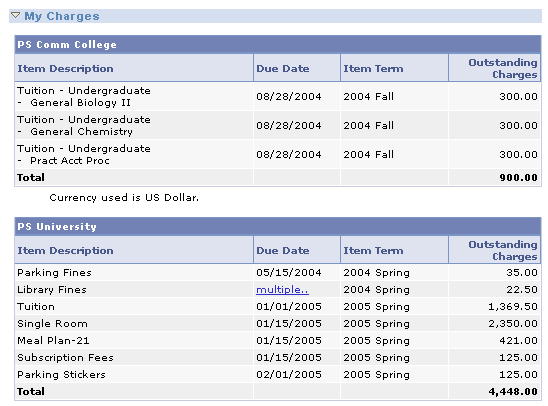
Select to display the Charges Due page. Four grids are displayed on this page, three of which are optional: Display Due Date Detail, Display Charge Detail, and Display Invoice Due. The Display Charges Due grid rolls up all charges by unique due date to be presented as a summary to the student. The Display Due Date Detail grid displays the details of all charges rolled up by unique due date. The Display Charge Detail grid displays the details of each charge. On this grid, the student has the opportunity to look deeper into charges containing multiple due dates. The Display Invoice Due grid display details of charges by billing invoice ID date. Note: Display Charge Detail and Display Invoice Due are not used in Fluid functionality. |
Display Payment History |
Select to display the Payments page. You can also choose to allow payment drilldown. For any successfully posted payments, the student can see which charges were reduced by those payments if the Allow payment drilldown check box is selected. Note: This is not used in Fluid functionality. |
Display Pending Payments |
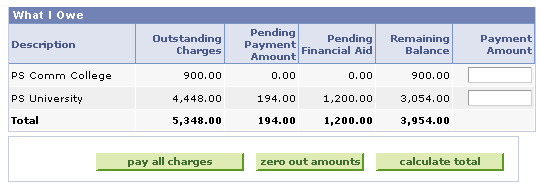
Select to display the student's pending payments on the following pages: Account Inquiry - Account Summary tab: What I Owe grid. Account Inquiry - Payments tab: Pending Payments grid. If this check box is deselected, the student's pending payments do not appear anywhere in self service. Note: This is not used for hosted payment. |
Include Pending Payments |
If this check box is selected, then the student's balance is reduced by the pending payment amount. This check box must be used in conjunction with the Display Pending Payments check box for the remaining balance amount to be reduced by any pending payments made. If this check box is selected, the total due amount is reduced by the pending payment amount on the Account Inquiry - Account Summary tab: What I Owe grid. If this check box is deselected, then the total due amount is not reduced by the pending payment amount on the Account Inquiry - Account Summary tab: What I Owe grid. The remaining balance amount is not reduced by the pending payment amount. Note: This is not used for hosted payment. |
Display Pending Financial Aid |
Select to display anticipated aid as a line item on the Account Inquiry - Account Summary tab: What I Owe grid and the Account Inquiry - Pending Financial Aid page. If this check box is selected, anticipated aid appears on the pages as a line item only and does not reduce the remaining balance amount. Students are informed of any anticipated aid, but their total charges are not reduced by the anticipated aid. If this check box is deselected, then the student's anticipated aid does not appear anywhere in the Account Inquiry self-service component (SSF_SS_ACCT_SUMM). |
Include Pending Financial Aid |
If this check box is selected, the student's balance is reduced by the anticipated aid amount. This check box must be used in conjunction with the Display Pending Financial Aid check box for the remaining balance amount to be reduced by any anticipated aid. If this check box is:
|
Include Fin Aid in Payments (include financial aid in payments) |
Select to include financial aid disbursements with all other payments. If this check box is deselected, financial aid disbursements appear in a separate financial aid activity line on the Payment History page. If your institution does not disburse financial aid, select this option to eliminate financial aid activity lines. Note: This is not used in Fluid functionality. |
Manage Bank Options
This group box provides additional configuration for bank account setup and maintenance.
Note: This is not used in Fluid functionality.
Field or Control |
Description |
|---|---|
Additional Details URL |
The values available in this field are based on the PeopleTools URL identifier. If you select a value here, the Additional Details link appears on the Manage My Bank Accounts - Agreement page. When students click the link, they access the URL that you have set up here. |
Help URL |
The values available in this field are based on the PeopleTools URL identifier. If you select a value here, the Help link appears on the Manage My Bank Accounts - Add Bank Account Details page and the Manage My Bank Accounts - Edit Bank Account Details. When students click the link, they access the URL that you have set up here. |
Display Agreement |
If you select this check box, the Manage My Bank Accounts - Agreement page appears when students create their initial bank account and the Agreement table (Bank Account) is updated. The agreement does not appear when students add subsequent bank information. |
Direct Deposit Options
This group box provides additional configuration for direct deposit setup and maintenance.
Note: This is not used in Fluid functionality.
Field or Control |
Description |
|---|---|
Additional Details URL |
The values available in this field are based on the PeopleTools URL identifier. If you select a value here, the Additional Details link appears on the Enroll in Direct Deposit - Agreement page. When students click the link, they access the URL that you have set up here. |
Help URL |
The values available in this field are based on the PeopleTools URL identifier. If you select a value here, the Help link appears on the Enroll in Direct Deposit - Add Direct Deposit page and the Enroll in Direct Deposit - Edit Direct Deposit page. When students click the link, they access the URL that you have set up here. |
Maximum Distributions |
Use this field to control the maximum number of direct deposit distributions that a student can set up in Self Service. A value of 1 appears by default. You can only enter whole numbers—for example, 4.5 is not allowed. Enter a value of 1 if you want refunds to always be disbursed to only one account. |
Display Subsequent Agreement |
If you select this check box, then, after the student has signed an initial agreement (using the Direct Deposit Agreement page - DD Enroll), an Agreement page appears every time that the student edits the direct deposit instructions. The Agreement table (DD Change) is also updated. (The Direct Deposit Agreement page does not require any setup here—it appears automatically when a student enrolls in direct deposit). |
See:
Important! PeopleSoft Business Interlinks is a deprecated product. The Business Interlinks class currently exists for backward compatibility only. For new integrations, use Integration Broker instead.
A flexible interface supports the processing of credit card and eCheck transactions
A flexible interface supports the processing of credit card and eCheck transactions. The interface uses a flexible adapter-based model to support the transmission of electronic payment transactions. You can use either the Integration Broker-based interface or the Business Interlinks interface to send electronic payment transactions to third party payment processors.
If you use Integration Broker, it supports the capture of the Security Code. Capturing this code lowers your transaction costs and increases fraud deterrence on card not present transactions.
See:
Electronic Payment Integration Developer's Reference Guide in My Oracle Support (ID 1982664.1).
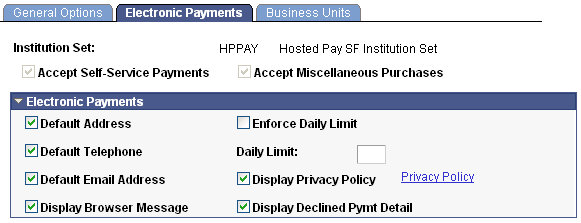
Access the Electronic Payments page ().
This example illustrates the fields and controls on the Electronic Payments page (1 of 2). You can find definitions for the fields and controls later on this page.
This example illustrates the fields and controls on the Electronic Payments page (2 of 2). You can find definitions for the fields and controls later on this page.
Note: Most of the fields on the Electronic Payments page are specific to each business unit in the institution set, not to the institution set as a whole. If you have multiple business units associated with the institution set, be sure to insert a row and enter the information on the Electronic Payments page for each business unit. Also, if you have more than one business unit associated with your institution set, you must enter a priority ranking for each (see following). The exceptions to this are the service impact and service indicator codes, which are institution set-specific, not business unit-specific.
To control what charges the student can pay towards in self service, you must ensure that the item type contains the correct charge priority list. The charge priority list that you assign to the eCheck item type can differ from the credit card item type. In this way, you can control whether particular charges can be paid by one payment method versus another. Be sure to specify the correct tender category (eCheck or credit card) on the item type so that it is available to select here.
Field or Control |
Description |
|---|---|
Accept Self Service Payments |
This is a display-only field that shows whether Accept Self Service Payments has been selected in the General Options setup. This means that web credit card payments are authorized for this business unit. |
Accept Miscellaneous Purchases |
This is a display-only field that shows whether Accept Miscellaneous Purchases has been selected in the General Options setup. |
Electronic Payments
Field or Control |
Description |
|---|---|
Default Address |
Select to make the address fields on the Make a Payment - Specify Payment Details page available for input. |
Default Telephone |
Select to make the telephone field on the Make a Payment - Specify Payment Details page available for input. |
Default Email Address |
Select to make the email field on the Make a Payment - Specify Payment Details page available for input. |
Display Browser Message |
Select this check box:
You define the browser requirements message and detail on the Payment Merchant page. |
Enforce Daily Limit and Daily Limit |
Select the Enforce Daily Limit check box to limit the number of self-service payments a student can make per day to the value that you enter in the Daily Limit field. For example, if you set up and institution set with both a credit card merchant ID and an electronic check merchant ID, and enter a daily limit of 4, then a student can make any combination of eCheck and credit card transactions up to a maximum of four total transactions per day. If a student exceeds the limit, the system prevents the student from making additional self-service payments until the following day. |
Display Privacy Policy |
Select to display the Privacy Policy link on the Make a Payment - Confirm Payment page if a school uses the hosted payment feature and on the Make a Payment - Specify Payment Details page if the school does not use the hosted payment feature. The privacy policy is optional and user defined. |
Privacy Policy |
Click to access the Institution Set Privacy Policy page and define a privacy policy for your institution. |
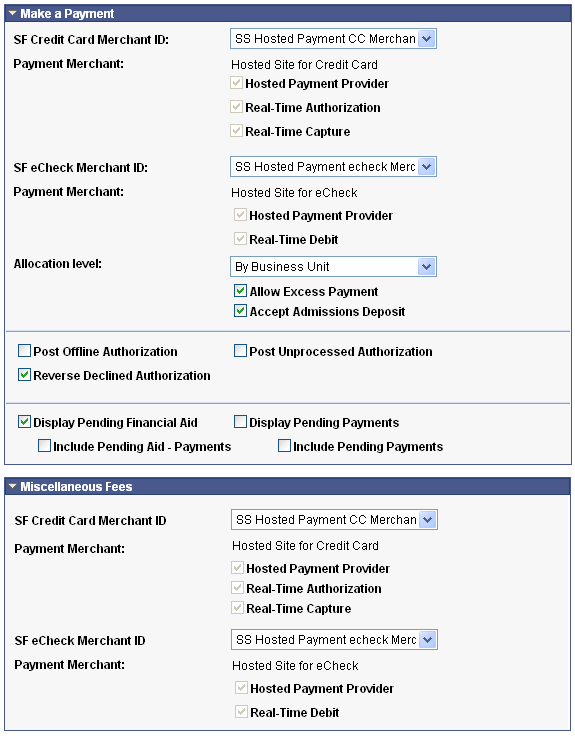
Make a Payment
Important! PeopleSoft Business Interlinks is a deprecated product. The Business Interlinks class currently exists for backward compatibility only. For new integrations, use Integration Broker instead.
Your selections here determine what students see in the Make a Payment self-service component. For instance, if you clear the Display Pending Financial Aid check box, then the student's anticipated aid is not displayed anywhere in the Make a Payment self-service component.
Field or Control |
Description |
|---|---|
SF Credit Card Merchant ID and SF eCheck Merchant ID |
Select a credit card SF merchant ID, an eCheck SF merchant ID, or both for an institution set. This determines which payment type is supported for this institution set: credit card only, eCheck only, or both. If you select a value in both the SF Credit Card Merchant ID and the SF eCheck Merchant ID fields, the Select Payment Method page prompts students to select one of two payment types from the drop-down list box—Pay by Credit Card or Pay by Electronic Check,—before they are permitted to enter self-service payment information. If you select a value in only one of these fields, then the system takes students directly to the Make a Payment - Specify Payment Details page because only one valid tender option is available for self-service payment. The Make a Payment page using Fluid user interface always begins with Step 1, Select Payment Method. See Making Electronic Payments. Note: Depending on the charge priority rules assigned to the ePayment item type, the student may not be presented with all charges to pay—the student is presented only those charges that are a part of the charge priority list that is associated with the ePayment credit card or eCheck item type. |
Payment Merchant |
The check boxes are selected or deselected by default depending on the setup on the SF Merchants page and are not available for edit on this page. Note: If both credit card and eCheck are available as payment methods for an institution set, both payment methods must be either hosted or non-hosted. For example, if you define an institution set that allows credit card payment with hosted payment and eCheck with non-hosted payment, you receive an error message advising that SF merchants have conflicting payment merchant values. You can, however, use Business Interlink for one payment method and Integration Broker for another. Also, across features, you can use both hosted and non-hosted payment—for example, you can use hosted payment for Make a Payment setup and non-hosted for Miscellaneous Fees setup. |
Allocation Level |
Use the allocation level to define how charges and payments are displayed on a self-service page. |
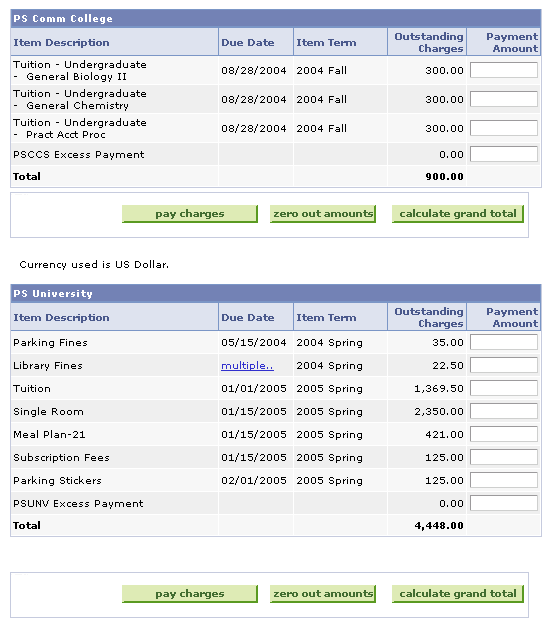
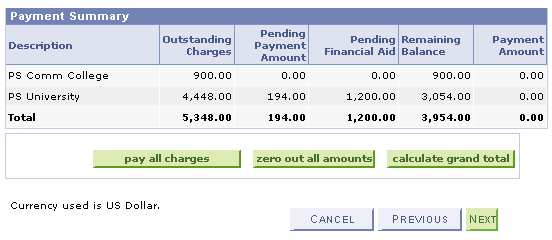
Allocation Level By Business Unit
This page displays all charges that the student incurred by business unit on the Make a Payment self-service component. Displaying charges in this manner forces the student to pay all or a portion of the charges by business unit. The Student Financials posting process invokes the appropriate charge priority and payment overall priority rules to the self-service payments.
This example illustrates the fields and controls on the Allocation Level By Business Unit page (1 of 2). You can find definitions for the fields and controls later on this page.
This example illustrates the fields and controls on the Allocation Level By Business Unit page (2 of 2). You can find definitions for the fields and controls later on this page.
Allocation Level by Charge
This page displays each charge that the student incurred individually by business unit on the Make a Payment self-service component. Displaying charges in this manner permits the student to pay all or a portion of each charge. The Student Financials posting process bypasses the established charge priority and payment overall priority rules and uses the amounts that the student indicates during the self-service transaction. The resulting effect is that the student can choose which charges to pay, thus creating a scenario in which older, more pressing charges can be ignored while newer charges can be reduced.
This example illustrates the fields and controls on the Allocation Level by Charge page (1 of 2). You can find definitions for the fields and controls later on this page.
This example illustrates the fields and controls on the Allocation Level by Charge page (2 of 2). You can find definitions for the fields and controls later on this page.
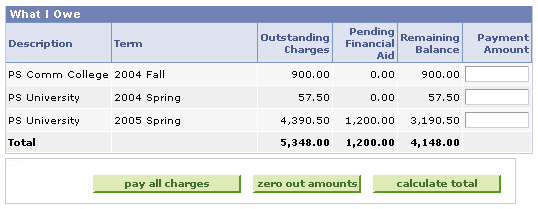
Allocation Level by Term
This page displays all charges that the student incurred by term within each business unit on the Make a Payment self-service component. Displaying charges in this manner permits the student to pay all or a portion of a term's charges—these charges are aggregated by business unit whereby the student cannot pay each individual charge. The Student Financials posting process invokes the appropriate charge priority and payment overall priority rules to the self-service payments.
Note: For the Allocation Level by Term feature to work, you must set Term, Payment Term First for Sort 1 of the Charge Sort for Payment Overall Priority attribute for applicable ePayment item types.
This example illustrates the fields and controls on the Allocation Level by Term page (1 of 2). You can find definitions for the fields and controls later on this page.
This example illustrates the fields and controls on the Allocation Level by Term page (2 of 2). You can find definitions for the fields and controls later on this page.

Field or Control |
Description |
|---|---|
Allow Excess Payment |
Select to allow students to make ePayments in excess of their balance due. |
Accept Admissions Deposit |
Select to accept payment for admissions deposits by credit card over the internet. The application center does not accept payment by eCheck. |
Set the parameters for the real-time posting of credit card transactions.
Field or Control |
Description |
|---|---|
Post Offline Authorization |
Select to post transactions in real time, even though you authorize the transactions through a batch process. This field is available only if you do not select the Credit Card Authorization option on the SF Merchants page. Note: This is not used in Fluid functionality. |
Post Unprocessed Authorization |
Select to post credit card transactions that fail while performing real-time authorization due to a connection problem. If you cleared this check box, the system posts only transactions with fully processed authorizations. Note: Consider the implications if transactions posted in real time fail authorization when processed at a later point in time (such as payment reversals and discharge of service indicators). Note: This is not used in Fluid functionality. |
Reverse Declined Authorization |
Select to automatically reverse a posted transaction when a credit card transaction is declined. This option should always be selected if you choose to post transactions with payments authorized offline (see above). Note: This is not used in Fluid functionality. |
Your next selections determine what students see in the Make a Payment self-service component. For instance, if you clear the Display Pending Financial Aid check box, then the student's anticipated aid is not displayed anywhere in the Make a Payment self-service component.
Note: Pending Financial Aid isn't displayed in CS Self Service (Classic, Fluid and Student Center) if you have integrated with Oracle Student Financial Planning (SFP) for financial aid processing. The display of Pending Financial Aid is dependent on the record PS_STDNT_AWRD_DISB which is populated for CS Financial Aid, but not for SFP.
Field or Control |
Description |
|---|---|
Display Pending Financial Aid |
Select to display anticipated aid as a line item on the Make a Payment - Specify Payment Amount page in the What I Owe grid. With this check box selected, anticipated aid appears on the page as a line item only and does not reduce the remaining balance amount. Students are informed of any anticipated aid, but their total charges are not reduced by the anticipated aid. If this check box is cleared, then the student's anticipated aid does not appear anywhere in the Make a Payment self-service component. |
Include Pending Aid – Payments |
Select to use pending financial aid to reduce the remaining balance amounts on the Make a Payment - Specify Payment Amount page. This check box must be used in conjunction with the Display Pending Financial Aid check box for the remaining balance amount to be reduced by anticipated aid. If this check box is selected, the student's total charges are reduced and the student is informed of any anticipated aid. If Display Pending Financial Aid and this check box are both cleared, then the student's anticipated aid does not appear anywhere in the Make a Payment self-service component. |
Display Pending Payments |
Select to display the student's pending payments on the Make a Payment - Payments page and the Make a Payment - Specify Payment Amount page. If this check box is cleared, then the student's pending payments do not appear anywhere in the Make a Payment self-service component. Note: This is not used in Fluid functionality. |
Include Pending Payments |
If this check box is selected, then the student's balance is reduced by the payment amount. This check box must be used in conjunction with the Display Pending Payments check box for the remaining balance amount to be reduced by any payments made. If Display Pending Payments and this check box are both cleared, then the student's pending payments do not appear anywhere in the Make a Payment self-service component. Note: This is not used in Fluid functionality. |
Miscellaneous Fees
Important! PeopleSoft Business Interlinks is a deprecated product. The Business Interlinks class currently exists for backward compatibility only. For new integrations, use Integration Broker instead.
Note: This group box is not used in Fluid functionality.
Use these fields if your institution wants to set up separate merchant IDs for miscellaneous purchases as opposed to regular tuition payments.
Field or Control |
Description |
|---|---|
SF Credit Card Merchant ID and SF eCheck Merchant ID |
Select a credit card SF merchant ID, an eCheck SF merchant ID, or both for miscellaneous fees. This determines which payment type is supported for this institution set: credit card only, eCheck only, or both. If you select a value in both the SF Credit Card Merchant ID and SF eCheck Merchant ID fields, the Select Payment Method page prompts students to select one of two payment types from the drop-down list box—Pay by Credit Card or Pay by Electronic Check—before they are permitted to enter self-service payment information. If you select a value in only one field, the system takes students directly to the Make a Payment - Specify Payment Details page because only one valid tender option is available for self-service payment. For miscellaneous purchases, the setup on the Purchase Items setup component (SSF_PUR_ITEM_TABLE) determines the items that are presented for purchase. Because these are optional purchases, they do not exist until the student (or user) elects to purchase these items. Because these are paid for at the time of selection, charge priority rules do not affect miscellaneous purchases. |
Payment Merchant |
The check boxes are selected or cleared by default depending on the setup on the SF Merchants page and are not available for edit on this page. Note: If both credit card and echeck are available as payment methods for an institution set, both payment methods must be either hosted or non-hosted. For example, if you define an institution set that allows credit card payment with hosted payment and eCheck with non-hosted payment, you receive an error message advising that SF merchants have conflicting payment merchant values. You can, however, use Business Interlink for one payment method and Integration Broker for another. (For credit cards, Security Code is supported only by Integration Broker). Also, across features, you can use both hosted and non-hosted payment—for example, you can use hosted payment for Make a Payment setup and non-hosted for Miscellaneous Fees setup. |
Access the Business Units page ().
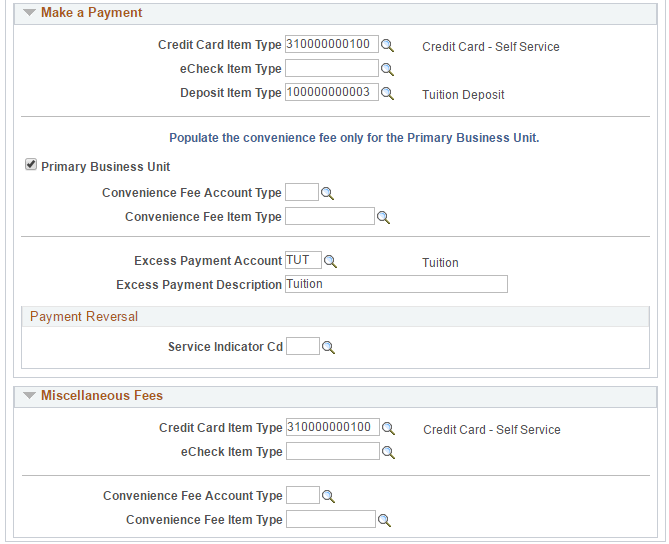
This example illustrates the fields and controls on the Business Units page (1 of 2). You can find definitions for the fields and controls later on this page.
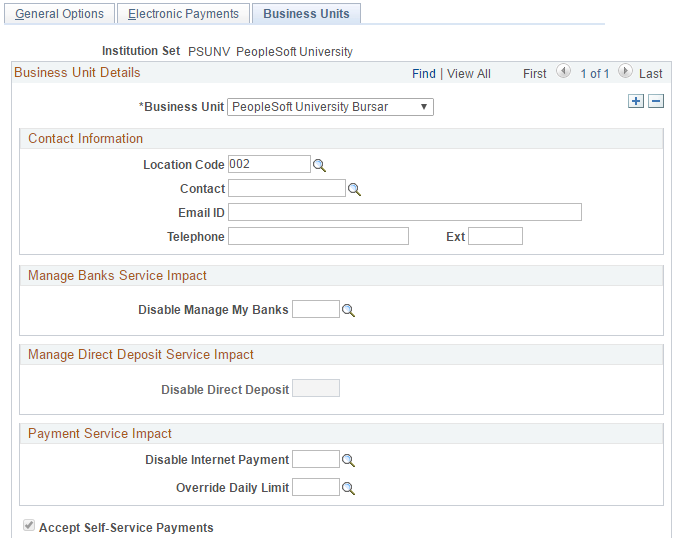
This example illustrates the fields and controls on the Business Units page (2 of 2). You can find definitions for the fields and controls later on this page.
This page is used for both classic and fluid self service.
Note: Most of the fields on the SF Institution Set - Business Units page are specific to each business unit in the institution set, not to the institution set as a whole. If you have multiple business units associated with the institution set, be sure to insert a row and enter the information on the SF Institution Set - Business Units page for each business unit. Also, if you have more than one business unit associated with your institution set, you must enter a priority ranking for each (see below). The exceptions to this are the service impact and service indicator codes, which are institution-set-specific, not business-unit-specific.
To control what charges the student can pay towards in self service, you must ensure that the item type contains the correct charge priority list. The charge priority list that you assign to the eCheck item type can differ from the credit card item type. In this way, you can control whether particular charges can be paid by one payment method versus another. Be sure to specify the correct tender category (eCheck or credit card) on the item type so that it is available to select here.
Field or Control |
Description |
|---|---|
Business Unit |
Enter the business unit that you want to include in this institution set. |
Contact Information
Note: This group box is not used in Fluid functionality.
Field or Control |
Description |
|---|---|
Location Code |
Select a location code to display a remittance address on the Account Summary and Total Due Charges pages. |
Contact |
Select the ID of the individual assigned to be the contact person in the event of web credit card transaction problems. |
Email ID |
Enter the email address of the contact person. |
Telephone |
Enter the telephone number of the contact person. |
Ext (extension) |
Enter the telephone extension of the contact person (if applicable). |
Manage Banks Service Impact
Note: This group box is not used in Fluid functionality. If Direct Deposit Enrollment is enabled for fluid self service, then this grid is disabled.
Use the Disable Manage My Banks service impact to remove student access to the Manage My Bank Accounts pages in Self Service. If a student has this service impact, the student cannot set up new bank accounts or edit existing bank account details. This service impact does not prevent direct deposit refunds from being distributed to existing bank accounts.
After you verify that the student cannot access the Manage My Bank Accounts component in Self Service, revoke the bank agreement if one exists.
Manage Direct Deposit Service Impact
Use Disable Direct Deposit service impact to prevent a student from accessing the Direct Deposit page in Fluid self service. This could be a temporary action because of fraud or a similar event.
See Managing Financial Accounts Using PeopleSoft Fluid User Interface.
Payment Service Impact
Field or Control |
Description |
|---|---|
Disable Internet Payment |
Select the negative service impact code that the system uses to disable a customer's ability to pay on the internet using a credit card. If students have this impact on their account, they cannot access the Make a Payment page. |
Override Daily Limit |
Select the positive service impact code that the system uses to enable customers to bypass the daily limit for credit card payments. If students have this impact on their account, they can make credit card payments in excess of the daily limit. |
Field or Control |
Description |
|---|---|
Accept Self-Service Payments |
This is a display-only field that shows whether Accept Self Service Payments has been selected in the General Options setup. This means that web credit-card payments are authorized for this business unit. |
Make a Payment
Field or Control |
Description |
|---|---|
Credit Card Item Type |
Enter the item type that the system uses for self-service credit card transactions entered for this institution set. Note: The payment item type that you select must specify credit card as a tender type. |
eCheck Item Type |
Enter the item type that the system uses for self-service eCheck transactions entered for this institution set. Note: The payment item type that you select must specify electronic check as a tender type. |
Deposit Item Type |
If you accept web credit card payments for admission deposits, select the item type that is defined for admission deposits. |
Primary Business Unit |
Select to designate the business unit as the one to which the system assigns ePayment transaction surcharges. Note: You can designate only one business unit per institution set as the primary business unit. |
Convenience Fee Account Type |
If you charge a convenience fee on credit card transactions, select the account to which the system posts charges resulting from a credit card transaction convenience fee. Note: If you charge a convenience fee, the payment item type used for credit card transactions must include the account type of your convenience fee item type on the account type page. |
Convenience Fee Item Type |
If you charge a convenience fee on credit card transactions, select the item type that the system uses when posting charges resulting from a credit card transaction convenience fee. Note: If you are charging a convenience fee, the item type specified here must be included in one of the Allowable Charges tree nodes in the charge priority list used by the credit-card payment item type. This charge priority list is specified on the item type miscellaneous page. |
Excess Payment Account |
Select the account to which the system posts credit card payments in excess of customer balances. If it is different , this selection overrides the excess payment account that you select in the Posting Setup 1 page of the SF Business Unit component (BUSINESS_UNIT_SF). |
Excess Payment Description |
Enter the label that you want to display for excess payments. This description overrides the description of the item type for credit-card payment and appears on the Allocate Payment page in the Future Charges section. |
Payment Reversal
Field or Control |
Description |
|---|---|
Service Indicator CD |
Select the negative service indicator code that the system attaches to student records when transaction authorizations fail and payments are reversed. |
Miscellaneous Fees
This setup allows different payment item types and convenience fee item types to be used as opposed to the regular Make a Payment item types.
Note: This group box is not used in Fluid functionality.
Field or Control |
Description |
|---|---|
Credit Card Item Type |
Enter the item type that the system uses for self-service credit card transactions entered for this institution set for paying for miscellaneous purchases. Note: The payment item type that you select must specify credit card as a tender type. |
eCheck Item Type |
Enter the item type that the system uses for self-service eCheck transactions entered for this institution set to pay for miscellaneous purchases. Note: The payment item type that you select must specify electronic check as a tender type. |
Convenience Fee Account Type |
If you are charging a convenience fee on credit card transactions for miscellaneous purchases, select the account to which the system posts charges resulting from a credit-card transaction convenience fee. Note: If you are charging a convenience fee, the payment item type used for credit card transactions must include the account type of your convenience fee item type on the account type page. |
Convenience Fee Item Type |
If you are charging a convenience fee on credit card transactions, select the item type that the system uses when posting charges resulting from a credit card transaction convenience fee. Note: If you are charging a convenience fee, the item type specified here must be included in one of the Allowable Charges tree nodes in the charge priority list used by the credit card payment item type. This charge priority list is specified on the item type miscellaneous page. |