Scheduling and Creating Voucher Payments for Online Vouchers
|
Page Name |
Definition Name |
Usage |
|---|---|---|
|
VCHR_PAYMENT_PNL |
View the payment schedule for a voucher and override payment settings. On this page, you can change the payment schedule, schedule multiple payments, schedule direct payments to an alternate supplier or supplier location, record a manual payment, and create an express payment. |
|
|
PAY_OPT_SEC |
Override the default bank holiday processing options and currency options for the payment. |
|
|
Supplier Bank Account Page |
PAY_TO_BANK_SCHED |
Set the pay to bank account for the remit to supplier. After selecting the account, bank information is displayed on the page. |
|
LATE_CHRG_SBP |
Override late interest charge information. |
|
|
Payment Message Page |
PYMNT_VCHR_MSG |
Enter a payment message text or select a predefined payment message code to include on the payment remittance advice. |
|
APD_MATURIT_DT_SEC |
Specify draft settings for a draft payment method. |
|
|
Letter of Credit Details Page |
LC_AP_INQ1 |
View details about a letter of credit. |
|
Letter of Credit Doc Page (letter of credit document) |
LC_AP_INQ2 |
View details about a letter of credit document. |
|
AP_EFT_LYT_SEC |
Enter information to settle a payment through PeopleSoft Financial Gateway or Pay Cycle Manager functionality. |
|
|
VCHR_HIPAA_SEC |
(USA) Enter information for Health Insurance Portability and Accountability Act of 1996 (HIPAA) compliance. The link and page appear only if the payment method for the voucher has an EFT layout of HIPAA. |
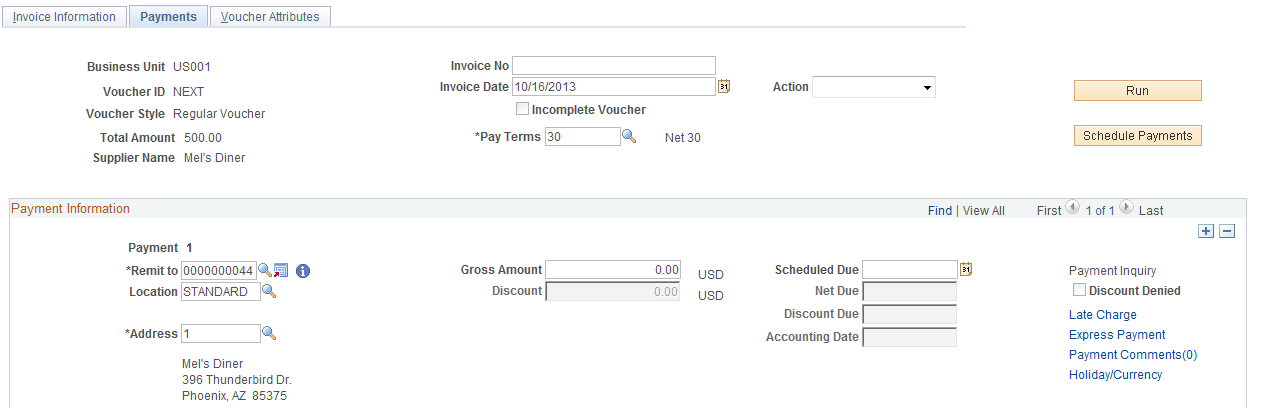
Use the Voucher - Payments page (VCHR_PAYMENT_PNL) to view the payment schedule for a voucher and override payment settings.
On this page, you can change the payment schedule, schedule multiple payments, schedule direct payments to an alternate supplier or supplier location, record a manual payment, and create an express payment.
Navigation:
This example illustrates the fields and controls on the Voucher - Payments page, add mode (1 of 2). You can find definitions for the fields and controls later on this page.
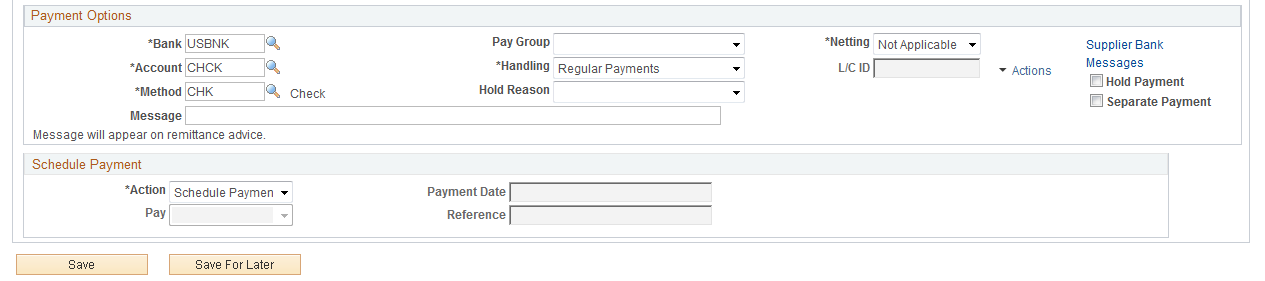
This example illustrates the fields and controls on the Voucher - Payments page, add mode (2 of 2). You can find definitions for the fields and controls later on this page.
PeopleSoft Payables schedules payments for a voucher when you save the voucher. At that time, the system processes the voucher fields against the Payment Terms table to determine the net due, discount due, and scheduled due dates for the payment.
Note: Remember that if the supplier is on hold, the system does not select the voucher for payment until you remove the payment hold status for the supplier.
If a payment has been reconciled, the fields on this page are unavailable.
Header
Field or Control |
Description |
|---|---|
Pay Terms |
Modify the payment terms. |
Schedule Payments |
Click to schedule the payment before you save the voucher. This function enables you to preview the payment due dates and discount (if any). With multipayment terms, you can also generate installment payment records (and review and edit them, if necessary) in advance of committing them when saving the voucher. You can always edit the voucher immediately after saving, but this alternate method may offer more peace of mind. |
HIPAA |
Click to access the HIPAA page, where you can enter HIPAA information for the voucher. This link appears only if the payment method for the voucher has an EFT layout of HIPAA. |
The Action field appears on this page as well as other pages in the Voucher component. This field is discussed in detail in a previous section.
Payment Information
Field or Control |
Description |
|---|---|
Scheduled Payment |
Displays the scheduled payment number. |
Remit to, Location, and Address |
Displays the appropriate remit to supplier for the payment based on the remit to supplier that is established for the supplier on the Invoice Information page. This value is supplied by default from values that are established at the supplier location level. Whereas in most cases you remit directly to the supplier that sent you the voucher, the system enables you to override the default choices for remit to supplier, location, and address. For example, if a supplier requires that payments be sent to its company corporate office rather than to a local office address, you can select the location to which the payment should be sent. You can also change the remit to supplier to pay one supplier for the vouchers of another, as is the case with factoring relationships, for example. Note: The system updates the Remit to and Location fields appropriately if there are any changes to Supplier ID, ShortName, or Location fields on the Invoice Information page. |
|
Click the Alternate Names icon to view the alternate names for the remit-to supplier. |
|
The Information icon appears if the supplier’s payment is placed on Hold Payment for the remit to supplier selected. It prompts you that the particular supplier’s payment is on hold in the Supplier Profile. |
(USF) Schedule ID |
U.S. Federal payment schedule ID. This field is populated only after you have run the Pay Cycle Application Engine (AP_APY2015) process for the payment. |
Gross Amount |
Enter the payment amount for the scheduled payment if you do not take a discount. If you have multiple payments scheduled for the voucher, the sum of the gross amounts for each of these payments must equal the gross amount of the voucher on the Invoice Information page. |
Discount |
Enter the amount of the discount that can be taken on the scheduled payment. If you have multiple payments scheduled for the voucher, the sum of all the discount amounts must equal the total discount amount that is available for the voucher. If you miss the discount due date and elect not always to take the discount, you cannot take advantage of this discount amount unless you reschedule the payment with new dates. |
Scheduled Due |
Determines when to pay the scheduled payment. During the payment selection step of the Pay Cycle process, the system compares the pay through date (entered as part of your payment selection criteria) to the scheduled pay date. If the scheduled pay date is less than or equal to the pay through date, the scheduled payment is a candidate for payment. When PeopleSoft Payables automatically schedules payments, the scheduled due date is set to one of these values:
Users who are authorized to schedule payments manually can manipulate these dates and amounts to tailor the voucher's scheduled payments to meet your organization's cash flow requirements. Note: When bank holiday processing is enabled, the system adjusts the scheduled due date forward or backward according to whether the due date falls on a work day, weekend, or holiday, depending on the parameters that are in effect. When the scheduled due date has been populated for a payment (either by calculation or by direct user entry), that payment is considered scheduled. The payment schedule is not updated for any subsequent changes in payment terms or basis date or amount data. You must first remove the date from the Scheduled Due field if you want to reschedule an already scheduled payment. |
Net Due |
Displays the net due date. When PeopleSoft Payables automatically schedules payments, the system calculates the net due date by applying the appropriate net payment terms timing calculation for the payment terms on the Invoice Information page. If you have specified net delay days for the supplier or for the PeopleSoft Payables business unit, the system adds that number of days to the date that is calculated from the payment terms to determine the net due date when the gross amount for the scheduled payment is due. |
Discount Due |
The system calculates the discount due date by applying the appropriate discount payment terms timing calculation for the payment terms on the Invoice Information page. If you have specified discount delay days for the supplier or for the PeopleSoft Payables business unit, the system adds that number of days to the date that is calculated from the payment terms to determine the latest date that you can legitimately retain the discount amount for the scheduled payment. |
Accounting Date |
The accounting date is based on the settings that are defined in the PeopleSoft Payables default hierarchy. |
Payment Inquiry |
Click to access the Payment Inquiry page to view payment information. This link is active only if the voucher has been paid. See Payment Inquiry Page. |
Holiday/Currency Options |
Click to access the Holiday/Currency Options page, where you can change the default bank holiday processing and currency options for the payment. |
Discount Denied |
This check box is display-only and is set by the Pay Cycle process. When the Evaluate Discount Rate feature is enabled at the Installation Options level, the Pay Cycle process determines whether the discount should be taken. If the discount is not taken, the Discount Denied check box is selected. |
Late Charge |
Click to access the Late Charge Information page, where you can review and override the system-assigned payment reason code and the late charge information that appears by default through the PeopleSoft Payables control hierarchy. You can override the payment reason code after you have paid the voucher, but you cannot change the Late Charge Option or the Late Charge Code fields after payment. Only user-defined codes appear. Note: This page is available only if you have enabled late charge calculation on the Installation Options - Payables page. |
Express Payment |
Click to access the Express Payment page, where you can create an express payment. The system copies all relevant information on the voucher to the payment fields for creating an express payment. Note: You cannot create an express payment if the supplier has a financial sanctions status of Review or Blocked. The Express Payment link is not available. |
Prepayment |
Click to search for and apply eligible regular vouchers to a prepaid voucher. This link is active only if you are entering a prepaid voucher. |


Payment Options
Field or Control |
Description |
|---|---|
Bank and Account |
Select the bank and bank account from which the payment is issued. This appears by default from the control hierarchy, but you can override these settings. Note: Select a netting bank account from the Voucher payment page if the remit to supplier value is an interunit supplier and the source value is Billing. |
Method |
Select a payment method. Values are: ACH: Automated Clearing House. BEF: Customer-initiated EFT draft. BOO: Customer-initiated draft. CHK: System check. DD: Direct debit. DFT: Supplier-initiated draft. EFT: Electronic Funds Transfer. GE: Giro EFT. GM: Manual giro. LC: Letter of credit. MAN: Manual check. WIR: Wire report. |
Drafts |
Click to access the Draft Maturity Dates page, where you can specify the draft maturity date options for the payment. This link is active only if you select a draft payment method. |
Pay Group |
Select the pay group for this payment, where applicable. Pay groups are used as part of the pay cycle selection criteria. You can use them to better control which payment schedules are selected. You define supplier pay groups on the Supplier Pay Group Codes page. |
Handling |
Displays the payment handling code, which appears by default from the PeopleSoft Payables control hierarchy. Each payment handling code has a sort sequence related to it that determines the order in which it prints. Checks are printed according to the sort sequence in ascending order: the lower the sort sequence number, the higher the sort priority. You must always have a payment handling code on a scheduled payment. You define payment handling codes on the Payment Handling Codes page. |
Netting |
Displays the status for the Automatic Netting Selection Application Engine (TR_NET_ASEL) process: H (hold): Net payment is on hold for the Automatic Netting Selection process in Treasury. This payment schedule is available for the netting selection process to select it. N (not applicable): Netting does not apply to this payment. This supplier is not a netting supplier S (selected): Net payment is selected for payment. Payment has been processed by the Automatic Netting Selection process and is now ready to be processed by the Netting Closing Application Engine (TR_NET_CLOSE and TR_NET_ARCLS) processes in pay cycle processing. |
Hold Reason |
Select a code to explain the payment hold. Values are:
The reason codes are stored in a translate table. You can add more codes to the translate table using PeopleTools. |
Messages |
Enter a payment message of up to 70 characters to appear on the remittance advice (check stub). You can also click the Messages link to access the Payment Message page, where you can select message codes for predefined messages to appear on the remittance advice and specify the order in which they appear. You can repeat this for each scheduled payment. You define message codes on the Payment Messages page which you access from the Procurement Options menu. See Payment Message Page. |
Supplier Offset TOP(supplier offset Treasury Offset Program) |
The value entered for the supplier provides the default for TOP eligibility at the voucher payment level. When using the SPSMISC EFT file format, the system will automatically populate this field based on settings at the supplier level. |
Supplier Bank Account |
Click to access the Supplier Bank Account page, where you can select the bank account sequence number. |
Letter of Credit |
Displays the ID for the letter of credit. This field is active only for a payment method of LC. Click the View Related Links icon to view the Letter of Credit Details page and the Letter of Credit document page. See Letters of Credit. |
Hold Payment |
Select this option to place a payment on hold. The system stores the scheduled payment but the Pay Cycle process does not pay it. When you are ready to take the payment off hold, deselect the check box. |
Separate Payment |
Select this check box if you do not want this payment to be grouped with other payments for the remit to supplier. |
(USF) Inbound IPAC (inbound intra-governmental payment and collection transaction) |
Select to indicate that this voucher is to be applied to an inbound IPAC transaction. This places the voucher payment on hold with a hold reason of IPC, IPAC hold, until the inbound IPAC data has been staged and is ready for you to associate with the voucher. This field is available only if you have enabled federal payments on the Installation Options - Payables page. |
(USF) Select IPAC (select intra-governmental payment and collection transaction) |
Click to access the Inbound IPAC Stage Selection page, where you can search for and select staged inbound IPAC transactions to associate with the voucher. This field is available only if you have enabled federal payments on the Installation Options - Payables page. |
(USF) IPAC (intra-governmental payment and collection transaction) |
Click to access the IPAC page, where you can enter and review IPAC information for the voucher. This link is active only if you have enabled federal payments on the Installation Options - Payables page and the payment method that you selected is defined as an IPAC EFT layout for the bank that you have selected. |
Schedule Payment
Field or Control |
Description |
|---|---|
Action |
Select the payment action. Values are:
|
Pay |
This field is enabled only if you have set the payment action to Record. This field enables you to indicate that either the Full amount or the Discounted amount is being paid. |
(USF) Reference Voucher and Reference Payment |
Enter the original voucher (reference voucher) in the Reference Voucher field and the schedule payment number of the canceled payment in the Reference Payment field. This creates a relationship between the source voucher and the reference voucher for reclassification purposes. These fields are available only if you have enabled federal payments on the Installation Options - Payables page. |
Payment Date |
The default is today's date. You can change it to reflect the date of the manual payment. |
Reference |
Enter a reference number when recording a manual payment. |
Applied Voucher |
Displays the voucher ID of the prepaid voucher to which this regular voucher was applied. This field appears only on regular vouchers that are applied to prepayments. |
Payment Amounts Other Than Gross or Discount
If you want to enter a payment that differs from the gross or discount amounts, you must enter additional payment schedules that add up to one of those amounts. Do this by inserting new rows for the payment and scheduling those payments for a later date.
For example, if the gross amount is 100.00 EUR, and you want to enter a manual payment of 70.00 EUR, you must create two payment schedules for the voucher:
One for 70.00 EUR.
One for 30.00 EUR.
Change the gross amount on the existing payment schedule to 70.00 EUR, and then insert a new payment schedule row and enter a payment of 30.00 EUR to equal the gross amount of the voucher. The system does not allow you to save the manual payment of 70.00 EUR until the voucher balances to either the gross or discount amount.
Vouchers with Payment Terms That Include Rebate Processing
Some suppliers provide a rebate rather than a discount for payments that are made early. You can set up such payment term on the Payment Terms - Single Payment page.
When the Voucher component processes vouchers with rebate terms, it performs the following validations:
Accounting policy must be gross.
Discount due date and scheduled due date must be today's date.
All voucher lines must be set to discount applicable.
Only one scheduled payment per voucher is allowed.
No discount calculation is applied when you save the voucher. Rebate calculation takes place in the payment selection step of the Pay Cycle process.
Use the Holiday/Currency Options page (PAY_OPT_SEC) to override the default bank holiday processing options and currency options for the payment.
Navigation:
Click the Holiday/Currency Options link on the Voucher - Payments page.
Holiday Processing Options
The system calculates bank holidays using the business calendar.
Field or Control |
Description |
|---|---|
Holiday Options |
Select from the following values: Due After Holiday: The system takes any bank holidays into consideration when it calculates the payment due date and delays payment until after the bank holiday. If you select this value, you can also select the Allow due date in next month check box to enable the payment to be made in the next month. If you don't select this check box, and the payment date after a holiday does fall in the next month, the system schedules the payment before the holiday. For example, you would not select this value if you generally want payments to be made after a holiday but not in the next month when a holiday falls at the end of a month. Due Before Holiday: The system takes any bank holidays into consideration when it calculates the payment due date and makes the payment before the bank holiday. Not Applicable: The system does not take bank holidays into consideration when it calculates the payment due dates. |
Days |
Enter the number of days after or before the holiday that the payment can be made. |
Currency Options
Field or Control |
Description |
|---|---|
Payment Currency |
Select the currency in which the payment is made. |
Rate Type |
Select the rate type for converting the invoice currency to the payment currency. |
Specify Rate |
Select if you want to enter a specific rate for converting the invoice currency to the payment currency in the Exchange Rate field. |
Paid |
If you enter a specific exchange rate, the amount in the payment currency is calculated and reported here. Note: This field is in deferred processing mode and a trip to the server is required to calculate the paid amount. You can invoke a trip to the server by clicking the Refresh button. |
Use the Late Charge Information page (LATE_CHRG_SBP) to override late interest charge information.
Navigation:
Click the Late Charge link on the Voucher - Payments page.
Field or Control |
Description |
|---|---|
Payment Reason Code |
Displays the system-assigned payment reason code; you can override this value after you have paid the voucher. You set up payment reason codes on the Payment Reason Codes page. The system-applied reason code that you attach to the SetID for this business unit on the Payables Definition - Payments page appears as default in this field. |
Late Charge Option |
Select either Compute Charges to have the system calculate late charges, or Not Applicable. You cannot change this value after the voucher has been paid. |
Late Charge Code |
If you choose to compute late charges at the voucher level, set the value here. You cannot change this value after the voucher has been paid. You set up late charge codes on the Late Interest Charges page. |
Late Charge Amount |
Displays the amount of the late charge to be paid. |
Late Charge Denied |
If the system-calculated late charge is below the minimum pay amount (as defined during late charge setup), the system does not pay the late charge. The late charge is denied. The system displays the denied amount in the Late Charge Denied field, and the late charge amount becomes zero. When the late charge is above the minimum pay amount, it appears in the Late Charge Amount field and the Late Charge Denied field becomes zero. |
Use the Draft Maturity Dates page (APD_MATURIT_DT_SEC) to specify draft settings for a draft payment method.
Navigation:
Click the Drafts link on the Voucher - Payments page. This link is active only for a draft payment method.
Field or Control |
Description |
|---|---|
Draft Sight |
References the agreed-upon payment terms between you and your supplier. These terms are similar to accounts payable and accounts receivable payment terms, except that they do not use discounts. You maintain your default sight codes at the business unit, voucher origin, and supplier levels of the control hierarchy. The system uses the draft sight code to calculate the maturity date. |
Maturity Date |
When you save a voucher with a payment method of draft, the system calculates the draft maturity date and the scheduled maturity date using the scheduled due date, draft sight code, and bank holiday processing options. You can override the Maturity Date field here, but the schedule due date for the voucher payment must be before or equal to the maturity date. |
Scheduled Maturity Date |
When you save a voucher with a payment method of draft, the system calculates the draft maturity date and the scheduled maturity date using the scheduled due date, draft sight code, and bank holiday processing options. You can override the Scheduled Maturity Date field here, but the schedule due date for the voucher payment must be before or equal to the maturity date. |
Group Code |
Use to group payment schedules manually into one draft. |
Use the Layout page (AP_EFT_LYT_SEC) to enter information to settle a payment through PeopleSoft Financial Gateway or Pay Cycle Manager functionality.
Navigation:
Click the Layout link on the Voucher - Payments page.
To enable editing of the Layout fields, you must first specify a payment method of ACH: Automated Clearing House, BEF: Customer-initiated EFT draft, EFT: Electronic Funds Transfer, GE: Giro EFT, or WIR: Wire report.
Field or Control |
Description |
|---|---|
Layout |
Select an applicable layout code. The system displays codes depending on the bank code, bank account, and payment method that are defined on the Payments page. When you click Save, the system validates layout codes against those defined at the bank account level. |
Settle by |
Displays the settlement method of the selected layout, either Financial Gateway or Pay Cycle Manager. Note: You must select layouts that are settled through Pay Cycle Manager for federal payments and (USA) HIPAA payments. |
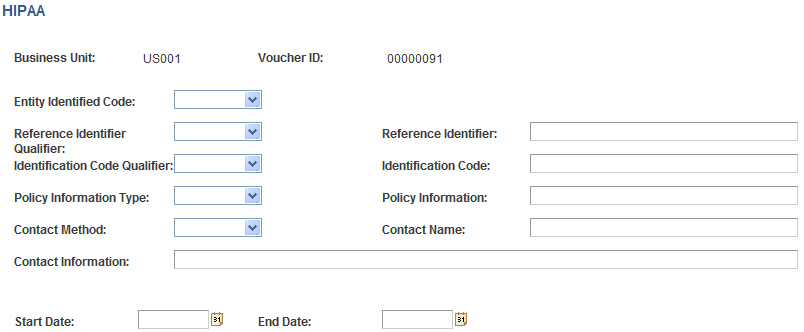
Use the HIPAA page (VCHR_HIPAA_SEC) to (USA) Enter information for Health Insurance Portability and Accountability Act of 1996 (HIPAA) compliance.
The link and page appear only if the payment method for the voucher has an EFT layout of HIPAA.
Navigation:
Click the HIPAA link on the Voucher - Payments page.
This example illustrates the fields and controls on the HIPAA page. You can find definitions for the fields and controls later on this page.
Field or Control |
Description |
|---|---|
Entity Identified Code |
Enter a code to identify the organizational entity, physical location, property, or individual: 3rd Party or Payer. |
Reference Identifier Qualifier and Reference Identifier |
Enter a qualifier against which to indicate that the payment is to be applied —Invoice, Master, or Plan— and a corresponding identifier number from the agency that is authorizing the payment. |
Identification Code Qualifier and Identification Code |
Enter a qualifier to indicate the code structure method of the identification code—D&B (Dun and Bradstreet), D&B + Sfx (Dun and Bradstreet plus 4-character suffix), Insurance, Plan ID, or Tax ID—and enter the corresponding code. |
Policy Information Type and Policy Information |
Enter Account, Contract, Invoice, or Policy to define the policy type, and enter additional information, such as the policy number. |
Contact Method and Contact Name |
Enter the preferred contact method: Email, Fax, or Telephone. Also enter the contact person's name. |
Contact Information |
Enter specific contact information, such as email address. |
Start Date and End Date |
Enter the dates to define the duration of the policy. |
Note: Page Personalization: On the Payments tab, the page personalization option Put this page in front (the current tab) when I come into this component is overridden due to the functional design requirements of the voucher component.