Setting Up Dunning Letter Processing
|
Page Name |
Definition Name |
Usage |
|---|---|---|
|
LETTER_CD_TBL |
Define letter codes for different levels of dunning letters and the default letter text for the code. |
|
|
DUNNING_TBL |
Define dunning IDs and select a dunning method (by level, by days past due, or by action list). |
|
|
DUNNING_LVL_TBL |
Define the levels for the dunning method that you selected on the Dunning ID page. (This page is not available for a dunning by action list method.) |
To set up dunning letter processing, use the Letter Code (LETTER_CD) and the Dunning (DUNNING_TABLES) components.
You define letter codes that specify the text that you want to print on a dunning letter. However, the letter code that you use when you print the letters depends on several other setup factors.
When you define the dunning ID, select a dunning method that determines which items appear in the letters and which letter code to use when you print the letters. You assign the dunning ID to a business unit and override it for individual customers. The AR Dunning Application Engine process (AR_DUNNING) uses the rules for the dunning ID associated with the business unit or customer to generate the dunning letters. This table describes how the method that you select determines which items appear on a letter and which letter code to use for each letter:
|
Method |
Description |
|---|---|
|
Dunning by Action List |
Letters are based on the action template assigned to collection and assessment rules. The Condition Monitor Application Engine process (AR_CNDMON) generates dunning letter actions with a specific letter code based on these rules. The collection and assessment rules determine whether items are eligible for dunning letters based on their amounts past due and the number of days past due. If you assign a dunning ID to a business unit or customer that uses the action list method, the AR Dunning process always uses the letter code that you specify in the action template. Note: If you assign a dunning ID to a business unit or customer that contains one of the other methods, the AR Dunning process uses the letter codes specified for the dunning ID and determines whether to use the highest or lowest level based on the parameters in the run control definition. |
|
Dunning by Level |
Letters are based on sequential levels (and intervals between levels), instead of the age of past due items. Each item passes through each dunning level, without skipping any levels, during each qualified letter extract process. The AR Dunning process determines whether any items are past due. If there are past due items, the process determines the level of the last dunning letter sent. The process also determines if the interval has elapsed for the waiting period between the levels. If the criteria are met, the process increments the level to the next level and sends the letter associated with the level in the dunning ID. Note: When you set up Dunning Levels, set up the Level 01 interval equal to zero to indicate to the Dunning process that no interval must elapse to advance to the next level based on the first time you run the Dunning process using the Dunning by Level method. |
|
Dunning by Days |
Letters are based on the number of days past due. A letter to each customer can contain past due items that fall into different levels based on the days past due. With this method, the items can skip levels between two sequential dunning letters. The process sends the letter associated with the level in the dunning ID. |
If you use dunning by level or dunning by days, you associate each letter code with a dunning level and assign the letter code with the least severe text to the lowest dunning level and the letter code with the most severe text to the highest dunning level. When you run the AR Dunning process, you choose to use either the highest or lowest dunning level. For example, if you have items that fall into the defined bracket for levels two and three and you select to use the lowest dunning level for a letter that includes all past due items, then the process prints the text from the letter code that you assigned to the second dunning level.
Besides the dunning method, the dunning ID determines when items are excluded from a letter—such as deduction or disputed items—and whether the letter is generated.
Use the Letter Code page (LETTER_CD_TBL) to define letter codes for different levels of dunning letters and the default letter text for the code.
Navigation:
Each letter code should be unique. You should create a letter code for each text variation and not use the same letter code that you used for other letters.
To print a separate letter for outstanding items in each age range, create a separate letter template for each letter code.
Field or Control |
Description |
|---|---|
Letter Code Type |
Select Dunning Letter. |
Dunning Letter Text |
Enter the text of the dunning letter. The text should be appropriate for the dunning level (first, second, and so on). The text appears before the list of open items on the dunning letter, unless you change the format of the letter in BI Publisher. |
If you do not use the delivered letter codes provided, then you must change the BI Publisher template that formats the letter.
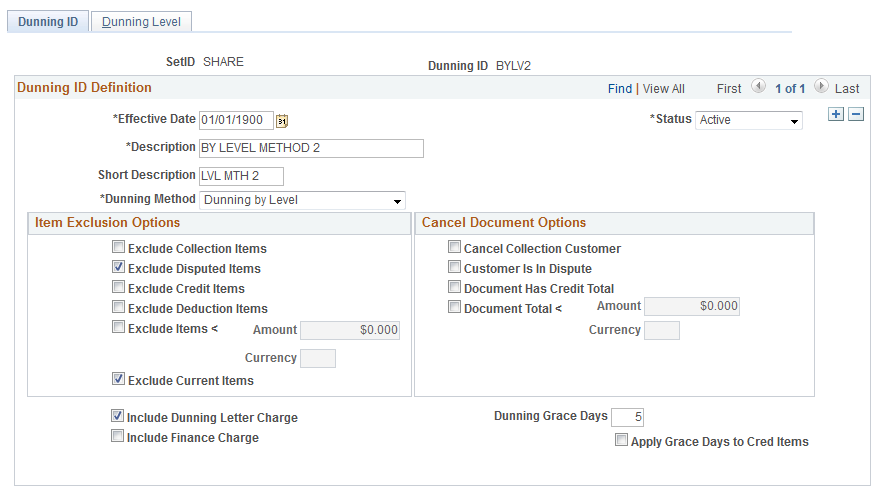
Use the Dunning ID page (DUNNING_TBL) to define dunning IDs and select a dunning method (by level, by days past due, or by action list).
Navigation:
This example illustrates the fields and controls on the Dunning ID page. You can find definitions for the fields and controls later on this page.
Field or Control |
Description |
|---|---|
Dunning Method |
Select the dunning method. Values are: Dunning by Action List: Based on the rules defined in an action template that the Condition Monitor process uses. If you select this value, the Dunning Level page is not available to define dunning levels. Dunning by Days: Based on a range of the number of days past due, such as 1 to 60 days, 61 to 90 days, and 91 to 9999 days. Dunning by Level: Based on a sequence with a number of days between letters. Note: The Condition Monitor process runs dunning letters when it completes. Always use dunning by action list if you use the Condition Monitor process for collection activities, unless the government requires you to use dunning by level. The Condition Monitor process uses the action templates that you set up to determine the rules for generating the dunning letters instead of the dunning method. |
Exclude Collection Items, Exclude Disputed Item, and Exclude Deduction Items |
Select to prevent items from appearing on dunning letters if they are deductions or marked for collection or dispute on the View/Update Item Details - Detail 1 page. |
Exclude Credit Items |
Select to prevent credit memos, on-account payments, and prepayments from appearing in dunning letters. |
Exclude Items < (exclude items less than) |
Select a monetary limit to prevent items from appearing in dunning letters if the items are under a certain amount. The system uses the rate type for the item to convert the amount that you enter to the item currency for comparison. |
Exclude Current Items |
Select this option to exclude current items and only process past due items. If you do not select this option, both current items and past due items are processed. This option is only available when the Dunning Method is Dunning by Days or Dunning by Level. |
Cancel Collection Customer and Customer Is In Dispute |
Select to prevent the system from generating dunning letters for customers who are marked for collection or dispute on the Credit Profile page. |
Document Has Credit Total |
Select to skip dunning letters with a negative total balance amount. |
Document Total < (document total less than) |
Select and enter a monetary limit to prevent the system from generating dunning letters when the total of items in the letter is less than a specified amount at the correspondence customer level. For example, you might cancel a letter if a customer with a small debit balance belongs to the same correspondence customer as a customer with a larger credit balance. The system uses the rate type for the correspondence customer to convert amounts for comparison purposes. |
Include Dunning Letter Charge |
Select to apply a fixed charge for each letter generated. The charge can be different for each dunning level. |
Include Finance Charge |
Select to impose an overdue charge for past due items in the dunning letter. |
Dunning Grace Days |
Enter the number of extra days to allow for postal service when running the AR Dunning process. Grace days is applicable only if Exclude Current Items is selected. |
Apply Grace Days to Credit Items |
Excludes credit items from the dunning letter when Credit Item Due Date + Dunning Grace Days > As Of Date. This is the system default. Credit items are any items with an item balance amount less than zero, such as on-accounts, prepayments, or credit memos. Deselect this check box so that the system will not apply Dunning Grace Days criteria to any credit items. You must also select the Include in Dunning check box on the credit item's Entry Type page (Set Up Financials/Supply Chain, Product Related, Receivables, Options, Entry Type, Entry Type) to add credit items to dunning letters. The dunning level for credit items is empty, or blank, in dunning reports. |
Use the Dunning Level page (DUNNING_LVL_TBL) to define the levels for the dunning method that you selected on the Dunning ID page.
(This page is not available for a dunning by action list method.)
Navigation:
This example illustrates the fields and controls on the Dunning Level page. You can find definitions for the fields and controls later on this page.
The fields that appear on this page depend on the method that you selected and on whether you selected the Include Dunning Letter Charge check box on the Dunning ID page.
Field or Control |
Description |
|---|---|
Level |
Assign a dunning level. Note: When you set up Dunning Levels, set up the Level 01 interval equal to zero to indicate to the Dunning process that no interval must elapse to advance to the next level based on the first time you run the Dunning process using the Dunning by Level method. For example: Row 1: Level = 01, Interval = 0, Letter Code = 1 Row 2: Level = 02, Interval = 27, Letter Code = 1 (or 2 or 3) |
Sequence |
Assign a sequence number to a level. |
Start Day, End Day, or Interval |
For a dunning method by days, select a start and end day for each level. The first start day for the first level must be 1, and the last end day for the last level must be 9999. For a dunning method by levels, indicate the number of days between levels. |
Letter Code |
Enter the letter code corresponding to the text that you want to send to customers whose outstanding items fall within the category. If you run the Dunning Letters - All Levels (ARX33000) report, the system uses the dunning level for either the oldest or newest item, based on your selection on the Dunning Letters Parameters page. |
Letter Charge |
Specify the charge for each letter that you send. This field is available only if you selected the Include Dunning Letter Charge check box on the Dunning ID page (Set Up Financials/Supply Chain, Product Related, Receivables, Credit/Collections, Dunning Methods, Dunning ID). |
You can create your own dunning letters and configure them to match the different credit approaches that you take with your customers or to change the letter layout. If you use the All Levels Dunning Letter (ARX33000 or ARX33A00) report that includes all past due items regardless of their age, you use the Letter Code page to configure the text for each dunning level. Specify whether or not to use the letter code assigned to the highest or lowest level when you run the AR Dunning process.
To print a separate letter for past due items in each age range associated with dunning levels, use the Level 1 Dunning Letter (ARX33001 or ARX33A01), Level 2 Dunning Letter (ARX33002 or ARX33A02), and Level 3 Dunning Letter (ARX33003 or ARX33A03) reports. The system uses the text for the letter code assigned to the appropriate dunning level. For example, if all items fall in the age range for dunning level one, use the Dunning Level 1 letter. If you have more than three dunning levels and letter codes, you must create your own dunning letters for each additional letter code and dunning level combination.
Note: (NLD) Use the ARX33A00, ARX33A01, ARX33A02, and ARX33A03 reports only if you have enabled business units to print the acceptgiro data on dunning letters.
See (NLD) Understanding Acceptgiro Form Printing.
When creating new dunning letters, Oracle recommends that you copy an existing dunning letter and save it using the naming conventions established for existing files. All the delivered files begin with AR. Oracle suggests using ARU to differentiate files that are user-created or -modified.
This section discusses how to:
Modify and create queries.
Add fields to dunning letters.
Create additional letter layouts.
Modifying and Creating Queries
If you do not use the delivered letter codes, you must modify the WHERE clause of the query to reflect the new letter codes in PeopleTools. This procedure can also be used to add fields to dunning letters or to create new queries by copying, renaming the files, then modifying the new file.
To modify the WHERE clause of a query:
Select
In the Search By field, enter the AR33001 or the report ID for the appropriate letter that you want to change and click Search.
Click the Edit button and then select the Criteria tab.
The Criteria page displays the fields in the query.
Click the Edit button for the criteria that you want to change.
The Edit Criteria Properties page appears.
Change the Expression 2 fields, as needed. For example, to use letter code 8 instead of 1, enter 8 in the Constant field for Expression 2.
Click OK and then select the appropriate option at the bottom of the Criteria page.
Click Save to save the query with the exact name and the same criteria as the original query.
Click the Save As link to save the query with a different name; the original query does not change.
Click the New Query link to create a new query; any changes to the existing query are lost.
After you save the query, click Run to run the query.
Adding Fields to Dunning Letters
Suppose that one of the sample dunning letters comes close to suiting your needs, but you want to display one or two additional database fields on the letter. To do so, you must change the AR Dunning Application Engine extract (AR_DUNNING), the query, and the BI Publisher template.
Editing BI Publisher reports is covered in detail in PeopleTools: BI Publisher for PeopleSoft.
See PeopleTools: BI Publisher for PeopleSoft, "Creating Report Templates" and "Defining Report Definitions."
Creating Additional Letter Layouts
If you have more than three letter codes and you generate dunning letters that include items in a single dunning level, you must create additional letter templates using BI Publisher.
Creating BI Publisher report templates is covered in detail in PeopleTools: BI Publisher for PeopleSoft.
See PeopleTools: BI Publisher for PeopleSoft, "Creating Report Templates" and "Defining Report Definitions."