Setting Up Run Controls for Receivables Update
|
Page Name |
Definition Name |
Usage |
|---|---|---|
|
POSTING_REQUEST |
Enter run parameters for the Receivables Update process for specified business units and run the process. |
|
|
POSTING_OPTIONS |
Select optional processes to run and specify an accounting entry definition for the Journal Generator process and an entry events definition for the Entry Events Generator process. These options apply to all business units processed by the run control. |
|
|
Application Engine Request Page |
AE_REQUEST |
Modify the steps for a run control ID for AR_POST# and AR_PGG#. See Modifying Steps for AR_POST and Modifying Steps for AR_PGG. |
The Receivables Update process processes all groups for all business units specified on the Receivables Update request. Depending on your installation size and the volume that you process, you may want to use a different method known as chunking. Chunking enables you to process large sets of data more efficiently by breaking them into subsets or smaller units of work. You can chunk by business unit, by group type, by both of these, or by group.
To use chunking when you run the Receivables Update process or set up batch priority run parameters:
Create a run control ID for the Receivables Update multiprocess job on the Receivable Update Request page.
Modify the Application Engine steps for the run control ID for each AR_POST# process on the Application Engine Request page.
For example, if you have three partitions, you define the parameters for AR_POST1, AR_POST2, and AR_POST3.
Modify the Application Engine steps for the run control ID for each AR_PGG# process on the Application Engine Request page.
For example, if you have three partitions, you define the parameters for AR_PGG1, AR_PGG2, and AR_PGG3.
In most cases, you probably will run the Receivables Update process by using a scheduled job.
When you create a run control request for the Receivables Update process, you can also specify that you want to run the Entry Events Generator and the Journal Generator processes.
See the product documentation for PeopleTools: Process Scheduler for more information.
Use the Receivable Update Request page (POSTING_REQUEST) to enter run parameters for the Receivables Update process for specified business units and run the process.
Navigation:
This example illustrates the fields and controls on the Receivable Update Request page. You can find definitions for the fields and controls later on this page.

Field or Control |
Description |
|---|---|
|
Post All Business Units |
Select this check box to process all business units that have transactions to post. When you select this check box and save, the page updates to include all the business units with transactions to post. The page automatically adds new rows for each business unit. The accounting from/to dates update to 01/01/1900 and the current date, respectively. In addition, all transaction types are selected. Note: If you select this check box and save, existing run control values are deleted. |
Group Unit |
Enter the business unit of the group that you want to post. |
High Balance Basis Date |
Select the date to use when calculating the customer history ID of HI_BAL_AMT. Options are: Run Date: By default, the Receivables Update process uses the run date. Calc Date (calculation date): Select if you want HI_BAL_AMT to be calculated as of the calculation date. The Receivables Update process then uses the calendar ID on the Receivables Options - Options 1 page to determine the calculation date. |
Accounting Date From and Accounting Date To |
When the system scans the database, it looks at the group accounting date for each group that is set to post to determine whether it falls in the date range that you specify here. If the effective date on the General Info page for a customer is outside the range of the accounting dates, the system does not select pending items to be posted for a customer. |
Transaction Types |
Select All to include all transaction types in Receivables Update processing. The default setting is to process all transactions. You can also select one or more transaction types from these options:
|
User Defined |
Select to update the history elements that you established on the User Defined History page. For example, if you use the user-defined history of SALES, sales history is calculated for the year and period defined by the accounting date of the activity. |
Payment Performance |
Select to update the system-defined history IDs for average days late, weighted average days late, weighted average terms, and weighted average days paid. |
DSO (days sales outstanding) |
Select to update both DSO30 and DSO90. SALES history is also included because DSO calculations use the sales figures updated as part of user-defined history. If you run DSO without calculating SALES history, no sales figures will be available. |
Calculation Year and Period |
If you select DSO, these fields appear. You can change the settings on the Receivables Options - Options 1 page. |
SubCustomer |
If you select DSO, this field appears if you selected either Use Both or Use 1st in the SubCustomer Usage field on the Installation Options - Overall page. This option updates history at subcustomer levels for all customers in the business unit who have subcustomer history enabled. |
Note: If you do not want to use DSO30 or DSO90, use the System-Defined History page to make these customer history IDs inactive.
The run control ID that you used to access this page is linked to your user ID. When you add a Receivables Update request, the system creates an Application Engine request for you with the same user ID and run control ID combination, specifying AR_PGG1 and AR_POST1 as the processes. If you want to add options to other parallel processes, you must add them separately.
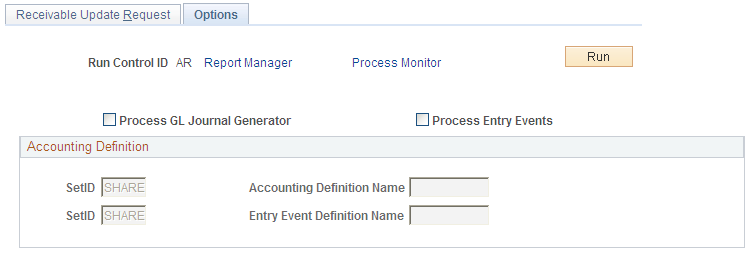
Use the Request Receivables Update - Options page (POSTING_OPTIONS) to select optional processes to run and specify an accounting entry definition for the Journal Generator process and an entry events definition for the Entry Events Generator process.
These options apply to all business units processed by the run control.
Navigation:
This example illustrates the fields and controls on the Request Receivables Update - Options page. You can find definitions for the fields and controls later on this page.
Field or Control |
Description |
|---|---|
Process GL Journal Generator |
Select to run the Journal Generator process, which generates the journals for the general ledger when the Receivables Update process finishes. If errors occurred in the accounting entries, the process will not process the entries. |
Process Entry Events |
Select to run the Entry Events Generator process as part of the Receivables Update process. This field is available only if you selected entry events during installation. |
SetID and Accounting Definition Name |
Select the accounting entry definition that the system should use when it creates the journal header and lines, such as ARDEFN. These fields are available only if you selected the Process GL Journal Generator field. |
SetID and Entry Event Definition Name |
Select the entry event process definition for the system to use when it creates supplemental accounting lines, such as ARUPDATE. These fields are available only if you selected the Process Entry Events field. |
Use the Application Engine Request page (AE_REQUEST) to modify the steps for a run control ID for AR_POST#.
Navigation:
This example illustrates modifying run parameters for the AR_POST1 process on the Application Engine Request page.
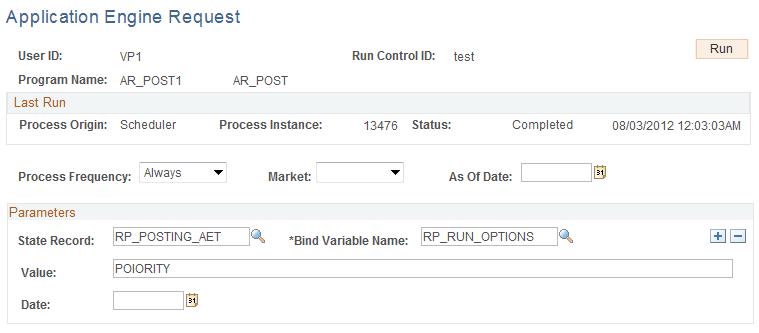
Enter the name of the appropriate AR_POST# program, such as AR_POST1.
Use the State Record, Bind Variable Name, and Value fields to define exactly what data to post. This enables you to process smaller units of data. Add as many rows as needed.
Setting PRIORITY Parameters
Enter PRIORITY in the Value field to give priority to groups whose posting action is Batch Priority. PRIORITY is designed to run on a recurrence definition that directs the system to run periodically throughout the day to pick up only new priority groups. You define recurrence definitions by using the Process Scheduler when you indicate how often to run the Receivables Update process (for example, hourly, or daily).
The following table describes PRIORITY and provides sample field values.
|
Description |
Sample Field Values |
|---|---|
|
Run PRIORITY as needed. Suppose that you have 10 business units and 5 different run control IDs, each specifying different combinations of business units by user ID. During the day, you want to post groups set to PRIORITY for any of the 10 business units. To do this, add a Receivables Update request with a new run control ID (for example, URGENT) that specifies all 10 business units. Add the PRIORITY run option as a parameter on the Application Engine request for the run control ID you created by adding an additional line. |
Program name: AR_POST#, such as AR_POST1 State record: RP_POSTING_AET Bind variable name: RP_RUN_OPTIONS Value: PRIORITY Note: After you enter the run parameters, assign the Receivables Update request to a Process Scheduler job with a scheduled run recurrence that runs every hour (for example, HOURLY). By selecting the hourly recurrence and initiating this job, direct the system to process all PRIORITY groups each hour for each of the specified business units. You can set up multiple PRIORITY server jobs to run at different intervals, processing a few business units in each job or processing only certain group types. |
Note: You do not need to set up an RP_RUN_OPTIONS for a Batch Standard run control. With standard processing, the system processes groups with either a Batch Priority or Batch Standard posting action. A standard scheduled job processes any priority groups that have not been processed since the last scheduled PRIORITY run.
Narrowing the Scope of Receivables Update
This table shows how you can narrow the scope of what the process posts.
|
Description |
Sample Field Values |
|---|---|
|
Post one group to a specific business unit. |
First row: State record: RP_POSTING_AET Bind variable name: GROUP_ID Value: (appropriate value) Second row: State record: RP_POSTING_AET Bind variable name: GROUP_BU Value: (business unit) |
|
Post one business unit to see all activity for a particular business unit. |
State record: RP_POSTING_AET Bind variable name: GROUP_BU Value: (appropriate value, such as US001) |
|
Post one group type, such as billing groups. |
State record: RP_POSTING_AET Bind variable name: GROUP_TYPE Value: (appropriate value, such as B for Billing) |
|
Post groups assigned to one user. Use this option if you run Receivables Update once a day, but you do not want to wait for the scheduled run. |
State record: RP_POSTING_AET Bind variable name: RP_USE_OPRID Value: (user ID, such as VP1) Note: Add more rows to further narrow the scope. For example, you could add a row with a bind variable name for a GROUP_BU with a value of a specific business unit. Or add a row with a bind variable name for a GROUP_TYPE with a value of P (for Payment). |
|
Combine processing options. For example, see only those payment groups in business unit US001. |
First row: State record: RP_POSTING_AET Bind variable name: GROUP_TYPE Value: (appropriate value, such as P for Payment) Second row: State record: RP_POSTING_AET Bind variable name: GROUP_BU Value: (business unit, such as US001) |
Using Chunking in Receivables Update
Chunking enables you to process large sets of data more efficiently by breaking them into subsets or smaller units of work. You can chunk by business unit, by group type, by both of these, or by group. This table shows examples of how to enter chunking parameters.
|
Description |
Sample Field Values |
|---|---|
|
Post one business unit at a time. |
State record: RP_POSTING_AET Bind variable name: RP_CHUNK_BY Value: BU |
|
Post one group type at a time across all business units requested. |
State record: RP_POSTING_AET Bind variable name: RP_CHUNK_BY Value: TYPE |
|
Post one group type at a time, one business unit at a time. |
State record: RP_POSTING_AET Bind variable name: RP_CHUNK_BY Value: BU_AND_TYPE |
|
Post each group, one at a time. |
State record: RP_POSTING_AET Bind variable name: RP_CHUNK_BY Value: GROUP |
See the documentation on managing Application Engine programs in PeopleTools: Application Engine.
Use the Application Engine Request page (AE_REQUEST) to modify the steps for a run control ID for AR_PGG#.
Navigation:
This example illustrates run parameters for AR_PGG1 on the Application Engine Request page.
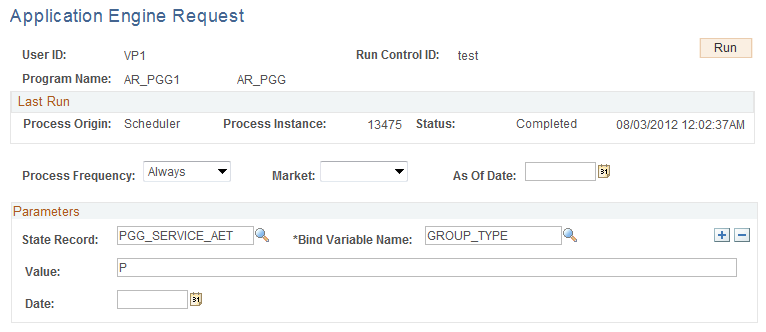
Enter the name of the appropriate AR_PGG# program, such as AR_PGG1.
You use the State Record, Bind Variable Name, and Value fields to define exactly what data to process. Add as many rows as needed.
This table shows how you can narrow the scope of what the process posts.
|
Description |
Sample Field Values |
|---|---|
|
To generate accounting entries for only group type P. |
State record: PGG_SERVICE_AET Bind variable name: GROUP_TYPE Value: P |
|
Add a parameter to specify the chunking method. You are limited to chunking by one field only, but you are not limited to specific values. |
State record: PGG_SERVICE_AET Bind variable name: AE_CHUNK_BY Value:
|