Setting Up Cross-Application Installation Options
Use the Installation Options component (INSTALLATION) to set up cross-application installation options.
|
Page Name |
Definition Name |
Usage |
|---|---|---|
|
Installation Options Page |
INST_LINKS |
Access the general options and the product options. |
|
INSTALLATION_FS |
Select the PeopleSoft products that you have licensed. |
|
|
INSTALLATION_FS1 |
Configure installation information and indicate how you want to use cross-application features. |
|
|
SDN_SRCH_OPT_SEC |
Define financial validation options for PeopleSoft Treasury, Payables, eSettlements, and Order Management. |
|
|
DB_ACCOUNT_SEC |
Enter logon IDs and passwords by SetID for each Dun and Bradstreet account. |
|
|
ALT_CHAR_PNL |
Select the alternate characters that the system uses for a specific language code. |
|
|
OPER_DEF_TABLE_DC |
Set Documentum installation options. |
|
|
INSTALLATION_FD |
Enable SAM processing for suppliers or customers. |
|
|
INSTALLATION_EE |
Enable the use of entry events in General Ledger, Payables, Purchase Orders, Receivables, and Billing, as well as upward and downward adjustments to commitment control budgets. |
|
|
INSTALLATION_KK |
Enter various commitment control installation options for default budget date, reversal date, budget period liquidation, funding source, and online budget checking. |
|
|
INSTALLATION_CU |
Define overall customer hierarchy default options. |
|
|
INSTALLATION_ATTCH |
Define maximum attachment upload limit for various products. |
Use the Installation Options - Products page (INSTALLATION_FS) to select the PeopleSoft products that you have licensed.
Navigation:
This example illustrates the fields and controls on the Installation Options - Products page.
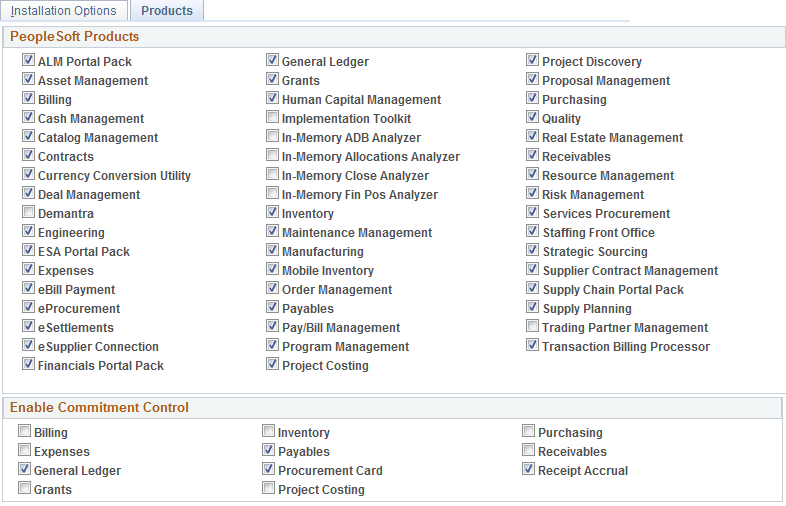
Deselect the check boxes for all products that you have not licensed. Select the check boxes for the products that you have licensed and need to enable in your database.
All PeopleSoft products are delivered with the purchased and licensed products. Deselect the check boxes for all products that you have not licensed. Select the check boxes for the products that you have licensed and enabled in your database.
Unless you deselect the unlicensed products, you are likely to encounter performance issues or other processing problems when unnecessary processes or database activity is triggered that is related to the unlicensed products.
For example, unlicensed products for which the check boxes remain selected can cause unnecessary processing due to ChartFields that are specifically related to the unlicensed products. If you have not licensed any of these products—Project Costing, Expenses, Resource Management—you will see these ChartFields: PC Business Unit, Activity, Source Type, Category, or Subcategory on pages. Deselect the check boxes for these three products on the Installation Options - Products page, and then run ChartField configuration to inactivate the ChartFields (as they are specific to these three products).
Field or Control |
Description |
|---|---|
PeopleSoft Products |
All PeopleSoft products are delivered to your database and are automatically selected by the system. Deselect all those you have not licensed. Note: Applications that you might not have licensed are delivered to your database with the purchase of your PeopleSoft applications and as delivered, all these applications are selected on this page and considered active by the system. Unless you deselect the unlicensed products, you are likely to encounter performance issues or processing problems when unnecessary processes or database activity is triggered that is related to the unlicensed products. For example, unlicensed products will cause unnecessary ChartField configuration activities related to the unlicensed products. |
Enable Commitment Control |
Click the check box for each PeopleSoft product, or application, for which you want to enable Commitment Control. You can enable or disable Commitment Control for each of these products at any time, but disabling Commitment Control for an application during a budget period may corrupt the consistency and integrity of your data. Many applications have dependencies with other applications that require you to maintain integration points between those applications for valid budget checking and notification. Do not enable or disable Commitment Control for an application unless you know precisely what effect your action will have on other applications. Note: Also, if you have not licensed Project Costing but have licensed Expenses or Resource Management and you still see Source Type, Category, or Subcategory on pages, deselect the check boxes for the unlicensed products on the Installation Options - Products page and use ChartField configuration to inactivate these ChartFields because they are specific to Project Costing. Other areas where you can encounter problems if unlicensed product check boxes are not deselected include on demand processing, and defining Ledgers for A Unit and ledger templates. Enable or disable Commitment Control processing for listed applications. |
Use the Installation Options - Overall page (INSTALLATION_FS1) to configure installation information and indicate how you want to use cross-application features.
Navigation:
This example illustrates the fields and controls on the Installation Options - Overall page (1 of 2).
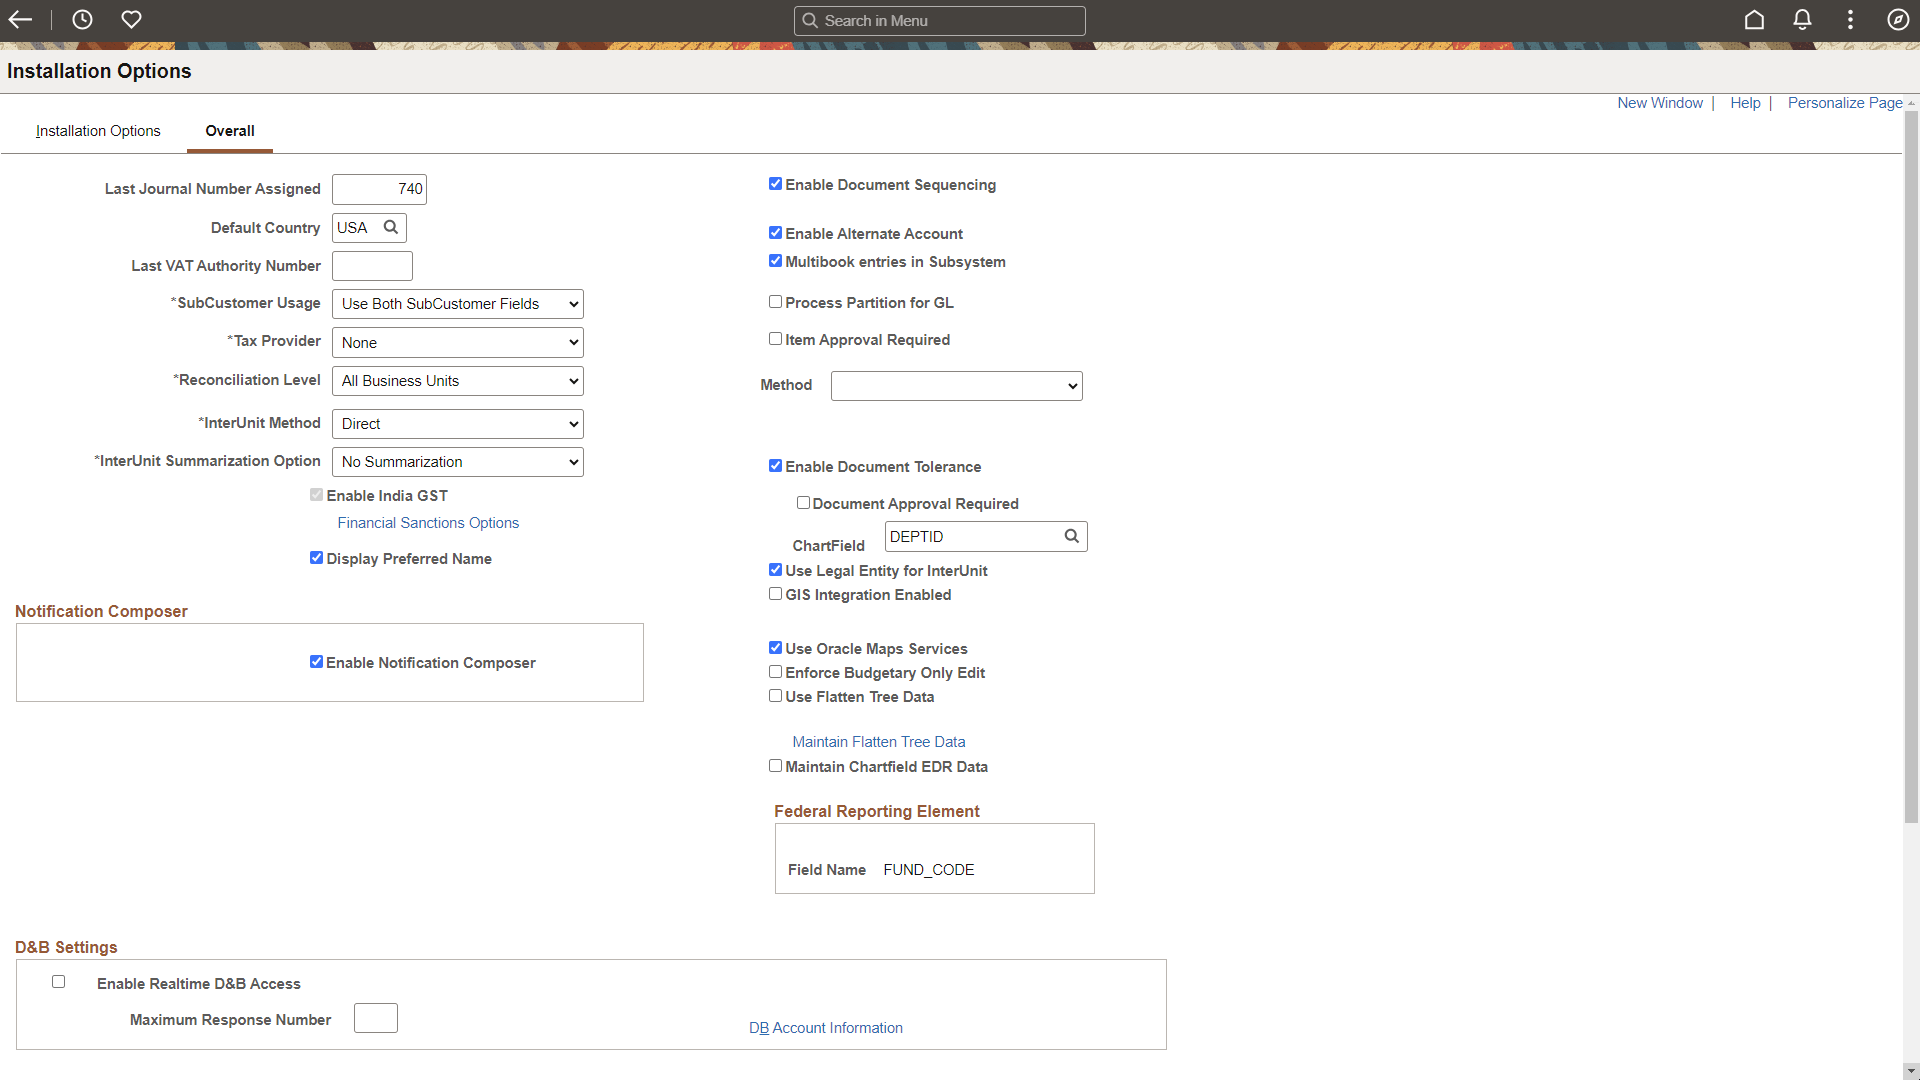
This example illustrates the fields and controls on the Installation Options - Overall page (2 of 2).

Field or Control |
Description |
|---|---|
Last Journal Number Assigned |
Displays a number that represents where to begin numbering journals. You can change the numbering for your journals so that the next journal number assigned is one number greater than the journal number that appears in this field. All journals increment sequentially from the first journal created. |
Default Country |
Select a country to appear by default on your pages. You can override the default on the actual pages. |
Last VAT Authority Number (last value-added tax authority number) |
Enter the last value-added tax (VAT) authority number used for the system to automatically start assigning when you create new VAT authority numbers. You can edit this field only if the VAT authority number changes. When you use the Express VAT Code function, the system automatically creates a VAT authority number at the time that you create a VAT code. You then assign one or more tax authorities to a VAT code, to define the VAT rate applicable for that VAT code. |
SubCustomer Usage |
History, aging, events, and some profiles are available for subdivisions within customers if you enable subcustomer levels in your system. Select whether you want to use the first SubCustomer field, both SubCustomer fields, or no SubCustomer fields. These fields appear on any pages where a customer that has subcustomers appears. |
Tax Provider |
Select None, Taxware, or Vertex as the type of tax provider software that you use. This option determines what fields appear on PeopleSoft application pages that have implications for sales and use tax. Before selecting a third-party tax application, the application should be installed and configured to communicate with the PeopleSoft system. Note: When you change tax providers, a process will run to update the geocodes and business unit tax settings. You can view the status of this process on the Tax Provider Installation page. Geocodes will be deselected when changing the tax provider to None. No taxes can be computed through a third-party solution until the process has finished. Transactions for business units set to use the PeopleSoft tax tables will not be affected by the change. |
Tax Provider Setup |
The Tax Provider Setup link appears when you choose a third-party from the Tax Vendor list. Click the link to complete setup for the chosen tax vendor solution. |
Reconciliation Level |
Identify the type of business unit-level security to use for the bank reconciliation process. Select All BUs if you want the reconciliation process to include all business units set up in the system. Select Single BU if you want reconciliation to adhere to the business unit security that you have already defined. When you select Single BU, the run parameters for the Auto Reconciliation process requires you to select the business unit that you want to perform reconciliation. The list displays the business units that the user is allowed to access. |
InterUnit Method |
Select one of the due-to and due-from balancing methods for InterUnit transactions from the following values. Direct: The due-to and due-from ChartFields used to balance each entity in the transaction are retrieved from the Inter/IntraUnit template definition of the entity. Indirect: The due-to and due-from ChartFields used to balance each entity in the transaction are retrieved from the Inter/IntraUnit template definition of the affiliate entity. Pairs: The due-to and due-from ChartFields used to balance each entity in the transaction are retrieved from a definition for the pair of entities, or business units, involved in the transaction. Pairs are defined on the InterUnit Pair Maintenance page. |
InterUnit Summarization Option |
Select one of the following options. Note: The InterUnit Summarization Option is not available to users of Sybase because of technical limitation of that database.
|
Enable India GST |
Select this check box to enable India GST. Note: Selection of this check box is a one-time setup. Once selected, you cannot deselect this check box or disable India GST. |
Financial Sanctions Options |
Click to access the Financial Sanctions Options page, where you can set up financial sanctions validation. |
|
Display Preferred Name |
Select to indicate that you want to display the employee or resource preferred name in PeopleSoft FSCM. When you select this check box for the first time and save the page, the system provides a message that the RS_PREF_NAME application engine process has been scheduled to update the personal data record (PERSONAL_DATA). After the process completes, most pages in PeopleSoft Financials show the employee or resource Display Name. When you deselect this check box and save the page, the updates are reversed. For additional information about this option and the pages used to view and edit preferred name, see the section below, Displaying Preferred Name. |
|
Enable Notification Composer |
Select to use the Notification Composer Framework in Enterprise Components. See Understanding Notification Composer. |
Enable Document Sequencing |
Select to use document sequencing for the overall installation. |
Enable Alternate Account |
Select to enable alternate account processing. Alternate account produces journal-line and transaction-level balances for statutory reporting requirements. The primary account field contains the corporate accounts, and an alternate account contains the statutory accounts. You define mapping options for each alternate account or the system accesses by default the suspense account defined on the Ledger For a Unit page. It is not necessary to install General Ledger to use alternate accounts in other applications. |
Create MultiBook Accounting Entries in Subsystems |
Select to enable the system to create multibook accounting entries on an auxiliary page in the subsystems. General Ledger must be installed for this option to be available. |
Process Partition for GL |
Select to improve processing performance. You must have performed the procedures necessary to enable multiple General Ledger Post processes to run concurrently with unique data partitions. This option is available only if you have installed General Ledger. |
Item Approval Required: Method |
Select Manual or Workflow as your approval method. If you select Manual, an authorized user can set the status of individual items on the Item Approval page to Approved or Denied. If you select workflow approval, you must establish item approval as a business process in PeopleSoft Workflow. |
Enable Document Tolerance |
Select to perform document tolerance checking, which is an edit that checks the percentage or monetary amount discrepancy between a requisition and purchase order document or a purchase order and voucher. This tolerance checking is performed at the distribution line level. You define these tolerance thresholds by ChartField value. In the ChartField field, enter the ChartField whose values you use to define document tolerance checking. |
Document Approval Required |
Select to have the Document Tolerance Checking Application Engine process (FS_DOC_TOL) check that the voucher has been approved. If the voucher is not approved, the process issues an exception. If you do not select this option, the process proceeds with the regular validation—whether or not the voucher has been approved—passing vouchers that are within tolerance and generating exceptions for those that are over tolerance. |
ChartField |
Enter the ChartField whose values you use to define document tolerance checking. |
Use Legal Entity for InterUnit |
Select if you want to segregate InterUnit transactions for business units by legal entities, such as corporations, partnerships, and sole proprietors, and if you want to use different InterUnit payables and receivables, depending on whether the transaction is InterEntity or IntraEntity. Deselect this field if the InterUnit method is pairs. |
GIS Integration Enabled (Geographic Information System integration enabled) |
Select to enable the integration of a Geographic Information System (GIS) with PeopleSoft Maintenance Management and PeopleSoft Asset Management. There are specific setup requirements to enable PeopleSoft Maintenance Management and PeopleSoft Asset Management to integrate with ESRI:
See also Location/Comments/Attributes Page. |
Use Oracle Maps Services |
Select this check box when you have licensed the Oracle Maps Cloud Service for PeopleSoft so that applications can use the eLocation service. Note: The Map display functionality shown in FSCM features requires a separate license to Oracle Maps Could Service for PeopleSoft. For more information, see the Licensing Information User Manual (LIUM). |
Enforce Budgetary Only Edit |
Select to enforce the budgetary only edit when you save a transaction. This enables edit of Budgetary Only ChartField values if there are multiple effective-dated values with different Budgetary Only values. Deselect this option if you do not require this edit. This option provides additional editing on transaction pages that are not supported by existing edits on the ChartField page (Set Up Financials/Supply Chain, Common Definitions, Design ChartFields, Define Values, ChartField Values, <ChartField>). Within some transaction pages, the existing prompt table edit restricts users from selecting ChartFields that are budgetary only ChartFields. However, if there are multiple effective dated rows on the ChartField page, then the prompt table edit may not recognize the budgetary only flag. This option provides additional online editing that is needed, in addition to the existing online edits. |
Use Flatten Tree Data |
Select to indicate that General Ledger processes that use PeopleSoft tree data should use flattened tree data if available and current. |
Maintain Flatten Tree Data |
Click this link to access the Tree Flattener Options page where you can select Detail List. Detail List indicates that you want to maintain a detailed list of flattened tree data. This option requires that the user maintain EDR data. The Maintain Chartfield EDR Data check box (below this link) must be selected if the user is maintaining a detailed list of tree data. |
Maintain Chartfield EDR Data |
Select this check box to indicate that ChartField effective date range data is to be maintained by Online ChartField components. |
Federal Reporting Element |
This is a display only field and drives the transaction for federal reporting. The field name is used as a cross reference when reporting federal transactions. |
Enable Realtime D&B Access (enable realtime Dun and Bradstreet access) |
Select to enable users to use the Dun and Bradstreet interface to order and purchase Dun and Bradstreet reports. |
Maximum Response Number |
Enter the maximum number of rows that you want to receive from the Dun and Bradstreet system when you are searching for a Data Universal Numbering System (DUNS) number. |
DB Account Information (Dun and Bradstreet account information) |
Click to access the D & B Account page, where you enter login information for each Dun and Bradstreet account. |
Account Balancing Attributes |
Select the appropriate check box to activate the following account balancing attributes: Balance Sheet Indicator: If you define an account value as balance sheet or off-balance sheet, you must also assign various General Ledger processes, such as Journal Edit, Revaluation, Closing, Position Accounting, and so on, with the appropriate balance sheet or off-balance sheet account to perform the necessary balancing. Book Code: If you use the Book Code feature to further segregate transactions into balancing subsets within the same ledger, it is particularly important that the Book Code ChartField values and the Balance Sheet Indicator values be properly grouped and matched with your account ChartField to ensure proper balancing. You define a combination of a book code and a balance sheet indicator value as an account balancing group. You associate the two with an account as an attribute. You can activate any one of the account balancing attributes. You do not need to activate both if you want to activate only one. The system populates the Default Value field with the default account balancing group value that you set up when you configure your ChartFields. Note: Book Code is only supported by the General Ledger and Asset Management products. You might require a blank Book Code if Asset Management has a mix of asset business units with some using and some not using Book Codes, which need new Account Balancing Groups and interunit templates to use the blank Book Code value. |
Note: When you enable India GST the system disables the earlier sales tax, excise and VAT but retains customs duty as is.
Once enabled, before you transact in the new tax regime, it is mandatory to manually run the data conversion application engine program DCLC25709172 to disable excise rows that exist within PeopleSoft data structures.
Displaying Preferred Name
Some employees may ask to be identified by a preferred name rather than their legal name. The Display Preferred Name check box (Installation Options - Overall Page) allows this capability.
When this check box is selected, the system uses the Display Name to identify an individual and typically includes Preferred Name information. Most PeopleSoft Financial pages show the Display Name and Preferred Name fields. Pages and processes that require the legal name continue to do so. See Personal Data (Edit) Page (Common Definitions) to view an image showing the Display Name and Preferred Name fields used in FSCM.
The Personal Data record is the source of name information and can be updated using an interface with PeopleSoft HCM, or manually using navigations under Common Definitions, Travel and Expenses, Resource Management, Maintenance Management, Grants or a third-party interface.
If your organization uses PeopleSoft HCM, it is recommended that you update employee tables in your human resources system first, and then load the employee data into your PeopleSoft FSCM database using the PERSON_BASIC_SYNC or PERSON_BASIC_FULLSYNC messages. After the synchronization process completes, you may need to add or edit employee profiles in the FSCM database. Employee information is sensitive. Therefore, it is suggested that you carefully authorize access to these pages. Any changes you make in your FSCM database using Personal Data pages may be overwritten in subsequent HCM synchronizations.
Navigations to Update Name: Name information can be viewed and updated from several different navigations in FSCM. Your use of these navigations is largely dependent on the products installed and whether an employee or resource is sourced from and synchronized using PeopleSoft HCM.
|
Controls for Updating Name Information |
||
|---|---|---|
|
Source Page and Navigation |
Employees and Resources Sourced from PeopleSoft HCM |
Employees and Resources Not Sourced from PeopleSoft HCM |
|
Editable |
Editable |
|
|
Editable |
Editable |
|
|
Not Editable |
Editable |
|
|
Not Editable |
Editable |
|
|
Editable |
Editable |
|
Use the Financial Sanctions Options page (SDN_SRCH_OPT_SEC) to define financial validation options for PeopleSoft Treasury, Payables, eSettlements, and Order Management.
Navigation:
Click the Financial Sanctions Options link on the Installation Options - Overall page.
This example illustrates the fields and controls on the Financial Sanctions Options page.
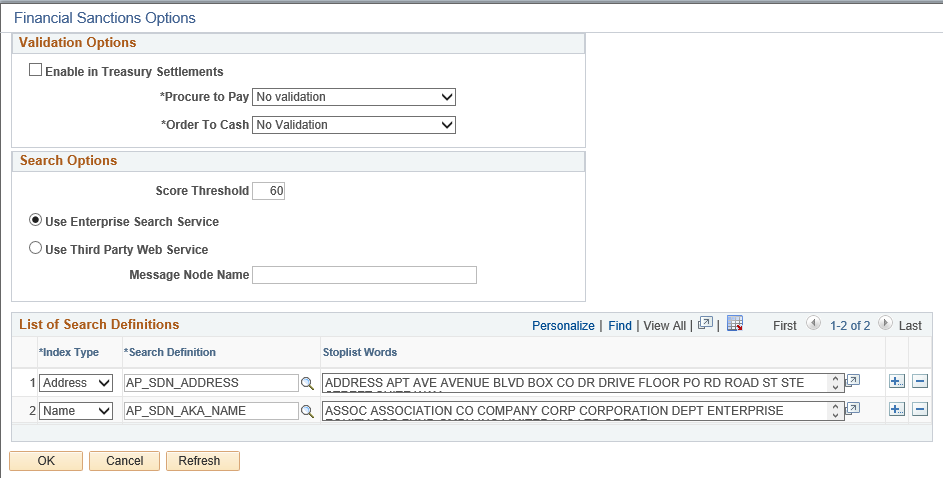
You can validate payees, banks, vendors, and customers against any search index you specify on the Financial Sanctions Options page. Depending upon how you set up the validation options, these applications provide a process for administrators to ensure the match is correct and to prevent any financial transactions from occurring with that individual or entity.
See Understanding the Financial Sanctions Service.
See Understanding Financial Sanctions Validation.
See Validating Financial Sanctions.
Validation Options
Field or Control |
Description |
|---|---|
Enable in Treasury Settlements |
Select to enable financial-sanctions validation in PeopleSoft Cash Management. Selecting this option initiates an SDN payee validation search during a settlement process involving transactions from banks for which the Financial Sanctions Validation check box is selected on the Bank Information page. |
Procure to Pay |
Select one of the following options to enable Financial Sanctions validation of PeopleSoft Payables and eSettlements suppliers. Enabled at Bank: Enables financial sanctions validation of suppliers whose banks are specified as requiring financial sanctions validation on the Bank Information component (COUNTERPARTY_DEFN). Enabled at Installation: Enables financial sanctions validation for all suppliers. No Validation: The system does not perform any financial sanctions validation. |
Order to Cash |
Select an option to enable financial sanctions validation of PeopleSoft Billing, Order Management, and Inventory customers. Options include: Enable at Business Unit: Enables financial sanctions validation of customers whose business units are specified as requiring financial sanctions screening in the Inventory Definition, Order Management Definition, and Billing Definition components (INV_BUSIN_UNIT, BUS_UNIT_TBL_OM and BUS_UNIT_TBL_BI, respectively). Enable at Install: Enables financial sanctions validation for the entire system and all business units. No Validation: The system does not perform any financial sanctions validation. |
Search Options
You perform a search in one of two ways: invoke a search on the financial sanctions data stored in the FSCM database or invoke a search using a third-party web service. A common application package (FS_SDN_SEARCH) provides a search interface for accessing the financial sanctions data stored in the FSCM database or by using a third-party web service.
Field or Control |
Description |
|---|---|
Score Threshold |
Enter a score that the system uses to determine if there is a potential match. The system performs a search on the search definitions created on the financial sanctions data. The score returned by the Search Framework is compared to the score that you enter. If the score returned is greater than, or equal to, the score that you enter, it is considered a potential match. Note: The higher the number you enter, the more accurate the match has to be to the financial sanctions data. The lower the number you enter, the system returns more potential matches. You need to determine what is acceptable for your organization. Warning! To modify the delivered score threshold amount, you must have a thorough understanding of how the PeopleSoft Search Framework search engine functions. You cannot modify this field if you are using OpenSearch as the Search Instance, and the OpenSearch version greater than 2.3. See PeopleTools: PeopleSoft Search Technology |
Use Enterprise Search Service |
Select to access the financial sanctions data stored in the FSCM database. |
Use Third Party Web Service |
Select to use a third-party web service to access financial sanctions data. |
Message Node Name |
Enter the node name for the exchange of XML-formatted, IP messages between PeopleSoft and the third-party web service. You must configure this node to invoke the third-party web service. Also, you must transform the outbound IP request message received by the third-party web service, as well as the inbound IP response message sent from it. See Understanding the Financial Sanctions Service. See Defining Integration Broker Settings for Payments. Note: This PeopleSoft application provides a web service (SDN Search) that accesses the financial sanctions data stored in the FSCM database. The web service is delivered using either Integration Broker or by using a Business Process Execution Language (BPEL) map. Enabling web services is discussed in PeopleTools: Integration Broker in the "Creating Third-Party Integrations Using WSDL" topic. |
List of Search Definitions
The Search Framework search engine performs the search on the financial sanctions data.
Field or Control |
Description |
|---|---|
Search Definition |
Enter a name search definition and an address search definition to use for financial sanctions validation. For the system to identify the most accurate match results, the system searches only the name fields against the name search definition and the address fields against the address search definition. Both the name and address search definitions are required. You must first build the search definitions using the Search Index Admin page in PeopleTools. Note: Oracle's PeopleSoft provides both a name and address search index (AP_SDN_ADDRESS and AP_SDN_AKA_NAME) for the Specially Designated Nationals (SDN) list. |
Stoplist Words |
Enter stop-list words, which control how Financial Sanction validation flags your entities. When validation is run, the system removes any words that match the entries made here. You can edit the existing list of words available for each of the Index types – Address and Name. |
Use the DB Account (Dun and Bradstreet account) page (DB_ACCOUNT_SEC) to enter logon IDs and passwords by SetID for each Dun and Bradstreet account.
Navigation:
Clickk the DB Account Information link on the Installation Options - Overall page.
For each business unit that has a separate billing account to purchase reports through the Dun and Bradstreet interface, enter the SetID. Enter the user ID and password that is used to log on for each SetID.
Use the Alternate Character page (ALT_CHAR_PNL) to select the alternate characters that the system uses for a specific language code.
Navigation:
. Click the Alternate Character link.
PeopleSoft Alternate Character architecture accommodates language phonetic requirements, primarily supporting Japanese Furigana requirements for EFT processing. You can expand its implementation to include other language needs.
Field or Control |
Description |
|---|---|
Language Code |
Select a code to which you can assign an alternate character value from the available options. When you select a code for a user (during security setup) and enable for that user the use of alternate characters, the system allows the user to use only the character set assigned to the user's language code for all fields with an associated Alternate Character field. |
|
When you enable alternate characters for a specific user, this button is activated to the right of all the fields in the system with an associated Alternate Character field. Click the Alternate Character button to enter and display the field value in the Alternate Character set. Alternate character sets are linked with language codes and then selected for use by user ID. Only the character set specified on this page for the specific language code of the user ID is allowed in the Alternate Character field. |

Use the Documentum page (OPER_DEF_TABLE_DC) to set Documentum installation options.
Navigation:
. Click the Documentum link.
You can set several specific document management control options that both enable the document management system and specify system-level configurations.
Note: All fields on this page are case-sensitive.
Field or Control |
Description |
|---|---|
Document Management |
Select if you want to enable the embedded enterprise document management system. Selecting this option activates the Documentum installation options. |
Documentum Docbase Name |
Displays the name of the document database that contains the documents that you access with pages for a specific PeopleSoft product. |
Maximum Documents in Query |
Displays the maximum number of documents that the system retrieves when you run document management system queries within the Documentum-enabled product. This value is the maximum number of documents that the system returns to the Query Result page, not the maximum number of documents that result from the document management system query itself. Note: This setting does not limit the maximum number of documents that can be associated on a page, just the number that are returned by a single query. |
Document Object Type |
Displays the document management system object supertype that you want to use when you access documents within the document database. The object type controls the set of valid attributes of the documents within Documentum. This object type must contain all attributes (fields) that you reference from PeopleSoft Engineering document query pages. |
Use the Federal Processing Options page (INSTALLATION_FD) to enable SAM processing for suppliers or customers.
Navigation:
System for Award Management
Field or Control |
Description |
|---|---|
Enable SAM |
Select to enable SAM processing for the implementation. |
Use NAICS Code Functionality (North American Industry Classification System) |
Select to indicate that your PeopleSoft Payables implementation already has updated NAICS codes, and that the system should use these updated codes for SAM processing on the Standard Industry Codes table (Set Up Financials/Supply Chain, Common Definitions, Customers, Standard Industry Codes). |
Suppliers |
Select to allow users to create suppliers from SAM data. |
Customers |
Select to allow users to create customers from SAM data. |
Use Taxpayer Name for Withholding |
Select to enable the PeopleSoft system to compare the name entered in the SAM Taxpayer Name field with the name entered in the PeopleSoft Supplier information. If a value is entered in the SAM Taxpayer Name field and is different from the value entered in the Supplier Name field on the Identifying Information Page then the Load SAM process updates the Withholding Alternate name field on the Supplier Information - Address Page for all addresses, after truncating the number of characters to forty (40). A message is displayed when the Withholding Alternate Name is updated and when the SAM Taxpayer Name is truncated if the update was performed during the on-line creation of a supplier. The Summary Messages section of the Inquire SAM File Information Page is updated with the changes mentioned above if the update was performed in the Load process. |
Federal Award Data
Field or Control |
Description |
|---|---|
Enable Procurement Fields |
Select to enable the Products and PIID and Parent PIID Display Length fields.
|
Enable Financial Assistance Fields |
Select to enable the Products, FAIN Display Length, and URI Display Length fields. Enter values for each field
|
Use the Entry Event page (INSTALLATION_EE) to enable the use of entry events in General Ledger, Payables, Purchase Orders, Receivables, and Billing, as well as upward and downward adjustments to commitment control budgets.
Navigation:
. Click the Entry Event link.
Field or Control |
Description |
|---|---|
Billing, General Ledger, Payables, Purchasing, Receivables, |
Select one of these options to identify how to use entry events for each product:
Note: Select Required or Optional for General Ledger on the Installation Options - Entry Event page to enable the Project Costing Budget Entry Event Interface Processor (PC_TO_EE) to generate supplemental accounting entries from Project Costing budget transactions. |
Upward/Downward Adjustment |
Select to perform upward and downward adjustments using entry events for commitment control budgets that are identified as having expired year funding in Commitment Control. |
Note: Entry event is not supported by funding source functionality.
Use the Installation Options - Commitment Control page (INSTALLATION_KK) to enter various commitment control installation options for default budget date, reversal date, budget period liquidation, funding source, and online budget checking.
Navigation:
. Click the Commitment Control link.
This example illustrates the fields and controls on the Installation Options - Commitment Control page.
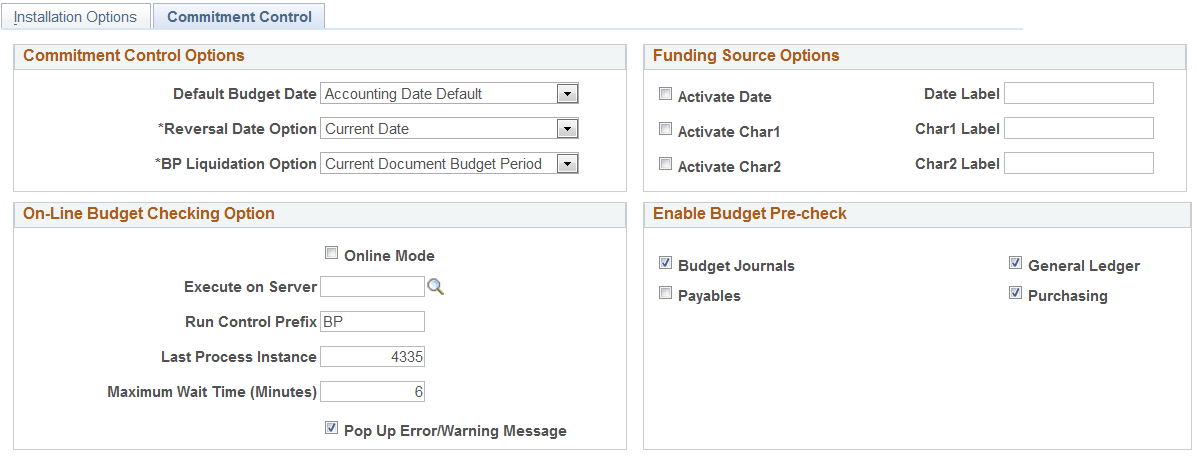
Commitment Control Options
Field or Control |
Description |
|---|---|
Default Budget Date |
Select a budget date default scheme for your requisitions, purchase orders, and vouchers. Values include: Accounting Date Default: Select to provide the document accounting date as the budget date default. Predecessor Doc Date Default: Select to copy the budget date from the predecessor document. |
Reversal Date Option |
Select the date to control reversal (re-budget checking) of documents. Values are: Prior Date: Select this option for the system to back out old entries, using the fiscal year and accounting period as they were originally recorded. For example, a purchase order originally created in period 1 is recorded as an encumbrance entry in period 1. However, if you then change the purchase order in period 2, giving it a new accounting date, the system reverses the purchase out of period 1 and rebooks it to period 2. Current Date: Using the current date option, entries are backed out and rebooked in period 2, leaving period 1 unchanged. Period 2 then has the net change to the document. |
BP Liquidation Option (budget period liquidation option) |
Values are: Current Document Budget Period: Select for liquidation to be the default budget period of the document being processed. For example, a purchase order originally recorded as an encumbrance for budget period 1 results in the liquidation of the encumbrance in the budget period of the expenditure that might have actually occurred in and been assigned to budget period 2. This option has one special scenario: if the ruleset ChartField was changed between the current document and its predecessor and the two ruleset ChartFields belong to different rulesets that have different budget period calendar, the budget period of the liquidation entry does not use that of the current document. Instead, the system uses the ruleset ChartField of the predecessor to get the corresponding budget period calendar, and it determines the liquidation budget period based on the calendar and the budget date of the current document. Prior Document Budget Period: Select to provide the budget period of the prior document as the default. For example, if a purchase order has a budget period of 1, then, when the expenditure occurs that liquidates the encumbrance, the liquidation occurs in the budget period assigned to the purchase order that created the original encumbrance, which is budget period 1. |
Funding Source Options
Field or Control |
Description |
|---|---|
Activate Date and Date Label |
Select the check box to make available a user-defined information only date field to which you can give a user-defined label of up to 15 characters. The field name appears on the funding source (KK_FUND_SOURCE) page, but the field is for information only; it has no logical operations associated with it nor is it delivered as a part of fund source inquiry. |
Activate Char 1 and Char 1 Label |
Select the check box to make available a user-defined 30 characters information field and give the field a user-defined label of up to 15 characters. Once defined, the field name appears on the funding source (KK_FUND_SOURCE) page, but the field is informational only; it has no logic or programmatic operations associated with it nor is it delivered as a part of fund source inquiry. |
Activate Char 2 and Char 2 Label |
Select the check box to make available a second user-defined 30-character information field and give the field a user-defined label of up to 15 characters. The field name appears on the funding source (KK_FUND_SOURCE) page. The field is for information only; it has no logic or programmatic operations associated with it nor is it delivered as a part of fund source inquiry. |
On-Line Budget Checking Option
Field or Control |
Description |
|---|---|
Online Mode |
Select to run the budget check process on the application server, which starts immediately without having to wait in a process scheduler queue. Deselect to run the budget check process on the process scheduler. Note: You can check the status of the budget check process on the process monitor only if you run the process using the process scheduler. |
Execute on Server |
Select the Process Scheduler server on which to perform online budget checking. If no server is specified, the system selects any available server during runtime. |
Run Control Prefix |
Enter a prefix to distinguish an online budget process run control. When you run budget checking for an online transaction, the system creates a run control budget checking request for the online transaction and runs the budget processor. The system increments the Last Process Instance by 1 and concatenates it with the Run Control Prefix to create a unique run control ID. |
Last Process Instance |
This is the last process instance used by the system to create a run control ID for the online budget checking request. The Last Process Instance value is maintained by the system, and you do not need to change it. |
Maximum Wait Time (Minutes) |
This is the maximum time in minutes that a user waits for an online budget checking request to complete. While waiting for the process to complete, the online transaction page is frozen. After the process is complete, the page is refreshed to show the budget checking status (whether the transaction passed or failed budget checking). However, if the maximum wait time has elapsed but the budget processor has not yet completed, the budget processor continues processing but the page is no longer frozen. The user does not need to wait any longer, but the page is not refreshed to show the budget checking status. Use the Process Monitor to check the budget processor status. You need to exit the component and re-enter to see the updated Budget Status once the budget processor is finished in the Process Monitor. |
Pop Up Error/Warning Message |
Select this option to have the system provide a pop-up message box after the online budget checking process is complete. This message only appears if the transaction encountered any budget checking errors or warnings. |
Enable Budget Pre-Check
Select the PeopleSoft applications in the Enable Budget Pre-check group box for which you want to enable check-only budget checking. The check-only feature allows you to budget-check transactions and budget journals online or in batch without posting transactions or budgets to the commitment control budget ledgers. The applications that appear in this group box vary, depending upon the products that are enabled for commitment control as specified in the Enable Commitment Control group box on the Installation Options - Products page.
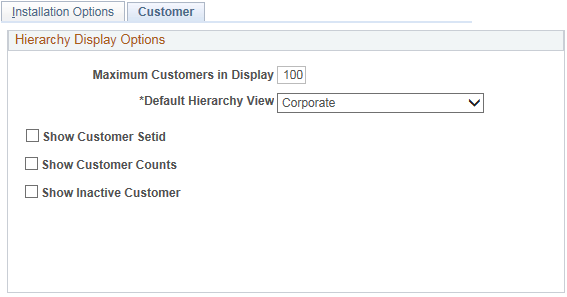
Use the Installation Options - Customer page (INSTALLATION_CU) to define overall customer hierarchy default options.
Navigation:
This example illustrates the fields and controls on the Installation Options - Customer Page. You can find definitions for the fields and controls later on this page.
The values selected on this page affect the way the Customer Hierarchy page is presented in these components.
Customer Information, General Information, Customer Hierarchy page (Customers, Customer Information, General Information, click the Correspondence Selection link, the Remit From Selection link, or the Corporate Selection link).
Customer Hierarchy component (Accounts Receivable, Customer Accounts, Customer Information, Customer Hierarchy).
Collections Workbench component (Accounts Receivable, Customer Accounts, Collections Workbench, click the Hierarchy tab).
Field or Control |
Description |
|---|---|
Maximum Customers in Display |
Displays a default value of 100. You can override this value. This value controls the number of customers that will be displayed AS WELL AS the number of customers that the user will be able to add to a hierarchy. There is no limit to the number of customers that you can add to a hierarchical relationship (corporate, correspondence, or remit from). However, if the number of customers that you add exceeds either the default value of 100 or the number that you enter in this field, then the entire tree will not be displayed on the page and a message will appear in the graphical hierarchy explaining that the hierarchy contains more customers than the Maximum Customers in Display entered on this page allows. |
Default Hierarchy View |
Accept the default value of Corporate or select one of these values to appear in the level field on the Customer Hierarchy page.
|
Show Customer Setid |
Select this check box to display the customer's SetID on the customer detail nodes and the summary nodes of customer hierarchy tree in the Customer Hierarchy page or the Collections Workbench Hierarchy tab. |
Show Customer Counts |
Select this check box to display the number of customers associated with each node on the customer hierarch tree in Customer Hierarchy page or the Collections Workbench Hierarchy tab. |
Show Inactive Customer |
Select this check box to display inactive customers on the customer summary and detail nodes of the customer hierarchy tree on the Customer Hierarchy page or the Hierarchy tab of the Collections Workbench. The check box is selected as the default option. Note: Customer balances are not impacted by your choice of not displaying inactive customers. These always roll up to the parent. |
Use the Installation Options - Multiple Attachments page (INSTALLATION_ATTCH) to define the maximum attachment upload limit for various products.
Navigation:
This example illustrates the fields and controls on the Installation Options - Multiple Attachments Page. You can find definitions for the fields and controls later on this page.
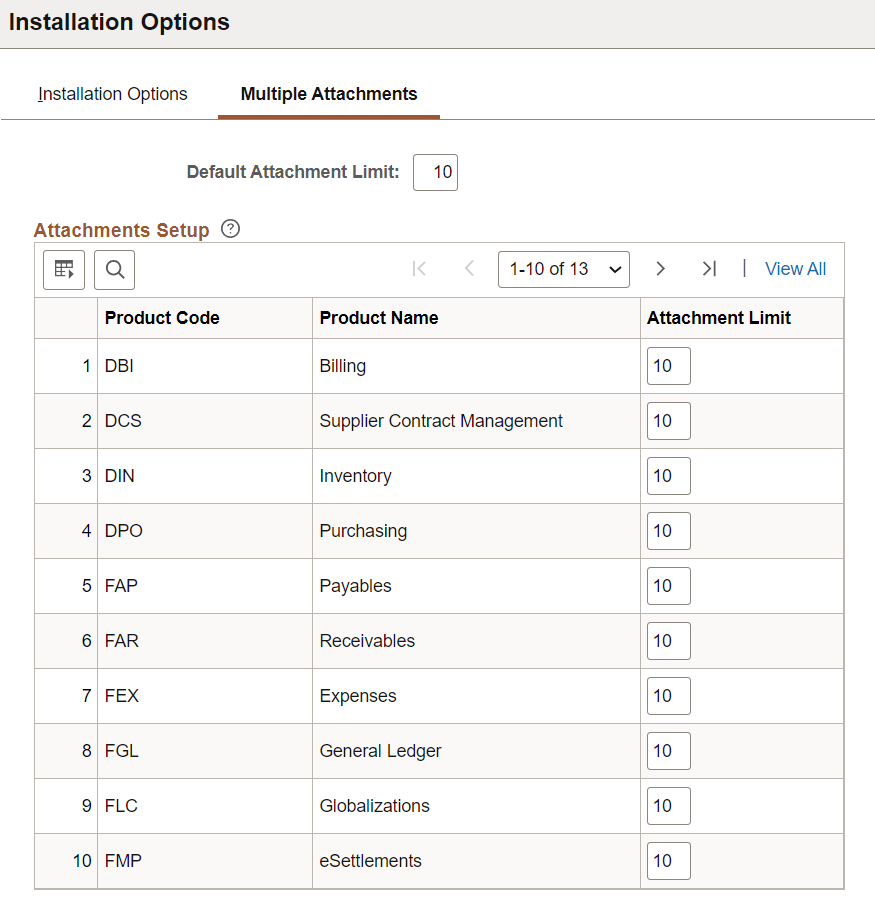
Depending on the specified limit, users can select and upload that many files at a time. For example, if the attachment limit for Billing (DBI) is set to 10, users can select up to 10 files to upload at a time by clicking the Add Attachments button on the Billing pages.
The Default Attachment Limit is 10. You can override this value. Up to 99 attachments are allowed to be uploaded at a time.
If users try to upload attachments more than their specified limit on any of the product pages, an error message appears specifying: Total number of files to be uploaded at a time has been exceeded.
|
Field or Control |
Description |
|---|---|
|
Product Code and Product Name |
Displays the Product Code and Product Name for which the attachment upload limit is to be set. |
|
Attachment Limit |
Enter the attachment upload limit as an integer between 1 and 99. Depending on the specified limit, users can upload that many files at a time on the various pages of the selected product. If an Attachment Limit is specified for a product, it will override the Default Attachment Limit. |