Correcting Journal Errors
|
Page Name |
Definition Name |
Usage |
|---|---|---|
|
JRNL_SUSP_CORR |
Create a journal to correct and reverse the suspense lines on a posted suspense journal. Select a suspense journal from the list of all suspense journals that have a journal status of Posted to Ledger(s). The process does not allow you to select an unposted suspense journal. |
|
|
JOURNAL_LN_S_TMP |
Select a journal entry template that specifies the columns that you want to display on the Journal Suspense Correction page. You define the template on the Journal Entry Template page. |
|
|
JRNL_SUSP_CFE_SEC |
Correct individual ChartField values that are in error. |
|
|
JRNL_SUSP_CF_SEC |
Change a ChartField value for multiple edit correction lines globally on the Journal Suspense Correction page. |
|
|
JRNL_SUSP_CORR_RVR |
Enter the reversal information for correction journals. |
|
|
JRNL_SUSP_ERRS |
Review the error message for a journal line. Click the Errors link for any line on the Journal Suspense Correction page. |
|
|
JRNL_SUS_CROSS_REF |
View the connection between the suspense journal and its corresponding corrections journal. You can review the status of both journals by clicking the Journal Status and Suspense Journal Status links. General Ledger uses the Journal Header Sibling table (JRNL_HDR_SIBL) to link the suspense journal and its corresponding corrections journal. |
|
|
JRNL_EDIT_LOG |
Unlock journals in a process instance that terminated abnormally. |
Use the Journal Suspense Correction page (JRNL_SUSP_CORR) to create a suspense correction journal to correct and reverse the suspense lines on a posted suspense journal.
Select a suspense journal from the list of all suspense journals that have a journal status of Posted to Ledger(s). The process does not allow you to select an unposted suspense journal.
Navigation:
This example illustrates the fields and controls on the Journal Suspense Correction page. You can find definitions for the fields and controls later on this page.
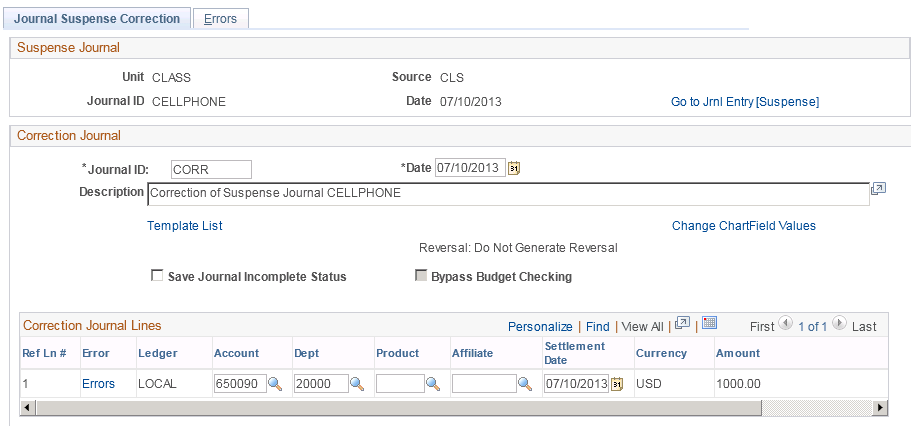
Select the suspense journal that you want to correct. Click the Go to Jrnl Entry [Suspense] link, which opens a new window where you can review the original Journal Entry - Lines page of the posted journal entry.
To correct the suspense journal, complete the following fields in the Correction Journal group box:
Field or Control |
Description |
|---|---|
Journal ID |
Defaults to NEXT and generates the next available journal number when you save the journal. If you do not want to use the default, enter a unique journal ID for the correction journal. |
Date |
Defaults to the date of the suspense journal. Only authorized users can change the correction journal date as well as the reversal information if the suspense journal has a reversal code other than Do Not Generate Reversal. |
Description |
Defaults to Correction of Suspense Journal followed by the journal ID of the suspense journal you are correcting. You can change this description if desired. |
Template List |
Click to open the Journal Line Template page that enables you to select a template that specifies which columns you want to display in the Correction Journal Lines grid. Alternatively, you can change the columns that appear within your suspense correction journal lines by clicking the Customize link and hiding the columns that you do not want to display in your entry. |
Correct ChartField Errors |
Click to open the Journal ChartField Errors page where you change the ChartField values in error. |
Change ChartFields Values |
Click to open the Change ChartField Values page where you can change a ChartField value globally on multiple edit correction lines. |
Reversal |
Click the link to open the Journal Suspense Correction Reversal page where you can change the reversal information for correction journals. |
Correction Journal Lines
The Correction Journal Lines grid displays the journal lines for the suspense journal that need to be corrected. The system generates edit and amount correction lines with the ChartFields and amounts from the journal lines marked in error. Use these correction lines to correct ChartField and amount errors.
Note: Correction journal lines for secondary ledgers are not displayed in the grid if the suspense journal is created with the KLS (Keep Ledgers in Sync) option selected.
When you first open the Journal Suspense Correction page, one or more amount correction lines are at the top of the scroll area, followed by one or more balance correction lines and edit correction lines. No references exist in the suspense journal for the balance correction lines.
Ref Ln # (reference line number) displays the line number that contains an amount error or an edit error in the suspense journal. The reference line number is always blank for the balance correction lines.
Click the Errors link for any line to open the Journal Suspense Correction - Errors page that shows the error log for the line.
When you save your work, the system creates a correction journal that contains the new correction lines. The system also generates the reversing suspense lines for the suspense journal. You won't see these lines in the grid.
Important! When you create a correction journal, you must determine whether the lines are correct or incorrect. If necessary, you can make further changes to the corrected journal before you run the Journal Edit process (Application Engine process GL_JEDIT) and the Journal Post process (GL_JP). But, you must make these changes from the Journal Entry - Lines page because the system changes the suspense status of the suspense journal to 2 when you save your correction journal. The Journal Suspense Correction page does not let you reenter the page for a suspense journal if its correction journal already exists.
If you have not run the Journal Post process (GL_JP) for the correction journal, and you decide that you want to start over, select the Delete Journal option in the Process field on the Journal Entry - Lines page to delete this correction journal. The system updates the suspense status of the suspense journal back to 1, and you can return to the Journal Suspense Correction page to create a new correction journal for the same suspense journal.
Note: A correction journal is a non-interunit journal when created. Like journals created by the Journal Entry - Lines page, the system still populates correction journal's IU System Transaction Code (IU_SYS_TRAN_CD) and IU Transaction Code (IU_TRAN_CD) but based on the suspense journal's values. If the suspense journal does not have these two values, interunit lines are not generated for the correction journal even if it is modified using the Journal Entry - Lines page to an interunit journal.
Use the Journal Line Template page (JOURNAL_LN_S_TMP) to select a journal entry template that specifies the columns that you want to display on the Journal Suspense Correction page.
You define the template on the Journal Entry Template page.
Navigation:
and click the Template List link
You can select a Journal Entry Template from a list of those that have been created in order to format your suspense correction entry.
Field or Control |
Description |
|---|---|
Selected |
Select to indicate that you are currently using the template when it is checked. To use a different template, select another line. |
Template Type |
Identifies the users who would use the template. For example, anyone could use an All template type. The Template ID is the name for the template. |
Default |
If selected, the system uses the columns selected as the default when you open the Journal Suspense Correction page. You can change the default only on the Journal Entry Template - Template page. |
Note: Journal entry templates are previously defined using the Journal Entry Template component. For this reason, the ChartField column check boxes that display on the Journal Line Template page are automatically selected and cannot be changed. If you want to display different columns, select the template that meets your requirements or create a new journal entry template.
Use the Journal ChartField Errors page (JRNL_SUSP_CFE_SEC) to correct individual ChartField values that are in error.
Navigation:
and click the Correct ChartField Errors link.
(The link appears only if the suspense journal has edit suspense lines.)
This example illustrates the fields and controls on the Journal ChartField Errors page. You can find definitions for the fields and controls later on this page.

Field or Control |
Description |
|---|---|
Correct ChartField Errors |
This link appears on the Journal Suspense Correction page only if the suspense journal has edit suspense lines. |
Error Count |
Indicates the number of lines that contain the ChartField value in error. |
Field Name |
Indicates the ChartField whose value is in error. |
Field Value |
Displays the incorrect ChartField value. |
Change to |
Enter the correct ChartField value. |
Selected |
Click to select the ChartField values that you want to update on the Journal Suspense Correction page. |
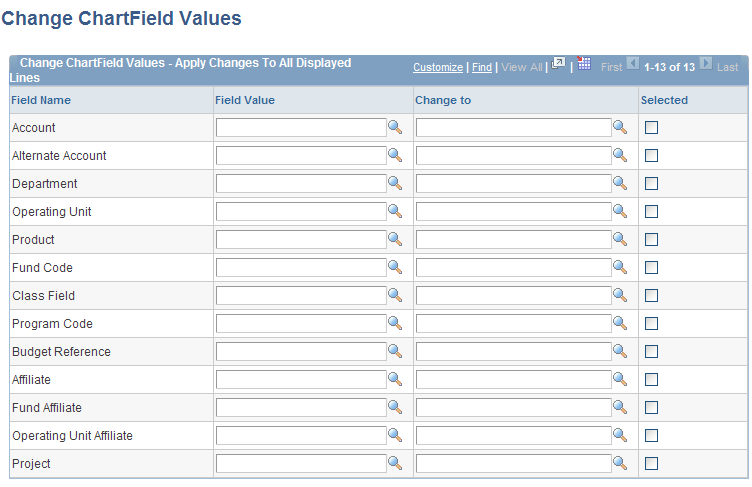
Use the Change ChartField Values page (JRNL_SUSP_CF_SEC) to change a ChartField value for multiple edit correction lines globally on the Journal Suspense Correction page.
Navigation:
Select and click the Change ChartField Values link.
This example illustrates the fields and controls on the Change ChartField Values page. You can find definitions for the fields and controls later on this page.
Field or Control |
Description |
|---|---|
Field Name |
Displays the name of each ChartField. |
Field Value |
Enter the ChartField value that you want to change. |
Change to |
Enter the new ChartField value. |
Selected |
Select to replace all occurrences of the ChartField value on the Journal Suspense Correction page. |
Use the Journal Suspense Correction Reversal page (JRNL_SUSP_CORR_RVR) to enter the reversal information for correction journals.
Navigation:
Select and click the Reversal link.
(The link appears only if the suspense journal has a reversal code other than Do Not Generate Reversal and the user has authorization to change the date on correction journals as set up on User Preferences - General Ledger page.)
This example illustrates the fields and controls on the Journal Suspense Correction Reversal page. You can find definitions for the fields and controls later on this page.
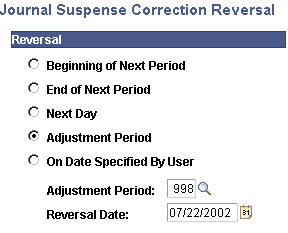
The Reversal link appears only if the suspense journal has a reversal code other than Do Not Generate Reversal and the user has authorization to change the date on correction journals as set up on the User Preferences - General Ledger page. Enter reversal information for a correction journal when the suspense journal reversal code is not Do Not Generate Reversal. A reversal journal for a suspense journal never goes to suspense, so you need only to correct the suspense journal.
Field or Control |
Description |
|---|---|
Beginning of Next Period |
Creates a reversing entry dated the first business day of the next accounting period. It uses the holiday list ID that you assigned to the business unit on the General Ledger Definition - Definition page to determine the first business day. If the business unit is not assigned a holiday list ID, the reversing entry is dated the first day of the next accounting period. If the journal is an adjusting journal, the reversing entry is dated the first business day of the first accounting period of the next fiscal year. |
End of Next Period |
Creates a reversing entry dated the last business day of the next accounting period. It uses the holiday list ID that you assigned to the business unit on the General Ledger Definition - Definition page to determine the last business day. If the business unit is not assigned a holiday list ID, the reversing entry is dated the last day of the next accounting period. If the journal is an adjusting journal, the reversing entry is dated the last business day of the first accounting period of the next fiscal year. |
Next Day |
Creates a reversing entry dated the next business day. It uses the holiday list ID that you assigned to the business unit on the General Ledger Definition - Definition page to determine the next business day. If the business unit is not assigned a holiday list ID, the reversing entry is dated the next day. |
Adjustment Period |
Click to creates a reversing entry to the adjustment period you select. When you select this option, enter values in the Adjustment Period and the Reversal Date fields. |
On Date Specified By User |
Enables you to select any date in the calendar. When you select this option, enter the reversal date. |
Adjustment Period |
Click the drop-down list to display a list of valid adjustment periods (as defined on the Detail Calendar), when you have selected the Adjustment Period option. |
Reversal Date |
When you select the Adjustment Period or On Date Specified By User option, enter a value in this field. The reversal date is used to populate the journal date and fiscal year of the reversing entry. If you specify a reversal date that is before the journal date or a date on a nonworking day and there is a holiday list ID assigned to the business unit, you receive an error message. The system does not reset the reversal date, and you must reenter a date that is after the journal date and is a working day. |
Note: During the Journal Edit process, the fiscal year of adjusting journals are updated with the fiscal year associated with the adjustment period defined on the open period update page. Make sure that the adjustment periods in the open period update page are set up correctly with adjustment years. Also, when changing the fiscal year associated with the adjustment period, make sure that all the relevant adjusting journals are posted before the change.
Use the Journal Suspense Correction - Errors page (JRNL_SUSP_ERRS) to review the error message for a journal line.
Click the Errors link for any line on the Journal Suspense Correction page.
Navigation:
Select
This example illustrates the fields and controls on the Journal Suspense Correction - Errors page. You can find definitions for the fields and controls later on this page.

This page displays information about the ChartFields and Amount errors on the suspense journal.
Field or Control |
Description |
|---|---|
Error Type |
Indicates the type of error, which can be ChartField error, Combo Edit error, Amount error, or Unknown. |
Line # (line number) |
Indicates the number of the reference line number on the Journal Suspense Correction page with the error. It shows the field name for the ChartField in error. It also displays the message set number that contains the error message, the message number, and the message text. Click the line number to return to the Journal Suspense Correction page and place your cursor where you need to make the correction. |
Use the Review Suspense Cross Reference page (JRNL_SUS_CROSS_REF) to view the connection between the suspense journal and its corresponding corrections journal.
You can review the status of both journals by clicking the Journal Status and Suspense Journal Status links. General Ledger uses the Journal Header Sibling table (JRNL_HDR_SIBL) to link the suspense journal and its corresponding corrections journal.
Navigation:
This example illustrates the fields and controls on the Review Suspense Cross Reference page. You can find definitions for the fields and controls later on this page.

Specify a combination of unit, journal ID, and date for the correction journal search criteria or just search on a unit.
Field or Control |
Description |
|---|---|
Search |
Click to view the correction journals that meet your search criteria and its corresponding Suspense Journal. Click Journal Status/Suspense Journal Status link to transfer to the Review Journal Status - Journal Lines page. It opens a new window, and from there you can view suspense/correction journal line information. |
Journal Status |
Click the link to transfer to the Review Journal Status page for the correction journal ID. |
Suspense Journal Status |
Click the link to transfer to the Review Journal Status page for the suspense journal ID. |
Because a link exists between a suspense journal and a correction journal, it is important to understand the rules for posting and unposting these journals.
Suspense Journals
The Journal Post process (GL_JP) uses the suspense journal status to determine how to process the journals:
Field or Control |
Description |
|---|---|
1 |
Unpost is allowed. The correction journal has not been created. |
2 |
Unposting is not allowed. The correction journal is created, but not yet posted. |
3 |
Unposting is allowed. The process also unposts the correction journal. An entry is inserted into the journal Header Sibling table with the unpost seq of 1. |
Correction Journals
When you post a correction journal, the system updates the suspense status to 3 on the suspense journal. You cannot unpost a correction journal. Instead, you unpost the suspense journal, thereby unposting both journals.
If the original journal had a reversal journal, the correction journal also includes a reversal that is created when posting the correction journal. All four journals are unposted together.
Use the Journal Unlock page (JRNL_EDIT_LOG) to unlock journals in a process instance that terminated abnormally.
Navigation:
This example illustrates the fields and controls on the Journal Unlock page. You can find definitions for the fields and controls later on this page.

General Ledger uses application locking when you run batch processes. When a general ledger process is processing a journal, it locks the journal so that no other process can access it. A process automatically turns the journal lock flag on and off to lock and unlock the journal during the process. If a process terminates abnormally, the journal may remain locked. You can unlock journals from a failed process by using the Journal Unlock page.
The page displays the ID of the user who ran the process that terminated abnormally.
The Processes List grid displays a list of processes that the user has run.
For each run of a process, it displays the process instance number and the run control ID. The Process Origin column indicates how the process was initiated, and it has the following possible values:
Field or Control |
Description |
|---|---|
Other GL Application |
Another General Ledger process, such as Allocations (FS_ALLC), called the process to start it. |
Other |
The process was initiated from an operating system command line. |
Process Scheduler |
A process scheduler definition initiated the process. |
Remote Call |
The process was initiated by an individual taking an action on a page. |
The Last Update DateTime column indicates the last date and time that the process made an update to the message log.
Select Marked for each process instance whose journals you want to unlock, and click the Unlock button.