Setting Up and Importing Spreadsheet Journals
To set up and import spreadsheet journals, use the JRNL1.xlsm (or JRNL1.xls) file that is delivered with your PeopleSoft products.
|
Page Name |
Definition Name |
Usage |
|---|---|---|
|
JRNL1_WS |
Set the defaults and set up your spreadsheets for importing into General Ledger. |
|
|
JRNL1_WS |
Specify the options, defaults, and settings for the journal sheets in your workbook. |
|
|
JRNL1_WS |
Configure (include, exclude, or rearrange) columns for different ChartFields. |
|
|
JRNL1_WS |
Alter field labels and column formats for different ChartFields on your spreadsheet. |
|
|
JRNL1_WS |
Create and edit journal data. See also Adding Journal Lines |
|
|
JRNL1_WS |
Create and edit journal data. |
|
|
JRNL1_WS |
Import journal sheets in online mode. |
|
|
JRNL1_WS |
Import journal sheets in batch mode. |
|
|
GL_EXCL_BATC |
Run the batch import process for journal sheet files that you created from the Spreadsheet interface into your PeopleSoft database. See Import Journals Now Page and Write Journals to File Page |
Use the Spreadsheet Journal Import page (JRNL1_WS) to set the defaults and set up your spreadsheets for importing into General Ledger.
Navigation:
Open the JRNL1_WS file delivered with your PeopleSoft products to open the Spreadsheet Journal Import control page.
If prompted, choose to Enable Macros.
This example illustrates the fields and controls on the Spreadsheet Journal Import page.
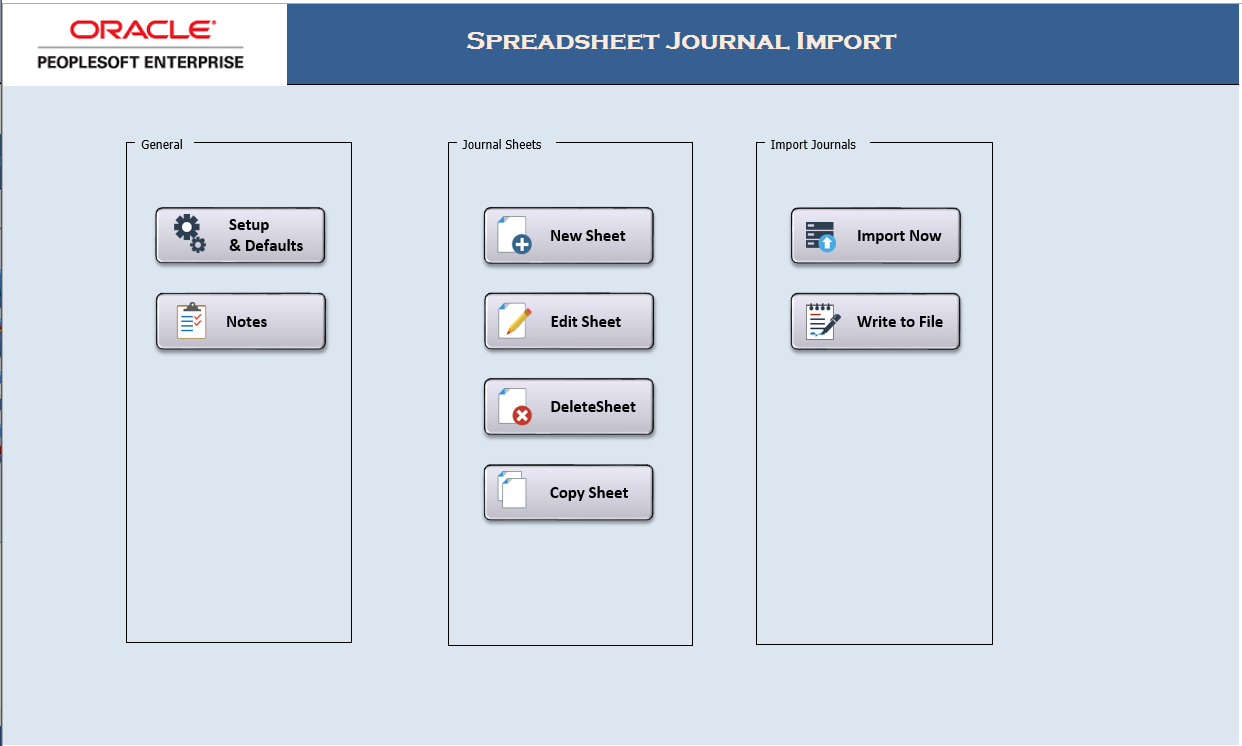
General
The General group box enables you to define options and defaults for this workbook and to enter any notes or calculations concerning this import.
Field or Control |
Description |
|---|---|
Setup & Defaults |
Click to set up access to the Define Options and Defaults dialog box. Use to set journal header defaults, message logging options, document sequencing options, online import controls, and so on. You can also access the ChartField Configuration dialog box from here. |
Notes |
Click to access a scratch pad in the workbook. Use the scratch pad for instructions, calculations, notes, and so on. |
Journal Sheets
The Journal Sheets group box enables you to insert a new journal sheet, or edit, delete, or copy an existing journal sheet.
Field or Control |
Description |
|---|---|
New Sheet |
Click to insert a new journal sheet. A workbook can contain as many journal sheets as needed, and each journal sheet can contain as many journals as desired. |
Edit Sheet |
Click to edit one journal sheet in the workbook. |
Copy Sheet |
Click to copy one journal sheet to a new journal sheet saved under a new name. |
Delete Sheet |
Click to delete one or more journal sheets in the workbook. |
Import Journals
The Import Journals group box enables you to import one or more of the journal sheets and save journal sheets to a file.
Field or Control |
Description |
|---|---|
Import Now |
Click to initiate online import of one or more journal sheets. The system imports only journals that are marked as import. |
Write to File |
Click to save selected journal sheets to a file. After saving one or more files, you must run the batch import process (GL_EXCL_BATC) to complete the file import process. |
Note: You can use Shift and Ctrl keys to select multiple journal sheets.
Use the Define Options and Defaults page to specify the options, defaults, and settings for the journal sheets in your workbook.
Navigation:
Click the Setup & Defaults button on the Spreadsheet Journal Import control page.
This example illustrates the fields and controls on the Define Options and Defaults page. .
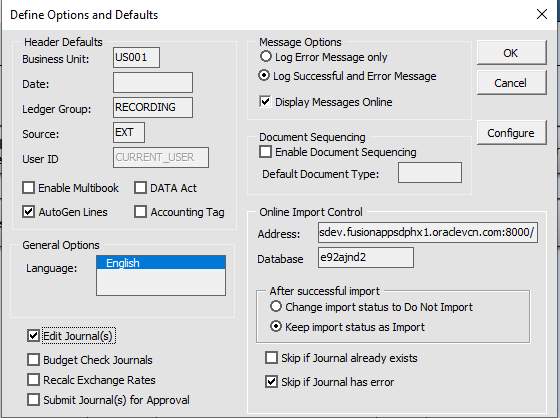
Header Defaults
Enter default values for the Business Unit, Date, Ledger Group, Source fields, and the following fields as necessary.
Field or Control |
Description |
|---|---|
User ID |
Enter a default (operator) user ID for the journal header. |
Enable Multibook |
Select this field to make the Ledger field in the New Journal Header page unavailable for selection. This ledger field displays when you click the Add button in the Spreadsheet Journal Import - Header section of the worksheet. The Ledger field on the journal header is optional. You only use it when you want to enter journals for ledger groups that are not set to Keep Ledgers in Sync and for which you do want to specify the ledger name on the header. If you select this check box, the Ledger field is not enabled on the journal header. |
AutoGen Lines (automatically generate lines) |
This field is related to the Keep Ledgers in Sync (KLS) option for multibook ledgers on the Detail Ledger Group page. The KLS option determines if a transaction is posted to one or to all ledgers in a group. If you select this option, the system automatically generates journal lines to support transaction detail for all ledgers in a ledger group. For example, if you enter a two-line journal import for a ledger group that contains three ledgers, the journal edit process generates an additional four lines—two lines for each additional ledger. If you do not select AutoGen Lines, and the ledger group of the journal is defined as KLS, then the Journal Edit process overrides your choice and still generates the corresponding lines for all ledgers in the group. |
Recalc Exchange Rates (recalculate exchange rates) |
Select this check box to recalculate exchange rates based on the most current exchange rate, if your journals are recorded in multiple currencies. For example based on the current quote, say 1 USD = 1.2 CAD, the conversion is done. See Understanding Multiple Currency Processing in General Ledger. |
Message Options
Define the message log options based on the following information:
Field or Control |
Description |
|---|---|
Message Options |
Log Error Messages Only: The system logs import messages to JRNLLOG.xls only when errors occur. Log Successful and Error Messages: The system logs all import messages to JRNLLOG.xls regardless of the import process being successful. |
Display Messages Online |
Select to show import error messages online. Otherwise, errors go only to the message log JRNLLOG.xls. |
Document Sequencing
Define document sequencing options based on the following information:
Field or Control |
Description |
|---|---|
Enable Document Sequencing |
Select to enable document sequencing for any business units that use it. You can track journals by document sequence number. Enabling this option enables you to specify document sequencing fields on the journal header. |
Default Document Type |
When document sequencing is enabled, specify a default document type—such as domestic customer invoices, customer credit memos, or customer debit memos—to indicate the business purpose of your transaction. You can enter a document type for each journal header at a later time. |
Online Import Control
Define options and behavior of online import mode based on the following information:
Field or Control |
Description |
|---|---|
Address |
Enter the server name and the port number of the Integration Gateway URL. |
Database |
Enter the domain site name (in lower case letters) of the environment to which journals are imported. |
After Successful Import |
Change Import Status to Do Not Import: The system changes import status of journals that are imported successfully. This prevents reimport of the journals when you attempt to import them a second time. Keep Import Status as Import: Select this if you do not want the system to change import status so that you can reimport it later. You can override journal import status at the journal sheet level anytime. |
Skip If Journal Already Exists |
Select this option and online load does not update already existing journals. The option is intended to prevent duplicate journals when a user is unaware that a journal has already been processed. This option is the default and is only applicable for online import using the Import Now functionality. A message is logged providing details of any journals skipped because they already exist in the system. If the option is not selected, online load updates already existing journals with valid journal data. Note: When NEXT is used for the journal ID it is not possible to check if a journal already exists. |
Skip If Journal Has Errors |
Select this option and online load does not load invalid journals. This option is the default and is only applicable for online import using the Import Now functionality. A message is logged providing details of journals that have invalid data. If the option is not selected then the online load does not load either valid or invalid journals for that journal sheet. Online load then proceeds to the next journal sheet and loads all journals in the next journal sheet if all the journals in that next journal sheet are valid. |
General Options
Field or Control |
Description |
|---|---|
Edit Journal(s) |
Select to automatically run the journal edit process during the Import process. The Journal Edit process can be run manually using the online journal entry component, Edit Journals (batch mode). Note: Journals are not created if an error occurs during the Import process. When you select this option, journals must pass the edit process before they can be imported successfully. |
|
Budget Check Journals |
Select to automatically budget check the journals, when they are uploaded. |
|
Recalc Exchange Rates |
Select to recalculate exchange rates per existing rates. This option also updates the transaction amount (if not in the base currency) to an amount in the base currency. |
Submit Journal(s) for Approval |
Select to indicate that after sheets are imported, the journals are to be processed through the Journal Import with Edit process and then approval workflow sends a notification to the approver. If you select this check box, the system automatically selects the Edit Journal(s) check box. This is because the journal must be valid before it can be approved. Therefore, it is required that the edit process is run first. If the Mark Journals to Post option is selected on the Installation Options - General Ledger Page and the User Preferences - General Ledger Page, and the Budget Check, Edit, and Approval processes result in an approved journal, then the system automatically changes the journal(s) to ready to post. |
Use the Chartfield configuration - Column page (JRNL1.XLS) to configure (include, exclude, or rearrange) columns for different ChartFields.
Navigation:
Click the Configure button on the Define Options and Defaults page to access the Chartfield configuration dialog box.
This example illustrates the fields and controls on the ChartField configuration - Column page.
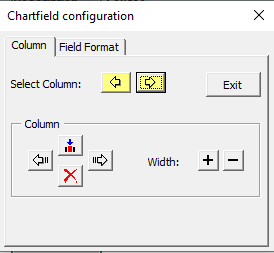
You can alter the contents of your spreadsheet one column at a time. The column that you intend to edit is highlighted in blue. The Chartfield configuration - Column page enables you to select a column and control its appearance.
Use this dialog box to change the format, ChartFields, and column layout of your spreadsheet.
Click the buttons in the Chartfield Configuration dialog box based on the following information:
Field or Control |
Description |
|---|---|
|
Moves the highlight one column to the left. |
|
Moves the highlight one column to the right. |
|
Shifts the highlighted column to the left. |
|
Shifts the highlighted column to the right. |
|
Inserts a new column to the left of the highlighted column. |
|
Click this button to increase the width of the highlighted column. |
|
Click this button to reduce the width of the highlighted column. |


Note: The configuration dialog box prevents you from deleting or modifying certain system required fields.
Use the Chartfield Configuration - Field Format page (JRNL1.XLS) to alter field labels and column formats for different ChartFields on your spreadsheet.
Navigation:
Click the Configure button on the Define Options and Defaults page and select the Field Format tab.
This example illustrates the fields and controls on the Chartfield configuration - Field Format page.
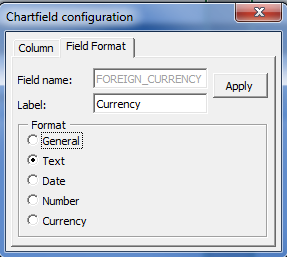
Use the Chartfield Configuration - Field Format dialog box to control the content and format of the columns on your spreadsheet.
Field or Control |
Description |
|---|---|
Field Name |
You must use a valid database field name from PeopleSoft journal tables. If you misspell a field name or enter an invalid field name, you will not receive an error message until you attempt to import the journal sheet. |
Label |
Enter the column label for the spreadsheet journal workbook. |
Format |
Specify the cell format. |
Apply |
You must click to save this format for the journal sheet. |
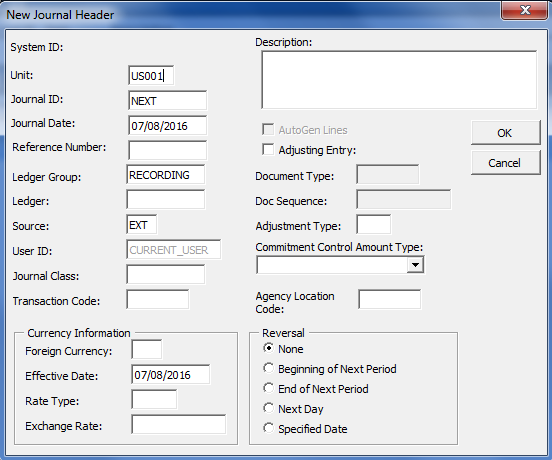
Use the New Journal Header page to access journal header defaults.
Navigation:
Click the New Sheet button on the Spreadsheet Journal Import page or click the “+” (plus) sign next to Journal Header (row 3) on the Journal Entry Sheet page.
This example illustrates the fields and controls on the New Journal Header page.
Field or Control |
Description |
|---|---|
Unit |
Enter a business unit and it is used by the system at import time to populate spread sheet journal lines when no business unit is specified for the line either through direct entry or copy down from the previous line value that you entered. |
Journal ID |
You can specify a journal ID or use NEXT to derive the journal ID. |
Journal Date |
Enter a date or use the current date supplied by the system. |
AutoGen Lines (automatically generate lines) |
Select this check box if the ledger group contains multiple ledgers. If you have selected the Keep Ledgers in Sync (KLS) option for multibook ledgers on the Detail Ledger Group - Definition page, you should always select the AutoGen Lines check box so that the system automatically generates journal lines to support transaction detail for each ledger in the group. For example, if you enter a two-line journal import for a ledger group that contains three ledgers, the journal edit process generates two lines for each ledger. |
Adjusting Entry |
Select this option and the adjustment period fields become available. |
Note: Fields associated with functionality that your organization chooses not to implement are unavailable. For example, if you choose not to implement document sequencing, those fields are unavailable. A field may also be unavailable depending on the settings on the Define Options and Defaults page.
Currency Information
Do not enter values for both the rate type and the exchange rate. If you do, you receive an error message. Enter one or the other, but not both.
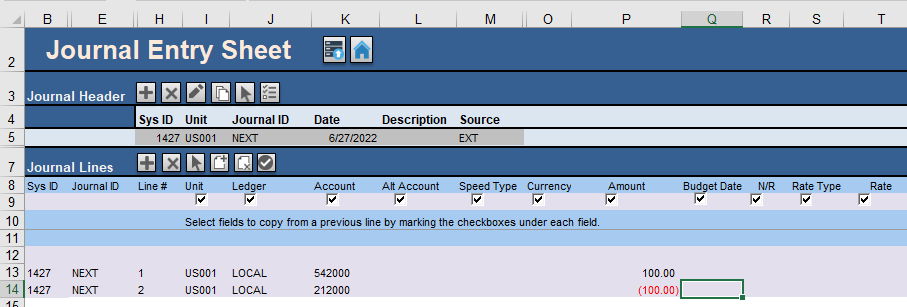
Use the Journal Entry Sheet page (JRNL1_WS.XLSM) to create and edit journal data.
Navigation:
Click the New or Edit button on the control page to create or edit a journal sheet.
This example illustrates the fields and controls on the Journal Entry Sheet page.
Field or Control |
Description |
|---|---|
|
Imports this journal sheet immediately using online import mode. |
|
Returns to the Spreadsheet Journal Import control page. |
 (import journals now)
 (home)
Spreadsheet Journal Import - Header Buttons
The buttons in the header section of the spreadsheet are:
Field or Control |
Description |
|---|---|
|
Creates a new journal header with its own default values. |
|
Deletes a journal. |
|
Edits the journal header fields. |
|
Copies a journal. |
|
Selects the journal header on whose lines you want to work. |
|
Changes import status of a journal. |
 (create journal)
 (delete journal)
 (edit journal header)
 (copy journal)
 (select journal)
 (change import status)
Spreadsheet Journal Import - Lines Buttons
The buttons in the lines section of the spreadsheet are:
Field or Control |
Description |
|---|---|
|
Adds a journal line in the current selected journal header. |
|
Deletes a journal line. Position your cursor on the line and click this button. |
|
Select to insert a line. |
|
Inserts a block of lines. |
|
Deletes a block of lines. |
|
Check the amount fields to verify that you have entered the number with the number of decimal points that you have set up. The default number of decimal points is 2. Click the button to check the number of decimal points before you import the journal. |
 (insert multiple lines)
 (delete multiple lines)
 (check number decimal points)
Click the Add button in the line section to access and add a journal line.
Populate the journal line data using the Tab key or arrow keys to advance from one cell to another.
Insert additional lines by clicking the Add sign again to insert a line and automatically reposition your cursor in the first active cell of the new line.
Scrolling left is unnecessary.
Select the check box for a field where you want the value of the field on that journal line repeated in the journal line that is added next.
Otherwise, the value for that field on the succeeding line is blank.
When running the spreadsheet import journal process, the system verifies that the user and user role has access to the business unit and source. If the user does not have access to the business unit and source, then a message is created indicating such and the specific journal is not created. See Enabling Journal Source Security.
Note: Use as many journals in a spreadsheet as you like. Note that when you insert lines, they carry the header displayed at the top of the sheet.
You can import journal sheets online from the control page or the journal sheet page:
Import Journals Now Page from the Spreadsheet Journal Import Page
Use the Import Journals Now page to select and import journal sheets in online mode.
Navigation:
Select the Import Now button on the Spreadsheet Journal Import page
This example illustrates the fields and controls on the Import Journals Now page.
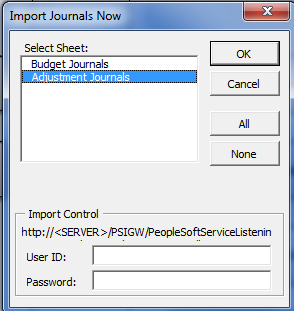
Select the sheets that you want to import to the General Ledger database. Enter your PeopleSoft database user ID and password and click OK.
Import Journals Online from the Journal Entry Sheet Page
Use the Import Journals Now page to import the journal you are working on in online mode.
Navigation:
Click the Import Journals Online Now button from the Journal Entry Sheet page.
This example illustrates the fields and controls on the Import Journals Now page.
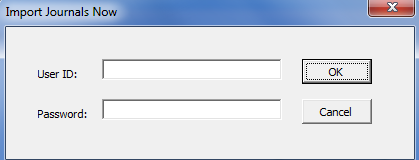
The URL to your PeopleSoft database appears automatically. Enter your user ID and password and click OK to import the journals.
Use the Write Journals to File page to import journal sheets in batch mode.
Navigation:
Select the Write to File button on the Spreadsheet Journal Import page
This example illustrates the fields and controls on the Write Journals to File page.
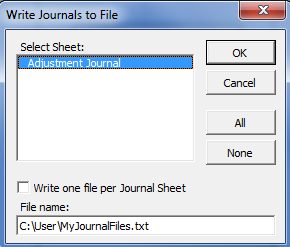
Some organizations create numerous journal sheets, which they store in flat files for processing at a later time. To do this, you must write the journal sheets to the individual flat files. When you are ready, you run the GL_EXCL_BATC batch import process.
The default for batch mode generates only one file for all journal sheets. However, you can create a separate XML file for each journal sheet.
To import one journal sheet at a time, create a separate XML files for each journal sheet by selecting the Write One File per Journal Sheet check box on the Write Journals to File page. The system generates one file for each journal sheet and an index file.
Select one or more journal sheets that you want to save and click OK. This stores the journal sheet data in the file that you specify in the File Name field.
To import the journal file into the PeopleSoft database, you must run the PeopleSoft Spreadsheet Journal Import Request batch import process (GL_EXCL_BATC) using the Spreadsheet Journal Import Request Page.
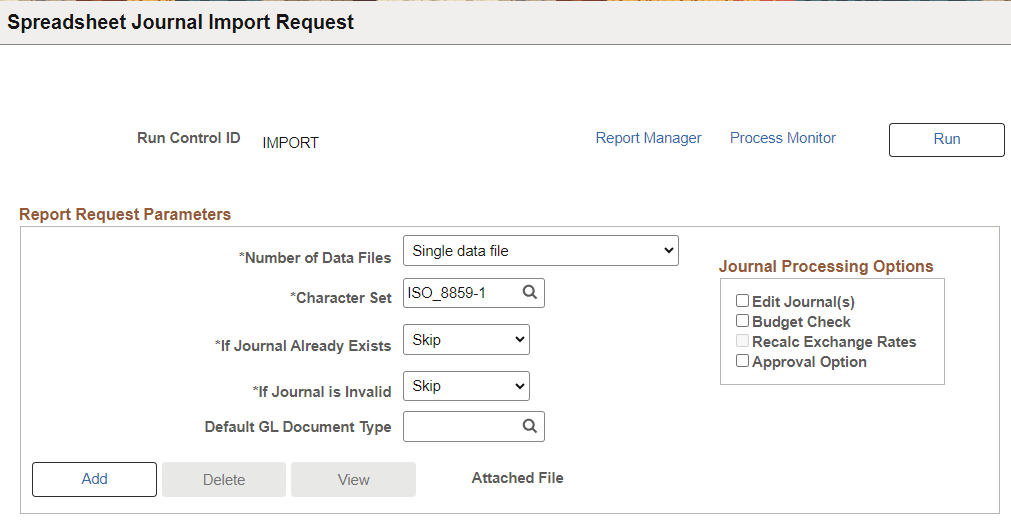
Use the Spreadsheet Journal Import Request page (GL_EXCL_JRNL) to run the Spreadsheet Journal Import process for journal sheet files created from the Spreadsheet interface into your PeopleSoft database.
Navigation:
This example illustrates the fields and controls on the Spreadsheet Journal Import Request page.
Field or Control |
Description |
|---|---|
Number of Data Files |
Single data file: The file you attached to this page is the data file containing journal data. Index file to other data files: The file you attached to this page is an index file containing file path and file names to one or more data files stored elsewhere. |
Character Set |
Select the character set of the flat file being imported. For example, you can specify ISO_8859-6 for Arabic or JIS_X_0208 for Japanese Kanji. |
If Journal Already Exists |
Select Abort, Skip, or Update. |
If Journal is Invalid |
Select Abort or Skip. |
Default GL Document Type |
If you use document sequencing, specify a default document type to indicate the business purpose for the transaction. You can enter a document type for each journal header at a later time. |
Check Decimal Position |
Select this option to validate decimal position. If selected, the Spreadsheet Journal Batch import process checks the decimal position of Amount values for importing journals and logs a message that provides details of journals with invalid decimal positions. Invalid decimal positions can occur when the decimal position for a given currency is set at two positions, for example, but the Spreadsheet file that is being imported allows up to three or four decimal positions. This option allows you to correct the discrepancy before importing the journal to PeopleSoft General Ledger. When the Spreadsheet Journal Import with Edit process runs (GL_EXCL_BATC) is run, the decimal position validation process runs automatically, regardless of whether this option is selected. |
Journal Processing Options: Edit Journal(s) |
Select to automatically run the journal edit process during the Import process. The Journal Edit process can be run manually using the online journal entry component, Edit Journals (batch mode). Note: Journals are not created if an error occurs during the Import process. When you select this option, journals must pass the edit process before they can be imported successfully. When you access the Process Scheduler Request page, verify that the Journal Import with Edit process (GL_EXCL_BATC) is selected. |
|
Journal Processing Options: Budget Check |
Select to automatically budget check the journals, when they are uploaded. |
|
Journal Processing Options: Recalc Exchange Rates (recalculate exchange rates |
Select to recalculate exchange rates per existing rates. This option also updates the transaction amount (if not in the base currency) to an amount in the base currency. |
Journal Operations: Approval Option |
Select to indicate that after sheets are imported, the journals are to be processed through the Journal Import with Edit process and then approval workflow sends a notification to the approver. If you select this check box, the system automatically selects the Edit Journal(s) check box. This is because the journal must be valid before it can be approved. Therefore, it is required that the edit process is run first. |
|
Add |
Click to add an attachment. Browse for the file you have written from the spreadsheet journal workbook, and then click Upload. |
|
Delete |
Click to delete an attachment. |
|
View |
Click to display the contents of the attached file. |