Managing Exceptions
|
Page Name |
Definition Name |
Usage |
|---|---|---|
|
INSTALLATION_AM |
Set the batch limit for PeopleSoft IT Asset Management and choose whether to display the financial impact of assets within PeopleSoft IT Asset Management. |
|
|
IT_EXCPT_SEL |
Search for exceptions and perform reconciliations on the displayed exception list. |
|
|
IT_EXCPT_ACTN |
Select actions and scope for specific business rules. Preview the scope for the action and scope combination. |
|
|
IT_EXCPT_SORT |
Configure sort parameters to be used on the Manage Exceptions page. |
|
|
IT_CHART |
View a graphical representation of the number of business rule exceptions over time. |
The reconciliation process between the third-party inventory database and the asset repository generates a list of exceptions. The list of exceptions allows sorting and filtering in numerous ways, enabling the investigation of exceptions and eventual reconciliation of databases.
The list shows attributes that exist in the third-party inventory database as well as the asset repository, such as serial numbers, for a group of assets, plus other important attributes where differences may be found. A shared serial number means the databases are talking about the same asset, so values in discovery (those values copied directly from the device) should match some of the values in the asset repository. Asset repository data may have typos or other errors, while automated device readings do not have typos. The attribute columns are sortable and there are filter parameters in the top half of the screen. The Advanced Sort Option leads to an additional sort page.
You can select one, many, or all rows of data using buttons or the check boxes at the left edge of the display. You can then choose to act upon the selected data.
Identifying Exceptions
The system displays disabled rows when an action on the asset is in process. This prevents assets that are currently being worked by the exception action process from being displayed and worked again. There is one row for each asset with all exceptions for that asset displayed in the row. For each exception there is a visual flag to identify it as a discrepancy.
Each attribute has its own status. Each status is associated with an icon so that you can visually identify the problem. Status columns are not sortable. Use advanced sort and sort by the exception of interest, for example "Department Exception."
Action Settings
The Select Actions page displays all the rules and actions that are associated with the selected assets from the Manage Exceptions page. The purpose of this page is to show the actions that are available to be processed for the assets selected and to define the scope of the action the user is about to submit. The available action set can be optionally applied to a scope larger than the rows than were selected. The selected rows simply allow you to select the attributes you want to reconcile. Once you are on the Select Actions page, you select the individual actions for the attributes and the asset set (scope) for which you want the action to apply.
The display shows the rule description and the action associated with the rule. Where the actions are email, they are shown as links.
Note: Actions that are set to automatically execute will not display on the Select Actions page unless they ended in error. Errors for actions can occur at the asset level; therefore, an auto-execute action may show for some assets and not for others.
Note: When a search is executed with Financial Impact selected, the only available action that will be displayed is Route to Finance. Route to Finance must also be included on the business rule in order for this action to display.
Batch limits are established to determine whether to process the exception actions online (launches processing of the actions immediately), or in a batch process (starts the transactions in the background and returns control to the user before waiting for the process to complete). The high volume decision is made by counting the total number of actions that apply to the total number of assets that were selected by the user on the Manage Exceptions page. The default value is 100. Adjust this number higher or lower as your processing system performance requires or allows. Batch limit is set within the Installation Options - Asset Management page.
This table shows the exception actions and related processing (the related processing that is shown in this table applies whether the action is processed in batch or online, except where specifically noted).
|
Exception Action |
Processing |
|---|---|
|
Update ARM |
Set processing |
|
Add |
Online – row by row Batch – set processing |
|
Retire |
Row by row |
|
|
Row by row |
|
Route to Finance |
Row by row |
|
Move to Inventory |
Row by row |
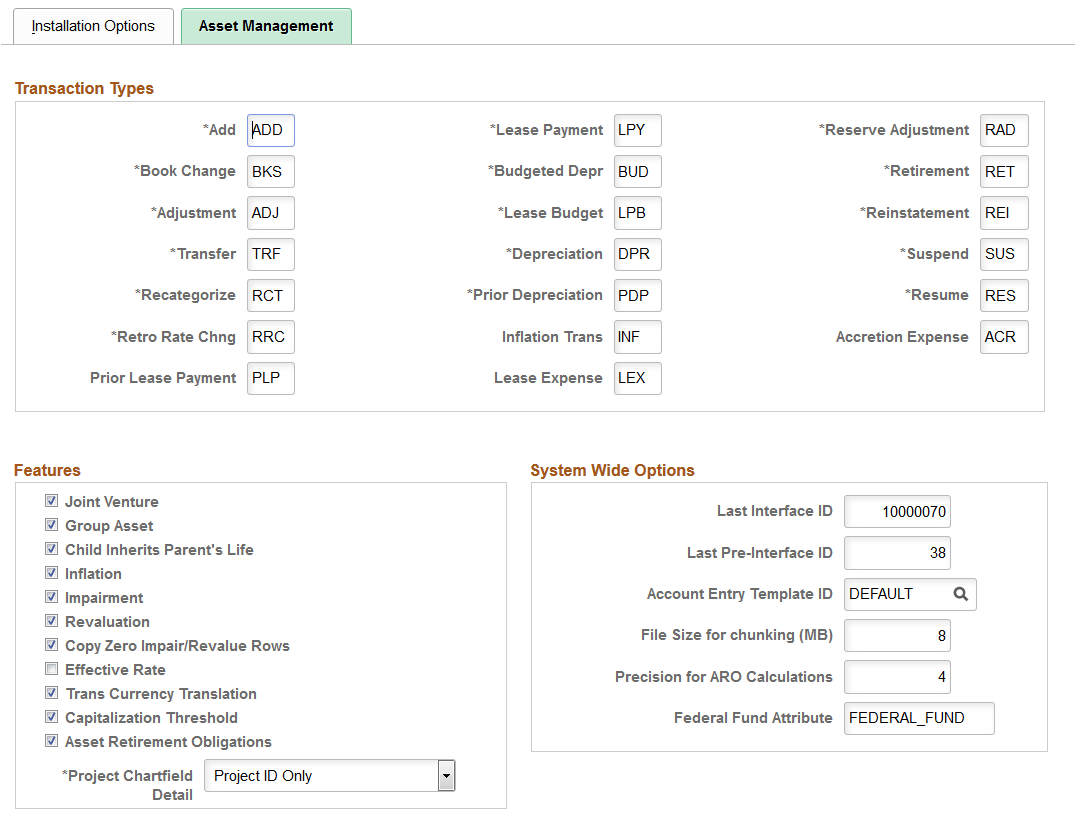
Use the Installation Options — Asset Management page (INSTALLATION_AM) to set the batch limit for PeopleSoft IT Asset Management and choose whether to display the financial impact of assets within PeopleSoft IT Asset Management.
Navigation:
Click the Asset Management link.
This example illustrates the fields and controls on the Installation Options - Asset Management page. You can find definitions for the fields and controls later on this page.
This example illustrates the fields and controls on the Installation Options - Asset Management page. You can find definitions for the fields and controls later on this page.
Select the IT Asset Management Installed check box to access the ITAM Options group box.
Field or Control |
Description |
|---|---|
Batch Limit |
Run Manage Exceptions in either a batch or online mode. Batch mode is the appropriate choice for large numbers of exception transactions. The batch limit specifies the threshold for switching from online to batch processing. In this example, if there are 100 or more transactions to process, the processing will occur in batch; if there are fewer than 100, processing will occur online. Enter the threshold to determine whether or not to process the exception actions online or in a batch process. |
Financial Impact |
Select this check box to display the financial search options and financial information within Manage Exceptions. When this check box is selected, the Financial List and Financial Impact appear on the Manage Exceptions and the Manage Assets Not Reporting pages as search criteria fields. Additionally, when there are assets that have exceptions, there is an additional tab that appears in the components called Financial Information. |
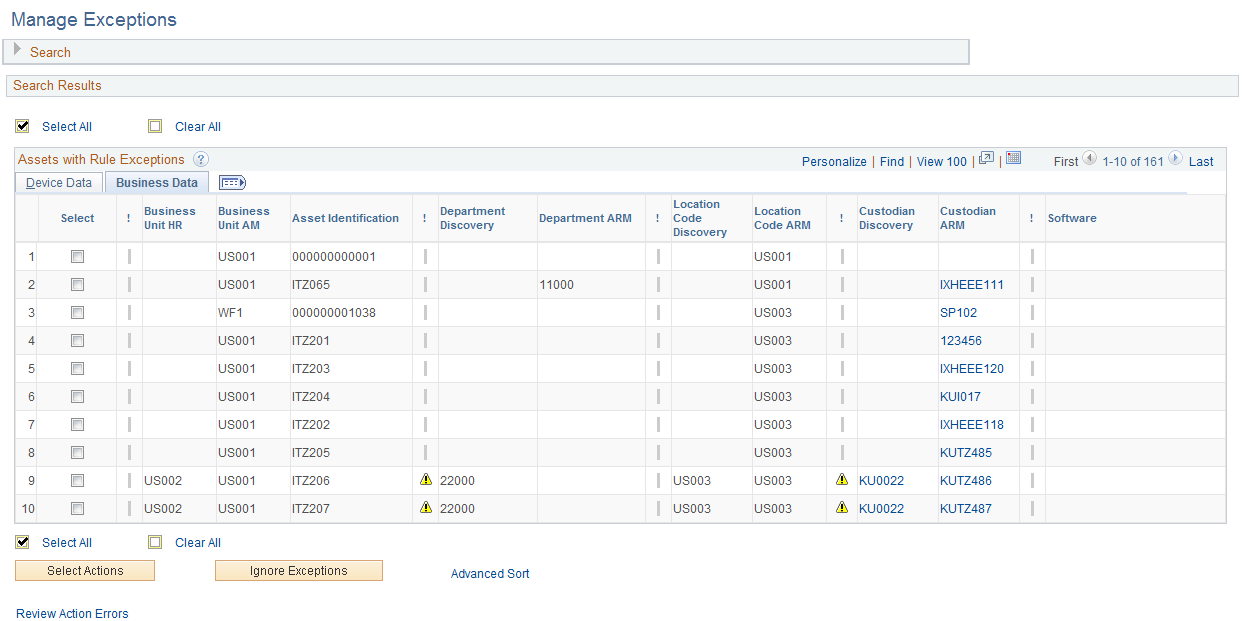
Use the Manage Exceptions page (IT_EXCPT_SEL) to search for exceptions and perform reconciliations on the displayed exception list.
Navigation:
This example illustrates the fields and controls on the Assets with Rule Exceptions - Device Data page. You can find definitions for the fields and controls later on this page.

Field or Control |
Description |
|---|---|
|
The system displays the exception icon beside each discrepancy that is found for the asset. |
|
This icon appears when a Business Rule exception has been designated as an ignored exceptions for an attribute for a given asset and if the ignore exception is current. That is, the icon appears if the ignored exception Begin Date is less than or equal to today's date and the Expiration Date is greater than or equal to today's date. This icon displays until the next run of the comparison process. Ignored exception actions are not included for selecting actions. |
|
This icon appears if an action has already been performed for that attribute. Once an attribute for the asset has been processed, it cannot be processed again. This is true even if there is more than one action to take for that attribute. Once the first action has been applied in a session, a second action cannot be applied for that attribute in a subsequent session. In order to apply further actions, a new Asset Comparison must take place. |
 Exception
 Ignored Exception
 Exception - action performed
Device Data Tab
Access the Device Data tab.
Note: The following definitions apply specifically to the business rules delivered with the system. The suggestions for reconciling this information may be different in your environment.
Field or Control |
Description |
|---|---|
Exists |
Displays alert when there is a duplicate serial ID for those assets that have an "Asset Not in ARM" exception. The Exists column is irrelevant (blank value) if the asset does not have an "Asset Not In ARM" exception. Click the link to access the Manage Physical Use page. The values that display in this column are:
An Asset Not in ARM exception can result from three different scenarios:
|
Serial Number Discovery and Serial Number ARM |
Displays the serial number of the asset found in third-party inventory and the serial number of the asset in the asset repository. If the serial numbers match, you do not need to take any action regarding the serial number, so investigate the exception(s) that caused the asset to appear in Manage Exceptions. If the serial number (asset) appears in discovery, but not in the asset repository, the appropriate action choice might be Add Asset. If investigation reveals that an asset already in ARM is the same as that asset in third-party inventory, reconciliation allows you to update the serial number in the asset repository through the Manage Exceptions grid. Typos are not uncommon in Serial Numbers. Manage Exceptions deals with them effectively. In this scenario, there should also be an entry where the serial number appears in the asset repository, but not in the third-party database, and it is at that entry where you can update the ARM number on the grid to match the correct asset from the third-party inventory. If the new serial ID is updated, the exception associated with the third-party asset which is to be reconciled is removed from reconciliation because the updated serial id exception replaces the exception for the asset found in discovery, not found in the ARM. If you have also selected the third-party asset for processing, it will not be processed. Note: The system displays only those assets that are in your asset group. |
Manufacturer Discovery and Manufacturer ARM |
Displays the manufacturer of the asset found in the third-party database and the manufacturer of the asset in the asset repository. If the manufacturers match, you do not need to take any action. If the manufacturer appears in third-party data, but not in the asset repository, or there is a difference in the values, the default reconciliation action is to update the manufacturer in the asset repository. The values that are displayed are the descriptions of the Manufacturer field. Both the manufacturer description and the manufacturer ID will be updated in the ARM, if that action is executed. |
Model Discovery and Model ARM |
Displays the model designation of the asset found in the third-party database and the model designation of the asset in the asset repository. If the model designations match, you do not need to take any action. If the model designation appears in third-party data, but not in the asset repository, or there is a difference in the values, the default reconciliation action is to update the model designation in the asset repository. |
Select Actions |
Click this button to display the actions you may take on the selected assets. For each selected row, all of the asset's discrepancies and the rules and actions associated with those discrepancies are determined. Once determined, the rules and actions are presented on the Select Actions page. |
Ignore Exceptions |
Click this button to ignore exceptions for the selected assets. You are directed to the Ignore Exceptions page where you can add the selected exceptions to an ignore list. Warning! You should not ignore software exceptions. If the software exceptions are ignored, it could present you with a lower count of the licenses that you have distributed, thereby subjecting you to potential license compliance issues. |
Advanced Sort |
The assets are sortable with the delivered grid sort (using the header column name.) so you can sort on all columns other than the exception flag columns. The advanced sort allows you to define a sort order by field hierarchy. |
Review Action Errors |
Click to view any action errors that may have occurred during the reconciliation. Action errors will show from previous reconciliations as well as from this reconciliation after the Submit Actions button is pressed on the Select Actions page. There may be some delay in generating action errors when processing in batch mode. |
|
Click the Log icon to access the Asset Comment page. Add relevant comments regarding the exception. |
 Log
LogBusiness Data Tab
Access the Business Data tab
This example illustrates the fields and controls on the Manage Exceptions - Assets with Rule Exceptions page: Business Data tab. You can find definitions for the fields and controls later on this page.
Note: Resolving the custodian exceptions through your standard asset transfer processes for the Asset Repository may resolve department or business unit issues during the next asset comparison process.
Field or Control |
Description |
|---|---|
Business Unit HR and Business Unit AM |
The system displays the business unit associated with the primary user of the asset found in the third-party database and the business unit of the asset in the asset repository. If the business units match, you do not need to take any action. If the business unit appears in third-party data, but not in the asset repository, or there is a difference in the values, the default reconciliation action is to route the transaction to a financial asset manager for transfer. |
Asset Identification |
The asset ID displays when the asset exists in the Asset Repository. |
Department Discovery and Department ARM |
The system displays the department of the primary user of the asset found in the third-party database and the department of the custodian of the asset in the asset repository. If the departments match, you do not need to take any action. If the department appears in third-party data, but not in the asset repository, or there is a difference in the values, the default reconciliation action is to update the department in the asset repository, where the new department resides in the assets current SetID, or route the transaction to a financial asset manager for transfer. |
Location Code Discovery and Location Code ARM |
The system displays the location code that is derived from the IP address of the asset found in the third-party database and the location code of the asset in the asset repository. If the location codes match, you do not need to take any action. If the location code appears in third-party data, but not in the asset repository, or there is a difference in the values, the default reconciliation action is to update the location code in the asset repository. |
Custodian Discovery and Custodian ARM |
The system displays the custodian (also known as the primary user) of the asset found in the third-party database and the custodian of the asset in the asset repository. If the custodians match, you do not need to take any action. If the custodian appears in third-party data, but not in the asset repository, or there is a difference in the values, the suggested reconciliation action is to update the custodian in the asset repository, email the custodian, or email the primary user. |
Software |
If there is a software exception on the asset, the system displays a link to the details of the exception. Click Details to access the Software Exceptions page. The suggested reconciliation actions are to email the custodian, email the custodian manager, email the primary user, email the primary user manager, or email software group owner. |
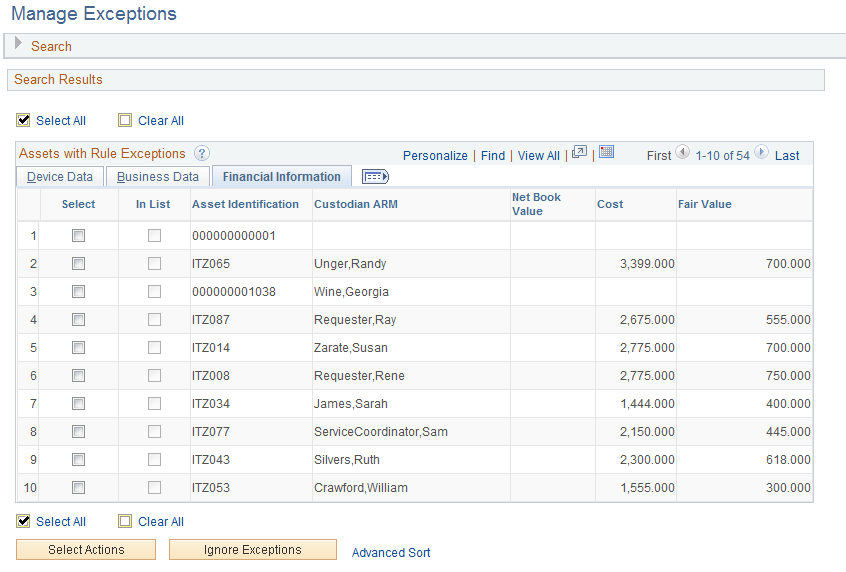
Financial Information Tab
Select the Financial Information tab.
This example illustrates the fields and controls on the Assets with Rule Exceptions page - Financial Information tab. You can find definitions for the fields and controls later on this page.
This example illustrates the fields and controls on the Assets with Rule Exceptions page - Financial Information tab. You can find definitions for the fields and controls later on this page.
The Financial Information tab is displayed when the Financial Impact check box is selected in Installation Options and one or more of the financial search criteria are selected.
Field or Control |
Description |
|---|---|
In List |
This check box indicates that this asset has been saved to any financial impact list |
Select |
This check box indicates that the asset is a target for action on the Manage Exceptions page or for addition to a Financial List. If you click the Save button in the Financial Impact section, and this box is checked, another check will appear in the In List column beside the existing check. At this point, you can take action on the asset from either the Assets with Rule Exceptions grid or the Financial Impact section, if the Financial List is not yet saved. |
Net Book Value (NBV) |
Net book value is calculated by obtaining the asset cost and the associated accumulated depreciation from the current effective row of the PeopleSoft Asset Management record, PS_DEPR_RPT. The calculated NBV is original asset cost less life-to-date depreciation (COST – DEPR_LTD.) |
Cost |
Asset cost is derived from the PeopleSoft Asset Management record, PS_DEPR_RPT. |
Fair Value |
Fair value is derived from the PeopleSoft Asset Management record, PS_AM_FMV_DTL, accessing the current effective row. |
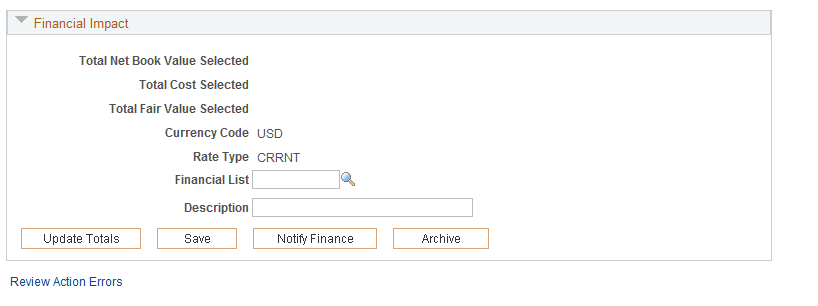
Total Net Book Value Selected , Total Cost Selected and Total Fair Value Selected |
Respective totals are displayed when you select one or more assets from the Assets with Rule Exceptions grid. |
Currency Code and Rate Type |
Values default from those values supplied within User Preferences. |
Save List As and Description |
Supply a name and description for the newly created Financial List, which includes the selected assets and their corresponding financial information. |
Update Totals |
Select to calculate or recalculate the NBV, Cost and FV totals after selecting or altering the assets for inclusion in the list. |
Save |
Click to save the Financial List once you have provided a name and description and updated financial totals. |
Notify Finance |
Displays a notification page to alert the Financial Asset Manager that there is a Financial List in need of attention. |
Archive |
Select to archive the selected Financial List, along with Business Unit, Asset ID, and header information. You may select to archive a financial list when it becomes obsolete. The list then becomes a read-only document. |
User-Defined Data Tab
Select the User Defined tab.
User-defined exceptions are displayed on the User-Defined tab. If you have no active user-defined rules, this tab is not displayed.
Use the Select Actions page (IT_EXCPT_ACTN) to select actions and scope for specific business rules.
Preview the scope for the action and scope combination.
Navigation:
Click the Select Actions button on the Manage Exceptions page.
This example illustrates the fields and controls on the Select Actions page. You can find definitions for the fields and controls later on this page.
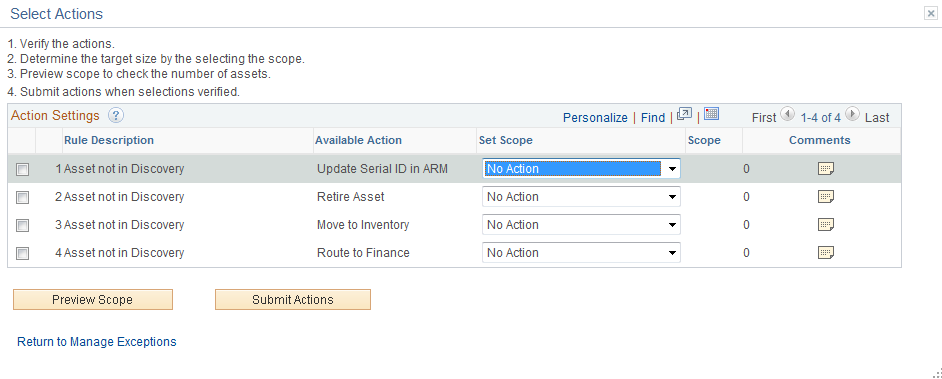
Action Settings
Field or Control |
Description |
|---|---|
Rule Description |
This field displays the rule exceptions found in the comparison process with the available actions for each exception. |
Available Action |
Actions associated with email show as enabled links. Click the link to view the message associated with the email. The message is display-only and will include sample data also stored in the message catalog. This preview message shows you what email string will be generated when the emails are sent out, once the actions are submitted. The messages will contain these parameters: Machine Name, Serial Number, Primary User Name, and Primary User Empl ID. The software email includes those fields plus the software title. Available action values are: Update Asset Repository: This action generates simple updates or inserts into the Asset tables for the following attributes in exception:
Note: Because Department and Location are SetID controlled fields, the Business Unit associated with the asset may need to be updated prior to updating these attributes. If the Business Unit HR, which is derived from discovery, is associated with a different SetID than the department and location, then they can't be changed until the Business Unit is changed, otherwise the department and location would not be valid. If the update action is applied to these assets, it results in an action error. Retire Asset: This action only applies to nonfinancial transactions. These transactions are processed on a row-by-row basis and passed through the RETIRE_NF component interface. Add Asset: This action adds an asset and sets it ready to be capitalized. These transactions are executed row-by-row, through the BASIC_CI component interface, while processing online and in set based processing when handled in batch mode. Note: When assets are added from the Add Asset action, they are added with an acquisition date, location effective date, and custodian effective date equal to the discovery date, which is the last inventory date from the discovery system. Email Person: For each person action, create a message to be sent to that person. Route to Finance: Each asset that has routing as an action will be added to the worklists based on how the asset is to be worked. Update Serial ID in ARM: Update the Serial ID in the Asset Repository. |
Set Scope |
Select the scope of the action to be taken. Values are: No Action: The system does nothing. Selected Assets: The system performs the selected action only against those assets that were selected on the previous page. Assets from Search Criteria: The system performs the selected action against all the assets that match the search criteria from the previous page. This action allows the system to perform the action against not only what could be selected with the select all functionality on the previous page, but also what may be outside of the component buffer. Since it is possible to have more rows match the search criteria than can fit in the buffer, this action allows them to act against the entire set. All Unreconciled ARM Assets: The system performs the action selected against all the assets that are in exception for the rule associated with this action in the ARM. Note: The system displays only those assets that are in your asset group. Note: When financial impact is set to yes, the Set Scope option of All Unreconciled ARM Assets is disabled. |
Scope |
Displays the count of assets that would be affected in each action row and by the action scope. The default value in the Scope column is zero. The sum of the scope count determines whether the actions are performed online or in batch. |
Comments |
Click the Comments icon to access the Action Comments page where you can add pertinent details about the action. You can view all comments that are added here within the Action Log as well as the Asset Log. The comments for each of the actions should be added by the same user. When an asset has multiple actions, each with a comment, the comments are concatenated and entered as one entry to allow an audit trail of which actions were applied at once. The system takes only one user for adding comments as it is assumed that the person who is executing the actions is the same for all the actions that are submitted together. |
Preview Scope |
Click this button to apply the search criteria defined by the scope of the action and display the number of rows to be affected by the scope in the Scope field. Note: Preview Scope generates counts and financial information totals if applicable, based on assets that are not in process. It is possible that the batch or online process can pick up additional assets that become available if they are in process at the time of previewing scope or at the time that the processing begins. The Preview Scope functionality takes into account the financial status of the asset as well as the Apply To value for the action as set on the Business Rule. The Apply To setting is not evaluated for the scope set until the Preview Scope button is invoked. For this reason, it is possible for the scope of the action to return a value of zero. If you suspect that there are assets that should be included in the scope, you should review the assets financial status as well as the business rule to make sure that the action is set to act upon that status (financial or nonfinancial) |
Submit Actions |
Click this button to launch the actions specified. The system will choose to run the actions online or in batch, according to ITAM options, and display a message to let you know which processing avenue was taken. |
Use the Sort page (IT_EXCPT_SORT) to configure sort parameters to be used on the Manage Exceptions page.
Navigation:
Click the Advanced Sort link on the Manage Exceptions page.
This example illustrates the fields and controls on the Sort page.
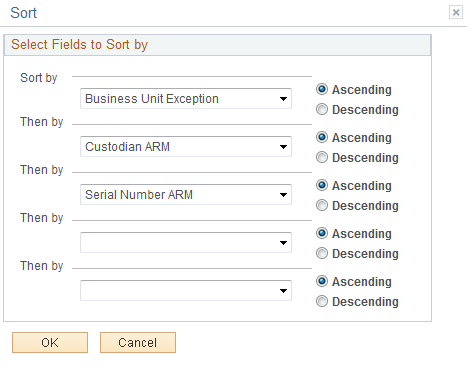
The system displays the fields that are available for sorting. The sort order is returned to the exceptions page and the values are sorted.
Use the Manage Exceptions Over Time page (IT_CHART) to view a graphical representation of the number of business rule exceptions over time.
Navigation:
IT Asset Management, Manage Exception Trend Chart, Manage Exceptions Over Time
This example illustrates the fields and controls on the Manage Exceptions Over Time page. You can find definitions for the fields and controls later on this page.
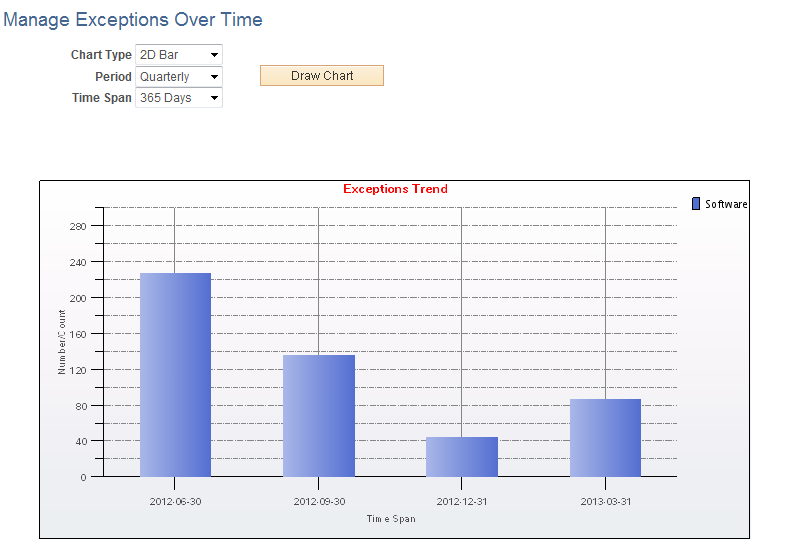
The Manage Exceptions Over Time page provides the ability to graph Manage Exceptions trends over a rolling twelve-month period. As you resolve the Business Rule exceptions from the Manage Exceptions page, the number of exceptions are recorded for each Business Rule where Trend Analysis is enabled.
Note: If the Metrics process is run multiple times during a day, exception counts for that day are recorded from the latest run. They are counted every time and the most recent counts are recorded. Average exception counts for a month and a quarter are calculated only once (when the Metrics process is run for the first time after end of the month or the end of the quarter). Once the counts for a month and a quarter are calculated, they are never calculated again.
Field or Control |
Description |
|---|---|
Chart Type |
Select either 2D Bar or 2D Line to view trend data as either a two dimensional bar graph or two dimensional line graph. The default value is 2D Bar. |
Period |
Select to present totals as Daily, Monthly, or Quarterly trends for business rule exceptions (for those business rules enabled for trend analysis). The default value is Quarterly. |
Time Span |
Select the period over which to graph trend data:
Note: Variances from the same period in the prior year appear when placing the cursor on a data point, if applicable. |
|
Click to plot the data points based upon the criteria selections that are made for chart type, period and time span. |

Note: If you want to exclude certain trend data, you can archive the data.