Working with Exceptions and Recurring Tasks in the My Work Pagelet
The My Work pagelet contains the Setup and Maintenance Exceptions, which are:
Missing Project User Fields
Missing Project Fields
Missing and Inactive Project Managers
Expired Projects with Active Status
Inactive Project Team Members
The My Work pagelet also contains the Recurring Tasks, which are:
Budgets to Finalize
Deferred Billing
Project Data Compression
This topic discusses the exceptions and recurring tasks under the My Work pagelet.
|
Page Name |
Definition Name |
Usage |
|---|---|---|
|
PC_PRJUSRFLD_FL |
View and update missing project user fields from the Project General component. |
|
|
PC_WC_PRJ_FL |
View and update projects with blank location or project type fields. |
|
|
PC_WC_MISSG_MGR_FL |
View and update projects, where there is no project manager or the project manager is no longer with the organization. |
|
|
PC_PASTPROJ_FL |
View and update projects with prior end dates, whose status is still Active. |
|
|
PC_WC_INACT_EMP_FL |
View and update project team members, where the project member is no longer with the organization. |
|
|
PC_MASS_BPFINAL_FL |
View and finalize multiple project budgets. |
|
|
PC_PROJRES_FL |
View and update deferred billings. |
|
|
PC_PRJ_COMPRESS_FL |
Project superusers can review projects ready for compression and run the compression process. |
Use the Missing Project User Fields (PC_PRJUSRFLD_FL) page to view a list of projects with blank values for project user fields and update the fields using the available related actions. This exception excludes projects with Closed status.
Navigation
Select the Projects WorkCenter tile.
|
Field or Control |
Description |
|---|---|
|
Action icon |
Select an exception line and click the Action icon to perform the required related action for the exception. Click the Update Missing Project User Fields action and enter value as appropriate. The Update Missing Project User Field window lets you enter values based on your selection. It could be a text field, currency, date, or amount. The User Fields tab on the Project General Information component reflects the updates. The updated lines are removed from the grid. For more information on the User fields tab, see Project Definitions - User Fields Page. Note: If you try to update multiple user fields at a time, a message displays indicating that you cannot continue. You can update the same user field (for example, user field 1) across multiple projects in a single action, but you cannot update multiple user fields (for example, user field 1 and user field 2) in a single action. |
|
|
Click to open the general information component of a project. |
 Details icon
If your organization does not use or require entry into all the project user fields, use the Filter icon and enter values into only those fields.
Note: If any errors occur while updating a project, an error message displays in the grid.
Use the Missing Project Fields (PC_WC_PRJ_FL) page to view a list of projects with blank location or project type. You can update the missing values using the related actions available on the page. This exception excludes projects with a Closed status.
Navigation
Select the Projects WorkCenter tile.
|
Field or Control |
Description |
|---|---|
|
Action icon |
Select an appropriate related action.
Note: Updates to Project Type and Project Location must be done separately and cannot be combined. |
Use the Missing and Inactive Project Managers (PC_WC_MISSG_MGR_FL) page to view a list of projects where there is no project manager or the project manager is no longer with the organization. This exception also includes projects for which the manager's schedule end date is prior to the project end date. This way, the exception assists project administrators in proactively identifying projects that will not have a project manager at a later date. This exception excludes projects with a Closed status.
Most projects should have a project manager with an Active status. You can add a manager to a project, replace the existing manager with another manager, or extend the schedule end date of the existing manager.
Note: Some projects might not require a project manager. Use filters such as project type, project status and business unit to remove such projects.
Navigation
Select the Projects WorkCenter tile.
|
Field or Control |
Description |
|---|---|
|
Action icon |
Displays the Update Manager End Date and Add or Replace Manager actions. Note: The system does not display the Action icon if you have installed both Resource Management (RM) and Program Management (PGM) products. |
The table below explains some scenarios where you can add, replace, or update a project manager:
|
Manager Status |
Related Action to be selected |
Use |
|---|---|---|
|
No Manager |
Add or Replace Manager |
You can add a manager if a project does not have one. The Add or Replace Manager window displays the following fields:
Note: The Effective Date in the Add Manager window must be within the Project Start and End dates. |
|
Inactive |
Add or Replace Manager |
You can replace a manager who is no longer with the organization (for example, employee status is Inactive). Note: When replacing an existing project manager with a new manager, the schedule end date of the existing manager is updated to a day prior to the start date of the new manager. The schedule end date of the new manager is updated to the Project End Date. |
|
Active |
Update Manager End Date or Add or Replace Manager |
In some cases, a project might get extended. If the schedule end date of the project manager was not extended, it will eventually result in the project without an active project manager. In such case, you can update the manager’s end date or, add or replace the manager.
|
Note: The Project Manager tab on the Project General component and the Project Team component are updated with the new information.
See Project Definitions - Manager Page
Creating Project and Activity Teams
Note: If any errors occur while you add, replace or update a project manager to a project, then an error message is displayed in the grid. You can resolve some of the errors from My Work Exception by entering the required update information. To resolve others, you might need to navigate to the respective project components.
Use the Expired Projects with Active Status(PC_PASTPROJ_FL) page to view a list of projects with prior end dates, and whose status is still Active. You can update the project status to Closed or extend the project end date. If more information is needed before you clear the exception, you can use the Notify action to communicate with others in your organization.
Navigation
Select the Projects WorkCenter tile.
|
Field or Control |
Description |
|---|---|
|
Action icon |
Displays the related actions you can perform to clear the exceptions, which are:
|
Use the Inactive Project Team Members (PC_WC_INACT_EMP_FL) page to view and update project team members who have been terminated. You can either update the team member's schedule end date to their termination date or replace the team member with another employee in which case the terminated employee's schedule end date is also updated. The exception includes terminated employees whose schedule end date is a future date. Terminated employees whose schedule dates of work have past are not included in the exception.
Note: Inactive project team members include employees with a status other than Active, Leave with Pay, Leave of Absence and Short Work Break.
Navigation:
Select the Projects WorkCenter tile.
|
Field or Control |
Description |
|---|---|
|
Actions |
Select an appropriate related action. The available options are:
|
One exception that will not be cleared after taking action is a team member who is terminated before the Project Start Date and the start date of the project is a future date (later than the current system date). In this scenario, the Schedule End Date is updated Project Start Date. You can use the icon on the grid to open the Project Team component and delete the employee from the team. Alternatively, wait until Project Start Date at which time the employee will no longer show as an exception.
In another scenario, you may receive an error trying to update the schedule end date of a terminated employee who has multiple schedules on a project. Although unlikely, this will occur when the team member has more schedules to update than the number of days between the project start date and their termination date minus 1 day. You can open the project team component and delete one or more of the schedules. This is most likely to occur when the termination date of the employee is near the project start date and the employee has many schedules on the project.
Use the Budgets to Finalize (PC_MASS_BPFINAL_FL) page to view and finalize multiple project budgets.
Navigation:
Select the Projects WorkCenter tile.
|
Field or Control |
Description |
|---|---|
|
Actions |
Select an appropriate related action. The available options are:
|
 |
Click to view the project budget details. |
Note: The Budgets to Finalize exception includes projects where the distributed amount does not equal the finalized amount, meaning there is an amount to be finalized. This includes the initial budget creation and changes to an existing budget. Project must be in approved status and the budget header status must be active. Amounts must be fully distributed across project activities and spread across time periods to be eligible for processing.
Use the Deferred Billing (PC_PROJRES_FL) page to view and update deferred billing transactions. You can view all active project transactions whose analysis type is DEF (deferred billing) and the Billing distribution status (BI_DISTRIB_STATUS) is P (priced).
Navigation:
Select the Projects WorkCenter tile.
|
Field or Control |
Description |
|---|---|
|
Actions |
Select a row and click the Actions icon to perform the required related action. The available options are:
|
|
Plan ID |
Click to view the Billing Plan - Billing Plan General Page. |
Use the Project Data Compression (PC_PRJ_COMPRESS_FL) page to review projects ready for compression and schedule or run the compression process by the Project Superuser.
As an incentive to running the project data compression process, the Project Data Compression page displays to the user the estimated row counts in proj_resource after running the compression process. With this information, project administrators have a good indication on the level of summarization and reduced count of rows in the project costing proj_resource table after running the compression process.
Navigation:
This example illustrates the fields and controls on the Project Data Compression page. You can find definitions for the fields and controls later on this page.

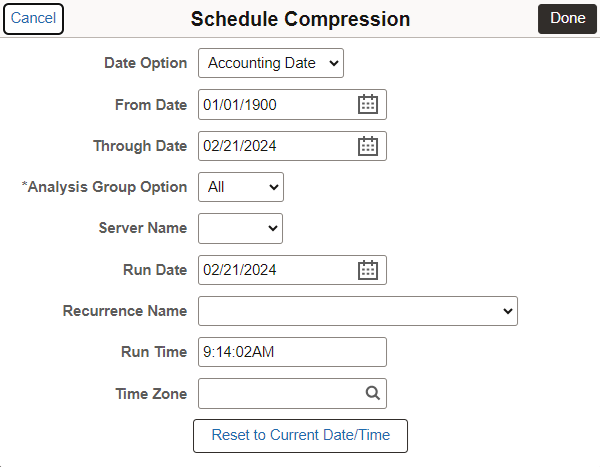
This example illustrates the fields and controls on the Schedule Compression page.
|
Field or Control |
Description |
|---|---|
|
Actions |
Select a row and click the Actions icon to perform the required related action. The available options are:
|
|
Project |
Displays the project ID. For security purposes, the projects displayed are filtered based on My Projects for the user logged in, with the exception of users who have the Compression Super User role on the installation options page. Users with this role will see all projects. |
|
Description |
Click for more information about the project, including the start date, project type, and manager. |
|
Eligible for Compression |
Displays the compression eligibility of the project based on project status. Displays Yes if the project is eligible for compression. |
|
Approved for Compression |
Displays Yes or No for projects approved or not approved for compression. |
|
Project Status |
Displays the status of the project. For more information on project status and its impact on the eligible for compression see the Status Types Page topic. |
|
Uncompressed Rows |
Displays the number of project transaction rows that have not been compressed. |
|
Compressed Rows estimate |
Displays the estimated number of rows after compression. This estimate is based on the organization's default compression template and is not adjusted for individual projects that use a different compression template. |
|
Project End Date |
Displays the end date of the project. |
|
Compression Template |
Displays the compression template, which will be used to compress the transaction rows. The default template can be overridden. |
|
Compression Status |
Displays the compression status. Values include:
|
|
Compressed Rows Actual |
Displays the number of rows after compression. |
Note: The Materialised View (PC_PROJ_RES_MV) must be built using Application Designer, then enabled and refreshed using the Enable Materialized Views and Maintain Materialized Views components.
The row counts for Uncompressed Rows and Compressed Rows Estimate are based on the organization's default compression template.
This example illustrates the fields and controls on the Project Data Compression page after compression.

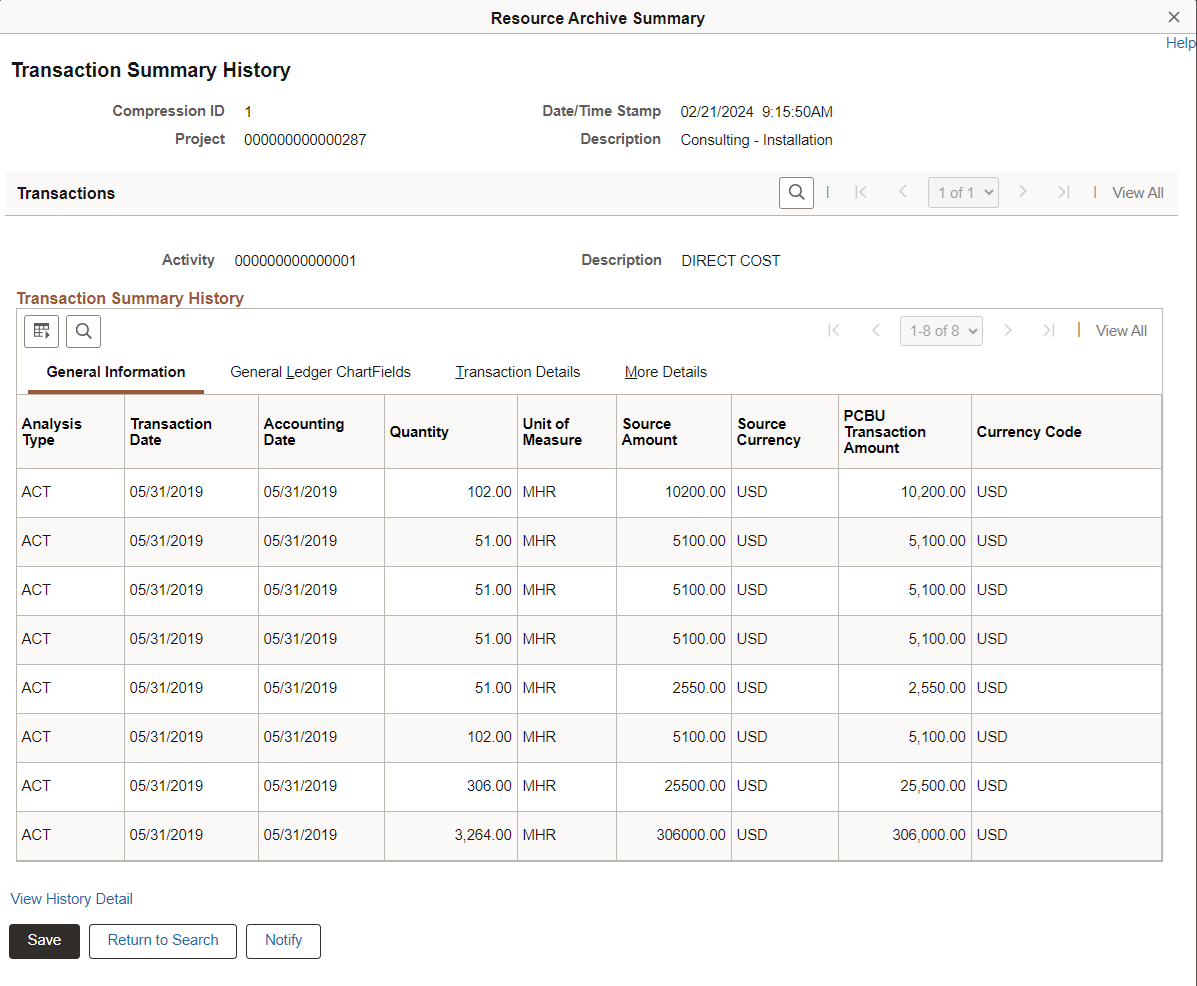
This example illustrates the fields and controls on the Resource Archive Summary page.
Note: The compression process can be scheduled once the project is approved for compression. If the project status is later changed to one that is not eligible for compression, it is the responsibility of the user to cancel the compression process, or it will run as scheduled.