Working with Your Agenda and History
This topic discusses how to work with Agenda and History.
|
Page Name |
Definition Name |
Usage |
|---|---|---|
|
FO_AGN_HIST_PG |
Track action items that you want to schedule for completions on a specific day and view a history of action items that have been taken. |
|
|
FO_AGENDA_DETAIL |
Add, modify, or view an agenda event to an order. |
|
|
FO_HISTORY_DTL |
View or update transactions that have already occurred. |
Use the Review Agenda/History page (FO_AGN_HIST_CMP) to track action items to be scheduled and completed on a specific day, and to view a history of action items that have been taken.
You can access this page using multiple navigation paths. Depending on the path that you take, some sections may be expanded or collapsed.
Navigation:
From the Agenda pagelet, click an individual item.
From the Recruiting Funnel, click an individual item.
This example illustrates the fields and controls on the Review Agenda/History page (1 of 2).
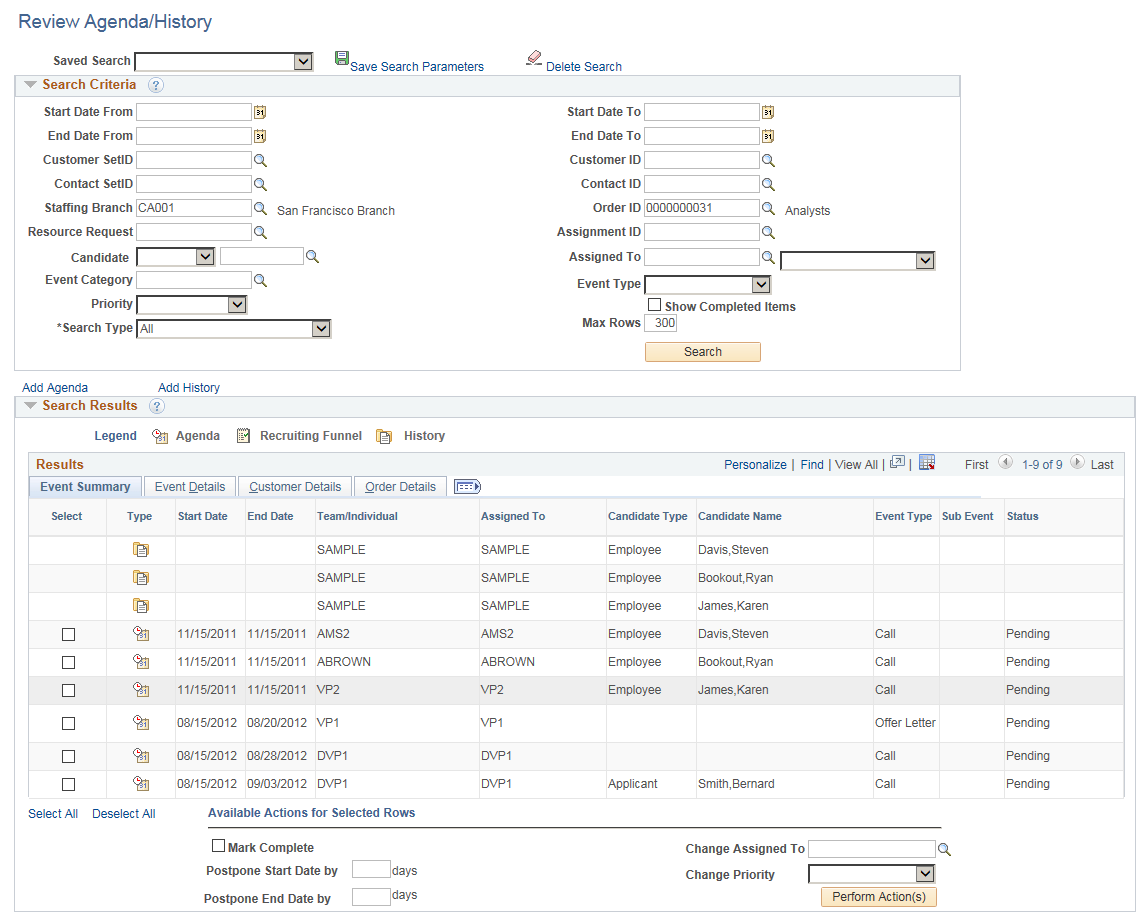
This page displays agenda items, recruiting funnel tasks and history item, and history items base on the search criteria. Events on the Agenda are directly assigned to a team member and an e-mail notification is sent to the team member for performing the task.
Field or Control |
Description |
|---|---|
Saved Search |
Select search parameters that you previously saved. You can save each inquiry's criteria as a unique name to be accessed at a later time. For example, you can save an inquiry that you want to run each week. |
Search Criteria
To search for agenda or history items, on the top part of the page, enter the field values for which you want the system to search. The more information that you enter the more specific the search is. To view details for an item, click the detail icon at the end of the item's row.
Field or Control |
Description |
|---|---|
Start Date From / Start Date To |
Enter the duration of a start date |
End Date From / End Date To |
Enter the duration of a end date |
Customer SetID |
Enter the SetID the of the customer who is associated with this agenda item. |
Contact SetID |
Enter the SetID the of the contact who is associated with this agenda item. |
Staffing Branch |
Enter the branch with which the agenda is associated. |
Candidate |
Select Appl (applicant) or Empl (employee or non-employee) to designate the status of the candidate who is associated with this agenda item (if applicable), and then enter the person's ID in the adjacent field. |
Event Category |
Select an event category to be associated to each event type. |
Priority |
Indicate the priority level of the item: High, Low, or Medium. This is useful when you are sorting through long lists of items on the Agenda page. |
Search Type |
Select a Search Type. |
Customer ID |
Enter the ID the of the customer who is associated with this agenda item. |
Contact ID |
Enter the ID the of the contact who is associated with this agenda item. |
Assigned To |
Enter the ID of an Individual user or a Team for which the Agenda or History item is assigned. Select an option from the drop-down list:
|
Add Agenda |
Click to access the Agenda Detail Page. |
Add History |
Click to access the History Details Page. |
Search Results
Field or Control |
Description |
|---|---|
(Check box) |
Select the check box next to an agenda or recruiting funnel row to perform a change that is available in the Available Actions for Select Rows section. |
Type |
Displays an icon that corresponds to one of these rows: Agenda, History, and Recruiting Funnel. Click the Agenda Details Icon to view agenda details in the Details section. Click the History Details Icon to view history details in the Details section. Click the Recruiting Funnel Events Icon to access Recruiting Funnel Events. |
Type |
Displays an icon that corresponds to one of these rows: Agenda, History, and Recruiting Funnel. Click the icon to access the corresponding information in the Details section. |
Mark Complete, Postpone Start Date,Postpone End Date, Change Assigned To, and Change Priority |
Click the check box or enter the information you want to change, and click the Perform Actions button. When you click the Save Changes button, the system performs the requested action. |
Perform Action(s) |
Click this button to perform the selected actions on the selected rows. You can make more than one change at the same time. For example, you can select multiple rows in the Search Results section, select the Mark Complete check box, change the Priority, and then click the Perform Action(s) button. This reduces the need to perform multiple actions individually. |


Details
The Details section changes depending on whether you select the Agenda Events or the History Events icon in the Type column of the Search Results section. For more information about this section, see Review Agenda/History - Details PageReview Agenda/History - History Details Page.
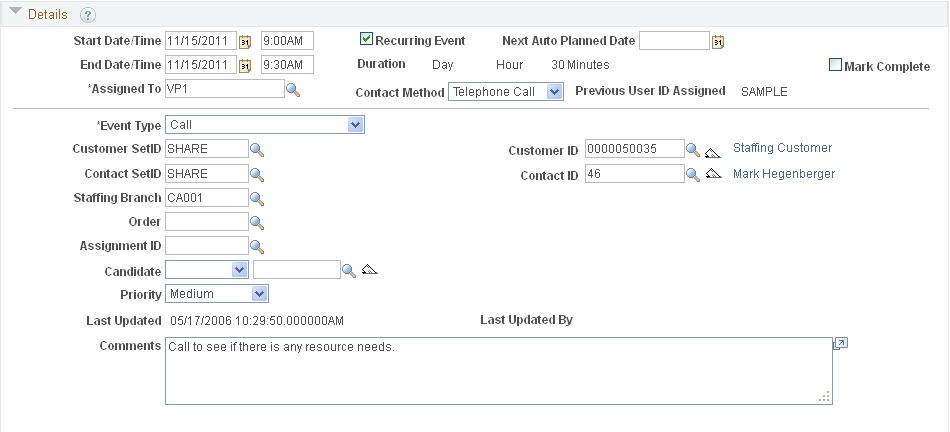
Use the Review Agenda/History page (FO_AGN_HIST_PG) to view or update additional information for an existing agenda event.
Navigation:
. From the Review Agenda/History page, select the Agenda Events icon in the Search Results section.
This example illustrates the fields and controls on the Review Agenda/History - Details Page.
Field or Control |
Description |
|---|---|
Start Date/Time and End Date/Time |
Enter the date and time on which the item is scheduled. The system will calculate the duration based on the values entered here. |
Recurring Event |
Select to have the system schedule the item for a future date after this occurrence has been completed. On the Contact component, Staffing Information page, you can specify a default number of recurring event days. When you create an agenda item, you can set the item to be recurring. When you complete the item, the system creates a new item for the specified number of days after the original. Note: To trigger the creation of the next item, you must first complete the current item. The system then displays the Next Event Date field. |
Next Auto Planned Date |
If the event is a recurring event, when the event is complete, this date represents is the date that the system uses to create the new, recurring, agenda entry. |
Duration |
The system calculates the duration of the item based on the start and end time values. |
Mark Complete |
Select this check box when you complete the item. After you do so and save the record, you can hide the item. This option is replaced by a status display field if the entry is from the recruiting funnel. |
Assigned To |
Displays the user, or team, for which the Agenda or History item is assigned. |
Contact Method |
Enter the method of contact for the item: Call, Email, In-Person, Verbal, or Written. |
Previous User ID Assigned |
Displays the user ID of the pervious person who was assigned to this agenda item. |
Event Type and Event Status |
Displays the type of event and its status that is associated with the agenda item, such as Availability or Call. You define event types as part of your Staffing Front Office configuration. |
Sub Event and Sub Event Status |
Displays the type of sub event and its status that is associated with the agenda item, |
Customer SetID and Customer ID |
Enter the SetID and ID of the customer who is associated with this agenda item (if applicable). Click the adjacent customer name link to open and view the customer's information on the Customer General Information page in a new page. |
Contact SetID and Contact ID |
Enter the SetID and ID of the contact who is associated with this agenda item (if applicable). |
Staffing Branch, Order, and Assignment ID |
Enter the branch with which the agenda is associated and, if applicable, the order, and assignment IDs. |
Candidate |
Select Appl (applicant) or Empl (employee or non-employee) to designate the status of the candidate who is associated with this agenda item (if applicable), and then enter the person's ID in the adjacent field. |
Priority |
Indicate the priority level of the item: High, Low, or Medium. This is useful when you are sorting through long lists of items on the Agenda page. |
Last Updated and Last Updated By |
Displays the date, time, and user ID that the agenda detail was last updated. |
Comments |
Enter additional information about the agenda item. |
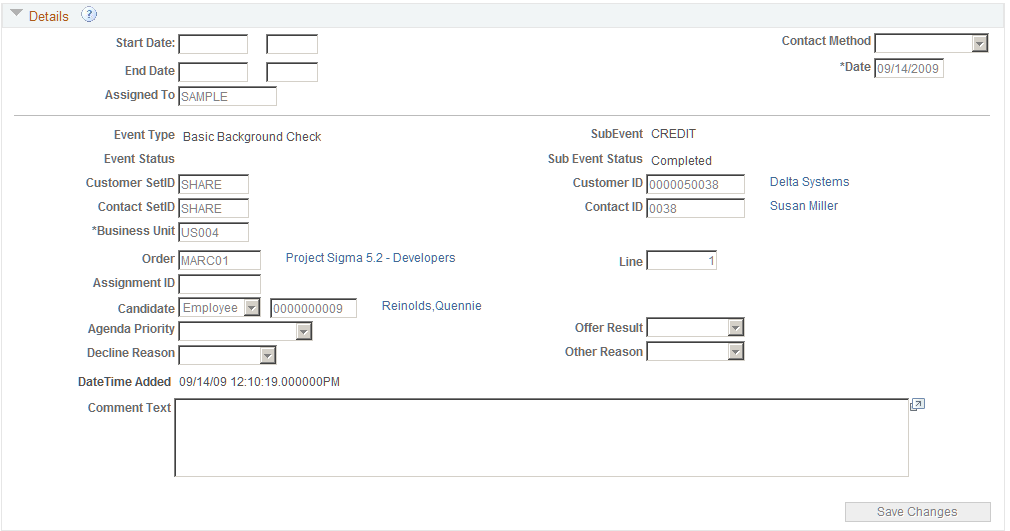
Use the Review Agenda/History page (FO_AGN_HIST_PG) to view or update transactions that have already occurred.
Navigation:
. From the Review Agenda/History page, select the History Events icon in the Search Results section.
Use the history functions in PeopleSoft Staffing Front Office to help keep track of tasks that you completed in the past.
In PeopleSoft Staffing Front Office, you can view, update, and save information about transactions or conversations that have already occurred. These include many of the events in which an employee has been involved, such as past orders and assignments. The system automatically saves some events to history. However, you can add other items at your discretion.
To add history, use the Add History link that is found on many pages in the application. No limit exists to the number of history rows that you can add to a record. However, you may periodically have to purge history records to reduce volume, increase storage capacity, and improve your system performance.
This example illustrates the fields and controls on the Review Agenda/History History Details Page.
Field or Control |
Description |
|---|---|
End Date |
Indicates the date on which the history item was completed. |
Contact Method |
Indicates the method of contact for the item, such as Call or Verbal. |
Date |
Displays the date for which the history item was scheduled. |
Event Status |
Displays the status if the item is part of an event list. |
Customer SetID, Customer ID, Contact SetID, Contact ID, Order, and Assignment ID |
These elements enable you to cross-reference history items with customers, contacts, orders, and assignments. |
Line |
Displays the line number. |
Agenda Priority |
Indicates the priority of the item when it was scheduled in the agenda. Priority is useful when you are sorting long lists of agenda items. |
Offer Result |
Enter a candidate's decision to take or not take an assignment to further narrow your search, such as Accept, Assign, Consider, Decline, or Other. |
Decline Reason |
Enter a candidate's reason for declining an assignment to further narrow your search, such as Benefits, Hours, or Pay. |
Other Reason |
Enter the other reason status, such as No Answer, or Phone Busy. |
Date Time Added |
Indicates the date and time that a user added the history record. |
Comment Text |
Enter additional information about the history item. |
Use the Agenda Detail page (FO_AGENDA_DETAIL) to add agenda event to an order.
Navigation:
Select the PeopleMatch tab. From the PeopleMatch page, click the Order Manager button. From the Candidate Events page, click the Add Agenda button.
Click the Add Agenda link on the Review Agenda/History page.
Click the Add Agenda icon on the Candidate Events page.
This example illustrates the fields and controls on the Agenda Detail Page.
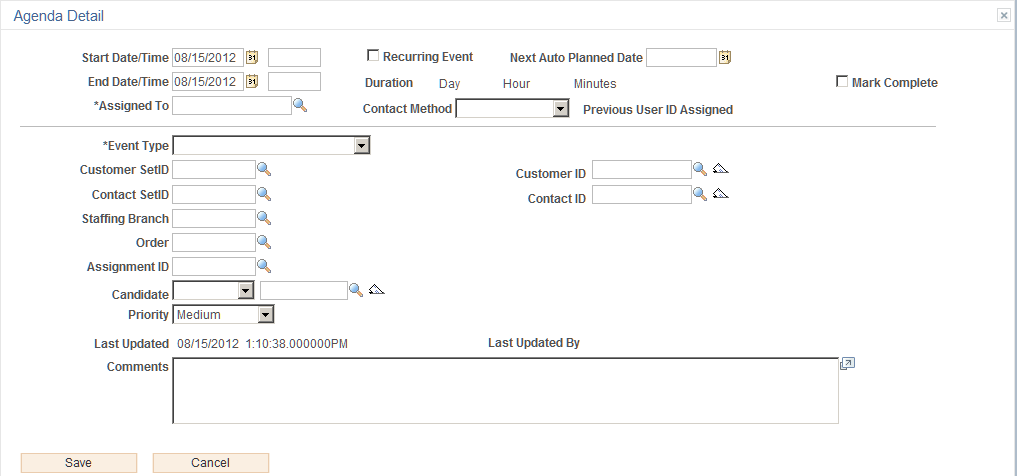
Fields and definitions are the same as those on the Review Agenda/History - Details Page
Fill in all the fields that apply to the event you are adding. If an agenda item is completed, select the Mark Complete check box.
When you click the Save button, the system returns you to the previous page. If you are returning to the Candidate Events page, the system displays the agenda item in the Agenda group box.
When agenda items are created (manually or automatically), e-mail notifications are sent to team members if the Send Notifications check box is selected on the Manage Teams Page.
Use the History Details page (FO_HISTORY_DTL) to view, update, and save records of transactions that have already occurred.
Navigation:
Click the Add History link on the Review History page.
Click the History icon on the Candidate Events page.
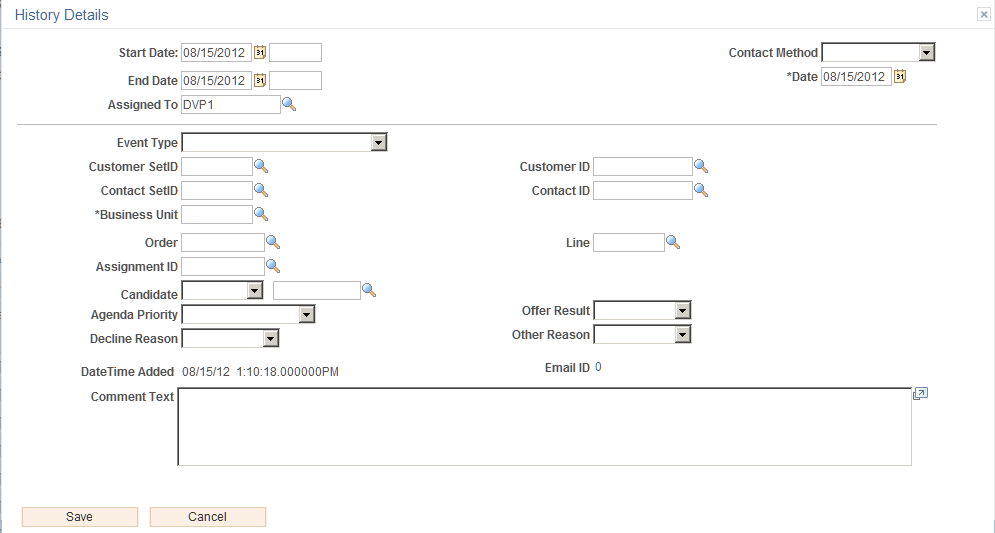
This example illustrates the fields and controls on the History Details Page.
Field or Control |
Description |
|---|---|
End Date |
Indicates the date on which the history item was completed. |
Contact Method |
Indicates the method of contact for the item, such as Call or Verbal. |
Date |
Displays the date for which the history item was scheduled. |
Customer SetID, Customer ID, Contact SetID, Contact ID, Order, and Assignment ID |
These elements enable you to cross-reference history items with customers, contacts, orders, and assignments. |
Agenda Priority |
Indicates the priority of the item when it was scheduled in the agenda. Priority is useful when you are sorting long lists of agenda items. |
Email ID |
Click to access the Sent Email page. |
Offer Result |
This field applies only to history items that are associated with the creation of assignments. It indicates the result that best represents why the applicant or employee accepted or declined a position. |
Decline Reason |
This field only applies to history items that are associated with the creation of assignments. It indicates the reason why the employee declined the position or assignment. |
Other Reason |
This field applies only to history items that are associated with the creation of assignments. It indicates the reason for an offer result of Other. |
Date Time Added |
Indicates the date and time that a user added the history record. |
Comment Text |
Enter additional information about the history item. |