Setting Up Dealing Trees and Deal Positions
|
Page Name |
Definition Name |
Usage |
|---|---|---|
|
Tree Manager Page |
PSTREEMGR |
Add a position tree that uses the TR_POSITION structure, insert the tree nodes. See the product documentation for PeopleTools: Tree Manager. |
|
Pos Tree Source Page |
POS_TREE_SOURCE |
Enter general information about the position source and define the position source set. See Entering Deal Position Tree Source Information for more information. |
|
Tree Wide Options Page |
POS_TREE_PNL |
Specify the market rate index to use for currency revaluation and define whether a deal needs to meet the criteria for an end node on the tree during deal validation. You can also select an option to compute running totals during deal position analysis. See Specifying Tree-Wide Options for more information. |
|
Node Definition Page |
POS_DEF_OPER_PNL |
Specify the characteristics for each node of a tree. See Defining Tree Nodes for more information. |
|
Node Properties Page |
POS_SOURCE_SET_PNL |
Identify sources for the specified node. See Defining Node Properties for more information. |
|
Node Properties - All Selection Criteria Page |
POS_ALL_CNDTN_SEC |
Create SQL statements of selection criteria for position source IDs. See Defining Node Properties SQL Selection Criteria for Deal Position Source Sets for more information. |
|
Selection Criteria Page |
POS_DEF_WHERE_SEC |
Enter selection criteria for a specific source ID. See Defining Node Properties for more information. |
|
Position Limits Page |
POS_LIMITS |
Indicate when limit checking should occur, who should be notified, and under what conditions. If you are using the Limit Checked workflow, you must establish position limits for the system to generate notifications. See Defining Position Limits for more information. |
|
Create Position SQL Page |
POS_CREATE_SQL |
Translate conversational language into the language of database operations. You can roll up functions by extending SQL statements downward from the parent level. This page is automatically accessed if needed when you are running deal position trees in the Position Manager. See Creating Position SQL for more information. |
|
Schedule Position Tree SQL Page |
TR_AE_RUNCNTL |
Run the Schedule/Calculate Tree SQL process (TR_POS_CSQL) to set up the intervals in which your SQL is to run. See Scheduling Position Tree SQL for more information. |
To define dealing tree and deal position information, use the following components:
Define Time Span (POS_TIME_SPAN_PNL).
Position Field Type (POS_FIELD_TYPE_PNL).
Position Source Definition (POS_SOURCE_TBL).
Tree Manager (PSTREEMGR).
Create Position SQL (POS_CREATE_SQL).
Use the TR_POS_TIME_SPAN_GBL component interface to load data into the Time Span tables.
Use the TR_POS_CREATE_SQL_GBL component interface to load data into the Create Position SQL tables.
Complete these steps to set up dealing trees and deal positions:
Define position field types.
Define a position source.
Define time buckets.
See Defining Time Sets.
Schedule position time spans.
Create a deal position tree.
Complete the position bin pages. (You should have five position bin pages.)
Enter deal position tree, source information on the Pos Tree Source page.
Specify revaluation and tree options on the Tree Wide Options page.
Define tree node options on the Node Definition page.
Define tree node properties and node property SQL selection criteria on the Node Properties page.
Define limits on the Position Limits page.
Create position SQL.
Schedule position tree SQL for subsequent changes to dealing trees.
PeopleSoft Tree Definition
Two pages control the database fields that are available to deal position and cash forecast management: Position Field Types page and Position Field Source page. PeopleSoft Treasury applications deliver sample position fields and sources in the sample database for guidance. Create position field types and position sources as appropriate to your organization. Typically, you implement page-level security to limit access to these pages to appropriate roles within your organization.
You need to set up your position sources and alias names before creating a deal position tree. After you have created the tree, you generate the SQL and define time sets. This diagram illustrates the setup process:
This diagram illustrates the setup process for dealing trees and deal positions
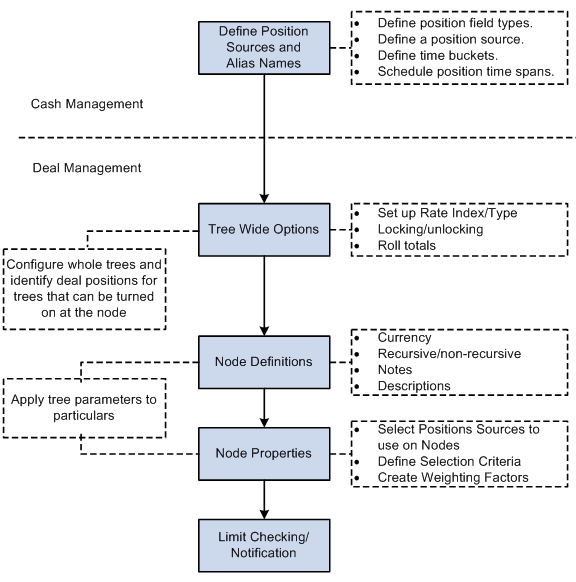
Each tree node corresponds to one or many position sources. You can define an unlimited number of deal position trees, and you can also associate limits with a node.
When analyzing deal positions, use time spans to define the periods for which to view the data. Time spans add the time dimension to your deal positions.
Effective Dating of Treasury Trees
Deal Position functionality does not support trees that are defined with multiple effective dates; each tree can have only one effective date. To use the same tree with different (multiple) effective dates, you must copy the tree, save it with a unique name, and specify an effective date. For example, to define the TR_DEAL_POSITION tree with three effective dates (January 1, 2000; January 1, 2001; and January 1, 2002), you need to create these three trees:
|
Tree Name |
Effective Date |
|---|---|
|
TR_DEAL_POSITION_2000 |
01/01/2000 |
|
TR_DEAL_POSITION_2001 |
01/01/2001 |
|
TR_DEAL_POSITION_2002 |
01/01/2002 |
See the product documentation for PeopleTools: Tree Manager.
Field or Control |
Description |
|---|---|
Pos Tree Source (position tree source) |
Define the source of data to include in a tree. This setting applies to the entire tree and is defined only once for each tree. |
Tree-Wide Options |
Set revaluation options, deal validation rules, and running total options for an entire tree. |
Node Definition |
Define characteristics for a node, including data source, summarization rules, and revaluation currency. |
Node Properties |
Determine which subset of records to include in a tree node. SQL is required for nonrecursive nodes but is optional for recursive nodes. |
Position Limits |
Define internal and external limits for a tree, and notification rules when limits are breached. This limit applies only to trees that use the structure TR_POSITION. |
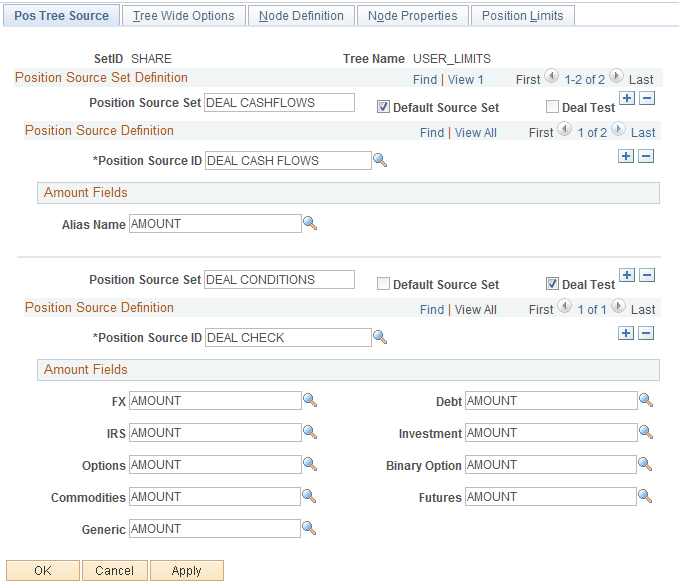
Use the Pos Tree Source page (POS_TREE_SOURCE) to enter general information about the position source and define the position source set.
Navigation:
Click the Edit Data icon on the Tree Manager page.
Select the Pos Tree Source (position tree source) tab.
This example illustrates the fields and controls on the Pos Tree Source page. You can find definitions for the fields and controls later on this page.
Field or Control |
Description |
|---|---|
Position Source Set |
Define the name of the source set for the tree. Select the Default Source Set check box to designate this as the default source set. |
Position Source ID |
The value that you select determines how the Amount Fields grid appears. Complete all of the fields. |
Deal Test |
Select the Deal Test check box if you intend to validate deals. |
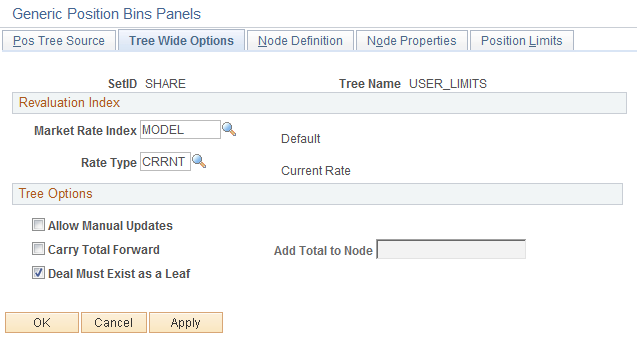
Use the Tree Wide Options page (POS_TREE_PNL) to specify the market rate index to use for currency revaluation and define whether a deal needs to meet the criteria for an end node on the tree during deal validation.
You can also select an option to compute running totals during deal position analysis.
Navigation:
Click the Edit Dataicon on the Tree Manager page.
Select the Tree Wide Options tab.
This example illustrates the fields and controls on the Tree Wide Options page. You can find definitions for the fields and controls later on this page.
Field or Control |
Description |
|---|---|
Market Rate Index and Rate Type |
When the currency of the amount that is used for determining a position is not the same currency that you define as the node currency, use these fields to revalue the amount. |
You must establish market rates for each currency pair that you revalue from the currency of the source position to the currency of the node position, or the system excludes the data. For example, suppose that you have various sources of data in which the currency is USD, GBP, EUR, and JPY, and the position currency for the node is set to USD. You define the following exchange rates:
|
From |
To |
|---|---|
|
USD |
USD |
|
GBP |
USD |
|
EUR |
USD |
|
JPY |
USD |
Note: When an exchange rate is entered from its own currency to its own currency, you must set the rate to 1.
Tree Options
Field or Control |
Description |
|---|---|
Allow Manual Updates |
Select to enable manual updates to the Lock/Unlock function on the Deal Position Manager page. |
Carry Total Forward |
Select to compute running totals when the deal position is evaluated. The system adds ending balance amounts for one period to the beginning balance amounts for the next period. If you select this check box, also select the node, in the Add Total to NodeNode field, to which you will carry the totals forward. |
Deal Must Exist as a Leaf |
Select this option if you require that a deal match the criteria for an end node (leaf) of a tree to be valid. Deal validation testing occurs when you click the Deal Test button at deal entry. If this check box is not selected, then deals that do not specifically match the criteria for an end node, but that do meet the criteria for a level in the tree hierarchy, are considered valid. |
Note: For deal validation using the Deal Test button, a tree must include %THIS DEAL in its root node selection criteria.
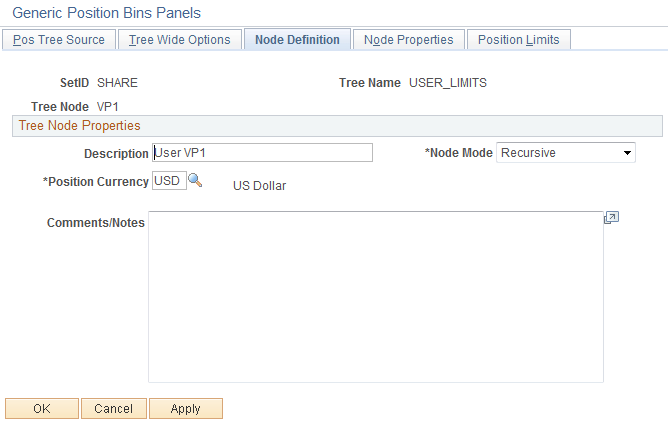
Use the Node Definition page (POS_DEF_OPER_PNL) to specify the characteristics for each node of a tree.
Navigation:
Click the Edit Data icon on the Tree Manager page.
Select the Node Definition tab.
This example illustrates the fields and controls on the Node Definition page. You can find definitions for the fields and controls later on this page.
Field or Control |
Description |
|---|---|
Node Mode |
Select a value based on the purpose of the node. For example, suppose that you are setting up a tree to track currency exposure. You may want to track exposure for only four or five main currencies. In that case, you would set the parent node to Non-recursive because you do not intend to include all possible foreign exchange (FX) deals in the child nodes and you want the parent node to provide total exposure for all currencies. On the other hand, if you want the parent node to provide total exposure for only the currencies that are selected in the child nodes, then you would set the parent node to Recursive. During position analysis, if your tree hierarchy contains parent nodes that are nonrecursive and the children beneath that node do not specifically select all the data, then the remaining amounts are incorporated into an other node so that the sum total of the child nodes equals that of the parent. Values are: Recursive: If a node is recursive, its total is determined by summing the totals of all the child nodes beneath it. Non-recursive: If a node is nonrecursive, its total is determined by summing the amounts for those transactions that meet the selection criteria for that node, independent of any child nodes that may exist beneath it. |
Position Currency |
Each node can report amounts in a different currency. Select the currency on which to base this node's amounts. Any amounts that are not in this currency are revalued to this currency, using the market rate settings that you made on the Tree Wide Options page. |
Note: End nodes, or leaves, of a tree must always be set to Non-recursive, and nonrecursive nodes must have selection criteria defined for each position source they use.
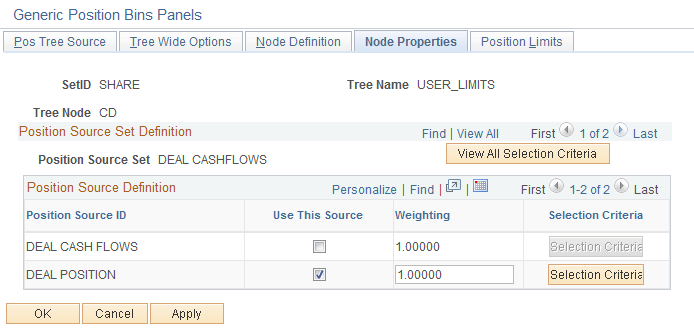
Use the Node Properties page (POS_SOURCE_SET_PNL) to identify sources for the specified node.
Navigation:
Click the Edit Data icon on the Tree Manager page.
Select the Node Properties tab.
This example illustrates the fields and controls on the Node Properties page. You can find definitions for the fields and controls later on this page.
Field or Control |
Description |
|---|---|
Use This Source |
Deselect this check box to prevent use of a position source ID. |
Selection Criteria |
Click this button to view the Selection Criteria page (POS_DEF_WHERE_SEC) for the selected position source ID, or click the View All Selection Criteria button to view all selection criteria information. |
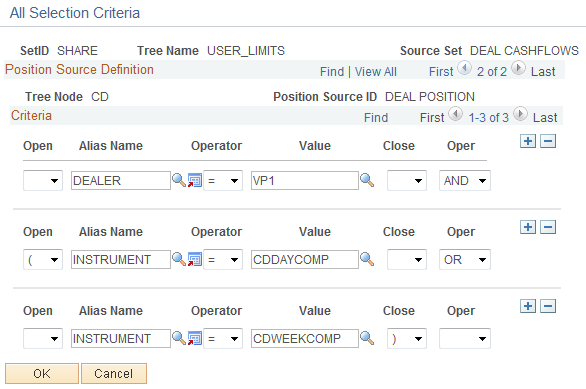
Use the Node Properties - All Selection Criteria page (POS_ALL_CNDTN_SEC) to create SQL statements of selection criteria for position source IDs.
After you create SQL statements with selection criteria for position source IDs, use the Create Position SQL page to process the SQL statements for the tree.
Navigation:
Click the View All Selection Criteria button on the Node Properties page.
This example illustrates the fields and controls on the Node Properties - All Selection Criteria page. You can find definitions for the fields and controls later on this page.
Field or Control |
Description |
|---|---|
Open andClose |
Select a character to open or close the statement. |
Operator |
Select a mathematical operator, and specify the value for the alias name. |
Oper (operand) |
Select a value when concatenating multiple SQL statements. |
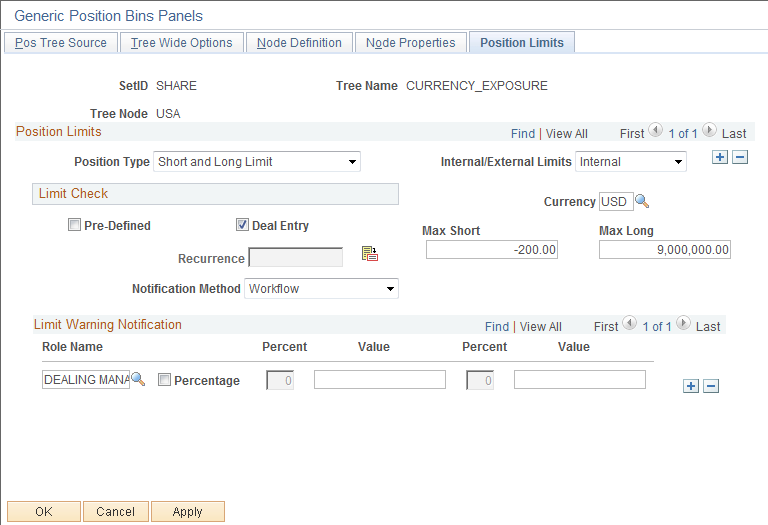
Use the Position Limits page (POS_LIMITS) to indicate when limit checking should occur, who should be notified, and under what conditions.
If you are using the Limit Checked workflow, you must establish position limits for the system to generate notifications.
Navigation:
Click the Edit Data icon on the Tree Manager page.
Select the Position Limits tab.
This example illustrates the fields and controls on the Position Limits page. You can find definitions for the fields and controls later on this page.
Field or Control |
Description |
|---|---|
Position Type |
Select from the following options: Long Limit Only: Select this option if you want notification in conditions in which you have a long position. Specify values in the Min (minimum), Max (maximum), and Long fields. Short and Long Limit: Select this option if you want notification in conditions in which you have either a short or a long position. Specify values in the Max Short and Max Long fields. Short Limit Only: Select this option if you want notification in conditions in which you have a short position. Specify values in the Min Short and Max Short fields. |
Internal/External Limits |
Indicate whether the limit is determined by an Internal source or is imposed from an External source, such as counterparty. |
Currency |
Enter the long and short limit amounts for the defined currency. |
Limit Check
Use the Limit Check grid to indicate when these position limits are checked. You can select both the Pre-Defined and Deal Entry check boxes.
Field or Control |
Description |
|---|---|
Pre-Defined |
Select for position limits to be automatically checked, and define a value in the Recurrence field to check position limits at regular intervals. |
Deal Entry |
Select to ensure that these position limits can be checked at deal entry (by clicking the Test Limits button on the Deal Detail page). |
Notification Method |
Choose the notification method for processing the facility review:
|
Limit Warning Notification
Field or Control |
Description |
|---|---|
Role Name |
Select a role name to receive warning notification. Specify either a limit value or select the Percentage check box, and enter a limit percent that activates the warning notification. |
Use the Create Position SQL page (POS_CREATE_SQL) to translate conversational language into the language of database operations.
You can roll up functions by extending SQL statements downward from the parent level. This page is automatically accessed if needed when you are running position trees in the Position Manager.
Navigation:
Field or Control |
Description |
|---|---|
Create SQL |
Click to generate the SQL for the tree. When the process finishes, a dialog box appears with this message: Completed creating SQL. |
SQL Statement |
Displays the SQL statement that the system generates for the node. |
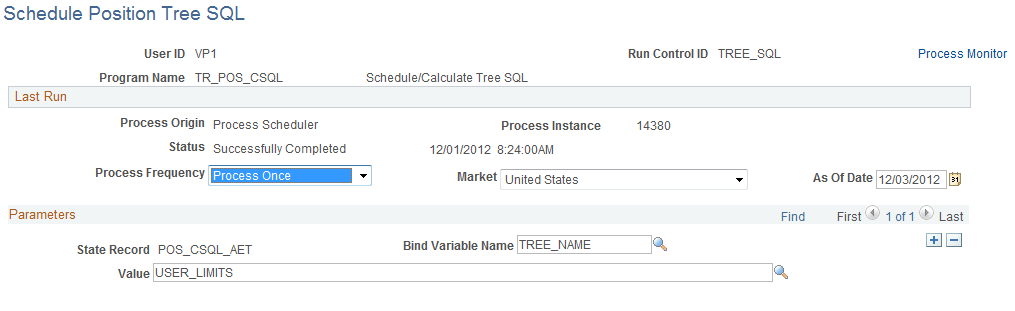
Use the Schedule Position Tree SQL page (TR_AE_RUNCNTL) to run the Schedule/Calculate Tree SQL process (TR_POS_CSQL) to set up the intervals at which your SQL runs.
Navigation:
This example illustrates the fields and controls on the Schedule Position Tree SQL page. You can find definitions for the fields and controls later on this page.
Field or Control |
Description |
|---|---|
Bind Variable Name |
Select the bind variable name of TREE_NAME, and enter the specific tree name to be calculated in the Value field. You can add records and specify as many bind variable names as are pertinent to the job. |