Creating and Maintaining ECOs
With PeopleSoft Engineering, you can efficiently create and maintain ECOs, including the definition of top-level information and items affected, as well as workflow data.
This topic lists common elements and discusses how to create and maintain ECOs.
|
Page Name |
Definition Name |
Usage |
|---|---|---|
|
EG_ECO_HEADER |
Maintain ECO header information including items affected data. For quick entry, this page contains all the fields required on the ECO. |
|
|
Maintain ECOs -Header: Email Log Page |
EG_SS_EMAIL_LOG |
View the thread of messages for a particular ECO. If this page is blank, no emails have been sent regarding this ECO. |
|
Maintain ECOs - Supplier Access List Page |
EG_SS_ECOVND_LST |
View a list of suppliers that can have access to this ECO. |
|
EG_ECO_REASONS |
(Optional) Associate reason and action codes with an ECO. |
|
|
Maintain ECOs - Header: Documents |
EG_ECO_DC |
Associate, access, and manage pertinent ECO documents in the embedded document management system. |
|
Maintain ECOs - Header - Attachments Page
|
EG_ECO_ATT |
Attach multimedia objects, or files, that relate directly to the ECO. Once attached, you can view these objects directly from this page. |
|
Maintain ECOs - Items Affected: Detail Page |
EG_ECO_ASSY |
|
|
Maintain ECOs - Items Affected: Reason/Action |
EG_ECO_ASSY_RES |
(Optional) Associate reason and action codes for each item affected by an ECO. |
|
Maintain ECOs - Items Affected: Document |
EG_ECO_ASSY_DC |
Associate, access, and manage pertinent item documents in the embedded document management system. |
|
Maintain ECOs - Items Affected: Attachments |
EG_ECO_ASSY_ATT |
Attach multimedia objects, or files, that relate to the affected item. Once attached, you can view these objects directly from this page. |
|
EG_ECO_ASSY_SCHD |
Review the engineering BOM and production release status for each item affected, as well as activate an ECO pending alert button on several related pages. |
|
|
EG_ECO_ROUTINGS |
Assign the ECO type, submit the ECO to workflow, define the ECO requestor, and associate related ECRs and ECOs. |
|
|
EG_IC_ECO_REVIEW |
Enter ECO approval information data and approve individual ECO workflow steps. |
|
|
ECO Report |
EG_ECO_REPORT |
Generate an ECO report (EGS1000). |
|
Approve/Convert ECRs |
EG_ECR_APPROVAL |
Change the status of an ECR, and optionally convert ECRs into ECOs. |
Field or Control |
Description |
|---|---|
Status |
Represents the overall state of the ECO. Values include: Pending, Canceled, Denied, Approved, and Released. You can change the overall status of the ECO with the Approve ECOs page. When you add an ECO, the system sets the status to Pending. Note: You must set this status to Approved before engineering BOMs can be transferred to manufacturing. |
Type |
Select the type of change. Values are:
|
|
Click the View Related Links button in the Item ID column to access any one of these pages:
|
BOM Type |
Select a type. Values are:
|
Routing Type |
Select a type. Values are:
|
|
Click the Attachments button to launch the multimedia object attached to the ECO. |


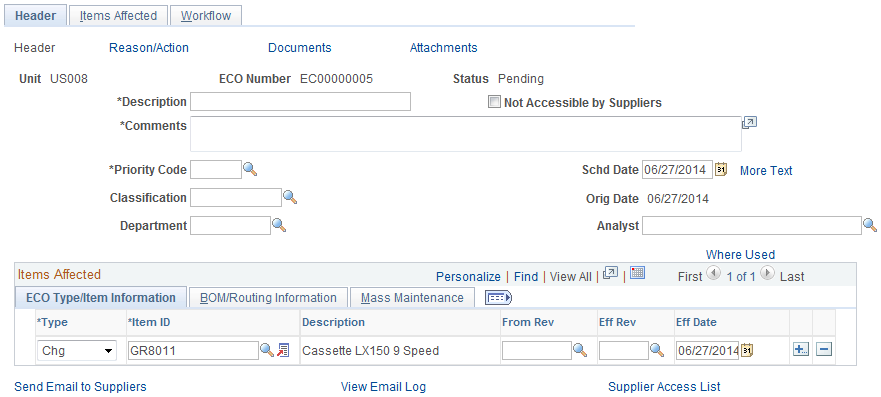
Use the Maintain ECOs - Header: Header page (EG_ECO_HEADER) to maintain ECO header information including items affected data.
For quick entry, this page contains all the fields required on the ECO.
Navigation:
This example illustrates the fields and controls on the Maintain ECOs - Header: Header page. You can find definitions for the fields and controls later on this page.
Field or Control |
Description |
|---|---|
ECO Number |
Displays NEXT, if this is a new ECO and you are using automatic numbering. |
Status |
Displays Pending, when you add an ECR. This status represents the overall state of the ECR. Other statuses include Canceled, Denied, Approved, and Converted. |
Description, Comments, Priority Code, and Department |
Displays default values from the ECR, if the ECO was converted from an ECR. Otherwise, you must enter the information. |
Not Accessible by Suppliers |
Select to block access to a specific ECO. Therefore, even if suppliers have been granted access with the BOM Access by Supplier page in PeopleSoft Manufacturing, you can deny them access to a specific ECO. |
Department |
Select or change the department responsible for the ECO. Departments are defined in the PeopleSoft General Ledger business unit. |
Schd Date (scheduled release date) |
Enter a date to identify when the ECO is scheduled to be released to manufacturing. This date does not represent the scheduled effectivity dates or revisions for the assemblies being changed. When you run the BOM Mass Maintenance process to automatically create new revisions, the scheduled release date is the effective date of any created revisions. |
Orig Date (original release date) |
Displays the original ECO scheduled date. This field is display only; the system sets it the first time that you save the ECO. |
Where Used |
Click this link to access the Select Assemblies by Items Where Used page, where you can find the item information that you need to populate the Items Affected region of the page. |
Items Affected
Field or Control |
Description |
|---|---|
Type |
Select the type of change. |
Item ID |
Select the changed, impacted, or new item ID. You can specify Make, Buy, Floor Stock, or Expensed items; however, you cannot specify PeopleSoft Supply Planning items. If the request is for a new item ID that doesn't yet exist on the Item Definition page, enter a placeholder item here. Note: If you list an impacted item, you must also list the corresponding new or changed item that impacts it. You can associate multiple items with a single ECO. |
From Rev (from item revision) |
Enter the originating revision on which you are basing the change. You can add multiple ECOs that affect the same item revision. Note: The from and effective revisions need to be defined with the Revision Maintenance page prior to using them here. |
Eff Rev (effective item revision) |
Select the new revision that is in effect after the change is implemented. If the item ID is revision-controlled, you can access this field; otherwise, it is display-only. You must have already defined this revision in the system, and the effective item revision can't have a start date that is prior to the From item revision. After you enter the effective revision, the system displays the start date of the revision in the Eff Date (effective date) field. If the item is not revision-controlled, you can enter the effective date for the change. Enter the new effectivity date for which the changes are in effect. Both Eff Rev and Eff Date fields are for informational purposes only. If you make changes to the BOM, the component ID effective and obsolete dates and revisions on the BOM should reflect this effective revision or date. |
Send Email to Suppliers |
Click to send email to suppliers, if you have enabled external access to suppliers for PeopleSoft Engineering information. The email contains one or two URLs. One URL sends the recipient back to the Header: Header page. A second URL sends the recipient to the Change Order Detail page. |
View Email Log |
Click to access the Email Log page, where you can view the entire thread of messages sent regarding the ECO. |
Supplier Access List |
Click to access the Supplier Access List page, where you can view the list of suppliers that can have access to this ECO information. |
BOM/Routing Information tab
Select the BOM/Routing Information tab on the Maintain ECOs - Header: Header page.
This example illustrates the fields and controls on the BOM/Routing Information for the ECO. You can find definitions for the fields and controls later on this page.

Field or Control |
Description |
|---|---|
BOM Chg (BOM change) |
Select if the item that you selected will need a BOM change as a result of the ECO. This field, along with the BOM Type and BOM Code fields, is used by the BOM transfer and mass maintenance functionality to transfer BOMs between PeopleSoft Engineering and PeopleSoft Manufacturing. When you select BOM Chg and you later run the engineering transfer or mass maintenance functions, the system assumes that a BOM is to be transferred or changed. If you deselect this check box, the BOM Type and BOM Code fields are unavailable for selection, and Production appears by default as the BOM type. |
BOM Type and BOM Code |
Select values for these fields. |
BOM Type |
Select a value for this field. Values are Production (default) and Rework. |
Rtg Chg (routing change) |
Select if the item that you selected will need a routing change as a result of the ECO. This field, along with the Routing Type and Routing Code fields, is used by the engineering transfer functionality to transfer routings between PeopleSoft Engineering and PeopleSoft Manufacturing. When you select Rtg Chg, and you later run the engineering transfer function, the system assumes that a routing is to be transferred or changed. |
Routing Type |
Select a value for this field. Values are Production (default), Rework, and Teardown. |
Routing Code |
Select a value for the routing. |
Mst Rtg (master routing) |
Selected if the item's routing is a master (or reference) routing that is currently used by another item; this check box is display-only. |
If you enter a value in the BOM Code or Routing Code field, you are indicating that the codes associated with the item ID are impacted by the ECO. If either field is left blank, you are indicating that all BOM and routing codes for the item ID are impacted. If the BOM Chg check box is selected, this indicates that one or more BOMs for the item is impacted by the ECO, and the BOM Code field becomes available. Likewise, if the Rtg Chg check box is selected, this indicates that one or more routings for the item is impacted by the ECO, and the Routing Code field becomes available.
Indicating BOM and routing changes on the ECO has this impact in PeopleSoft Engineering:
Engineering transfers use this information to transfer and validate specified BOMs or routings to and from PeopleSoft Engineering.
The mass maintenance code is applied to all BOM codes specified when run (when mass maintenance is specified for the item ID).
If you run the Mass Maintenance process combined with the auto revision feature, new revisions are created for the BOM items.
In addition, new BOM components are introduced to the BOMs effective for the new automatic revisions.
Mass Maintenance tab
Select the Mass Maintenance tab on the Maintain ECOs - Header: Header page.
This example illustrates the fields and controls on the Mass Maintenance information for the ECO. You can find definitions for the fields and controls later on this page.

When an ECO is impacting several BOMs (for example phasing out a component and adding a revised component), you can implement the actual BOM changes by listing the impacted assemblies on the ECO and associating a Mass Maintenance Code (MMC). This code specifies the details of the change. This tab enables you to associate the MMC with the impacted assemblies. After saving this information on the ECO, you can use Mass Maintenance by ECO to implement changes to the BOMs.
Field or Control |
Description |
|---|---|
Mass Maint Code (mass maintenance code) |
Select the code that will be the ECO default MMC. You can then use this default or select a different MMC for the ECO-affected items displayed. The MMC status appears as a display-only field. Note: You can specify an MMC for an item only if you select the BOM Chg check box. You can change the MMC for an item at any time, except when the status for the MMC is Success. |
|
Click the View Related Links button in the Mass Maint Code column to access one of these links: Add Mass Maintenance Code: Click this link to access the BOM Mass Maintenance page to add a new mass maintenance code. Update Mass Maintenance Code: Click this link to access the BOM Mass Maintenance page to update an existing mass maintenance code. |
Rev Up (automatic revisions) |
Selected by default if the associated MMC is set to use automatic revision and if the associated affected item is both revision-controlled and set to automatic revisions. You can select this check box to manually automatically revision the item, if the item is set up to automatically increment the revision and the MMC is blank or the MMC used does not specify automatic revision. If you decide to automatically increment the revision for the item, then select this check box, and run the BOM Mass Maintenance by ECO process for the ECO in order to complete the automatic revisioning for the item. You can also use this check box to automatically increment the revisions of higher-level assemblies. If you set Type to Imp (impacted), and the item is defined to use revision-controlled and automatic revisions, you can select Rev Up to indicate that this item's BOM is to be automatically incremented to the next revision when the mass maintenance by ECO process is run. Note: The Rev Up feature cannot be run with the mass maintenance by MMC process nor can it be run within PeopleSoft Manufacturing. |
|
Click the Look Up Mass Maintenance Code button to find additional parent assemblies in which to automatically create revisions. |
Rev Created (automatic revision created) |
This check box indicates that the BOM Mass Maintenance by ECO process has been run for this ECO and the revision has been successfully created. This field is always display-only. |


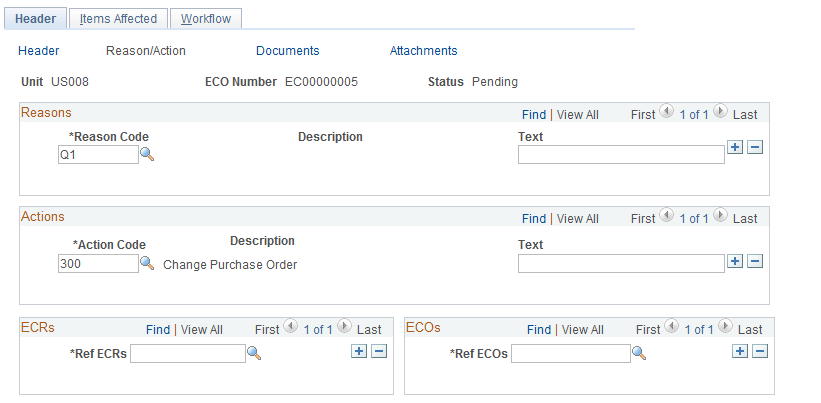
Use the Maintain ECOs - Header: Reason/Action page (EG_ECO_REASONS) to (Optional) Associate reason and action codes with an ECO.
Navigation:
This example illustrates the fields and controls on the Maintain ECOs - Header: Reason/Action page. You can find definitions for the fields and controls later on this page.
Field or Control |
Description |
|---|---|
Reason Code and Action Code |
Select reason codes and action codes. Reason codes reflect why a change is required. Action codes are based on engineering codes and represent the foreseen potential impact of the request. You can add unlimited reason and action codes. |
Text |
Enter additional reason and action codes. Note: These reasons and actions apply to the overall ECO and are not item-specific. |
Ref ECRs (reference ECRs) and Ref ECOs (reference ECOs) |
Link an ECO to one or more existing ECRs or ECOs. If the ECO was originally converted from an ECR, the system automatically populates the Ref ECRs field with the original ECR from which it was converted. |
Use the Maintain ECOs - Header - Attachments page (EG_ECO_ATT) to attach multimedia objects, or files, that relate directly to the ECO.
Once attached, you can view these objects directly from this page.
Navigation:
Field or Control |
Description |
|---|---|
File Ext (file extension) |
Select the type of media that you want to attach. You set up file extensions by using the File Locations page. |
Document ID and Description |
Enter the file name and description of the multimedia file that you're attaching. |
Note: Attachments have no integration or relation to the embedded document management functionality. They are most useful if you aren't using the document management functionality.
Use the Maintain ECOs - Items Affected: Status page (EG_ECO_ASSY_SCHD) to review the engineering BOM and production release status for each item affected, as well as activate an ECO pending alert button on several related pages.
Navigation:
Field or Control |
Description |
|---|---|
Engineering BOM Exists |
In the Engineering BOM Status group box, this check box is display-only. The system selects it if an engineering BOM currently exists for the item ID and BOM code combination. |
User ID and Copy Date/Time |
Displays the user ID and the date and time of copy, if the BOM was copied into engineering. If you specified a BOM code for this item's BOM, then the copy information refers to that particular BOM code. If the BOM code is blank, then the copy information refers to the last BOM code that was copied to engineering. |
Engineering Routing Exists |
In the Engineering Routing Status group box, this check box is display-only. The system selects it if an engineering routing currently exists for the item ID and routing code combination. |
User ID and Copy Date/Time |
Displays the user ID and the date and time of copy, if the routing was copied into engineering. If you specified a routing code for this item's routing, then the copy information refers to that particular routing code. If the routing code is blank, then the copy information refers to the last routing code that was copied to engineering. |
Release Date |
Enter the release date. The release date is the scheduled release date of the item ID and BOM and routing changes to production, by using the Approve ECO page, the engineering transfer process, or the BOM mass maintenance process. Note: Today's date initially appears by default as the release date. It can be modified until the BOM, routing, or both are released by using the Engineering Transfers process, at which time the Release Date field is updated with the actual transfer date and becomes unavailable for input. |
Release Status |
Select the production release status. Values are:
|
Orig Date (original date) |
Displays the original release date for the ECO item. |
ECO Pending Alert |
Select to make pending ECOs visible within EBOM, MBOM, item revision, and routing maintenance pages. |
|
When you select the ECO Pending Alert check box, the ECO button appears on these pages when information (such as item revisions) is maintained for the item with an ECO against it. When you click the ECO button, you can display the pending ECO, effective revision for the change, and associated text describing the change. Once the ECO is released, the ECO button no longer appears. |

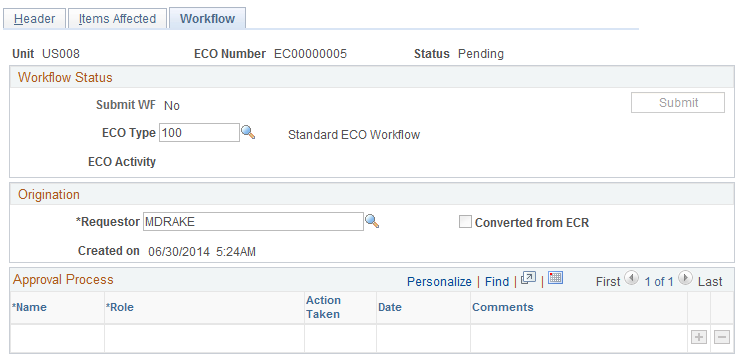
Use the Maintain ECOs - Workflow page (EG_ECO_ROUTINGS) to assign the ECO type, submit the ECO to workflow, define the ECO requestor, and associate related ECRs and ECOs.
Navigation:
This example illustrates the fields and controls on the Maintain ECOs - Workflow page. You can find definitions for the fields and controls later on this page.
Field or Control |
Description |
|---|---|
ECO Type (ECO approval type) |
You can optionally associate the ECO with an ECO type. When you specify an ECO type, the ECO Activity field displays the first sequence and ECO activity, as defined within that ECO type. ECO approval types enable you to associate the ECO with a sequential routing of activities through which the ECO must move and which must be promoted prior to its completion. To promote or demote ECO activities, use the Promote ECO Activity page. You can use this feature independently of workflow. If workflow has been enabled with the Engineering Options page, and the ECO type has a business process and approval rule set associated with it, then the ECO can be routed through steps defined within the approval rule set so that role users can approve, deny, or recycle an ECO. When the ECO is routed within workflow, the current activity appears. These role users access ECO approval processing by way of the worklist. Note: You can't change the ECO Type field once the ECO has been submitted to workflow. |
Submit |
If workflow has been enabled with the Engineering Options page, and the ECO type has a business process and approval rule set associated with it, you can click this button (which also saves the ECO) to initiate workflow approval processing as defined for the ECO type that you specified. Once workflow has been initiated, the system displays Submitted in the Submit WF (submit workflow) field, and the field is unavailable. If the workflow has been submitted, a list of users and related roles to which the workflow is submitted appears in the Approval Process scroll area. The list of users is originally derived from the ECO type and approval rule set associated with it. Once created, this list can be modified to include or exclude additional users for this particular ECO. As long as you don't click the Submit button, workflow won't be initiated. If workflow hasn't been enabled, this field is unavailable for selection. |
Requestor |
Enter the name of the requestor in the Origination group box. The value of this field appears by default from an associated ECR if converting an ECR created the ECO. |
Converted from ECR and Created on |
If the ECO was created from a converted ECR, then this display-only check box is selected and the created on time stamp displays the time that the ECR was converted to an ECO. If the ECO wasn't converted from an ECR, then the created on time stamp displays the current time by default and is display only. |
After an ECO is submitted for workflow, the list of approvers is determined and displayed in the Approval Process group box. The person who submits the ECO for workflow processing is listed as the originator. You can add or delete approvers from the workflow Approval Process as long as the person has not yet approved the workflow entry for the ECO. Once the approver has taken an action, all the fields are unavailable for selection. When a new approver is added, the step for the new approver is set at the next step by the system. For example, if AMS2 is at step 2, and the Add button is clicked, the new approver is added with step 3. This means that the new approver is notified when all approvers at step 2 have approved the ECO.
When a workflow approver approves an ECO, the approver in the next step is notified with an email or worklist entry. The method by which each approver is notified depends on the workflow rules set up using the Workflow System Rules page. If an approver denies or recycles an ECO, then the approver in the previous step is notified, and the action taken is reset to Pending.
See also PeopleSoft Engineering, “Delivered Workflows for PeopleSoft Engineering”.
Use the Maintain ECOs - Approval page (EG_IC_ECO_REVIEW) to enter ECO approval information data and approve individual ECO workflow steps.
Navigation:
For multiple step approval, the Maintain ECOs - Approval page is visible only if all of these statements are true:
The current user is the current approver in the list of approvers, as displayed in the Approval Process group box on the Maintain ECOs - Workflow page.
The action is not Approved.
All approvers at the previous steps have already approved the prior ECO workflow approval status.
For single-step approval, the Approval page is visible if the current user is in the list of approvers and the approval action is not set to Approved.
You need to grant privileges to ECO approvers for these objects:
On the Permission Lists - Pages page, you need to add WORKLIST.
The approver uses this to access ECOs that need to be reviewed.
On the Permission Lists - Component Interface page, you need to add WORKLISTENTRY.
This component interface is used to mark an ECO as worked after the ECO is reviewed or approved.