Creating a Pick Plan for Work Order Items
One of the ways to issue items to a work order technician is to generate a pick plan, physically pick the items, and then issue the items to the work order. This section discusses generating the pick plan. The pick plan is an optional step in PeopleSoft Inventory, the use of it depends on your environment. The Work Order Pick Plan process (IN_ALM_PICK ) creates the pick batch ID and allocations, then generates the INS6010 pick plan report. The pick plan can generate the material storage locations to pick from using the directed picking rules, a specific material storage location, or the default shipping location. If the Work Order Pick Plan process errors during processing, use the Release Inventory Locks page to release the records from processing.
The work order pick plan can be generated from:
The Work Order Pick Plan process page within PeopleSoft Inventory.
Additional parameters for the pick plan can be set up using the Report Options link on this page.
The Picking Plan button on the Work Order- Schedules: Inventory page within PeopleSoft Maintenance Management.
The Work Order Pick Plan process is run on all line items listed in the Inventory Schedules group box unless you select one or more line items before using the Picking Plan button. If no line items are selected then clicking the Picking Plan button runs the Work Order Pick Plan process on all line items.
The parameters for the pick plan can be set up using the Picking Plan Setup link on this page.
Note: The Order Release Request process, Fulfillment Workbench, and fulfillment engine application messages will not process work order lines.
Using the Work Order Pick Plan process page, you can:
Create a push pick plan that uses hard allocations to stock at specific material storage locations to fulfill the demand line.
If the item is defined as a soft-reserve item but has not yet been reserved, then the item quantity is also soft-reserved at the business unit and item level.
Create a pull pick plan that suggests material storage locations with stock to fulfill the demand line.
Reprint a previously generated pick plan.
Cancel the allocation and reserve to the demand line on a pick plan.
A work order pick plan inserts the pick batch ID and pick line on the work order demand line in the IN_DEMAND table. This enables the user to access these lines on the Issue to Work Orders component when using an Issue Option that includes a pick list. A work order demand line can only be on one pick plan at a time. If you are using work order pick plans, it is important to monitor any remaining unpicked quantities. For example, if you have 20 units for a work order line displayed on the pick plan and you issue only 15 units, then the system needs to be told what to do with the remaining 5 units. The unpicked quantity remains on the pick plan until you issue or clear the quantity on the Issue to Work Orders component.
Based on the selection criteria, the Work Order Pick Plan process page can pick up a pre-allocated demand line. The work order pick plan uses the material storage location and quantity that was in the original pre-allocation.
If the work order's inventory commit rule is to commit when the pick list is created, then only work order items with a scheduled need date within the pick plan's date selection are committed. For example, let's assume a work order contains item ID 10001 with a scheduled need date of today and also item ID 10005 with a scheduled need date of next week. If the work order pick plan is run for a scheduled need date of today, then item ID 10001 is committed to inventory's IN_DEMAND table but not item ID 10005.
If the work order's reservation rule is to reserve when the pick list is created, then only work order lines within the reservation lead days are reserved by the Work Order Pick Plan process.
|
Page Name |
Definition Name |
Usage |
|---|---|---|
|
RUN_IN_WO_PICK |
Enter parameters to generate a pick plan for items needed for a work order. |
|
|
IN_WO_PICK_OPT_SEC |
Define additional options for the report generated by the Work Order Pick Plan process. |
Use the Work Order Pick Plan page (RUN_IN_WO_PICK) to enter parameters to generate a pick plan for items needed for a work order.
Navigation:
This example illustrates the fields and controls on the Work Order Pick Plan process page. You can find definitions for the fields and controls later on this page.
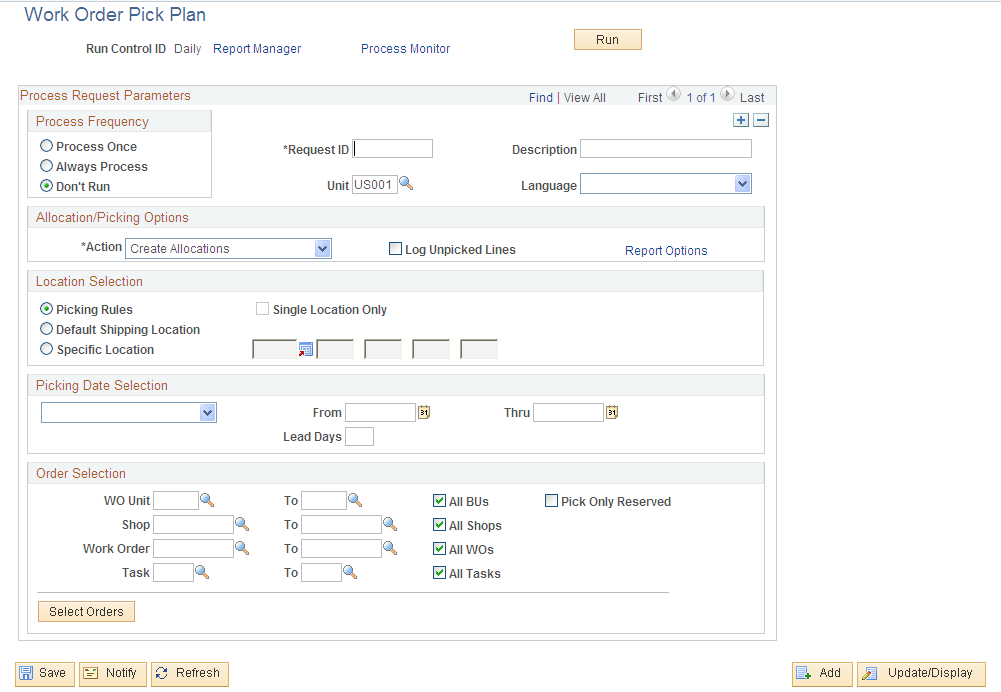
Use this page to generate a picking plan or reprint a picking plan; in addition, you can commit, reserve, allocate, unreserve, and deallocate work order demand lines.
Field or Control |
Description |
|---|---|
Unit |
Enter the PeopleSoft Inventory business unit for this process. |
Allocation/Picking Options
Field or Control |
Description |
|---|---|
Action |
Defines the action to be taken when running this process. The options are:
|
Log Unpicked Lines |
When generating a pick plan, you can select this check box to assign the pick batch ID to the work order lines (parts) that do not have enough available quantity in the inventory business unit. Inserting the pick batch ID on the IN_DEMAND line enables the user to access these lines on the Issue to Work Orders component when using an Issue Option that includes a pick list. If you selected the Log Unpicked Lines check box when you originally generated the pick list and then you reprinted the pick list using the Action of Regenerate Output the unfulfilled demand lines are reported. |
Keep Reservations |
If you have selected the Cancel Allocation value in the Action field, the system default is to remove the demand line's reservation as well as the allocation. Select this check box if you want to keep the soft-reserve on the demand lines. |
Keep Pre-Allocations |
Select this check box to keep any pre-allocations created through the Allocation Workbench or through pegged putaways. This check box is available when you select the Cancel Allocation value in the Action field. |
Keep All Allocations |
Select this check box to keep any allocation (pre-allocation or standard allocation) currently assigned to the demand line. This check box is available when you select the Cancel Allocation value in the Action field. |
Report Options |
Click to access the Report Options page where you can define the print options for your pick plan. |
Location Selection
When creating a pick plan, these options determine how the process suggests material storage locations for picking.
Field or Control |
Description |
|---|---|
Picking Rules |
Select to use the picking rules defined by the picking algorithm entered in the Location Option field of the Setup Fulfillment-Order Release page or defined for the individual item on the Setup Item Fulfillment page. |
Default Shipping Location |
Select to use the Default Ship Location defined on the Setup Fulfillment-Shipping page or defined for the individual item on the Setup Item Fulfillment-Shipping Options page. |
Specific Location |
Select to define the material storage location in the fields to the right. |
Single Location Only |
Select to have the picking plan suggest only one material storage location for picking each demand line. You must select the Default Shipping Location or the Specific Location option to use this check box. |
Picking Date Selection
To narrow the selection even further, you can release work order parts based on their Schedule Needed Date. This date is located on the Material tab of the Work Order-Schedules: Inventory page. For example, you might want to pick orders whose parts have a schedule needed date of today or through next week. These picking date selections can default from the Order Release Date/Time Select group box of the Setup Fulfillment-Order Release page.
Field or Control |
Description |
|---|---|
Date Range |
The process includes demand lines needed within the specified From and Thru parameters. For example, you could select work orders for picking that have schedule needed dates between Monday and Wednesday. |
Lead Days |
The process includes demand lines needed on or before today's date, plus the specified picking lead time entered in the Lead Days field. For example, you could select to picking orders needed tomorrow by entering 1 in the Lead Days field. Note: If the business unit requires closure calendar validation for shipping activities as defined on the Closure Calendar page, and the schedule needed date falls on a defined closure date, the system adds one day for every closed day to the picking lead time to compare against the schedule needed date. Times are not included in these calculations. |
Today |
The process includes demand lines with a schedule needed date of today. |
Order Selection
This group box can limit picking to a subset of the work orders meeting the selection criteria. Use the Select Orders button to retrieve all orders that match the search criteria entered above on this process page, then you can select individual orders to be released. This option is particularly useful when time is short or when you want to reduce the picking workload to small batches that are easily handled by a single picker.
Note: Although you select orders based on work order numbers rather than on specific order schedule lines, only schedules meeting the selection criteria are actually added to pick plan.
When you save this process page after selecting individual orders in the Work Orders group box, PeopleSoft Inventory automatically assigns a unique pick release ID to the active run control and to each selected demand line. The run control will process only the demand lines associated with this pick release ID. If you do not select individual work orders in this group box, the run control processes all demand lines that meet the selection criteria.
The pick release ID gives you the flexibility to exit and reenter the process page without having to select the orders again. When you click the Select Orders button, the system retrieves any previously selected work orders in addition to those matching the current search criteria. The system assigns any new orders to the same pick release ID that you assigned to the original selections. After you run this run control the system resets the pick release ID to 0. The system also resets the ID for any demand lines that you cancel before running the process.
Field or Control |
Description |
|---|---|
Pick Only Reserved |
Select this check box to limit the selection to demand lines that have been previously reserved. The system will not try to reserve additional quantity for partially reserved demand lines. The system will still select non-soft reserve items and items whose work order reservation reserve rule is Pick Plan Creation. |
WO Unit, Shop, Work Order, and Task |
Enter work order selection criteria to narrow the items displayed when the Select Orders button is used. |
Select Orders |
Click this button to open the Work Orders group box where you can select to release a subset of the work orders meeting the selection criteria. |
Sel |
Select the check box for each work order that you want to include. |
Src BU |
Identifies the PeopleSoft Maintenance Management business unit of the work order. |
Use the Report Options page (IN_WO_PICK_OPT_SEC) to define additional options for the report generated by the Work Order Pick Plan process.
Navigation:
Select the Report Options link on the Work Order Pick Plan page.
This example illustrates the fields and controls on the Report Options page. You can find definitions for the fields and controls later on this page.
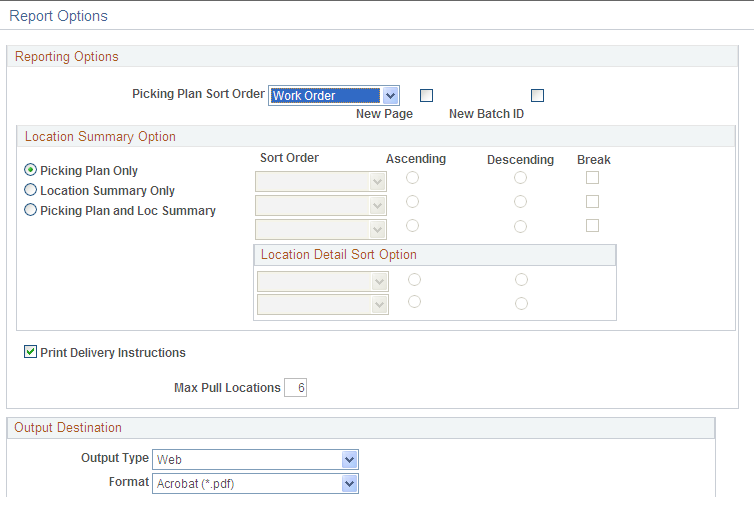
The pick plan report always displays the unfulfilled quantity. If the entire quantity cannot be fulfilled, then the work order demand line appears in the unfulfilled section of the report. If the work order demand line can be partially fulfilled, then the unfulfilled quantity is displayed as another row on the pick plan report directly below the quantity that can be fulfilled.
Reporting Options
Field or Control |
Description |
|---|---|
Picking Plan Sort Order |
Specify how to sort your picking plan. You can sort by the PeopleSoft Maintenance Management fields of work order ID, work order task, part number, or shop ID. |
New Page |
Select this check box to insert a page break at the sort level. |
New Batch ID |
Select this check box to create a new pick plan ID at the sort level. |
Print Delivery Instructions |
Select to print delivery instructions on the pick plan. Delivery instructions are defined on the Work Order-Schedules: Inventory page. |
Max Pull Locations |
Indicate the maximum number of material storage locations to include on a pull picking plan or the maximum number of substitute item material storage locations to print on the picking plan. The default value is 6. |
Location Summary Option
If you are using a push picking plan (the Action of Create Allocations on the Work Order Pick Plan page), you can print a Location Summary report with or without a full Picking Plan report. The Location Summary report sorts the demand lines according to where the items are physically stocked within the warehouse (Inventory business unit). The layout of the printed report reflects the actual positions of stock to be picked, enabling your personnel to fulfill all orders on the picking plan without revisiting locations. The Location Summary report includes two different sorts:
Sort Order: This sort is based on the physical location table (PHYSICAL_INV) that contains the location, quantity, and other details about every item stocked within each inventory business unit. You can select up to three sorts related to the physical location table. For example, if you select Area, as the highest-level ascending sort order, the Location Summary report groups together all demand lines to be picked from storage area A, then groups all lines to be picked from storage area B, and so on. In addition to the layout of the business unit (for example, zones, storage areas, material storage locations), you can also select sort order values based on the stock stored within the business unit, including; item ID, lot ID, serial ID, staged date, and so on.
Location Detail Sort Option: This sort is based on the demand fulfillment tables (IN_DEMAND and its child records) that contain information on the work order itself, including; work order ID, work order task, and shop ID. This sort occurs within the higher-level Sort Order. For example, if you select Area, as the highest-level ascending sort order and Work Order ID as the highest-level ascending location detail sort option, then the Location Summary report groups together all demand lines to be picked from storage area A and, within storage area A, sorts the work order demand lines by work order ID, and next groups all lines to be picked from storage area B, and within B sorts the demand lines by work order ID, and so on.
For each location to be picked, the report displays a row with the full information, including; zone, ASRS ID, material storage location, item, lot, serial, staged date, storage container, quantity to be picked, and the stocking unit of measure (using the sort order). Below this row, the order demand lines are displayed (using the location detail sort option). For example, if you are picking lot-controlled stock using sort orders of storage location and then lot with a location detail sort option of work order ID, then the Location Summary report might look like this:
Storage Area A, Aisle 42, Cabinet 12, Shelf 3 (the material storage location), Item ID LT5001, Lot ID 3000, 25 EA (the quantity to be picked and stocking UOM)
Work Order 1, Line 1
Work Order 1, Line 2
Storage Area A, Aisle 42, Cabinet 12, Shelf 3, Item ID LT5001, Lot ID 3001, 50 EA
Work Order 1, Line 1
Work Order 1, Line 2
Storage Area B, Aisle 18, Cabinet 55, Shelf 1, Item ID LT5001, Lot ID 7000, 100 EA
Work Order 2, Line 1
Note: It is possible to complete all of the picking using only the Location Summary report; however, you can only view details such as picking errors or picking line and schedule orders and notes if you print out a full Picking Plan report.
Field or Control |
Description |
|---|---|
Picking Plan Only, Location Summary Only, and Picking Plan and Loc Summary (picking plan and location summary) |
Indicate which version of the picking plan you are printing. Location summary options are only available when you select Create Allocations in the Action field on the Work Order Pick Plan page. |
Sort Order |
Select up to three sorting levels to sort demand lines on the Picking Plan Location Summary report. These sort orders are based on the locations within the inventory business unit (physical location table). For each level, indicate whether the sort is in ascending or descending order and whether a page break should occur. Values for the highest-level Sort Order field are:
Once a value has been used at a higher-level sort order, the same value cannot be repeated in a lower-level sort. The values for the two lower-level Sort Order fields are:
|
Location Detail Sort Option |
Select up to two location detail sort options. The detail sort options are based on values located on the work order demand line, not the physical locations within the warehouse. For each level, indicate whether the sort is in ascending or descending order. Once a value has been used at the higher-level sort order, the same value cannot be repeated in the lower-level sort. Values for the location detail sort option fields are:
|
Output Destination
Field or Control |
Description |
|---|---|
Output Type |
Identify the type of output for your picking plan. Options are Email, File, Printer, Web, Default, Any, or Window. |
Format |
Identify the type of format for your picking plan. Options vary depending on the Output Type chosen. |
Destination |
Enter the directory into which you want to save the picking plan. |