Creating a Pre-Allocation
A pre-allocation occurs when a demand line is allocated to inventory stock while the demand line is still in the Unfulfilled or Releasable fulfillment state. A pre-allocation can be created by:
The pegging feature.
The Allocation Workbench (IN_ALLOC_WBENCH).
The Create/Update Stock Request (MATERIAL_ISSUES) component.
The Shortage Workbench (IN_SW_WORKBENCH).
For sales orders, the Order Entry Form (ORDENT_FORM) component within PeopleSoft Order Management.
The Inventory Create Stock Request EIP (Enterprise Integration Point).
You can create a pre-allocation to a MSL that is currently being cycle counted.
You can pre-allocate an RTV (return to vendor) order line to non-nettable and restricted MSL.
Pre-Allocation and Undo Fulfillment Processes
When you are returning a demand line that is currently in the Released or Confirmed fulfillment states to an earlier state by using a PeopleSoft process, you can choose to keep the allocation or even the reservation by selecting the Keep Reservations, Keep Lot Allocations, Keep Pre-Allocations, and Keep All Allocations check boxes on the following process pages:
The Undo Fulfillment Request (IN_FUL_UND) process page using the action of Return to Unfulfilled, Return to Releasable, or Return to Released.
The Order Release Request process page using the action of Return to Unfulfilled or Return to Releasable.
The Work Order Pick Plan (IN_ALM_PCK ) process page using the action of Cancel Allocations.
Planning for a Possible Pre-Allocation
When you are working with Released or Confirmed demand lines and anticipate that you might need to return the lines to the Unfulfilled or Releasable states, then you can tell the system to keep your current allocation if the line is moved upstream. Select the value of Pre-Alloc in the Allocation field (ALLOCATE_SOURCE) of an existing row or any new rows added on the following pages:
Material Picking Feedback page (for Released demand lines).
Shipping/Issues - Picking Feedback page (for Released or Confirmed demand lines).
Location / Lot / Serial page of the Fulfillment Workbench (for Released demand lines).
The Inventory Picking page within the SCM Integrations menu (for Released demand lines).
Using the Pegging Feature to Create Pre-Allocations
Pegging links demand to incoming supply. Based on your settings in the Pegging Item Setup page and the Pegging Setup page, a pre-allocation can be created during putaway. When the incoming supply is put away into the inventory business unit, the Complete Putaway (INPPPTWY) process can allocate the incoming supply to the corresponding outgoing demand. Outgoing demand can be a material stock request, sales order, or work order. When the entire pegged quantity is received, then the peg status is complete and the order displays a pre-allocation.
Using the Allocation Workbench
The Allocation Workbench enables you to create, update, or remove a pre-allocation or lot allocation and to create a standard allocation. The Allocation Workbench can be used for:
Material stock requests originating from PeopleSoft Inventory, PeopleSoft Supply Planning, or PeopleSoft Purchasing.
Sales orders created in PeopleSoft Order Management.
Work orders created in PeopleSoft Maintenance Management that have been committed to the PeopleSoft Inventory demand fulfillment table (IN_DEMAND).
Using the Create/Update Stock Request Component
After you have added the lines to a material stock request, you can use the Create/Update Stock Request component to:
Automatically create a pre-allocation to all the demand lines in the order by clicking the Pre-Allocate button on the Stock Request Summary page. The system selects the material storage locations to allocate to the demand lines.
Manually create a pre-allocation for one demand line using the Allocation Workbench. On the Stock Request Summary page, select the line and select Allocations in the Line Menu field to access the Allocation Workbench-Summary page. Using the Allocation Workbench, you can create a pre-allocation or lot allocation, or move the demand line to the Released state and create a standard allocation.
Create a lot allocation using the Allocate Lots (LOT_ALLOC_ORDR_INV) component. On the Stock Request Summary page, select the line and select Allocate Lot in the Line Menu field.
See Creating or Modifying Orders Online in PeopleSoft Inventory.
Using the Shortage Workbench
On the Shortage Workbench, select Pre-Allocate in the Header Action field or the Detail Action field to automatically create a pre-allocation to the selected demand lines. The system selects the material storage locations to allocate to the demand lines.
See Understanding Shortage Handling in PeopleSoft Inventory.
Pre-Allocating Sales Orders in PeopleSoft Order Management
The Order Entry Form component within PeopleSoft Order Management can be used to pre-allocate or lot allocate sales orders by accessing the Allocation Workbench. Using the Allocation Workbench, you can create a pre-allocation or lot allocation, or move the demand line to the Released state and create a standard allocation. From the Order Entry Form, access the Allocation Workbench by:
Selecting Allocations or Lot Allocation in the Header Menu field. All lines on the sales order are displayed on the workbench.
Selecting a line of the sales order and then selecting Allocations or Lot Allocation in the Line Menu field. Only the selected line is displayed on the workbench.
Pre-Allocating Stock Requests Using the Inventory Create Stock Request EIP
Within the PeopleSoft Integration Broker, the Inventory_Create_Stock_Request service operation enables you to send data from a third-party source into the PeopleSoft Inventory system and create a new material stock request (MSR) or a new demand line on an existing MSR, including external orders, internal orders, interunit transfers, and RTV orders. When the new material stock request is created in the Unfulfilled or Releasable fulfillment state, you can choose to pre-allocate using the LLS (location, lot, serial) level of the message where the ALLOCATE_SOURCE field and the MSL can be defined.
Note: The LLS level is used to further identify instructions for how a transaction should be processed. Information such as MSLs, lot ID, serial ID, staged dates, and storage containers are carried at this level.
|
Page Name |
Definition Name |
Usage |
|---|---|---|
|
IN_ALLOC_WB_SRCH |
Enter search criteria to display demand lines in the Allocation Workbench. |
|
|
IN_ALLOC_WB_SUMMRY |
Create, update, or remove a pre-allocation or lot allocation and create a standard allocation using the Allocation Workbench. Use the Allocation Workbench-Summary page to have the system automatically select the material storage location or lot ID for allocation or to access the Allocation Workbench-Detail page. |
|
|
IN_ALLOC_WB_DETAIL |
Manually select the specific material storage location or lot ID for allocation to the demand line. In addition, you can use this page to view, change, or remove the current allocations. |
Use the Allocation Workbench - Search page (IN_ALLOC_WB_SRCH) to enter search criteria to display demand lines in the Allocation Workbench.
Navigation:
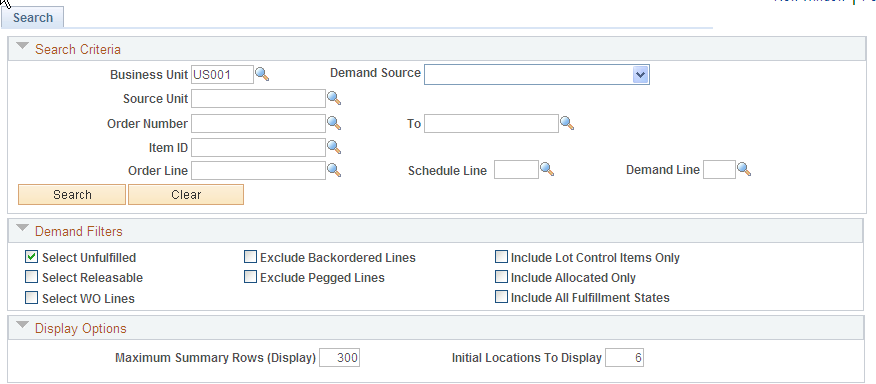
This example illustrates the fields and controls on the Allocation Workbench - Search page (1 of 2). You can find definitions for the fields and controls later on this page.
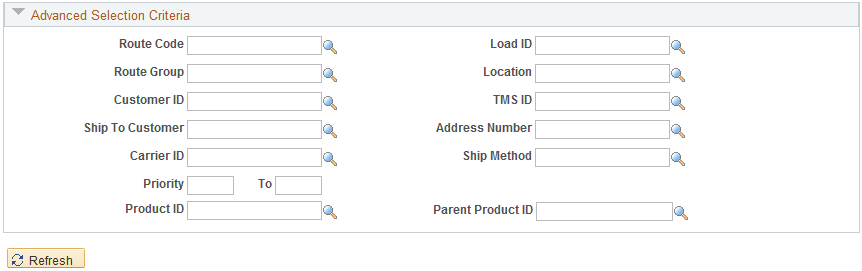
This example illustrates the fields and controls on the Allocation Workbench - Search page (2 of 2). You can find definitions for the fields and controls later on this page.
The Allocation Workbench - Search criteria page is the entry point into the Allocation Workbench component. Enter the demand selection criteria, and then click the Search button to view the search results on the Allocation Workbench-Summary page.
Search Criteria
Enter the selection criteria to find demand lines for the Allocation Workbench.
Field or Control |
Description |
|---|---|
Business Unit |
Enter the PeopleSoft Inventory business unit containing the demand lines that you want to change. |
Demand Source |
Restrict the orders displayed on the Allocation Workbench-Summary page to one of the following sources:
|
Source Unit |
Enter the business unit where the orders originated. |
Order Number and To |
Enter the order number or range of order numbers to display. If you enter a range of orders using the Order Number and To fields, then the system displays all eligible orders, sorted in alphanumerical order, that fall between the starting and ending order numbers. |
Item ID |
Enter an item ID to select only demand lines using this item. |
Order Line, Schedule Line, and Demand Line |
Enter the line number, schedule line number, and demand line number to display a specific line of the order number entered previously. |
Search |
Click to initiate a search for demand lines that match all the criteria entered on this page. |
Clear |
Click to erase all of your field entries on this page. |
Demand Filters
Use the Demand Filters group box to select or exclude demand lines based on fulfillment status, allocation type, and other criteria.
Field or Control |
Description |
|---|---|
Select Unfulfilled |
Select to include demand lines in the Unfulfilled fulfillment state. Lines in this state can be pre-allocated or lot allocated (if the item is defined for lot allocation). |
Select Releasable |
Select to include demand lines in the Releasable fulfillment state. Lines in this state can be pre-allocated or lot allocated (if the item is defined for lot allocation). |
Select WO Lines |
Select to include work order demand lines from PeopleSoft Maintenance Management. These demand lines are in the Pending fulfillment state. To appear on the Allocation Workbench, the work order demand line must have been committed to Inventory Demand Fulfillment table (IN_DEMAND). Note: Select at least one of the following check boxes or no search results will be retrieved: Select Unfulfilled, Select Releasable, or Select WO Lines. You can select all of the check boxes. |
Exclude Backorder Lines |
Select to exclude any backordered demand lines. |
Exclude Pegged Lines |
Select to exclude any demand lines that are:
|
Include Lot Control Items Only |
Select to display only demand lines with lot-controlled items. |
Include Allocated Only |
Select to display only demand lines that have an existing allocation. |
Include All Fulfillment States |
Select to display demand lines in all the fulfillment states. |
Advanced Search Criteria
Enter additional search criteria to find demand lines for the Allocation Workbench.
Field or Control |
Description |
|---|---|
Route Code and Route Group |
Enter a value to select orders grouped together for a particular transportation grouping and transportation route for delivery of the order. |
Load ID |
Enter a value to select orders assigned to a single load ID. |
Customer ID and Location |
Enter a value to select orders that were entered for a particular customer and customer location. |
TMS ID |
Enter to select orders by the TMS (transportation management system) reference ID assigned during the interface to the transportation management system. |
Ship To Customer and Address Number |
For sales orders, enter the Ship To Customer ID and address to select orders. |
Carrier ID |
Enter a value to select orders with one carrier. |
Ship Method |
Enter a value to select orders using one Ship Via code. |
Priority and To |
Enter a shipping priority code or range of codes that are assigned to sales orders in PeopleSoft Order Management or to interunit transfers coming from PeopleSoft Supply Planning. |
Product ID |
Enter the product ID from PeopleSoft Order Management. |
Parent Product ID |
Enter the parent of a product kit from PeopleSoft Order Management. |
Shop, Service Group, Work Type, Asset Location, and Project |
(Work order demand lines only) Enter values to narrow the selection of work order demand lines. The available values are based on the Maintenance Management business units that are tied to the Inventory business unit. |
Use the Allocation Workbench - Summary page (IN_ALLOC_WB_SUMMRY) to create, update, or remove a pre-allocation or lot allocation and create a standard allocation using the Allocation Workbench.
Use the Allocation Workbench-Summary page to have the system automatically select the material storage location or lot ID for allocation or to access the Allocation Workbench-Detail page.
Navigation:
Click the Search button on the Allocation Workbench-Search page after entering selection criteria.
On the Stock Request Summary page, select a line and select Allocations in the Line Menu field.
On the Order Entry Form, select Allocations or Lot Allocations in the Header Menu field or the Line Menu field.
This example illustrates the fields and controls on the Allocation Workbench - Summary page. You can find definitions for the fields and controls later on this page.
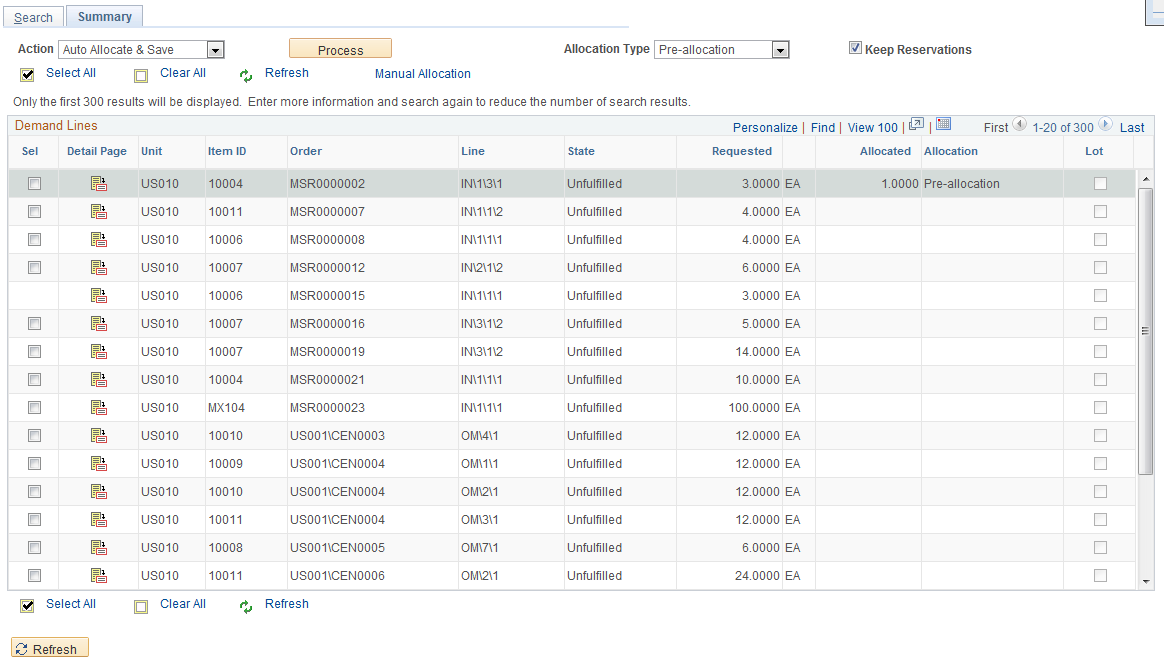
The Allocation Workbench enables you to create, update, or remove a pre-allocation or lot allocation and to create a standard allocation. Use the Summary page to have the system automatically select the material storage location or lot ID to allocate or access the Detail page to manually select the specific material storage location or lot ID for allocation.
Field or Control |
Description |
|---|---|
Action |
Select an action to allocate or deallocate the selected demand lines. The action is performed when you click the Process button. Actions include:
|
Process |
Click to initiate the action on the selected demand lines and then perform a save. |
Allocation Type |
When creating a new allocation, select the type of allocation. Options are:
|
Keep Reservations |
Select to keep the soft-reservation on a demand line when you remove an allocation (un-allocate). |
Select All and Clear All |
Click to select or clear all the demand lines displayed in the Demand Lines group box. |
Manual Allocation |
Select to access the Allocation Workbench - Detail page for all demand lines selected in the Demand Lines group box. This link is useful when you want to view or manually change multiple demand lines using the Detail page. |
|
Select the Manual Allocation icon located on a demand line row to display the one demand line on the Allocation Workbench - Detail page where you can apply manual changes to the allocation. |
Requested |
Displays the total requested quantity for this demand line. |
Allocated |
Displays the quantity for this demand line that is currently allocated. Remember that a pegged demand line is not allocated until the incoming supply has been received and put away into PeopleSoft Inventory. |
Allocation |
Displays the type of allocation for this demand line, including pre-allocation, lot allocation, and standard allocation. |
Lot |
(Display only) This check box is selected if the item on the demand line is lot-controlled. Only lot-controlled items can be lot allocated. |
 (Manual Allocation icon)
Use the Allocation Workbench - Detail page (IN_ALLOC_WB_DETAIL) to manually select the specific material storage location or lot ID for allocation to the demand line.
In addition, you can use this page to view, change, or remove the current allocations.
Navigation:
Click the Manual Allocation icon on the Allocation Workbench-Summary page.
Click the Manual Allocation link on the Allocation Workbench-Summary page after selecting one or more demand lines.
This example illustrates the fields and controls on the Allocation Workbench - Detail page. You can find definitions for the fields and controls later on this page.
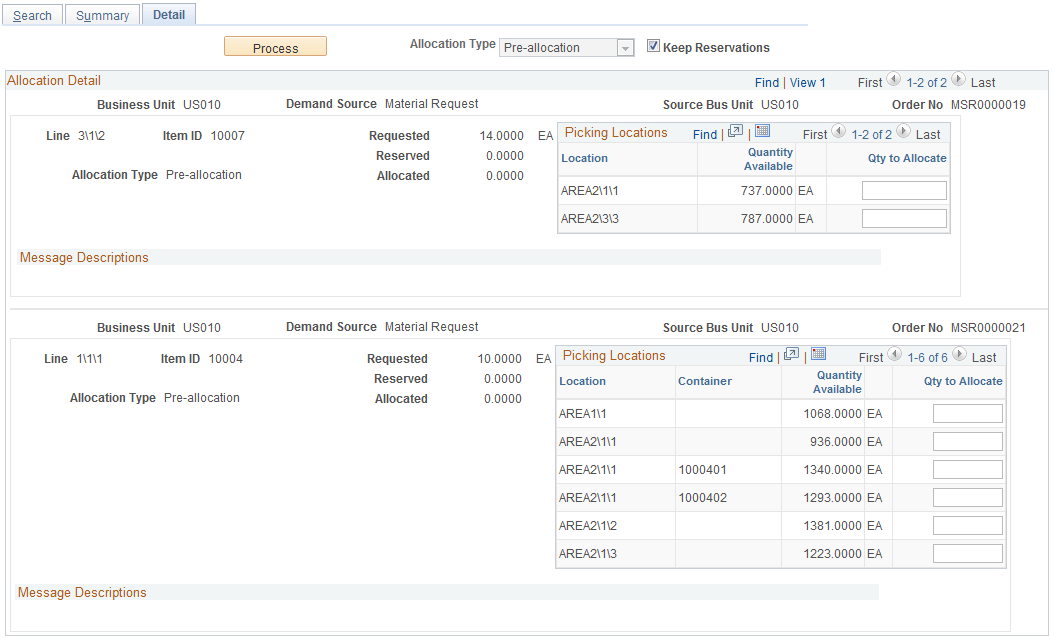
Use the Allocation Workbench - Detail page to select the specific material storage location or lot ID for allocation to the demand line. In addition, you can use this page to view, change, or remove the current allocations.
Field or Control |
Description |
|---|---|
Process |
Click the Process button to save the changes that you have made on this page. |
Allocation Type |
Displays the value selected on the Allocation Type field on the Allocation Workbench - Summary page. Options are:
|
Business Unit, Demand Source, Source Bus Unit, and Order No |
Displays the inventory business unit, demand source, source business unit, and order number of the demand lines displayed subsequently. This information is repeated for each order displayed. |
Line |
Displays the order line number, schedule line number, and demand line number. |
Quantity Requested |
Displays the item quantity requested on the demand line. |
Quantity Reserved |
Displays the item quantity currently reserved at the business unit level. This is a soft-reserve which reserves stock at the inventory business unit level but not at the material storage location or lot ID levels. If a demand line does not have a soft-reserve when you allocate stock on this page, a soft-reserve is automatically applied along with the hard-allocation. |
Quantity Allocated |
Displays the item quantity currently allocated at the material storage location level or lot ID level. |
Allocation Type |
Displays the type of allocation that currently exists or that will be applied using this page. The options are:
|
Pegged |
Displays the current pegged quantity on this demand line. This is an open peg; the incoming supply has not yet been received into the inventory business unit. When incoming supply is received, the peg status is changed to completed and quantity in this field is set to zero. A reservation or pre-allocation can be created during the putaway of the incoming supply and those quantities are displayed on this page. |
Lot\Location\Serial |
Displays the current material storage locations or lot IDs that exist for this item ID. |
Quantity Available |
Displays the stock currently available in the business unit's material storage location or lot ID that can be allocated to the demand line. |
Qty to Allocate |
Enter or view the stock quantity allocated to the demand line. The total quantity that you can allocate to a demand line is Quantity Requested minus Quantity Backordered minus Quantity Shipped (work orders only) minus Quantity Pegged. To remove an existing pre-allocation or lot allocation, change this quantity to zero. |