Understanding the Picking Process
The picking process in PeopleSoft Inventory enables you to release orders to picking, select the material storage location to pick stock from, enter picking results, and confirm the picked stock so that the demand lines can go to the shipping stage. In any step in the picking process, you can use auto-processing to complete the orders in one step by sending the demand line through the picking confirmation, shipping or depletion steps.
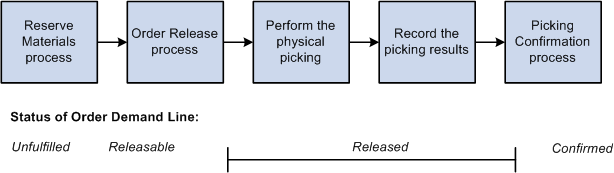
The following diagram illustrates the basic picking steps of running the Order Release process, performing the physical picking from the warehouse, recording the actual picking results, and then running the Picking Confirmation process to complete the picking stage of demand fulfillment. This diagram also displays the corresponding demand line fulfillment state for each picking step:
Order Release Process
The first step in the picking process is order release. Run the Order Release Request process to:
Select orders and demand lines and release them for picking. The lines are set to the released state and assigned a pick batch ID to uniquely identify the grouping.
(Optional) Create hard allocations to the demand lines. This is also known as a push pick plan or system-defined pick plan.
The Order Release process uses the specified picking rules to determine the most appropriate material storage location from which to pick each item, then creates an allocation to reserve the requisite quantity in the material storage location that appears on the SQR picking plan report or the picking extract file. Once an allocation exists, the allocated quantity in that material storage location is unavailable to fulfill other demand lines.
Note: The following situations force a hard allocation on the demand lines: pre-allocation, lot-allocation, the auto-pick option, and any auto-procession option.
(Optional) Make suggestions for picking from material storage locations. This is also known as a pull pick plan or user-defined pick plan.
The picking plan suggests storage locations from which to pick each item but does not make an allocation. Because there is no allocation of quantity at the material storage location level, the picker is not limited to a specific location, nor is the item necessarily excluded from other Order Release processes.
Note: For an item to appear on a push or pull picking plan, its storage location must be available for picking. Items in storage locations that contain negative quantities or that are suspended, on hold, closed, non-nettable, used for work in progress, or undergoing physical cycle counts are not included on picking plans. Items in the default ship staging location are only included if you have selected the Available to Pick Plan option on the Default Ship Staging Location page. Items with a status of on hold, rejected, or restricted are also excluded from picking plans.
(Optional) Releases demand lines for picking without allocations or suggesting picking locations.
The Order Release process can produce:
An SQR picking plan report.
Useful for environments where you want a picking instructions on paper for your stockroom workers.
A picking extract file.
Useful for environments with electronic data collection devices.
The Shipping Order Release EIP.
This outbound service operation can send data to a warehouse management system (WMS) or send radio frequency ID (RFID) data to a third-party to produce RFID tags.
Generate bar code labels, carton labels, and item usage labels for orders selected to be released.
This process uses the fulfillment engine processing default structure defined for the Order Release Request row on the Setup Fulfillment-Fulfillment Task Options page (business unit level). If no value is entered, then the process uses the value in the Fulfillment Engine Options page (SetID level).
The Order Release process can be launched from the Order Release Request process page or by using the Advance to Release choice on the auto-processing option for the Reserve Materials process page, the Create/Update Stock Request component, the Fulfillment Workbench (with an action of reserve), or the Inventory_Reservation EIP. For the Reserve Materials process page, the Create/Update Stock Request component, the Fulfillment Workbench, and the Inventory_Reservation EIP, you attach a pre-defined run control of the Order Release Request process page to define how the orders should be processed through order release.
Note: The demand lines selected for processing are determined by the initial process, not by the selection criteria on the pre-defined run control. If you want a downstream process, such as Order Release, to use its own selection criteria and (possibly) pick up additional demand lines not in the initial process, then use a PeopleSoft Process Scheduler job to string processes together.
Record the Picking Results
When you have released demand lines to picking with an allocation, then the system requires a confirmation that items were picked as allocated. Any picking exceptions to the original allocation must be reported prior to confirming the demand line. The picking feedback step can be bypassed for all lines picked as allocated when using the auto-pick feature. This feature marks the demand lines as confirmed during the Order Release process so only exceptions to the original allocations need to be reported.
When you have released demand lines to picking without an allocation, then the system does not know where to pull the stock from: in this case, you must enter all the picking results with the material storage locations used.
The picking results can be entered into PeopleSoft Inventory by:
Using the Material Picking Feedback page to enter the results manually.
Using the Inventory Picking inbound EIP and process to record results recorded on electronic data collections devices.
Using the Fulfillment Workbench with the action of Pick Confirm.
Using the Inventory Pick Confirm EIP to receive picking results from a third-party warehouse management system (WMS).
This service operation would be used when the WMS is providing only picking information.
Using the Inventory Shipping EIP to receive picking and shipping results from a WMS in a single transaction.
This service operation would be used when the WMS is providing both picking and shipping information.
Using the outbound Shipping Notification EIP to receive picking and shipping results from a warehouse management system (WMS).
Note: The Shipping Notification EIP is available for backwards compatibility to earlier releases.
The Inventory Pick Confirm EIP and the Inventory Shipping EIP can be used in place of the Shipping Notification EIP.
Picking Confirmation Process
The Picking Confirmation process selects demand lines that:
Have been marked for confirmation during the Order Release process (auto-pick) or during picking results.
Have not been marked for confirmation when using one of the Complete Flag options.
The Picking Confirmation process:
Moves the demand lines from the Released state to the Confirmed state.
Decreases the onhand quantities for the appropriate storage locations and prepares the demand lines for shipment processing.
For push picking plans, the Picking Confirmation process also relieves the allocations created by the Order Release process.
Note: Because these adjustments to on hand quantities are made at the storage location level only, the business unit on hand quantities do not reflect the new storage location quantities until you run the Deplete On Hand Qty (Depletion) process (IN_FUL_DPL). To compare the balances, use the Item Balance by Location and Item Balance by Unit pages in the Maintain Inventory, Review Inventory Balance Info menu. In addition, you can select the Pre-Depletions Only check box on the Review Transaction History inquiry page to see demand lines that have been pick confirmed but not yet depleted. Available quantity at the business unit level does reflect all picking feedback reported at the material storage location level.
This process uses the fulfillment engine processing default structure defined for the Picking Confirmation row on the Setup Fulfillment-Fulfillment Task Options page (business unit level). If no value is entered, then the process uses the value in the Fulfillment Engine Options page (SetID level). Using these defaults, you can set the Complete Flag to finalize picking and set the Auto-Processing option to Advance to Shipped or Advance to Depleted. These defaults can be overridden on the Picking Confirmation process page where you can also add shipping information to complete the order.
If you are shipping a group of order lines by using the Advance to Shipped choice on the Auto-Processing option, keep in mind that all the lines that are confirmed may not necessarily be shipped together for the following reasons:
Unless shipment of partial orders is allowed, all demand lines for auto-processing orders must be confirmed before they are eligible for shipping.
If you are auto-processing sales orders identified for single shipment, then all demand lines must be confirmed and assigned to the same shipping ID before the orders are shipped.
If you have selected the Verify Ship Date and Time check boxes on the Setup Fulfillment-Shipping page, then stock is shipped if the scheduled shipment date is the current date or in the past.
To ship stock earlier than the scheduled ship date, select the Ship Prior to Sched Date check box and enter the Ship Early date on the order.
Holding and Cancelling Orders
In PeopleSoft Order Management, holds can be applied automatically or manually at order entry. Entry violations can prevent fulfillment in PeopleSoft Inventory if the violation of the order parameter is serious, or the system simply displays a warning message for less important infractions.
For stock requests, you place the order on hold using the Cancel/Hold Stock Requests page.