Defining Cardholder Profile
To define cardholder profiles, use the Cardholder Profile component (CC_EE_PROFILE).
This section provides an overview of the Personal Employee Enterprise Integration Point (EIP)
|
Page Name |
Definition Name |
Usage |
|---|---|---|
|
CC_PERSONAL_DATA |
View cardholder information, such as personnel status and home address. This is a display-only page and is shared by PeopleSoft Expenses and PeopleSoft Purchasing. |
|
|
CC_CARD_DATA |
Enter card issuer, card number, and set the transaction limits for that card. |
|
|
CC_CARD_DATA5 |
Define suppliers and the card options for these suppliers. |
|
|
CC_CARD_DATA4 |
Define who can access this procurement card and identify the rights that they have. |
|
|
CC_CARD_DATA2 |
Enter accounting distribution defaults for single-line distribution or assign SpeedCharts for multiline distributions. |
|
|
SpeedChart Detail Page |
CC_SPEEDCH_DTL |
View the details of the SpeedChart. |
|
CC_CARD_DATA3 |
Set restrictions on the card by limiting the amount that the cardholder can spend on a specific commodity. |
|
|
Cardholder Information Page |
RUN_POY8000 |
Run the Cardholder Information multiprocess job (POY8000). This process will generate the Cardholder Information report (POX8000) |
|
Purchase Exceptions Page |
RUN_POY8010 |
Run one of these multiprocess jobs: Exceed Limit-Per-Trans (POY8010) which will generate the Exceed Limit-Per-Trans report (POX8010), Exceed Limit-Per-Cycle (POY8011) which will generate the Exceed Limit-Per-Cycle report (POX8011), Exceed Trans-Per-Day (POY8012) which will generate the Exceed Trans-Per-Day report (POX8012), Exceed Trans-Per-Cycle (POY8013) which will generate the Exceed Trans-Per-Cycle report (POX8013), or Unauthorized Commodity (POY8014) which will generate the Unauthorized Commodity report (POX8014). |
|
MCC Exceptions Page(merchant category code exceptions) |
RUN_POY8064 |
Run the MCC Exceptions multiprocess job (POY8064). This process will generate the MCC Exceptions report (POX8064) |
The employee accessible in this setup may be a result of an interface with PeopleSoft Human Resources or another external human resources package. The external interface is created by using the personal employee EIP. The interface within PeopleSoft is accomplished using the Load Employee Data page.
You can also receive employee procurement card data from PeopleSoft Human Resources. These EIPs enable PeopleSoft Expenses and PeopleSoft Purchasing to send and receive basic cardholder data to and from PeopleSoft Human Resources. When one application changes a record, an EIP automatically updates and synchronizes tables in the other applications.
This table lists service operations that contain code used to send and receive information between the databases:
|
Service Operation |
Records |
Description |
|---|---|---|
|
CORPORATE_CARD_DATA_FULLSYNC |
CC_CARD_DATA_EX |
Full data load of employee corporate card account data. |
|
CORPORATE_CARD_DATA_SYNC |
CC_CARD_DATA_EX |
Incremental update of corporate card account data. |
|
CORPORATE_CARD_FULLSYNC |
CC_CARD_TBL_EX |
Full data load of corporate card suppliers. |
|
CORPORATE_CARD_SYNC |
CC_CARD_TBL_EX |
Incremental update of corporate card suppliers. |
Use the Personal Data page (CC_PERSONAL_DATA) to view cardholder information, such as personnel status and home address.
This is a display-only page and is shared by PeopleSoft Expenses and PeopleSoft Purchasing.
Navigation:
Field or Control |
Description |
|---|---|
Personnel Status |
Displays the cardholder personnel status, such as employee, consultant, contractor, or any other designation that your organization uses. Appears by default from human resources and cannot be changed. |
Telephone |
Displays the cardholder home telephone number. |
Use the Card Data page (CC_CARD_DATA) to enter card issuer, card number, and set the transaction limits for that card.
Navigation:
This example illustrates the fields and controls on the Card Data page. You can find definitions for the fields and controls later on this page.
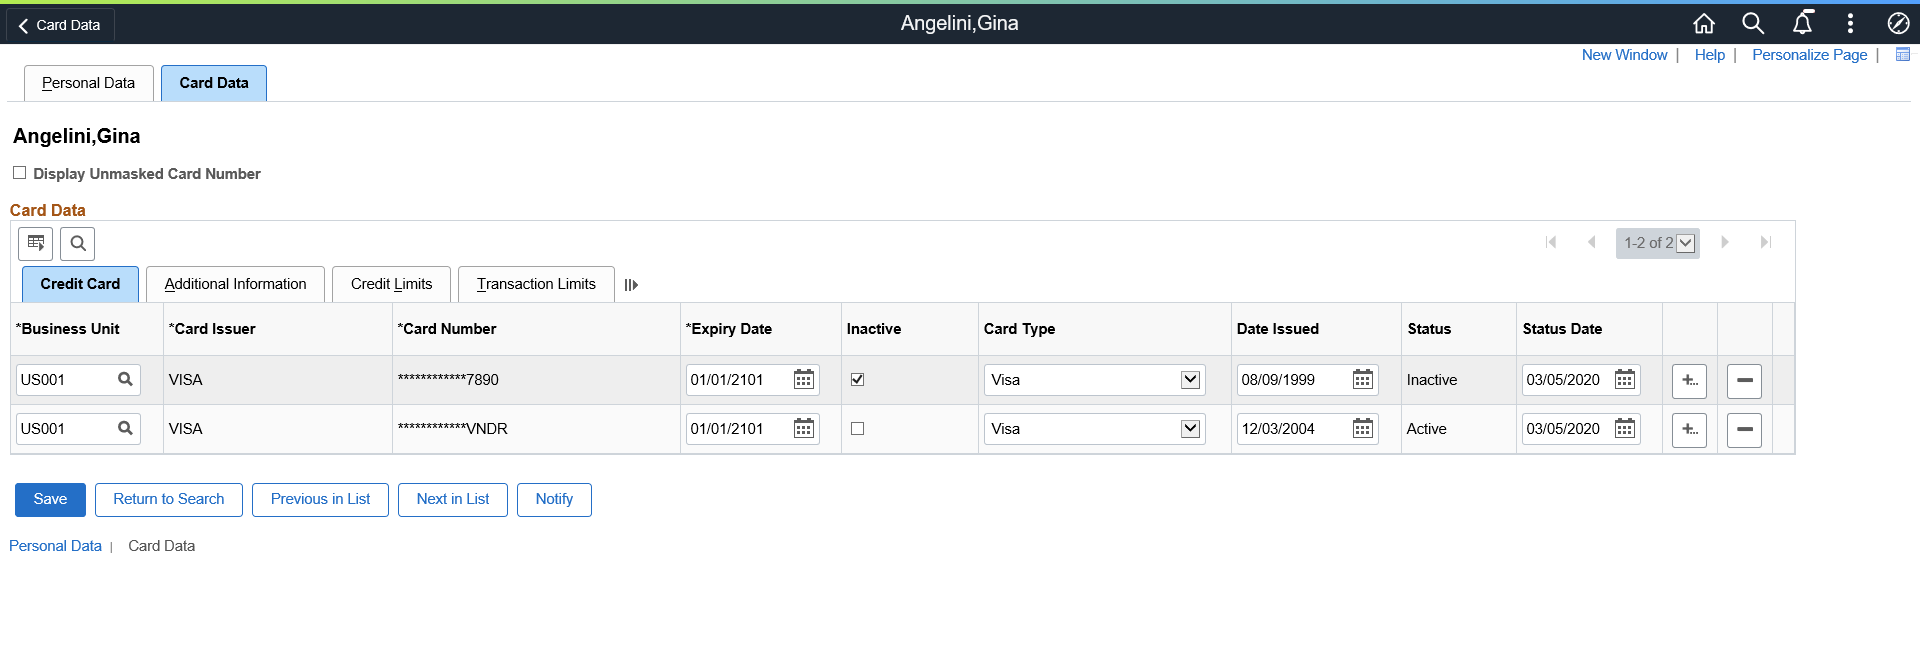
Card Data
Select the Card Data tab.
Field or Control |
Description |
|---|---|
Card Issuer |
Select the procurement card issuer. |
Card Number |
Enter the card number. Note: The Display Unmasked Card Number check box under the employee name allows you to mask or unmask the card number. |
Expiry Date |
Enter the card expiry date. |
Inactive |
You can set the status of a card to Active or Inactive. When the card status is Inactive, another employee can use the same card number. In this case, the system generates a warning message similar to the following: Are you sure you want to assign credit card ************7890 to IXHEEE120 (10070, 381). The credit card number has been assigned to another employee with Inactive status. You can either proceed with the selection or cancel the process as you wish. Note: You cannot assign an active credit card to multiple employees. The system does not allow it and generates an error message. |
Card Type |
Select the card type for this procurement card. |
Date Issued |
Select the date when the card was issued to the user. |
Status |
Displays the status as Active and Inactive based on the selection of the Inactive check box. |
Status Date |
Displays the date of status change. |
Additional Information
Select the Additional Information tab.
Field or Control |
Description |
|---|---|
Supplier Card |
Select this check box if this card is a Supplier card. Once you select this check box the suppliers link becomes available. |
Suppliers |
Click this link to access the Suppliers page. Use this page to assign the supplier and card options for this supplier card. This will simultaneously update the supplier location with the same data (like requestor in assign proxies). This relationship can be maintained in either place. |
Proxies |
Select the Proxies link to assign proxies. For more information, see Assign Proxies Page. |
Credit Limits
Select the Credit Limits tab.
Note: The fields on this tab are only used for reporting purposes.
Field or Control |
Description |
|---|---|
Maximum Credit Limit |
(Optional) Enter the maximum credit limit for the credit card. |
Monthly Credit Limit |
(Optional) Enter the maximum amount that a cardholder can spend every month. |
Transaction Amount Limit |
(Optional) Enter the maximum amount that a cardholder can spend for each transaction. |
Currency |
Select the currency for the credit limit fields. |
Transaction Limits
Select the Transaction Limits tab.
Note: The fields on this tab are only used for reporting purposes.
Field or Control |
Description |
|---|---|
Transactions Allowed Per Month |
Enter the number of transactions that a cardholder can perform in a month. |
Transactions Allowed Per Day |
Enter the number of transactions that a cardholder can perform in a day. |
Use the Suppliers page (CC_CARD_DATA5) to define suppliers and the card options for these suppliers.
Navigation:
Click the Suppliers link on the Card Data page.
Field or Control |
Description |
|---|---|
Pay for PO |
Select this check box if you want this supplier card to appear as the payment method for this supplier and location on a purchase order. If selected this supplier card will appear by default on the purchase order. |
Allow Override |
Select this check box if this supplier card for this supplier and location can be overridden on a purchase order. |
Dispatch Option |
Select the dispatch option for this supplier location. Options are:
The system will also update the fields on the Cardholder Profile and Assign Proxies pages with the selection you make here. |
Use the Assign Proxies page (CC_CARD_DATA4) to define who can access this procurement card and identify the rights that they have.
Navigation:
Click the Proxies link on the Card Data page.
Field or Control |
Description |
|---|---|
Add Proxy By Role |
Click the link to select proxy users by their role names. The system displays all users assigned to the selected role and adds them to the Proxies grid. The role names are populated in the Role field. |
User ID |
Select the user authorized to reconcile procurement card statements for the selected card. Creating a user ID enables you to have a centralized reconciliation team that has the authority to review and edit an individual cardholder's statement. Individual cardholders cannot reconcile their own statements unless they have been set up as their own proxy. |
Role |
Select an appropriate role for the designated proxy. Each role carries a set of access rights. |
Requestor Default |
This check box setting appears by default from the Assign Proxies page when defining the security for the proxy. If this check box is selected, this is the procurement card that will appear as the default when defining the requestor on the Requestor Setup page. If you make any changes to this check box, the setting will automatically be reflected in the Assign Proxies page when defining the security for the proxy and automatically be reflected in the Requestor Setup page. |
Buyer Default |
This check box setting appears by default from the Assign Proxies page when defining the security for the proxy. If this check box is selected, this is the procurement card that will appear as the default when defining the buyer on the Buyer Setup page. If you make any changes to this check box, the setting will automatically be reflected in the Assign Proxies page when defining the security for the proxy and automatically be reflected in the Buyer Setup page. |
Use the Default Accounting Distribution page (CC_CARD_DATA2) to enter accounting distribution defaults for single-line distribution or assign SpeedCharts for multiline distributions.
Navigation:
Click the Default Distrib (default distribution) link on the Card Data page.
This example illustrates the fields and controls on the Default Accounting Distribution page. You can find definitions for the fields and controls later on this page.
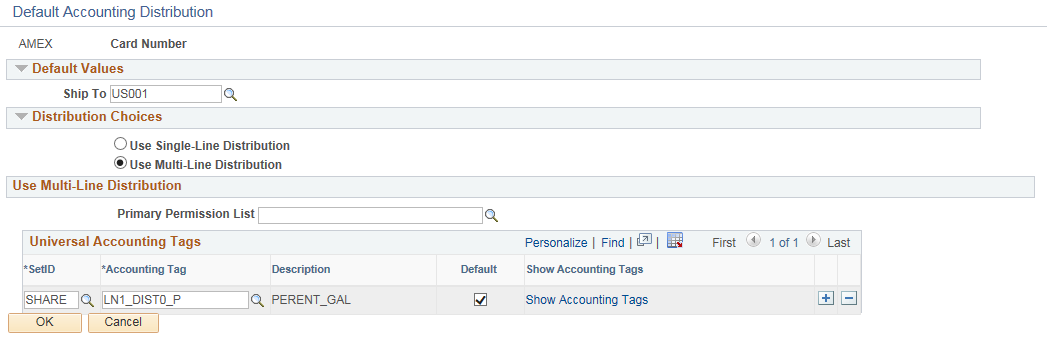
Distribution Choices
Field or Control |
Description |
|---|---|
Use Single-Line Distribution |
Select this option to assign a single account distribution for the procurement card transactions. This option is selected when the page appears. Note: If you select this option, it enables the Use Single Line Distribution group box. |
Field or Control |
Description |
|---|---|
Use Multi-Line Distribution |
Select this option to assign multi-line distributions for the procurement card transactions. Note: If you select this option, the Use Multi-Line Distribution group box is enabled. |
Use Multi-Line Distribution
Field or Control |
Description |
|---|---|
Speedchart Key |
Select SpeedCharts that can be used for this card when reconciling the statement. Each SpeedChart can carry one or multiple distribution lines. Select a default SpeedChart that is used in the ProCard Load Statement process to create default accounting distribution lines. Note: You must designate a default SpeedChart for the system to use when loading statement data. |
Accounting Tag |
Click the prompt to select appropriate Accounting Tags that will be used to populate ChartFields on transaction distribution lines. The system automatically prorates the amount of an accounting line according to the proration percentages defined on the Accounting Tag. Note: Accounting Tag field appears only if Accounting Tag check box is selected for Purchasing on the Accounting Tag Registration page. See Setting Up Accounting Tags |
Show Accounting Tags |
Click the link to access the Accounting Tag detail page. The Accounting Tag detail page provides information about the Accounting Tag. |
Use the Restricted Purchase page (CC_CARD_DATA3) to set restrictions on the card by limiting the amount that the cardholder can spend on a specific commodity.
Navigation:
Click the Commodity Codes link on the Card Data page.
Note: The fields on this page are only used for reporting purposes.
Field or Control |
Description |
|---|---|
Commodity Code |
Select the commodity for which you want to set a cardholder purchasing restriction. Only commodity codes defined for the SetID associated with the default business unit that you selected on the Card Data page are available. |
Limit Amount |
Enter the maximum amount that the cardholder can spend on the commodity. |
Limit Per Trans (limit per transaction) |
Enter the maximum amount that the cardholder can spend per transaction on the commodity. |