Predefining Agreements
|
Page Name |
Definition Name |
Usage |
|---|---|---|
|
CS_AGREE_HDR |
Set up basic agreement information for contract agreements. |
|
|
CS_AGREE_CLAUSE |
Assign clauses to contract agreements. |
|
|
CS_AGREE_WF |
Assign notifications for agreements and steps. |
Use the Contract Agreement Definition page (CS_AGREE_HDR) to set up basic agreement information for contract agreements.
Navigation:
This example illustrates the fields and controls on the Contract Agreement Definition page.
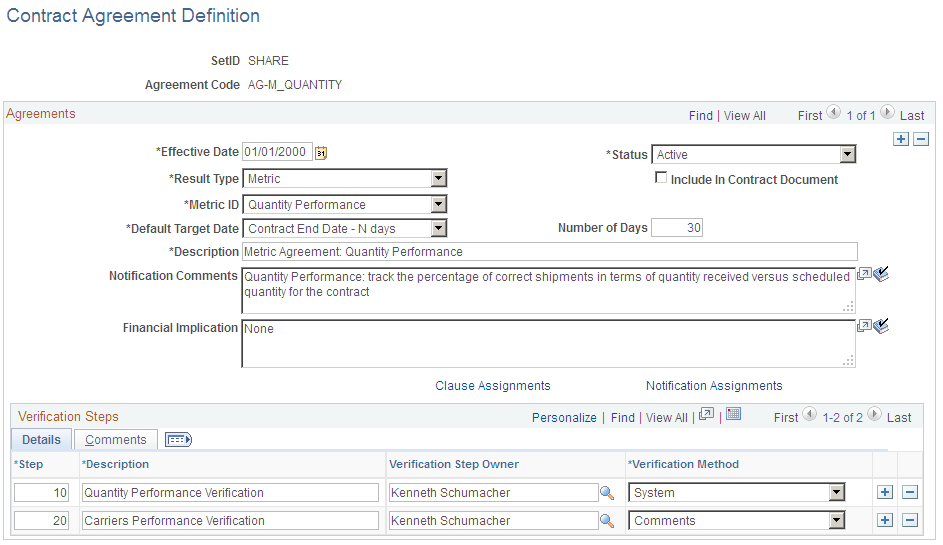
Use this page to predefine agreements. After defining the agreement, you can use the agreement code to provide default information from this agreement into a new contract agreement. Agreement codes are defined by SetID. SetID records are the same set control group as the PeopleSoft Supplier Contract Management contract set control group.
Refer to Common Elements Used When Managing Contract Agreements for common field definitions. Those that are not common are defined below.
Field or Control |
Description |
|---|---|
Agreement Code |
Displays the identifier for the agreement that you are adding or maintaining. |
Effective Date |
Select the date on which the agreement is to become effective. The default value is today's date. This date controls when you can use the agreement. |
Status |
Select the state of the agreement. If you select Active, the agreement is available for immediate use with contracts. If you select Inactive, you can create the agreement and define its data, but it is not available for use. |
Result Type |
Select a value that indicates how you are measuring the results of the agreement. The result type you select determines other page elements and system behavior when you assign this predefined agreement to a contract. Note: Some result types are metric-related. See Understanding Agreement Metrics. |
Default Target Date |
Select a method for defining the default target date. The system uses the value defined here to calculate a due date for the agreement when the agreement is specified on a contract. After you add the date, changes to the agreement's default target date does not change the contract's target date on any contract where this agreement code is specified. |
Number of Days |
Enter the number of days by which you want to offset the default target date. For example, if you select Contract Start Date + N days in the Default Contract Date field and you want the default contract date to be seven days after the contract start date, enter 7 in the Number of Days field. |
Verification Steps - Details
Use this section to define the verification steps for this agreement.
Field or Control |
Description |
|---|---|
Step |
When you add data to any of the following fields, the system assumes you are adding verification steps to the agreement and certain fields on the page then become required. If you do not add data to the step, the system assumes there are no verification steps. Verification steps are automatically added to a contract when you specify the agreement on the contract. You can delete steps without affecting existing contracts. You can also delete steps on an existing contract without affecting the predefined agreement. |
Verification Step Owner |
Select a user who will be responsible for this agreement verification step. You can also enter an owner's name. When you select a predefined agreement to use with a contract, the system populates the verification owner information along with due date information for the contract agreement. |
Verification Method |
Select the method by which you want to verify this step. The method defines how a verification owner indicates that a verification step has been completed. This field is required if you are adding steps to the agreement. For a definition of each option, see Common Elements Used When Managing Contract Agreements. |
Verification Steps - Comments
Use this tab to enter comments about the verification step to include the e-mail notification that is sent to the approver, collaborator, or reviewer. You can enter up to 254 characters and you can define separate comments for each verification step.
Use the Assign Agreement Clauses page (CS_AGREE_CLAUSE) to assign clauses to contract agreements.
Navigation:
Click the Clause Assignments link on the Contract Agreement Definition page.
The system adds these clauses to the transactional contract when you specify this agreement for the contract header, contract line, or contract category.
If you elect to include the agreement information in the contract document, the system incorporates the clauses specified here into the Microsoft Word document. When defining sections for a document, you include agreement information. When that section is used in a document configurator, the system adds clauses associated with the agreements to the document.
Use the Search button to select a clause to include on the contract agreement. See Search Content By Type Page (for Clauses, Document Configurators, and Sections).
The Title, Full Text, and Reference Text fields are display-only. When you select a clause ID, the system populates these fields with existing clause data. You cannot change this data unless you use the clause maintenance facility. In this case, the clause update is controlled by the document authoring system and could include collaboration and approvals before the approval status makes it available to be used again.
Field or Control |
Description |
|---|---|
Sequence |
Displays the sequence for this agreement clause. The sequence number controls the order in which the clause appears in the document. The system generates this Microsoft Word document using information and values from the document authoring system and transactional data. When a clause is first added to an agreement, the sequence number is 10 by default, but you can change it as needed. When adding additional clauses, you should leave a gap between sequence numbers in case you need to insert an additional clause between two existing clauses. Click the + button and assign the sequence number based on where the clause should appear. |
Clause ID |
Select a clause to assign to the agreement. This is a required field. The clause must already exist before you can assign it to an agreement. You cannot add ad hoc clauses to agreements. Use the Clause feature in the Manage Contract Library component to add a clause for use with an agreement. |
Search |
Select to access the Clause Search page, where you can provide search information for locating clauses. |
Select Body Text
Use this group box to define which type of body text you want to use in the clause. You can select only one type.
Field or Control |
Description |
|---|---|
Full Text |
Select to display the full text of the clause in the agreement document. Full text and by reference text are generation types that the system uses when generating the working Microsoft Word document. You can select either full text or by reference text. |
By Reference Text |
Select to include text by reference in the clause. Text by reference indicates a line to which the clause applies and a reference document that describes conditions for the line. The citation of the reference text should be sufficient to describe the contents of the reference, so that reprinting the full text of the clause in the document is not needed. |
Title |
Displays the clause title. This value is used with the clause regardless of whether you select Full Text or By Reference Text. |
Full Text |
Displays the full text from the clause. |
Reference Text |
Displays the by reference text from the clause. |
Use the Agreement Notification page (CS_AGREE_WF) to assign notifications for agreements and steps.
Navigation:
Click the Notification Assignments link on the Contract Agreement Definition page.
This example illustrates the fields and controls on the Agreement Notification page.

Use this page to indicate if notifications will be initiated when a change in status occurs for an agreement or step or if you want to notify the recipient about a pending or past due date.
The system uses these notifications as default values on the contract when the agreement is specified on the contract header or line. The recipients you add here are typically those individuals who are always an interested party when this agreement is included in a contract. At the contract level, you can add additional notifications or delete existing ones. If the interested parties are always different for each contract, you do not need to specify any notifications here. Instead, you can set up the notifications when you create the transaction contract.
Field or Control |
Description |
|---|---|
Sequence |
Displays the notification sequence. This is a system-generated number that identifies the notification. |
Notification Type |
Select a notification type. Notification types are triggers for sending notifications to specified recipients, and is a required field. You can add as many recipients as necessary for each notification type. Values are:
|
Verify Step |
Select a verification step to which this notification applies. The system displays this field when you select Verification Step as the value in the Notification Type field. |
User Type |
Select whether the user is an internal or external user. The system controls the behavior of the remaining fields, depending on your selection. If you select Internal, the system low lights the Allow Updates check box. If you select External, you can indicate if the external user can update the agreement and manually enter users and their email addresses. |
Allow Updates |
Select to allow external users to update the agreement verification step (deliverable) when you have enabled supply-side portal access to update the deliverable. This check box is only available for external users. Suppliers can then update this deliverable at any time, but they are notified to do so based on the notification setup for their user IDs. For more information about external users: See Reviewing and Collaborating on External Documents and Understanding Supplier Information Maintenance |
Recipient Name |
Enter an external user who is not defined to the system. You must also enter an email address when you enter a recipient. You can also select an internal user, but the system does provide the email address automatically. To populate the User ID and Email Address fields automatically, use the Search Recipient button, described next, to select a recipient. |
|
Click this button to search for users based on either their recipient name, user ID, or email address. The system populates the Recipient Name, User ID, and Email Address fields with your selection. |
User ID |
Select a user ID to use for this notification. |
Specify Email |
Select to activate the Email Address field. You can normally use the address that the system placed in the field which will be the default email address for the user ID, or you can override and manually enter an external email address for cases where simple notification is wanted but a user ID does not exist in the system. |
Email Address |
Enter an email address for the recipient. This field is required and the system uses it to route notifications. The system automatically populates this field from the user ID's default email. If you are sending a notification to an external user, you can manually enter the address. Make sure the Specify Email check box is selected to allow updates to this field. |

Details
Use this tab to set up notification reminder dates for recipients of agreement or step notifications. You can base notifications on a change in status of the agreement or step or as a reminder when a due date is approaching. You can also select to send notifications in all instances or to send notifications for specific reminders.
Field or Control |
Description |
|---|---|
Notify On Status Change |
Select if you want to notify the recipient when a status change occurs in the agreement or verification step. The system sends the notification to all recipients with a notification type set to Agreement or Agreement and Steps when the compliance status of the agreement is changed from Not Set to Cancelled, Compliant, or Not Compliant. If the activity status of the verification step changes from Not Started to Cancelled, Completed, Failed, or In Process and the recipient's notification type is set to Agreement and Steps or Steps (and the step specified is being changed), the system sends a notification. To make changes to the status at the agreement or verification step level, use the Update Agreement Statuses component. |
Warning Performance |
Select if you want to warn the recipient about the performance against an agreement. This check box is available when the notification is tied to a verification step that has a system verification method and a metric result type. |
Unacceptable Performance |
Select if you want to notify the recipient that the performance against an agreement is unacceptable. This check box is available when the notification is tied to a verification step that has a system verification method and a metric result type. |
Reminder Number Of Days Prior |
Enter the number of days that you want a recipient to take action before the agreement or verification step is due. For example, if the target date of the agreement or the due date of the step is set to March 15 and you set the number of days prior to 5, the system notifies the recipient five days before March 15 (that is, March 10). If the notification type is Agreement, the system notifies the recipient this number of days before the target date of the agreement. If the notification type is Verification Step, the system notifies the recipient this number of days before the due date of the step. If the notification type is Agreement and Step, the system notifies the recipient this number of days before the target date of the agreement as well as this number of days before the due date of every step. If you leave this field blank, the system does not send reminders. |
Final Reminder Days |
Enter the number of days before the target date of the agreement or the due date of the step that you want the system to send a final reminder. This field processes dates the same as the Reminder Number of Days Prior field and represents the last notification before the target date or due date have passed. |
Passed Target Date |
Select to indicate that the recipient is to be notified when the target date of the agreement has passed and the compliance status of the agreement is not set to Compliant or the due date of the step has passed and the activity status is not set to Completed. The system notifies the recipient following each run of the Workflow Notifications process until the agreement or step status is set to Compliant/Completed or Canceled. |