Viewing and Editing Documents
|
Page Name |
Definition Name |
Usage |
|---|---|---|
|
CS_DOC_MAINT |
Edit and view documents, and cancel document checkout. See Editing Documents from the Document Management Page, Viewing Documents from the Document Management Page, and Canceling Document Checkout from the Document Management Page. |
|
|
List of People to Notify Page |
CS_DOC_NOTIFY_SP |
Define users who should be notified when a document that is checked out is checked in. When you enter an user's e-mail address, the system inserts a date and time stamp for when the user was defined. You can select which template to use with the notification by selecting a value in the Notify When Available Template field on the Installation Options - Supplier Contract Management Page. |
|
CS_DOC_VERSIONS_SP |
Check in documents. |
You can edit documents using Microsoft Word by checking out the document and downloading it to the local system, where you can work with the document offline. To use Microsoft Word, you must configure it for use with the PeopleSoft system.
PeopleSoft Supplier Contract Management and Microsoft Word use Microsoft Office Open XML to describe the structure of the document. The system represents content, such as clauses, sections, and bind variables, with text that is surrounded by specialized strings of text called tags. For example, a bind variable called Company could be represented in XML with the starting tag bindval, followed by Company and the name of the bind variable, and ending with another tag. The system processes clauses in a similar manner using a contract_obj XML tag.
See Understanding Microsoft Word Integration with Supplier Contract Management.
During editing and check-in, the content control tags enable the system and Microsoft Word to communicate properly. Because the XML tag structure defines the structure, Microsoft Word provides the capability to protect the XML tags that the PeopleSoft system uses to prevent damage to the tag structure. If you alter or delete the tags in Microsoft Word, you risk losing the mapping between the two applications.
You can use installation options to indicate how the system processes a document when you check out the document for editing. You can set the document to automatically open with track changes enabled and protect bind values in the document. If you do not set installation options to automatically track changes in a document, you can manually select to track changes while you are in the Microsoft Word document.
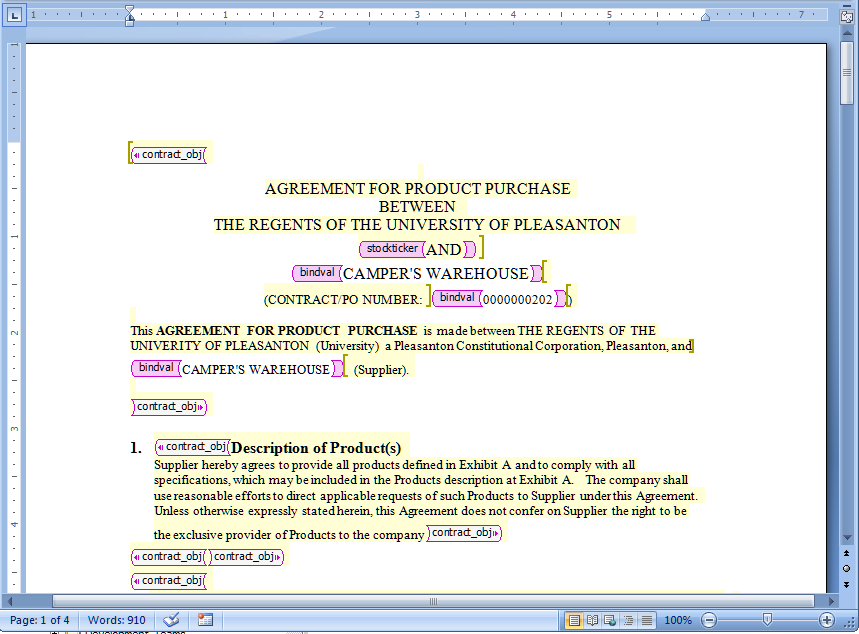
This example illustrates how a Microsoft Word document might appear when you open it for editing and the XML tags appear:
This example illustrates the fields and controls on the Example of Microsoft Word document and XML tags when you open the document for editing. You can find definitions for the fields and controls later on this page.
As you check out, edit, and check in documents, you should be aware of several considerations and conditions as you process the document. Many of these are described in the Understanding Microsoft Word Integration with Supplier Contract Management topic.
See Also: Setting Up PeopleSoft Integration Broker for Microsoft Word, Editing Clause Text, and Setting Up Installation Options for PeopleSoft Supplier Contract Management.
Document Checkout
You check out a document when you use the Edit Document button on the Document Management page to either review or update the document. When you check out a document, it remains available for viewing, but the system prevents other users from editing it. You can also cancel the checkout.
When you check out a document, the system creates a single file and opens the document in Microsoft Word. The system can also automatically download multiple files when you check out files for editing during amendment processing. If you are comparing documents or opening an amended document using Amend Contracts with Amendments as the amendment process option, the system sends the amendment along with the original document when you select to edit the files. It also provides instructions for multiple file check-in sequences.
The system provides a Notify Me button when a document is checked out by another user. Click the button to add user email addresses for those who the system should notify when the document is checked back into the PeopleSoft system. This enables you to be notified as soon as the document is checked in.
The system uses a Notify When Available template for sending notifications to users who you define for notification. To update the template, use the Notify When Available Template field on the Installation Options page.
Document Check In
Use the Check In button to upload the document file back in to the PeopleSoft system. After you check in the document, the Check In button is no longer available. The button also is not available when the document is checked out and you are not the user who checked out the document.
After you finish editing the Microsoft Word document, you must save the document as an .xml document type. When you click the Check In button, the system prompts you for information to upload the file. Locate and upload the file from the client machine. If all validations pass, the system updates the version of the document with any document changes as part of the check-in process. The document also is available for workflow processing.
If you are checking in an amended contract using two-file amendment processing, where you are maintaining amended changes in both the main contract and separate amendment file, and the amendment configurator has specified an amendment placeholder section in it, an additional check box appears that enables you to automatically update the amendment file.
This feature enables you to use the two-file amendment functionality, but begin by making amendment changes only to the main contract to the point that all main changes are complete. You can select this check box on final check in or during a refresh as an alternative, which initiates server-side processing to:
Compare the last executed document with the current main contract.
Extract those changes.
Place the changes in a separate amendment file as a starting point for authoring a separate amendment file.
In cases where you have setup the system and configurator to use amendment placeholder sections, the system first displays edit buttons for separate amendment file editing only after you select the Update Amendment File option at least once.
Note: The check-in and uploading of the document does not delete the local files from the client machine. You should delete these files periodically.
When you check in a document, the system:
Parses the Microsoft Word file and saves the plain text of the document.
The system uses the plain-text version of the document for index searches and for indicating clause additions, changes, and deletions if you use clause approvals during document approvals.
Validates that the .xml file is a Microsoft Word document file.
If you are attempting to check in a file that is not a Microsoft Word XML document file, the system displays an error message and ends the check-in process.
Validates that the file you are checking in is linked to the correct contract ID if the document is a purchasing contract type document.
If the document belongs to a different contract, the system displays an error message that indicates that the contract you are checking in does not match the contract that appears on the Document Management page. You cannot continue until you select the correct file to upload. For ad hoc documents, the system does a similar check using the ad hoc document ID.
Updates any bind variable values that exist in the document version, or amendment, to match the current version and amendment numbers.
The system processing depends on the setting on the Installation Options page. If the Update Version and Amendment Binds check box is selected, the system makes the update.
Issues a warning if a new bind variable has been added during editing.
The system also suggests whether a refresh is necessary to resolve the value of the bind variable. In this case, after checking in the document, you must click the Refresh Document button on the Document Management page to update the document to include the new transactional values.
Relaxed Check In
There may be situations when documents are modified by users or processes (especially outside your organization) that can cause the loss of important xml tagging, document key fields, and attributes within the document. These xml tags are used when checking documents back into the system, and when performing other actions after check-in such as refresh or deviation reporting.
If important tagging information is missing from the document the system provides warnings, and in some cases allows the check-in to occur based on your response to the message. In this case, you are warned that relaxed check-in is available, but features, such as refresh, compare with refresh, or object deviation reports no longer work for the document. You are given the option to continue with relaxed check in, or you can cancel the check in process.
The system allows for this relaxed–type of check-in so that the business process can continue for the contract rather rejecting the checking.
Important! You should carefully consider the practice of checking in documents that are missing the xml tagging information and loss of functionality for those documents before doing so on a regular basis.
Use the Document Management page (CS_DOC_MAINT) to edit documents, view documents, and cancel document checkout.
Navigation:
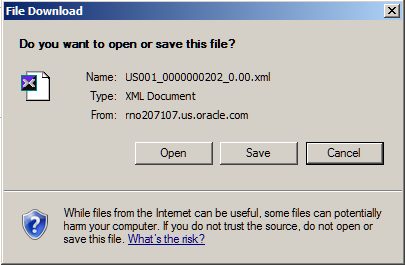
Click the Edit Document button. The File Download page appears:
This example illustrates the fields and controls on the File Download page. .
When you edit a document, the system places it on your local computer in a directory that you specify. The file remains in the directory even after it is checked in. You can cancel the checkout.
When you check out a document for editing, the buttons for other document actions are hidden. The system also updates information about the document, such as to whom the document is checked out and when it was checked out. When the file is checked in, the system displays the last modified date.
The page appears with several options for processing the file.
Note: If you are editing an amended document or comparing documents, the system displays this page for each document.
See Amendment Processing.
Field or Control |
Description |
|---|---|
Open |
Select to open the file for immediate review. This enables you to view and edit the content of the file. You must save the file to a directory after you open it in order to check changes back in. Note: Opening Microsoft Word files directly using the browser might invoke a Microsoft Word browser plug-in. While this supports various versions of Microsoft Word, you should configure client machines to open Microsoft Word directly on the desktop. See the Microsoft web page for more information. See Understanding Microsoft Word Integration with Supplier Contract Management. |
Save |
Select to save the file in a directory on the local computer. Note: Make sure that you do not have files with similar names in the directory to which you are sending the document. While you can overwrite an identical file to check out the file, when you check in the document, you must ensure that you have the correct document. |
Cancel |
Select to cancel checking out the file. This enables you to select certain amendments to open while canceling the checkout of others. |
More Info (more information) |
Select to access the Microsoft Internet Explorer Help utility and web page, where you can view more information about downloading files. |
To complete the editing process:
Click the Save button.
The Save As page appears, where you can define the file location. The file name for the document is set by the system and should not be changed. It must remain as a Microsoft Word .xml file format after you complete edits. Select a folder where you want to save the document on the local computer.
Click the Save button.
After the file is downloaded, the Download Complete page appears.
Click the Open button.
The system launches Microsoft Word and opens the document for editing. You can also click the Open Folder button to open the folder in which you placed the file.
When you check out multiple files, you process them at the same time, but you must open each one and save it individually. The same is true for checking in files.
Use the Check In Document page (CS_DOC_VERSIONS_SP) to check in documents.
Navigation:
Click the Check In button on the Document Management page.
Use this page to select the version and enter a brief description of the changes. The page appears when you click the Check In button. If you have also checked out amendments, the system displays a message that multiple files are to be uploaded and provides instructions on the page.
Field or Control |
Description |
|---|---|
Version |
Select the option for how you want the version to increment for the file that you are checking in. |
Same Version |
Select to use the version that appears in this field as the current document version when you check in the document. This version number appears when the system references the document. This option is available only if you have selected the Allow Check-In as Same Version check box on the Document Format and Options page. |
Minor Version |
Select to use this version as the current document version when you check in the document. This version number appears when the system references the document. This is also the default version when you check in the document. Minor versions begin with 0.01 as the version number. |
Major Version |
Select to change the updated document version to reflect major changes. For example, major changes might occur when milestones are reached in the contract's status. Major versions must be selected and begin with 1.00 as the version number. |
Update Amendment File |
Select to update the amendment file automatically with compared adds, changes, and deleted text that you have made to the main amended contract document. When selecting this check box, a server-side compare is performed between the last executed main contract document and the latest version that has been checked in. Those changes are inserted into the location in the separate amendment document based on the location of the amendment placeholder section in the amendment configurator. This option enables you to edit only the main contract and have the comparison performed for you to extract changes to the separate amendment file as a starting point for edits within the separate amendment file. This option applies only when the amendment option is Amend Contract with Amendment Files and the current document is in an amendment cycle and the amendment file's configurator ID has an amendment placeholder section defined within the structure. |
Comments |
Enter a description for the changes that were made to the document. The comments that you enter appear in the document's history. To view comments for all versions of the document, click the Document Version History link on the Document Management page. |
To locate the document for check-in:
Click OK to proceed, and a prompt appears for you to enter the filename and path to locate the file that you are checking in.
Either enter the file name and path or click the Browse button to locate the checked out document.
The Choose file page appears.
This screen shot illustrates the Choose file window.

To check in the document:
Select the document from its location.
The system highlights the selection.
Click the Open button.
The check-in page appears with the file name and path.
Click the Upload button.
The system uploads the updated version of the document into the library.
The system validates the file when you upload it and provides messages about the check-in process.
Note: The check-in and upload process does not delete local files from the client machine. These files should be deleted periodically.
Use the Document Management page (CS_DOC_MAINT) to view documents.
Navigation:
Click the View Document button on the Document Management page
The View Document button launches the current version of the document in Microsoft Word, but does not check it out. If you have checked out the document, the view document function opens a version of the document that is prior to the document that is checked out. The view does not include any edits that may have been made to the checked out document.
To view documents, click the View Document button. The File Download page appears.
Use the Document Management page (CS_DOC_MAINT) to cancel document checkout.
Navigation:
Click the Cancel Check Out button on the Document Management page
The Cancel Check Out button is available only when a document has been checked out. You may want to cancel the check out if you learn that the document does not require an update after you access it. When you cancel the check out, any updates that you made to the document will be lost. The system makes the document available for editing after you cancel the check out.