Defining Pop-up Menus
This section provides an overview of classic pop-up menus and discusses how to:
Create pop-up menu definitions.
Define transfer links.
Important! Classic pop-up menus are not supported in fluid applications. The use of these pop-up menus can produce unpredictable results with other features of fluid applications. See Creating Fluid Pop-up Menus for information on how to create pop-up menus for fluid applications.
Pop-up menus are an Application Designer definition that consists of one or more items, referred to as links. While the Application Designer definition is referred to as a “pop-up menu” the items are rendered as links, and not as a menu, at runtime. These links can be defined to either perform a definitional transfer or to execute a PeopleCode program.
A definitional transfer is distinguished from transfers that are made using PeopleCode programs—for example, modal transfers. Definitional transfers always replace the current page in the current window. To perform a modal transfer, you must use PeopleCode.
PeopleCode for links in pop-up menus does not share the same limitations as PeopleCode in standard menus, so pop-up menus provide an effective alternative to using command push buttons on pages. Pop-up menu PeopleCode programs can be used for any number of purposes, for example:
To perform a modal transfer.
To recalculate a field value.
To trigger a PeopleSoft Workflow business event.
Pop-up Links at Runtime
This example illustrates pop-up links next to the View Other Links button.
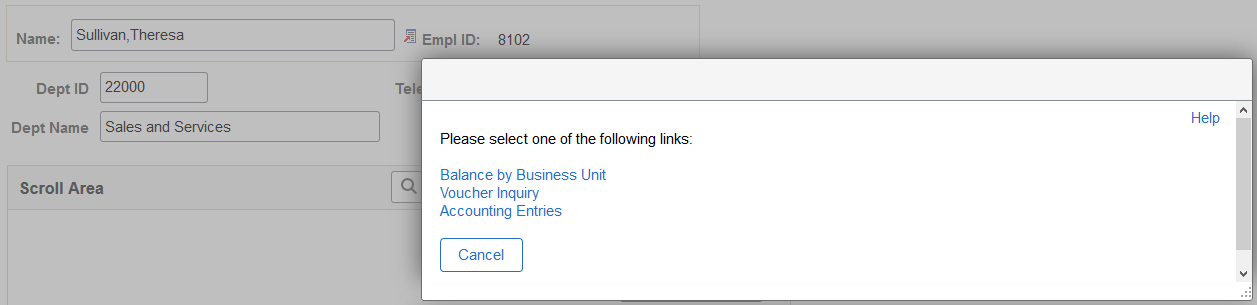
These standard icons appear on the page at runtime when a pop-up menu is associated with a page field:
Term |
Definition |
|---|---|
|
Click the View Other Links button to open a modal window where you can select from among the links listed. Note: This icon appears if the pop-up links consist of more than one item. |
|
Click this button, labeled with the name of the single link, to execute the action of the link directly. Note: This icon appears if the pop-up links consist of only one item. |


This section discusses how to:
Create new pop-up menus.
Associate pop-up menus with page fields.
Creating New Pop-up Menus
To create a new pop-up menu:
Select
The New dialog box appears.
Select Menu.
Click OK.
The New Menu dialog box appears.
Select the Popup option for the menu type.
Click OK.
A new pop-up menu definition appears.
Define the menu items for the pop-up menu.
Set the menu properties:
Add a description and comments about your pop-up menu.
On the Use tab, type the menu label that you want to appear for that pop-up.
Save the pop-up menu definition.
To provide users with access to the pop-up menu, associate it with a page field.
Associating Pop-up Menus With Page Fields
To associate a pop-up menu with a page field:
Open the page definition that contains the page field to which you want to associate the pop-up menu.
Right-click the page field and select Page Field Properties.
When the properties dialog box for that field appears, select the Use tab.
In the Popup Menu group box, select from the available pop-up menus in the drop-down list box.
Click OK.
Save the page definition.
Definitional transfer links, which you create only in pop-up menus, enable you to specify a menu, component, and page to which the user is taken when the link is selected. The following procedure describes how to create a new definitional transfer link or redefine an existing menu item as a transfer link.
To create a definitional transfer link:
In a pop-up menu definition, double-click a menu item to access its properties.
To create a menu item, double-click the empty rectangle at the bottom of the menu. The Menu Item Properties dialog box for pop-up menus appears.
If this is a new menu item, enter a menu item name and label text in the Menu Item fields.
You can create a shortcut key for the menu item by placing an ampersand in the label.
Set the transfer properties.
Click the Transfer button to make this a transfer menu item.
Click the Define Transfer button to display the Transfer Properties dialog box.
This dialog box enables you to define the properties of a definitional transfer that is made from a link in a pop-up menu. The component from which you are transferring is the originating component. The component to which you are transferring is the destination component.
Specify the following:
Field or Control
Description
Portal
Select the navigation registry, such as the EMPLOYEE portal.
Node
Select the PeopleSoft database to which you want the transfer menu to point. Local is the default. Valid values include all of the values in the MSGNODENAME column of the PSMSGNODEDEFN table. If you select a node other than Local, the system deselects the Use data from current page in search dialog check box.
Menu
Select the name of the menu containing the destination component.
Component
Select the name of the destination component.
Market
Select the market of the destination component.
Component Item
Select the name of the page to display at the front of the destination component.
Action
Select an action mode (Update/Display, Update/Display All, Correction, or Data Entry) to constrain the user profile to a specific action mode at the time of the transfer. The action modes that are available in the prompt list depend on which modes are specified as valid in the destination component definition.
Select Prompt to enable the user profile to select an available action mode at the time of the transfer. The action modes that the user profile can select depend on which action modes are defined as valid in the destination component definition and to which action modes the user profile is granted access in Maintain Security.
Set the transfer type.
Field or Control
Description
Re-use current window
Select to transfer to the component in the same window in which the transfer is initiated.
Use new window (minimize current window)
Select to minimize the current window and open the destination component in a separate window.
Specify whether to supply search key values from the originating component.
Field or Control
Description
Use data from current page in search dialog
Select to use the values from the originating component search keys in the search dialog box of the destination component. If these values allow the system to select a unique row from the search record, the search dialog box is bypassed and the destination component opens immediately.
Deselect this check box if you want the user to type the search key values into the search dialog box.
Click OK to accept the Transfer Properties dialog box settings.
Click OK to accept the Menu Item Properties dialog box settings.
Save the menu definition.