Migrating PUM Data
Change Assistant provides the ability to migrate metadata from the current PUM Source to the new PUM Source. The following data types can be migrated:
PUM Customization Information
Test Information
Package Definition Information
Package definition information refers to all of the metadata for Change Packages that were created on the PUM Source. Only Created change packages are migrated.
Importing the Change Package definitions into the new PUM Source provides change package history. The change package definitions can be viewed in the new PUM Source, but can not be used to directly create a change package.
Merge Repository and PUM Automated Updates
Exporting PUM Data from Current PUM Source
To export PUM data on the current PUM source:
From the Change Assistant menu, select Tools, Options, PUM Source.
Alternatively, select Tools, Change Actions, Update Manager, PUM Source .
Click Manage for Migrate Customer Data.
Select Export PUM(User) Metadata From Existing PUM Source.
Select the current PUM database.
Select the metadata to export.
Select the export directory in the Export To field.
The export file is a data mover DAT file. By default the name is customerdata.DAT.
Deselect Import PUM(User) Metadata to New PUM Source.
Click Import/Export.
Change Assistant will check that the database is a PUM Source, if it is not, you will receive an error message.
A message is displayed that the export was successful.
Importing PUM Data into New PUM Source
To import PUM Data from a DAT file into a new PUM Source:
Install a new Change Assistant instance for the new Update Image.
In the new Change Assistant instance, select Tools, Options, PUM Source.
Click Manage for Migrate Customer Data.
Deselect Export PUM(User) Metadata From Existing PUM Source.
Select Import PUM(User) Metadata to New PUM Source.
Either select the new PUM Source database or click the Create button to open the Define Database Wizard and define the database.
Select the metadata to export.
Select whether to overwrite existing data or ignore duplicates.
Select Specify.
In the Import From field select the path and file for the DAT file exported from the old PUM Source.
Click Import/Export.
Migrating PUM Data
If both your old PUM source and new PUM source are available, you can export and import at the same time.
To migrate PUM data:
Download and deploy new Update Image.
Install Change Assistant from the PS Home that matches the new PUM Source.
Note: Change Assistant Settings can be retained from the existing instance of Change Assistant. See Installing Change Assistant
In Change Assistant, configure database definitions for the old PUM source database and the new PUM source database.
Select the task Migrate Customer Data from the Tools menu.
Select the metadata to import and export.
Click Import/Export.
Change Assistant performs a compatibility check.
If the compatibility check passes, a Migration Summary report is displayed.
Click Finish.
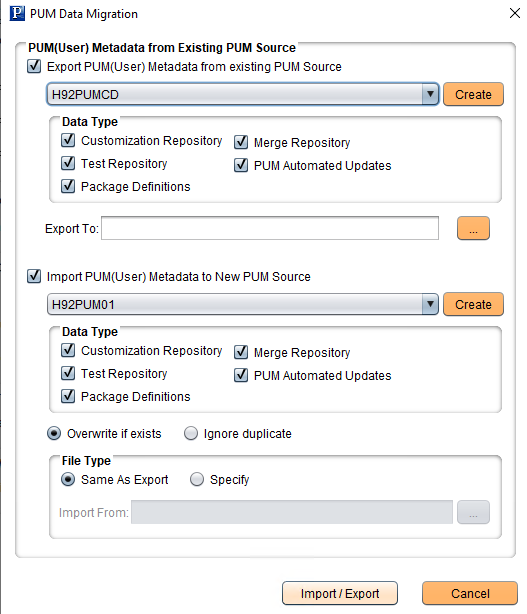
In Change Assistant, select Tools, Options, PUM Source tab, then click Manage for Migrate Customer Data.
This example illustrates the fields and controls on the PUM Data Migration page. You can find definitions for the fields and controls later on this page.
Field or Control |
Description |
|---|---|
Export PUM(User) Metadata From Existing PUM Source |
Select to enable the export. |
Database |
Select the old PUM source database. If the database has not been defined in this instance of Change Assistant, use the Create button to launch the Define Database wizard. |
Customization Repository |
Select to export the customization repository. |
Test Repository |
Select to export the test repository. |
Package Definitions |
Select to export change package definitions. |
Merge Repository |
Select to export Merge Repository. You can also export merge session history tables to maintain different versions of customization object in the merge repository. Refer to Retaining Object Merge Data and Session |
PUM Automated Updates |
Select to export PUM Automated Update settings and jobs. Note: Only applies to PUM Images on PeopleTools 8.59 and above. |
Export To |
Enter the path and file name for the export. |
Import PUM(User) Metadata to New PUM Source |
Select to enable import. |
Database |
Select the new PUM source database. If the database has not been defined in this instance of Change Assistant, use the Create button to launch the Define Database wizard. |
Customization Repository |
Select to import customization repository. |
Test Repository |
Select to import test repository. |
Package Definition |
Select to import change package definitions. |
Merge Repository |
Select to import Merge Repository. You can also import merge session history table to maintain different versions of customization object in the merge repository. Refer to Retaining Object Merge Data and Session |
PUM Automated Updates |
Select to import PUM automated update settings and jobs. |
Overwrite if exists |
Select to overwrite data if the data already exists. |
Ignore duplicate |
Select to ignore duplicate data. |
Same as Export |
The file specified in the Export To field is used. |
Specify |
Select if you have an existing file to import. |
Import From |
Enter the path and file name for the import. |