Using RTF Templates
RTF templates support most XSL functionality and can be designed with robust processing and formatting code.
This section discusses how to:
Create RTF templates.
Incorporate sub-templates.
Include images.
Change default template font.
Use drilling URL in RTF template.
Incorporating data created with Rich Text Editor (RTE) into template.
Embedding PCL code into template.
Using two dimensional (2D) barcode functions.
Handle sensitive data in RTF templates.
To create an RTF template using Microsoft Word:
Download the delivered BI Publisher Template Builder plug-in for offline template design on the Reporting Tools, BI Publisher, Setup, Design Helper page to facilitate the insertion of application data tags into your RTF templates.
The BI Publisher Template Builder is an extension to Microsoft Word that simplifies the development of RTF templates. While the Template Builder is not required to create RTF templates, it provides many automated functions that may increase your productivity.
Note: You can choose to automatically view the Word Template Builder Tutorial File, Template Builder for Word Tutorial.doc, upon installing the plug-in. This document offers a quick and informative tutorial of the Template Builder.
The Template Builder for Word Tutorial.doc is located in the \Template Builder for Word\doc directory of the folder where Oracle BI Publisher Desktop, BI Publisher Template Builder plug-in, was installed.
Sample report templates are available in <Installation Directory>\BI Publisher Desktop\samples.
Download the XML sample data file by clicking the Sample Data link on the Reporting Tools, BI Publisher, Create BIP Report Definitions page for a specified query.
Load the sample data into the document by selecting from the Microsoft Word Template Builder tool bar menu.
Design your template in the RTF document.
By using the downloaded XML sample data, you can insert the data field tags into your template rather than manually typing XSL-formatted tags.
You can preview the template output with the sample XML data from the Oracle BI Publisher menu using Preview Template or select Preview from the Template Builder toolbar.
Upload the completed template into the report definition by clicking the Upload button on the Reporting Tools, BI Publisher, Create BIP Report Definitions, Template page.
Note: Your data source XML structure should be designed to be as close as possible to the groupings used for in the actual report template structure; this improves runtime performance by preventing unnecessary XSL transformation. This is particularly applicable for reports with complex data structures and very large file sizes.
See Fusion Middleware Report Designer's Guide for Oracle Business Intelligence Publisher, “Creating RTF Templates.”
Refer to Word Template Builder Tutorial.
See Working with Template Design Helpers, Creating Report Definitions.
When designing a template, you can incorporate one or more sub-templates into your primary template.
You must use specific syntax to:
Create sub-templates.
Import sub-templates.
Call sub-templates.
See Maintaining Sub-Templates.
Creating Sub-Templates
Within a single sub-template file, multiple sub-template components can be available. Start and end template indicators must exist to distinguish these various components.
<?template:component_name?>
<?end template?>
For example, syntax of a sub-template file containing two components could be:
<?template:peoplesoft?>
Pleasanton Campus
500 Oracle Lane
Pleasanton, CA  94488
<?end template?>

<?template:logo2x.5?>
 Oracle_Logo
<?end template?>
where <?template:peoplesoft?> is the start template indicator of the component peoplesoft and<?template:logo2x.5?> is the start template indicator of the component logo2x.5. Each<?end template?> tag indicates the end of its respective component.
Importing Sub-Templates
To import a sub-template file that is stored in the Content Library, place the following syntax at the top of the primary template file:
<?import:psxmlp://sub-template_NAME?>where sub-template_NAME is the registered sub-template ID in the Content Library.
For example:
<?import:psxmlp://STDHEADER?>This syntax must be
in Normal text.
Note: The sub-template reference is defined only in the RTF template. The sub-template must be defined in Content Library; however, the relationship to templates using the sub-template is not defined in the database. Developers must be aware of the sub-template relationships when modifying the RTF sub-template.
Calling Sub-Templates
Place the following syntax in the primary template file in the location where the desired text or XSL instructions from the sub-template file should appear:
<?call-template:peoplesoft?>In the preceding sample
code peoplesoft is the name of the component that you want to use in the sub-template
file.
Note: Primary templates calling nonexistent or inactive sub-templates cause an error message to be issued indicating the reason for the problem. This error information is incorporated into Process Scheduler error handling as well as into online viewing or previewing of the report.
Testing a Sub-Template in Microsoft Word
You should test your template and sub-template using Template Builder before uploading to PeopleTools to make your sub-template is accessible to your template on the file system.
Use the following syntax when importing:
<?import:file:C:///Template_Directory/subtemplate_file.rtf?>Notice the triple slashes and the use of the actual file name instead of template ID.
When your design is complete, you can change the import statement back to make the sub-template available to the main template in PeopleTools environment:
Note: In order to successfully import the sub-template file in Word, select BI Publisher menu, Options, Preview tab, and open the Properties table. Search for and set the property xdk-secure-io-mode to False. This property is set to True by default, as a security precaution.
BI Publisher supports a number of methods for including images in your reports:
Inserting images.
Importing images.
Rendering image field data (BLOB).
Inserting Images
To directly insert a .jpg, .gif, or .png image file into a template:
Select while the template is open in Microsoft Word.
Select the desired .jpg, .gif, or .png file to insert into the template.
Save the template.
Note: Oracle recommends that you use the Microsoft Word Insert menu option to insert the image, because the additional properties that you need to set for the RTF template to correctly generate reports with those images are automatically set by means of this method. Additionally, dragging and dropping an image onto a template creates a link to the local machine being used and may cause problems when the report is generated.
Importing Images
To import an image from a sub-template file:
Embed the .jpg, .gif, or .png into the sub-template file.
For example,
<?template:logo2x.5?>
 Oracle_Logo
<?end template?>
where
Oracle_Logois the actual .jpg, .gif, or .png.Import the sub-template file that includes the image by including the following syntax at the top of the primary template file:
<?import:psxmlp://sub-template_NAME?>In this code sample,
sub-template_NAMEis the registered sub-template ID in the Content Library.Add the calling details in the primary template at the appropriate location using the following syntax:
<?call-template:logo2x.5?>In this code sample,
logo2x.5is the name of the component that contains the image in the sub-template file.
Rendering Image Field Data (BLOB)
BI Publisher supports the rendering of BLOB (Base64 encoded) data fields in an XML file.
To render an image at runtime, add the following syntax in a Form Field Help Text box :
<fo:instream-foreign-object content-type="image/jpg">
<xsl:value-of select="IMAGE_ELEMENT"/>
</fo:instream-foreign-object>
where image/jpg is the
MIME type of the image (other MIME types are image/gif and image/png)
and IMAGE_ELEMENT is the element containing BLOB (Base64 encoded) data in the XML
file.
Also, you can specify height and width attributes for the image to set its size in the published report. You can specify height and width attributes in inches, pixels, centimeters, or by percentage. BI Publisher scales the image to fit the size that you define. The following examples illustrate the attributes for height and width of an image:
Image size attributes in inches:
<fo:instream-foreign-object content-type="image/jpg" height="3 in" width="4 in">Image size attributes in pixels:
<fo:instream-foreign-object content-type="image/jpg"
height="300 px" width="400 px">
Image size attributes in centimeters:
<fo:instream-foreign-object content-type="image/jpg"
height="3 cm" width="4 cm">
Image size attributes as a percentage of the original dimensions:
<fo:instream-foreign-object content-type="image/jpg"
height="300%" width="300%">
Note: BI Publisher supports rendering of images in all output formats—PDF, HTML, RTF, and XLS.
Query and Connected Query data sources containing image fields generate the binary base64 encoded data string for these image fields in the generated XML file provided the query’s Image Fields property is set correctly.
If you are using a Query or Connected Query data source, follow these steps for the underlying query containing the image field:
Open a query definition (Reporting Tools, Query, Query Manager).
Click the Properties link.
In the Image Fields group box, select Image Data.
Click OK, and save the query.
See Viewing and Editing Query Properties, Setting Image Fields.
The output report from RTF template uses template-level default fonts for empty report spaces and empty table cells. If the default font size does not match the font height used in a template, a final report could look different from user expectations. In this case, the user can change the template default font either in design time or runtime:
Design time
Set the xdo.cfg for the font. For example, set the default font for a specific report to be Helvetica, size 8:
<property name="rtf-output-default-font">Helvetica:8</property>Runtime
Use PeopleCode to set the font. For example, set the default font for a specific report to be Times New Roman with height 10:
&asPropName = CreateArrayRept("", 0);
&asPropValue = CreateArrayRept("", 0);
&asPropName.Push(""rtf-output-default-font");
&asPropValue.Push(""Times New Roman:10");
&oRptDefn.SetRuntimeProperties(&asPropName, &asPropValue);
Drilling URLs are supported in BI Publisher reports with a data source of PS Query or Connected Query.
Note: Drilling URLs are supported only in RTF templates.
To use a drilling URL in a BI Publisher report:
Create the query with the drilling URL defined as a field.
Create an RTF template.
In the RTF template map one or more fields to the fields that contain drilling URL.
Highlight the field where you want to place the drilling URL.
Select Insert (from the Word menu), Hyperlink or use Ctrl+K.
In the Insert Hyperlink dialog box, enter the URL link in Address field.
Each URL link should be defined as {URL_FIELD}, where URL_FIELD is the unique field name for the expression that contains a specific drilling URL.
This example illustrates the fields and controls on the Insert Hyperlink dialog box.
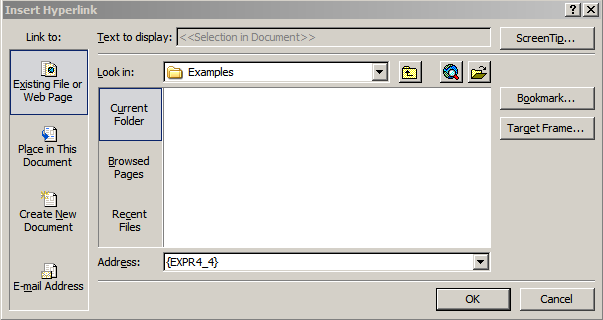
Use the Target Frame push button to select how this URL link will be opened, either in the same window or in the new window
Note: The URL value does not need to be added to the report, as long as the unique field name (data file that contains the URL) is mapped to a field in the report.
If the BI Publisher report is run in Process Scheduler using an application engine program, you will need to add additional code to identify the process instance for the application engine program before processing the report. The process instance can be retrieved from the state record PSXPQRYRPT_AET. This call is needed to set a drilling URL during Query or Connected Query execution.
&ProcessInstance=PSXPQRYRPT_AET.PROCESS_INSTANCE;
&oRptDefn.ProcessInstance = &ProcessInstance;
&oRptDefn.ProcessReport("", "", %Date, "");
When you click the drilling URL in the report depending on the drilling URL type, one of the following occurs:
For Query URL, the Query results are displayed.
For Component URL, the appropriate PeopleSoft page is opened.
For External URL, the external page is opened.
See Fusion Middleware Report Designer's Guide for Oracle Business Intelligence Publisher.
The data entered in an RTE (Rich Text Enabled) long edit field is stored in the PeopleSoft database as formatted HTML data. BI Publisher reports are capable of displaying this HTML formatted data in the output report without requiring any special conversion, as had been required in previous PeopleTools releases. The Oracle BI Publisher core engine natively supports the use of HTML formatted data fields in an RTF report template.
You can embed custom Printer Command Language (PCL) code to enable font selection for secure check printing (that is, to invoke the MICR font used for bank account codes and the check’s secure signature fonts). To embed PCL commands in the file that is printed, use the BI Publisher commands described below in your RTF template in the specific position on the page where you want the PCL commands to render.
RTF templates can be created with PCL hardcoded lines, which means that a user can directly specify the exact PCL command to be included at a specific visual position on a PCL page.
In the template, include the following syntax at the position where you want to print the text.
<pcl><control><esc/>(pcl command)</control>(text or data field)<sp/>
(text or data field)</pcl>
where:
<pcl></pcl>: indicates the start and end of the custom PCL command sequence and the text to print using the custom command.
<control></control>: indicates the start and end of the PCL sequence.
<esc/>: include <esc/> between <control> and </control> to escape character (ASCII 0x1b) in the output.
<sp/>: inserts a space.
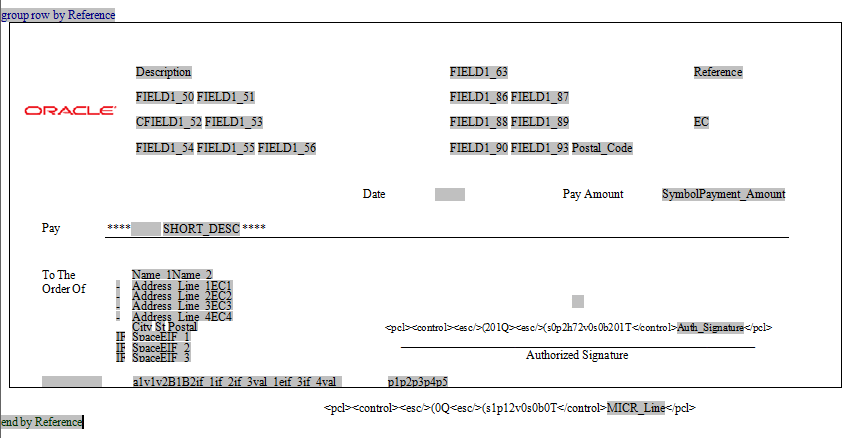
This example illustrates the PCL command sequence in a RTF template.
RTF template with embedded PCL code
For PCL printing, a report follows the following process:
Creating the report
For PCL outputs, during the report creation process, the RTF template will be populated with the XML data and then a PDF report will be created. In the resulting PDF, the PCL command sequence specified in the RTF template will still be displayed as regular text with the XML data replaced in the fields.
Note: Only the PDF report with the embedded PCL command sequence is stored in Report Manager. The PCL file is removed from the server unless the psxp_debug property is enabled. However, if a password is required to open or modify the PCL file, the PCL file will be removed even when the psxp_debug property is enabled.
Printing the PDF report
When the PCL file is sent to a printer where the MICR fonts and the Troy Signatures are installed, the PCL command sequence is replaced with bank account code and signature.
You can use QR code or PDF417 2D barcode type to create barcodes in RTF templates. When you create an RTF template, use the qrcode or pdf417 functions to specify the barcode type. These functions do not require external fonts.
QR Code Syntax
In the template, include the following qrcode syntax:
<?qrcode: <DATA>; <SIZE>[; <CHARSET>]?>where:
DATA: indicates the data to be encoded in the QR code format.
SIZE: indicates the QR code size dimension in points (pt).
CHARSET (Optional): indicates the character set for encoding the data. Default is UTF8.
pdf417 Syntax
In the template, include the following pdf417 syntax:
<?pdf417: <DATA>[; <XSCALE>[; <COLUMNS>[; <ROWS>[; <CHARSET>]]]]?>where:
DATA: indicates the data to be encoded in the PDF417 format.
XSCALE: indicates the point (pt) per PDF417 module width. Default value is 1 (1pt per module).
COLUMNS: indicates the number of columns to be used in the generated PDF417 symbol. Default value is -1.
ROWS: indicates the number of rows to be used in the generated PDF417 symbol. Default value is -1.
CHARSET (Optional): indicates the character set to be used to encode data with the Byte compaction mode. Specify CHARSET only if the data contains non-Latin-1(ISO-8859-1) characters.
A BI Publisher report
that uses query, connected query, or composite query as a data source
may include data fields containing sensitive information, which should
be masked either with an asterisk or with another masking character.
When you use a formatting function, such as format-number() or format-date(), on such a field, it may generate an error message or produce a
blank value.
This happens because masking characters invalidate the canonical form or representation of the data, which is typically a requirement for most BI Publisher functions.
PeopleSoft provides
the $MaskedFields parameter to the BI Publisher core engine at runtime. This parameter
contains a semi-colon separated list of all masked fields that have
been detected in the underlying data source.
With this information, a report developer can use conditional logic in the RTF template to check whether a certain field is masked, before applying any formatting function on its value. Instead of using a formatting function, the report developer can customize the masked value. For example, replacing asterisks with the text PRIVATE.
For example, if the
data source contains the masked fields BIRTHDATE and ADDRESS, the $MaskedFields runtime
parameter will contain the following text:
BIRTHDATE;ADDRESS;Before using this parameter, you must declare it under a form field at the top of the reports primary RTF template, as shown in the following example:
<xsl:param name="MaskedFields" xdofo:ctx="begin"/>Example to Format a Masked Data Field
This example shows how to use conditional logic in RTF templates to either format a potentially masked data field using a function, or to display a customized text, for example PRIVATE, in its place.
Instead of formatting or customizing the masked data field, you may continue to use the un-formatted data value. Check how the ADDRESS field is processed in this example.
This example illustrates the formatting of masked data field in RTF templates.
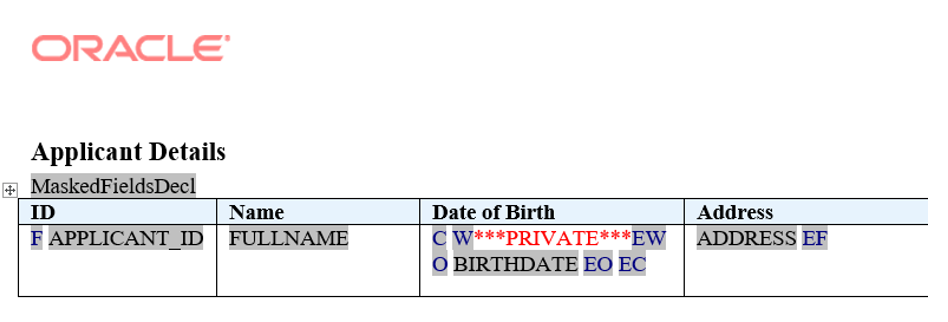
The following table shows the entries made in the template shown in the above figure:
|
Default Text |
Form Field Entry |
Description |
|---|---|---|
|
MaskedFieldsDecl |
<xsl:param name="MaskedFields" xdofo:ctx="begin"/> |
Runtime parameter declaration. |
|
F |
<?for-each:row?> |
Opening for-each loop for the row element. |
|
APPLICANT_ID |
<?APPLICANT_ID?> |
Placeholder for APPLICANT_ID element. |
|
FULLNAME |
<?FULLNAME?> |
Placeholder for FULLNAME element. |
|
C |
<?choose:?> |
Opens the choose statement. |
|
W |
<?when: contains($MaskedFields,'BIRTHDATE;')?> |
Tests if BIRTHDATE element is contained in list of masked fields. If it does, the boilerplate text ***PRIVATE*** that follows, is displayed. Note: Include trailing semi-colon after the masked field. |
|
EW |
<?end when?> |
Ends when condition test. |
|
O |
<?otherwise:?> |
If the previous condition tests are not true, the form field/text that follows this is displayed. |
|
BIRTHDATE |
<?format-date:BIRTHDATE;'LONG'?> |
Displays the BIRTHDATE element as a formatted date. |
|
EO |
<?end otherwise?> |
Ends the otherwise statement. |
|
EC |
<?end choose?> |
Ends the choose statement. |
|
ADDRESS |
<?ADDRESS?> |
Placeholder for ADDRESS element. |
|
EF |
<?end for-each?> |
Closing tag for the for-each loop. |
This is one example to show how conditional logic may be applied in RTF templates.
For other possible ways to use conditional logic, see Fusion Middleware Report Designer's Guide for Oracle Business Intelligence Publisher, “Creating RTF Templates,” Using Conditional Formatting.
Masked Data Fields in a Connected Query
A connected query can generate hierarchical XML.
When a BI Publisher
report uses a connected query data source, the $MaskedFields runtime
parameter will contain a semi-colon separated list of all masked fields
in their full XPath form.
This example shows an
XML generated from a connected query data source, and the corresponding
value of $MaskedFields for such a BI Publisher report using this data source.
This example illustrates a sample XML Data.
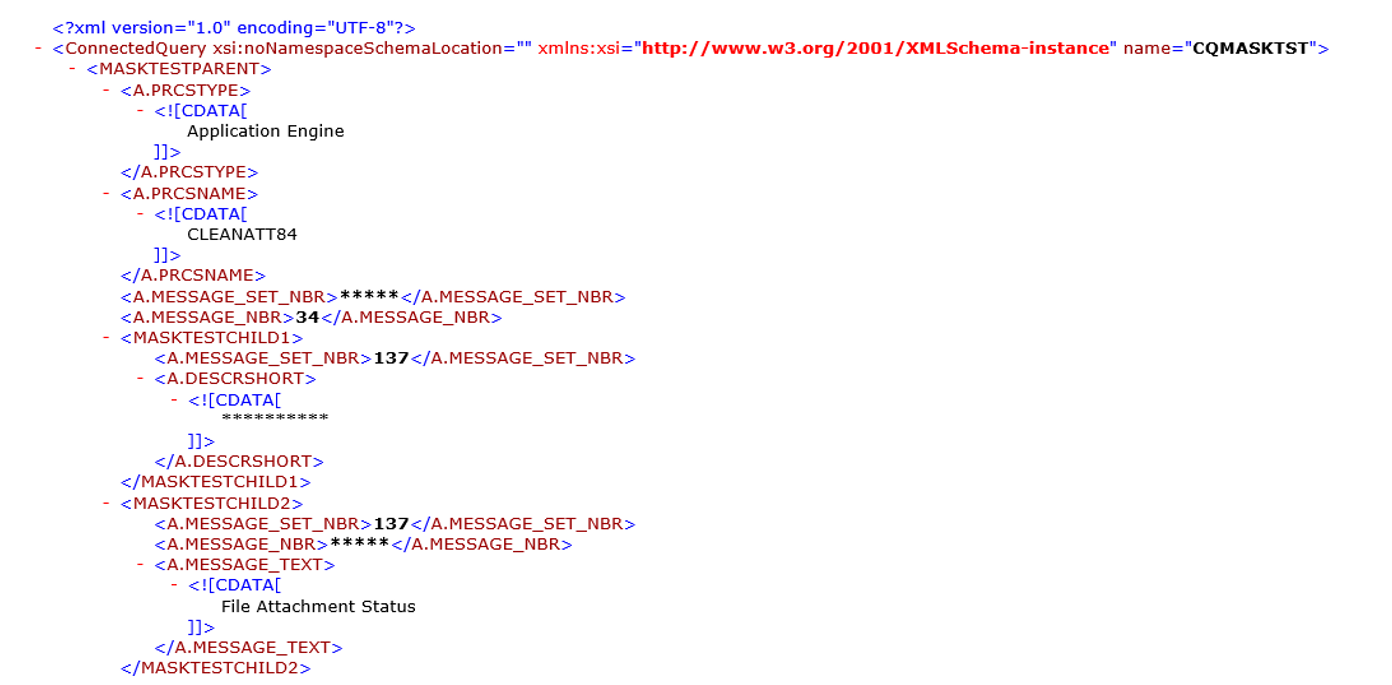
For this XML data, the $MaskedFields runtime
parameter value will be:
MASKTESTPARENT/A.MESSAGE_SET_NBR;MASKTESTPARENT/MASKTESTCHILD1/A.DESCRSHORT;
MASKTESTPARENT/MASKTESTCHILD2/A.MESSAGE_NBR;