Managing Dashboard Pages
This section discusses how to:
Create and manage dashboards.
Specify dashboard properties.
Specify the menu location of a dashboard.
Specify the pagelets or tiles that can appear on a dashboard.
(Fluid only) Create sections on fluid dashboards.
(Classic only) Arrange pagelets on classic dashboards.
(Fluid only) Arrange tiles on fluid dashboards.
(Fluid only) Publish additional tiles to already personalized dashboards.
(Fluid only) Disable user personalization on fluid dashboards.
Note: In addition, you can create and manage WorkCenter dashboards (a type of classic dashboard), which are maintained separately from other classic dashboards. See Creating and Managing WorkCenter Dashboards.
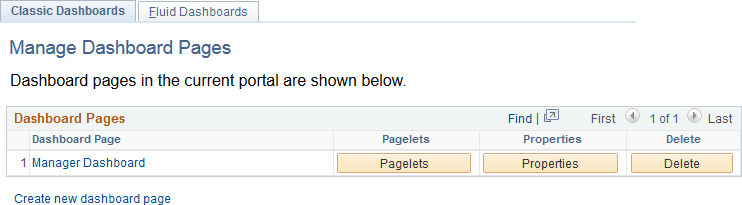
Use the Manage Dashboard Pages page to manage dashboard definitions:
Use the Classic Dashboards page (PTAL_DASHBD_PAGES) to manage classic dashboard definitions.
Use the Fluid Dashboards page (PTAL_FLDASHBDPAGES) to manage fluid dashboard definitions.
Navigation:
This example illustrates the fields and controls on the Classic Dashboards: Manage Dashboard Pages page. You can find definitions for the fields and controls later on this page.
Field or Control |
Description |
|---|---|
Create new dashboard page |
Click to access the Dashboard Page Administration page and configure the properties of a new dashboard definition. |
Dashboard Page |
Displays an active link to the dashboard itself. Click the link to access the dashboard. |
(Classic only) Pagelets |
Click to configure the content and layout of a classic dashboard. |
(Fluid only) Tiles |
Click to configure the content of a fluid dashboard. |
Properties |
Click to access the Dashboard Page Administration page and specify dashboard properties, location, and security details. |
Delete |
Click to remove the dashboard content reference definition from the portal registry. |
Use the Dashboard Page Administration page (PTAL_DASHBD_ADMIN) to specify dashboard properties including the dashboard’s location in the menu structure.
Navigation:
On the Manage Dashboard Pages page:
Click the Create new dashboard page link.
Click the Properties button for an existing dashboard definition.
This example illustrates the fields and controls on the Dashboard Page Administration page. You can find definitions for the fields and controls later on this page.

Enter the following dashboard properties:
Field or Control |
Description |
|---|---|
Dashboard Name |
Enter a unique identifier for the dashboard. This field is required. |
Dashboard Label |
Enter the label that appears in the navigation. This field is required. |
Long Description |
Enter a description that appears as the tool tip text. |
Keywords |
Enter a keyword or keyword phrase to be stored as a content reference attribute. Note: Two content reference attributes are created: KEYWORD (to store the keywords in the base language) and KEYWORD_LNG (to store the keywords in the current session language). See Defining Content References for more information on content reference attributes. |
Owner ID |
Select the organization that owns the object. |
Dashboard Page Link
Use these fields to specify the location of the dashboard page link in the menu structure.
Field or Control |
Description |
|---|---|
Parent Folder |
Enter the name of the navigation folder in which you want to place the dashboard page link. Click the look up button to access the Select the Dashboard Link Parent Folder page. |
Sequence number |
Enter a number to specify the order of the dashboard link within the parent folder. |
Security
Use the fields in the Security group box to specify whether access to the dashboard is restricted by permission list and role or unrestricted and available to all users.
Field or Control |
Description |
|---|---|
Security Type |
Select from these values:
|
Selected Security
Insert rows into the Selected Security grid to specify the permission lists and roles that provide access to the dashboard. You can combine permission lists and roles by inserting multiple rows in the grid.
Field or Control |
Description |
|---|---|
Type |
For each row, select from these values:
|
Name |
Specify the permission list or role name that provides access to the dashboard. Click the look up button to see a list of available names. |
Save |
Click to save the configuration and return to the Manage Dashboard Pages page. |
Cancel |
Click to discard any changes and return to the Manage Dashboard Pages page. |
Use the Select the Dashboard Link Parent Folder page (PTAL_SELECT_FREF) to specify the location of the link to the dashboard in the portal menu structure.
Navigation:
On the Dashboard Page Administration page, click the look up button for the Parent Folder field.
This example illustrates the fields and controls on the Select the Dashboard Link Parent Folder page. You can find definitions for the fields and controls later on this page.

To select the parent folder of the link to the dashboard, you must navigate through the menu tree until you see the destination folder.
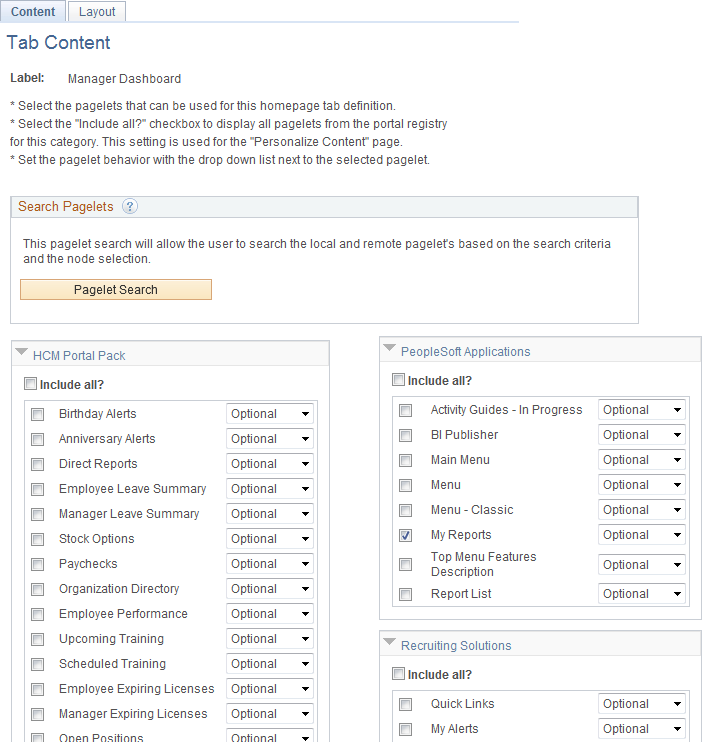
Use the Tab Content page (PTSYSTABCONTENT) to specify which pagelets can appear on classic dashboards and which tiles can appear on fluid dashboards. (This page is similar to the pages that you use for the same purposes on homepages. The process is also the same.)
Navigation:
On the Manage Dashboard Pages page:
Click the Pagelets button to specify pagelets for a classic dashboard.
Click the Tiles button to specify tiles for a fluid dashboard.
This example illustrates the fields and controls on the Content - Tab Content page for pagelets. You can find definitions for the fields and controls later on this page.
Note: The Layout page tab is not displayed for fluid dashboards.
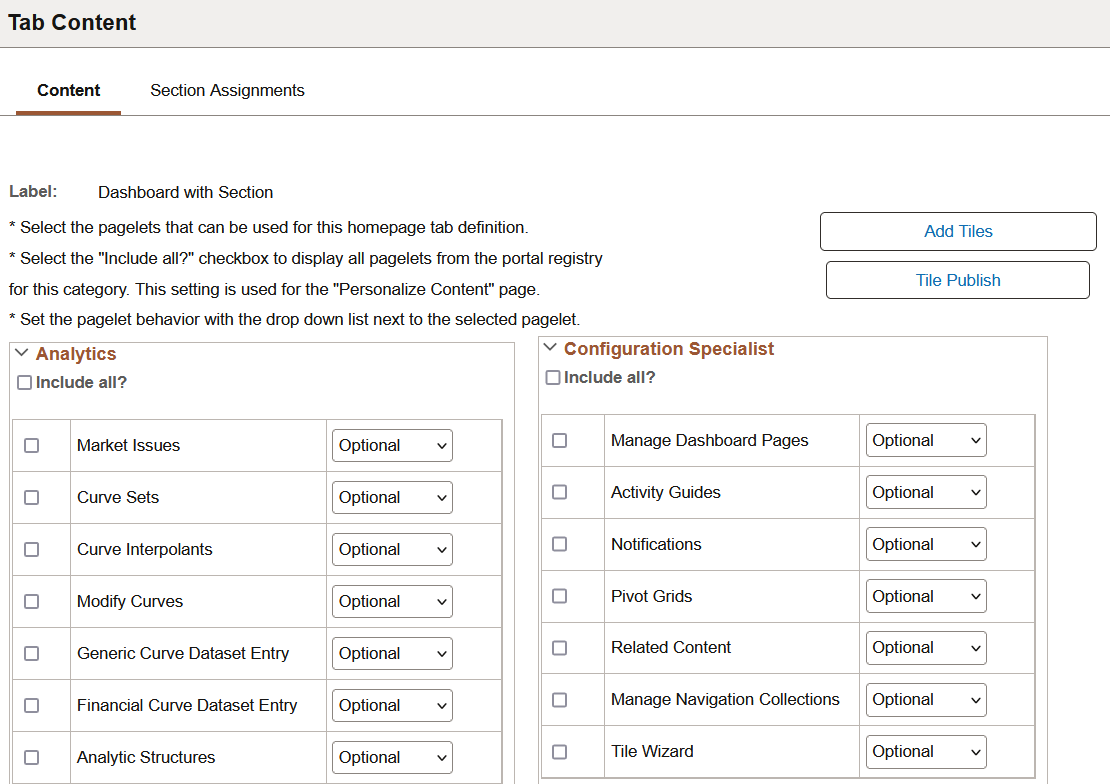
This example illustrates the fields and controls on the Content - Tab Content page for tiles. You can find definitions for the fields and controls later on this page.
To select the pagelets or tiles that can be displayed on this dashboard:
Expand any collapsed group boxes and then select the check box to make the pagelet or tile available for this dashboard.
Select the Include All? check box to select all pagelets or tiles in the category.
Note: The user must have security access to the pagelet or tile definition for the pagelet or tile to be displayed on the dashboard.
-
In addition:
For classic dashboards, you can click the Pagelet Search button and select a pagelet from the Pagelet Search page to add it to the dashboard definition.
See Searching for and Importing Pagelets and Tiles for more information on searching for pagelets on local and remote nodes.
For fluid dashboards, you can click the Add Tiles button and select a tile from the Tile Search page to add it to the dashboard definition.
See Searching for and Importing Pagelets and Tiles for more information on searching for tiles on local and remote nodes.
Use the drop-down list box to select the pagelet or tile behavior. If you're creating a section, you must select the tile behavior type other than Optional.
Note: If you change the behavior type of a tile and the tile is assigned to a section on the Section Assignments page, the behavior type of the tile in the section is automatically updated to reflect the change.
Values are:
Field or Control
Description
Optional
The pagelet or tile is available to all users that have permissions to the pagelet or tile. The pagelet or tile is not visible by default, but users have the option to add this tile or pagelet to their dashboard. In addition, once added to a dashboard, the user can move or delete this pagelet or tile.
Only selected optional tiles are available for users to add later on to their dashboard.
Setting a tile that is assigned in a section from non-Optional to Optional removes the tile from the section because Optional tiles cannot be assigned to sections.
Opt-Dflt (optional default)
The pagelet or tile is visible to all users by default for users that have permissions to the pagelet or tile; users can move or delete the pagelet or tile.
Note: You must select the Opt-Dflt setting if you wish to publish additional tiles to users who have already personalized this homepage. See (Fluid only) Publishing Additional Tiles to Already Personalized Dashboards for more information.
Req-Fix (required fixed)
The pagelet or tile is visible to all users by default for users that have permissions to the pagelet or tile; however, users cannot move or delete the pagelet.
Required
The pagelet or tile is visible to all users by default for users that have permissions to the pagelet or tile; users can move the pagelet or tile, however, they cannot delete it.
Click the Save button.
If you're creating a standard fluid dashboard, that is, a dashboard without sections, then on clicking the Save button, the fluid dashboard is ready for use.
If you want to create a sectionalized fluid dashboard, that is, a dashboard with sections, then you should use the Section Assignments tab to create sections and assign tiles to it.
(Fluid only) Deselecting a Tile on an Existing Fluid Dashboard
When you deselect a tile on an existing fluid dashboard, the tile is not displayed on a user-personalized fluid dashboard and a non-personalized fluid dashboard.
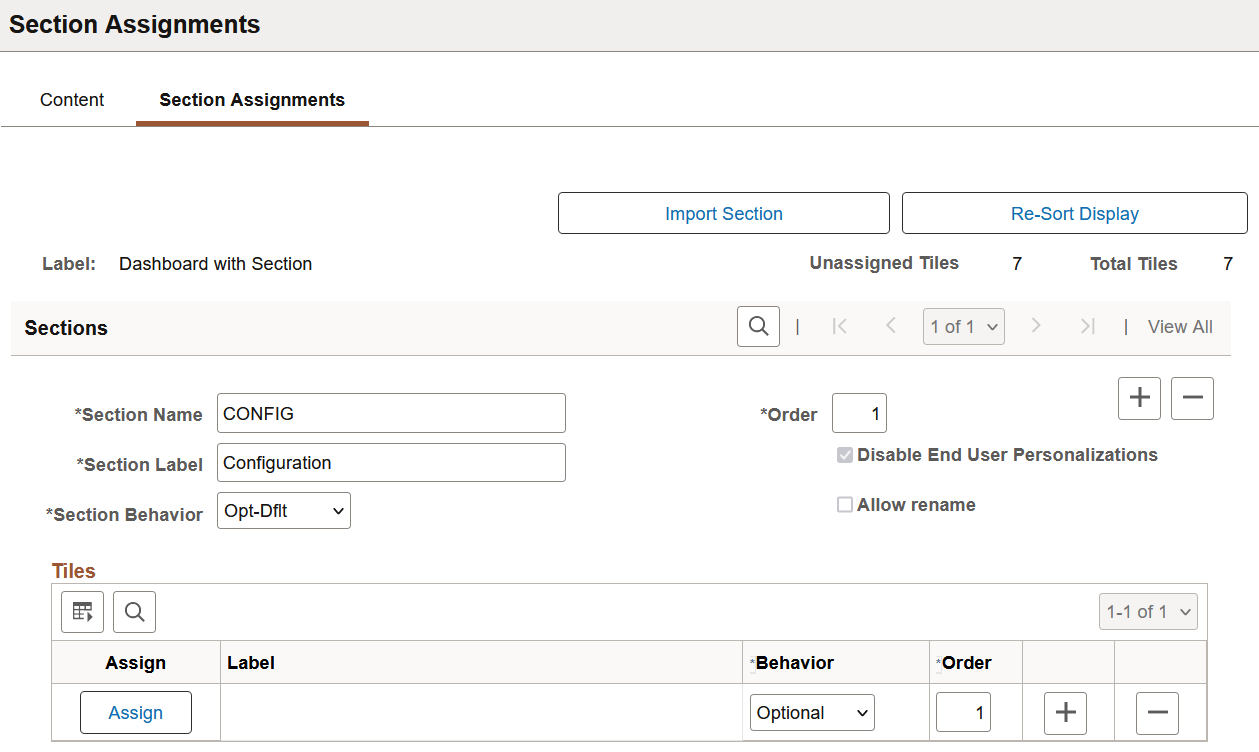
Use the Section Assignments page (PTSYSTABSECTIONS) to create sections and assign tiles to a fluid dashboard. (This page is similar to the page for sections assignments on homepages. The process is also similar.)
Navigation:
On the Tab Content page, select the Section Assignments tab.
This example illustrates the fields and controls on the Section Assignments page for dashboards. You can find definitions for the fields and controls later on this page.
|
Field or Control |
Description |
|---|---|
|
Import Section |
Select to copy a section definition from a section template. The section template is saved in the Fluid Section Templates folder. For more information, see Importing a Section in Homepages and Dashboards. |
|
Re-Sort Display |
After you've created sections, assigned tiles to the sections, and set the order for the tiles, select the Re-Sort Display button to sort the display of sections and tiles by their order number. |
|
Unassigned Tiles |
Displays the number of tiles that are not assigned to any sections; the number decreases as you assign tiles to sections. Unassigned tiles are placed in the standard homepage area, that is, at the top of the homepage. These tiles are ordered on the homepage based on their portal sequence number. |
|
Total Tiles |
Displays the number of tiles that you selected on the Content tab. |
Sections
Rules for managing a section:
A section can contain several tiles.
If a section does not contain any tiles, the section is not displayed on the dashboard.
You can use the empty-section tile, which is an administrator controlled tile, to ensure that the section is displayed. See Configuring Tiles for an Empty Section.
Ensure that the sections with the Req-Fix behavior are grouped together at the beginning of the dashboard.
|
Field or Control |
Description |
|---|---|
|
Section Name |
Enter a unique ID for the section definition. It should be unique within a dashboard. The value that you specify in the Name field can consist of up to 30 letters, digits, and underscores ( _ ). It cannot contain any spaces and cannot begin with a digit. |
|
Section Label |
Enter a label for the section. The label is visible to all users who can view this section. |
|
Section Behavior |
The behavior types that are applicable to homepages are also applicable to sections. The behavior types are as follows:
|
|
Order |
Enter a value to designate the order of the sections when multiple sections are defined on a homepage. The order number determines the sequence in which the sections appear on a homepage. The section with the lowest order number appears first. If any order numbers are identical, then the sequence is alphanumeric. Note: The section order is solely controlled by the order number specified here. |
|
Disable End User Personalizations |
By default, end-user personalization is disabled for sectionalized dashboards. See (Fluid only) Disabling User Personalization for Dashboards. |
|
Allow Rename |
When end-user personalization is disabled for a dashboard, the renaming of a dashboard is also automatically disabled. |
Tiles
The Tiles grid appears after you create a section, which enables you to assign tiles for the section.
Rules for assigning tiles to a section:
A tile can appear only once on a dashboard.
Ensure that the tiles with the Req-Fix behavior are grouped together at the beginning of the section.
Empty-section tile must be assigned the Req-Fix behavior and should be placed as the first tile in a section. See Configuring Tiles for an Empty Section.
|
Field or Control |
Description |
|---|---|
|
Assign |
Clicking the Assign button displays the Tile Assignment page where you can select tiles to insert into the section. |
|
Label |
Displays the label of the tile. |
|
Behavior |
Displays the behavior of the tile that you specified for a tile on the Content tab. However, you can modify the behavior type as required. |
|
Order |
Enter a value to designate the order of the tile within a section. The order number determines the sequence in which the tiles appear in a section. The tile with the lowest order number appears first in a section. If any order numbers are identical, then the tile sequence is alphanumeric. Note: The tile order is solely controlled by the order number specified here. |
Importing a Section
You can import the section templates that are stored in the Fluid Section Templates folder into a dashboard.
For instructions on creating a section template, see Creating a Section Template.
The steps to import a section into a dashboard are similar to importing a section into a homepage. See Importing a Section in Homepages and Dashboards.
Use the Tab Layout page (PTSYSTABLAYOUT) to specify the initial layout of columns and pagelets for a classic dashboard. (This page is similar to the page that you use for the same purpose on homepages. The process is also the same.)
Navigation:
On the Tab Content page, select the Layout page tab.
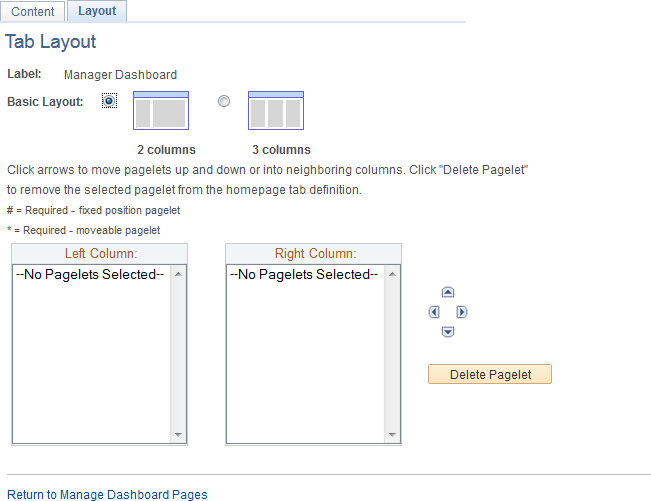
This example illustrates the fields and controls on the Tab Layout page. You can find definitions for the fields and controls later on this page.
Field or Control |
Description |
|---|---|
Label |
Displays the label information from the Content Ref Administration page. |
Basic Layout |
Select to display the pagelets in either two or three columns on the dashboard. To specify the three-column layout, be sure that at least one pagelet does not have the Req-Fix behavior option selected on the Content page. |
Columns |
Displays the pagelets selected on the Content page in the column sections. If the basic layout is two columns, the pagelets are divided into left and right columns. If the basic layout is three columns, the pagelets are divided into left, center, and right columns. Note: A pound sign (#) indicates a pagelet with the Req-Fix behavior option selected on the Content page. An asterisk (*) indicates a pagelet with the Required behavior option selected on the Content page. For example, #Signon would indicate that the Signon pagelet cannot be moved to a different location on the homepage. |
|
Use the Move icons to position the pagelets. Highlight a pagelet, and then click the directional arrow buttons to move the selected pagelet above a pagelet, below a pagelet, to the next column to the right, or the next column to the left. |
Delete Pagelet |
Highlight a pagelet and then click to delete it from the homepage. |

To arrange the layout of the dashboard:
Select a basic layout option.
Select the pagelet name.
Click the directional arrow buttons to position the pagelets in the columns.
Click the Save button.
Note: As the portal administrator, you determine the amount of flexibility that you give users to change the layout of the pagelets. The settings that you select on both the Tab Content and Tab Layout pages determine the degree of flexibility. Grant the end user as much or as little flexibility as your organization demands.
There is no specific page that allows the portal administrator to arrange or order the tiles on a fluid dashboard. Instead, the sequence number for each tile determines the initial order of tiles on a fluid dashboard similar to how tiles are ordered on a fluid homepage. Tiles appear in order with the lowest sequence number first. If any sequence numbers are identical, then the order is alphanumeric. If no sequence number is specified for a tile, the default value of zero is used for that tile.
To rearrange the tile order:
Select
Continue to navigate through the folder structure; select .
Click the link for the folder that contains the tile that you want to reorder.
Click the Edit link for each tile that you want to reorder.
Enter a number in the Sequence field.
Click Save.
If you have the Portal Administrator role, you can use the Tile Publish page to publish tiles to already personalized homepages or dashboards. Otherwise, you can write a PeopleCode program to publish tiles to already personalized homepages or dashboards; for more information, see the following section.
Note: On homepages that are disabled for end-user personalizations, the Tile Publish button is not enabled.
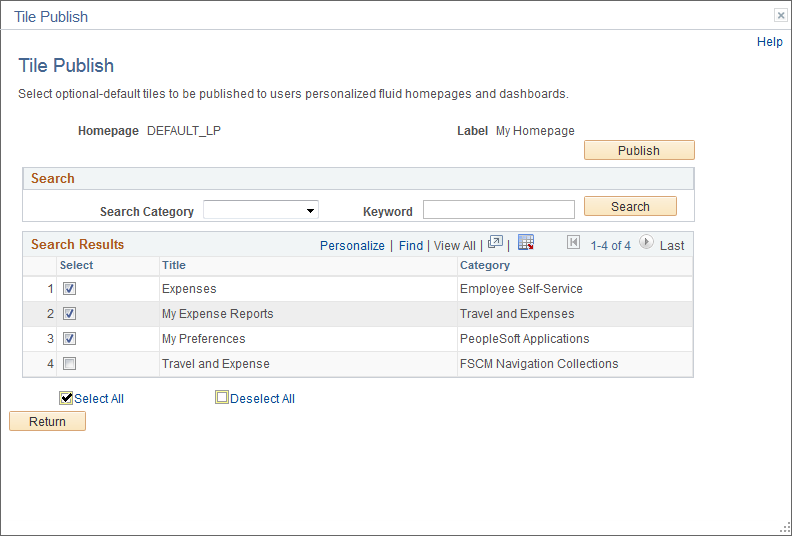
Use the Tile Publish page to publish additional tiles to users who have already personalized this homepage or dashboard.
This example illustrates the fields and controls on the Tile Publish page.
To publish additional tiles to users who have already personalized this homepage or dashboard:
On the Tile Content - Tab Content page, select the additional tiles for this homepage or dashboard.
Select Opt-Dflt for each of these tiles.
Save the homepage definition (or dashboard definition).
Click the Tile Publish button.
The Tile Publish page is displayed listing all new and existing tiles that have been marked as Opt-Dflt.
Select which tiles are to be published to users who have already personalized this homepage or dashboard.
Note: Tiles that are not selected and tiles that have been previously published for this homepage or dashboard are not removed by this process.
Click the Publish button.
A confirmation message indicates how many tiles have been published.
Click OK.
Make note of the process ID in case you need to use Process Monitor to review the status of this PT_TILE_PUB process.
Note: Process Scheduler must be running on your system to complete this process. After the process successfully completes, the updates will be visible to users when they sign in next or after they refresh the homepage or dashboard.
Click the Return button to return to the Tile Content - Tab Content page.
Portal administrators can disable end-user personalization on fluid dashboard definitions by navigating through the Structure and Content component. Dashboard administrators cannot specify this setting through Manage Dashboard Pages.
By default, sectionalized dashboards automatically disable end-user personalization. You can apply this setting for standard dashboards (dashboards without sections) and for sectionalized dashboards.
Consider the following when you plan to disable end-user personalization:
When you disable end-user personalization, users cannot personalize a dashboard. In fact, the Personalize Dashboard option is not available in the dashboard Actions menu.
When end-user personalization is disabled for a dashboard, which has been personalized by users in the past, that personalization is no longer available for use (or the personalization data becomes stale) because end-user personalization data is not maintained. User personalization data that is no longer maintained includes removed tiles, added tiles from the tile repository, pin-to tiles, and tile order changes.