Cloning Environment
Use the Clone Environment action to duplicate an existing PeopleSoft environment running in Cloud Manager.
The new environment need not be an exact copy of the original environment, since you can choose the instances you wish to copy. The new environment is built by reconfiguring the disks from deep clone, saving installation and deployment time.
The following restrictions apply to cloning environments:
Parallel cloning for same source environment is not supported.
Clone feature is not supported for Oracle database versions prior to 19.0.0.0.
Clone feature will not be able to trigger a clone if a previous clone for the same source environment is in a failed state.
Delete the failed cloned environment using Cloud Manager. Cloud Manager will clean up all the resources relating to the failed Oracle Cloud Infrastructure (OCI) clone environment.
The source Pluggable Database (PDB) should be available in OCI to be cloned.
Clone feature does not support bare metal (BM) instance cloning.
If DB system is created manually and TDE Wallet Password is not the same as Database Administrator Password, TDE Wallet Password on the Manage Attributes page must be updated before initiating Local clone.
Local cloning and Remote cloning features are supported for DB Systems of VM shape and Exadata.
To create a Remote clone:
The source and destination databases must be in the same availability domain.
The source and destination databases must use the same Oracle database software version and be in the same software edition.
Clone feature does not update the active web profile on the cloned environment. The active web profile for the cloned environment retains the load balancer information in the virtual addressing section.
See the information on configuring web profiles in the product documentation PeopleTools: Portal Technology.
To set up the load balancer on the cloned environment, select Details for the environment and configure the Load Balancer Settings page.
To use the cloned environment without a load balancer, you need to manually update the host, port in virtual addressing settings for the active web profile. To update the web profile:
Switch to a different active web profile by editing the WebProfile property of configuration.properties file in the web server domain and restarting the web server domain.
To use PSADMIN to administer a PIA site, see the product documentation, PeopleTools: System and Server Administration, Using the Web (PIA) Server Menu.
Correct host, port in virtual addressing section of webprofile profile configuration for the intended web profile.
Switch back to the intended web profile by editing the WebProfile property of configuration.properties file in the web server domain and restarting the web server domain.
Here are examples of use cases for cloning environments.
Duplicate environment with Database, Middle Tier, Search Stack Node including OpenSearch Dashboards or Kibana, Web Server, and Windows client running in distributed nodes with the exact configuration and data as the source environment.
A scaled down copy with Database, Middle Tier and Web Server for a test environment.
All environment components are running on compute instances.
See Cloning Compute Instances later in this section.
Database is running on DBS (Oracle Base Database Service) and other components are running on compute instances (Infrastructure as a Service).
See Cloning an Environment With Database Running on DBS and Other Nodes on Compute later in this section.
Database is running on Autonomous Database (ADB-Dedicated or ADB-Shared) and other components are running on compute instances (Infrastructure as a Service).
See Cloning an Environment With Database Running on ADB and Other Nodes on Compute later in this section.
Database is running on Exadata Database Service on Dedicated Infrastructure (ExaCS) and other components are running on compute instances (Infrastructure as a Service).
See Cloning an Environment With Database Running on Exadata and Other Nodes on Compute later in this section.
Note: The cloned environment need not be an exact copy of the existing environment, because you can select the tiers you want to clone. Once the cloned environment is running, you can perform scaling and Lifecycle Management actions.
See Managing Nodes.
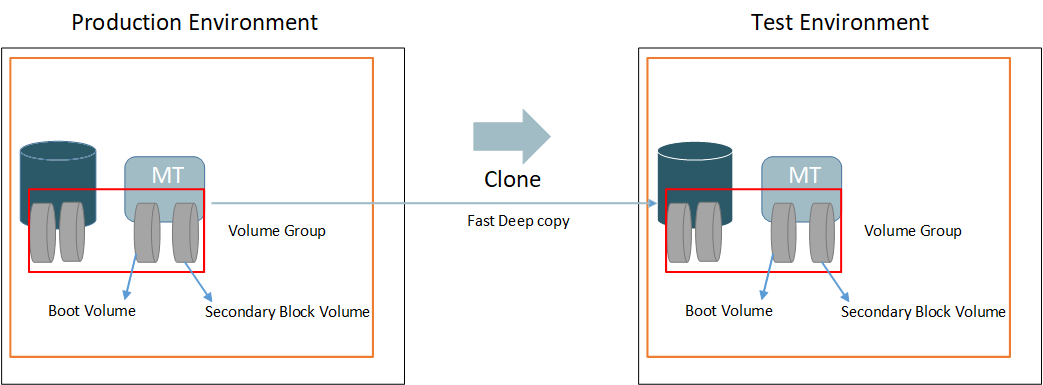
When all of the components for the PeopleSoft environment are running on Compute, the clone process uses OCI Clone APIs to clone the boot volume and secondary block volume into a volume group. The volume group is then used to create a new instance of the environment.
This diagram illustrates the cloning process.
The cloning operation will copy both the boot volume and the secondary block volume into a volume group, then perform a fast deep copy to create a new environment that is the exact copy of the source.
To clone an environment with all components running on compute instances:
From the Cloud Manager Homepage, select the Environments tile.
Click on the Related Actions button corresponding to the environment to be cloned and select Clone Environment.
The Clone Window displays all the components for the environment.
This is an example of the Clone page for a full-tier environment, where all components are running on compute. You can find definitions for the fields and controls later on this page.

Enter a new Environment Name.
Remove any instance of your choice from the target clone environment by selecting No in the Select to Clone field corresponding to that environment.
Note: The option to select the field to be cloned is disabled for database instances and full-tier instances, because they are essential to create the target environment.
Click the Configure button.
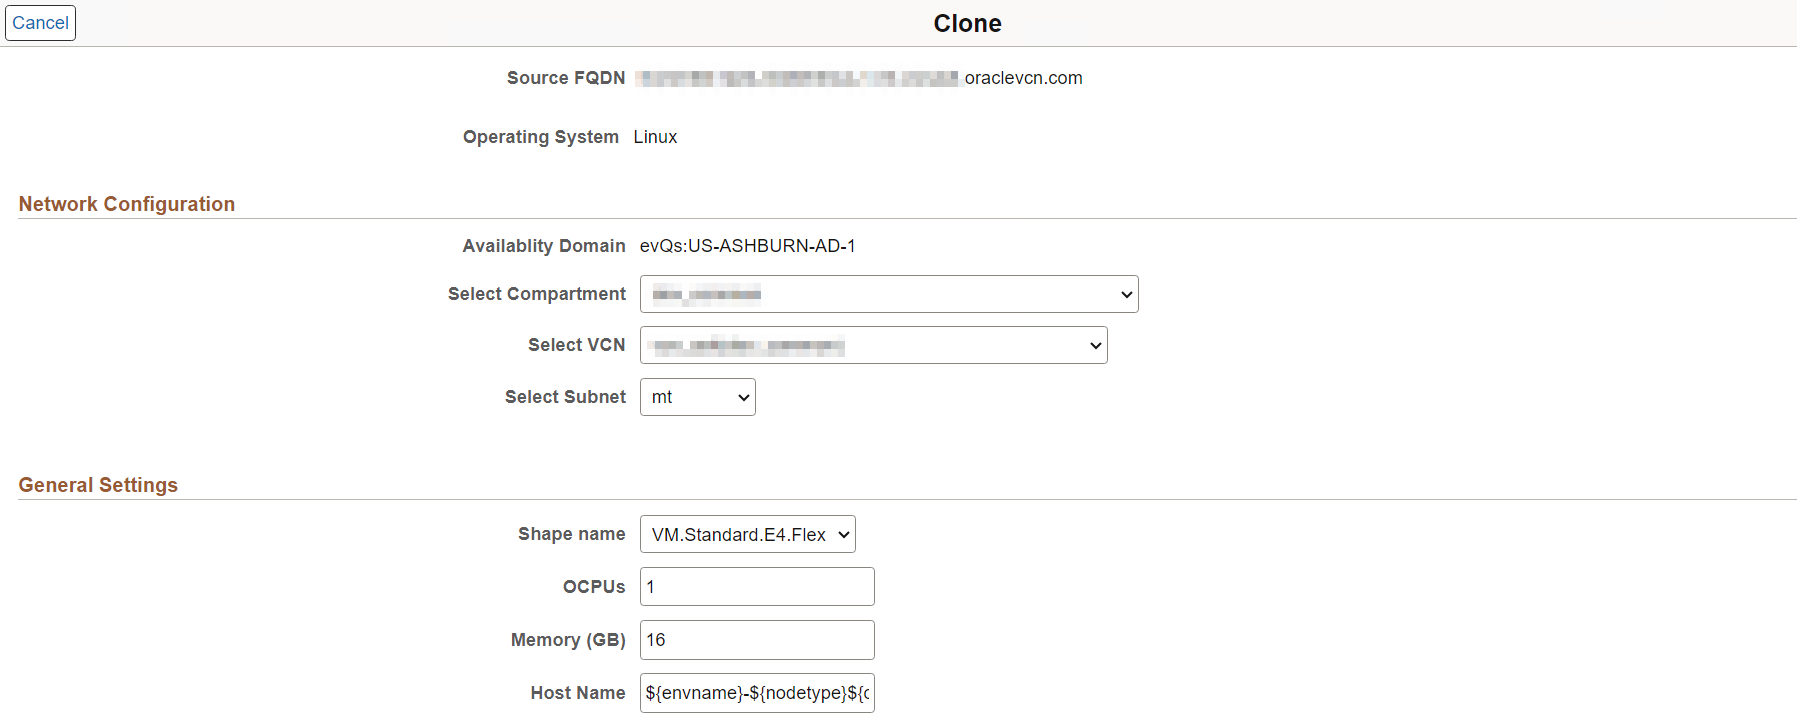
The Clone window displays the Network Configuration and General Settings associated with the selected instance for cloning.
This is an example of the page used to configure compute instances for cloning. You can find definitions for the fields and controls later on this page.
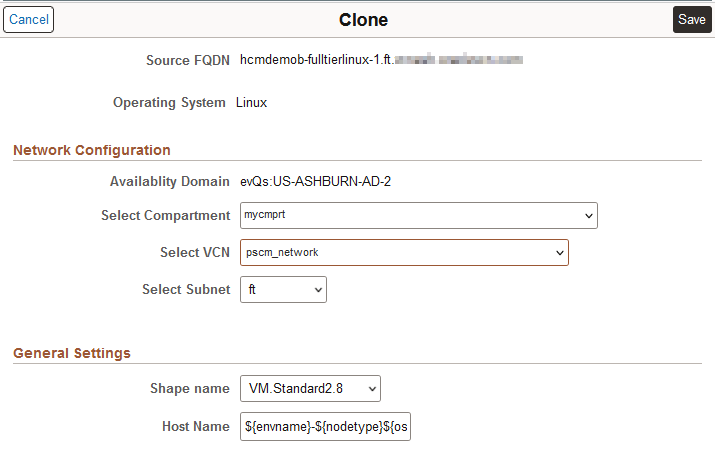
Make the necessary changes to the Network Configuration and General Settings for the cloned environment.
Field or Control
Description
Select Compartment
Select the compartment containing the VCN you want to use.
Select VCN
Select the VCN for the compute node.
Select Subnet
Select the subnet within VCN for the compute node.
Shape Name
Select the name of the standard/ flexible shape that you want to use for the compute node.
Host Name
Enter a new host name if necessary.
By default, the host name will have the following format: ${envname}-${nodetype}${ostype}-${instno}, where envname stands for Environment Name and instno stands for Instance Number.
Click Save to save the changes.
Click the Clone button.
Select Yes to confirm. Cloning will initiate.
The cloning process will take 10 to 15 minutes.
Note: The system validates available resources before starting the cloning process. See Validating Resources
Use the Refresh button to view the status. Status will change from Initiating to Provisioning and then to Running.
For environments with database on DBS, the Clone operation requires OCI clone APIs to create the corresponding database node in the cloned environment.
There are three options for cloning environments with database on DBS: local cloning, remote cloning, and new DB System.
Local Clone Type for DB System
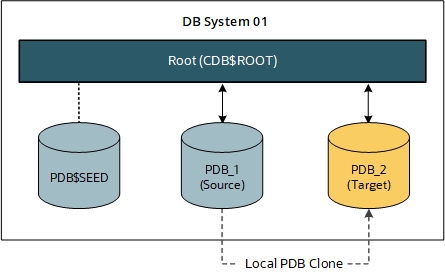
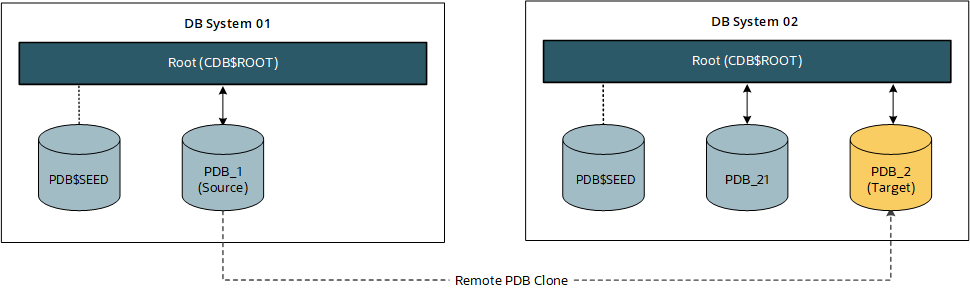
Perform local cloning by creating a clone of the PDBs within the existing DB system and CDB. Using this operation, you can clone the PDB alone, without creating a new DB system.
This diagram illustrates cloning the PDB within the existing DB system.
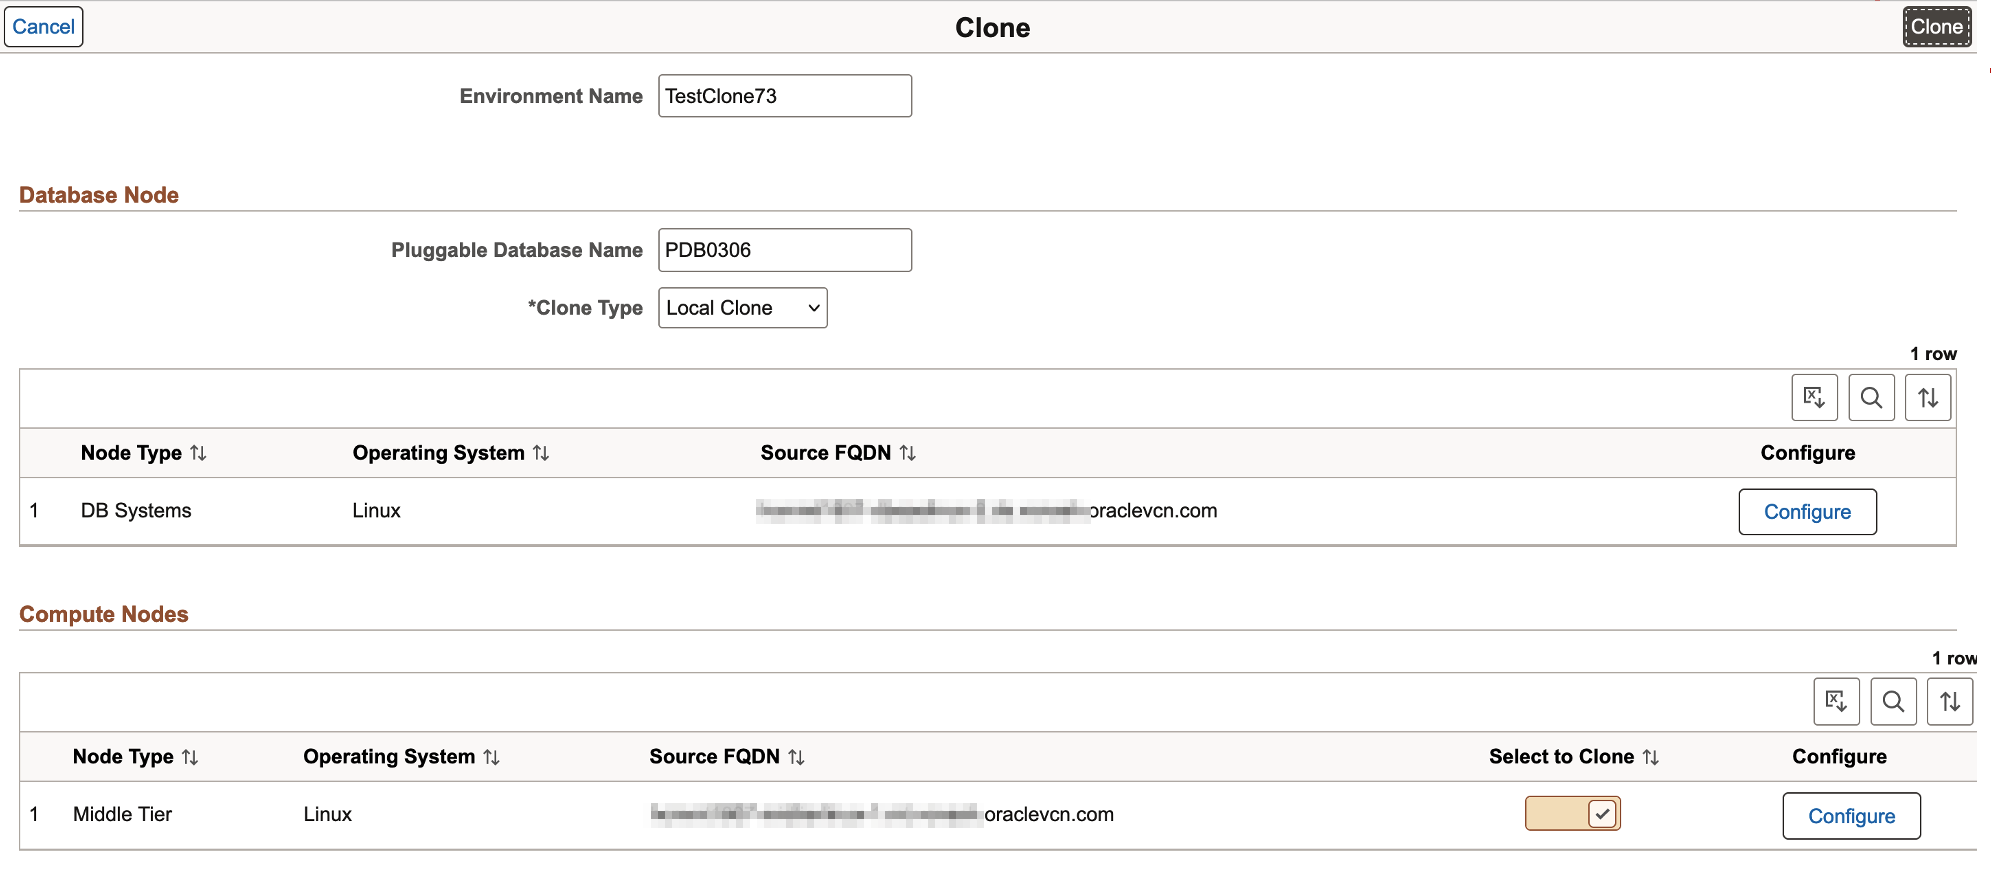
To perform local cloning for an environment where the database is running in DBS and other nodes are on compute:
From the Cloud Manager Homepage, select the Environments tile.
Click on the Related Actions button corresponding to the DBS environment to be cloned and select Clone Environment.
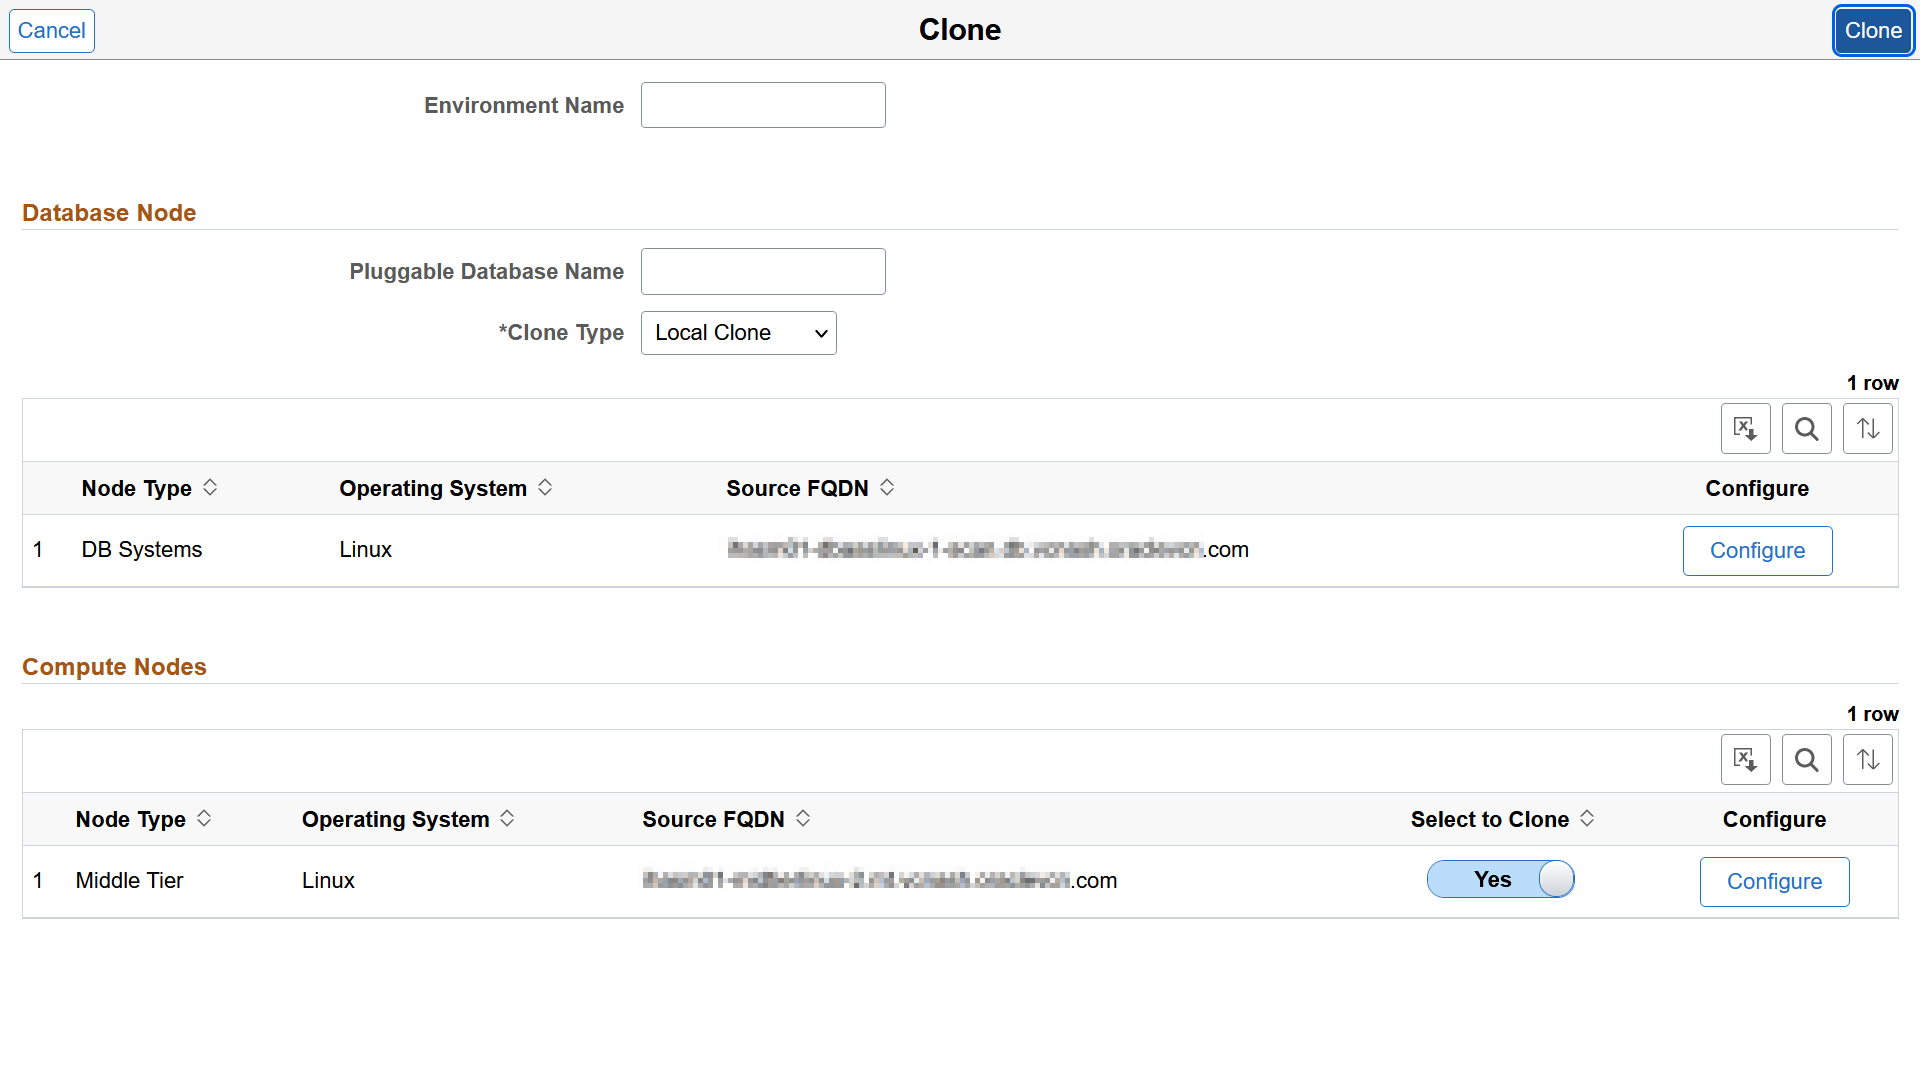
The Clone window displays two sections, one for the Compute Nodes and one for the Database Node.
This example illustrates the fields and controls on the Clone page for an environment where the database is running as a service. You can find definitions for the fields and controls later on this page.
Field or Control
Description
Environment Name
Enter the name for the new environment.
Pluggable Database Name
Enter the name of the pluggable database to be cloned.
Clone Type
Select Local Clone type. The other available options are Remote Clone and New DBS.
Select to Clone
Select No to exclude an instance in the source environment from being cloned to the target environment. Select Yes to include the instance in the target cloned environment.
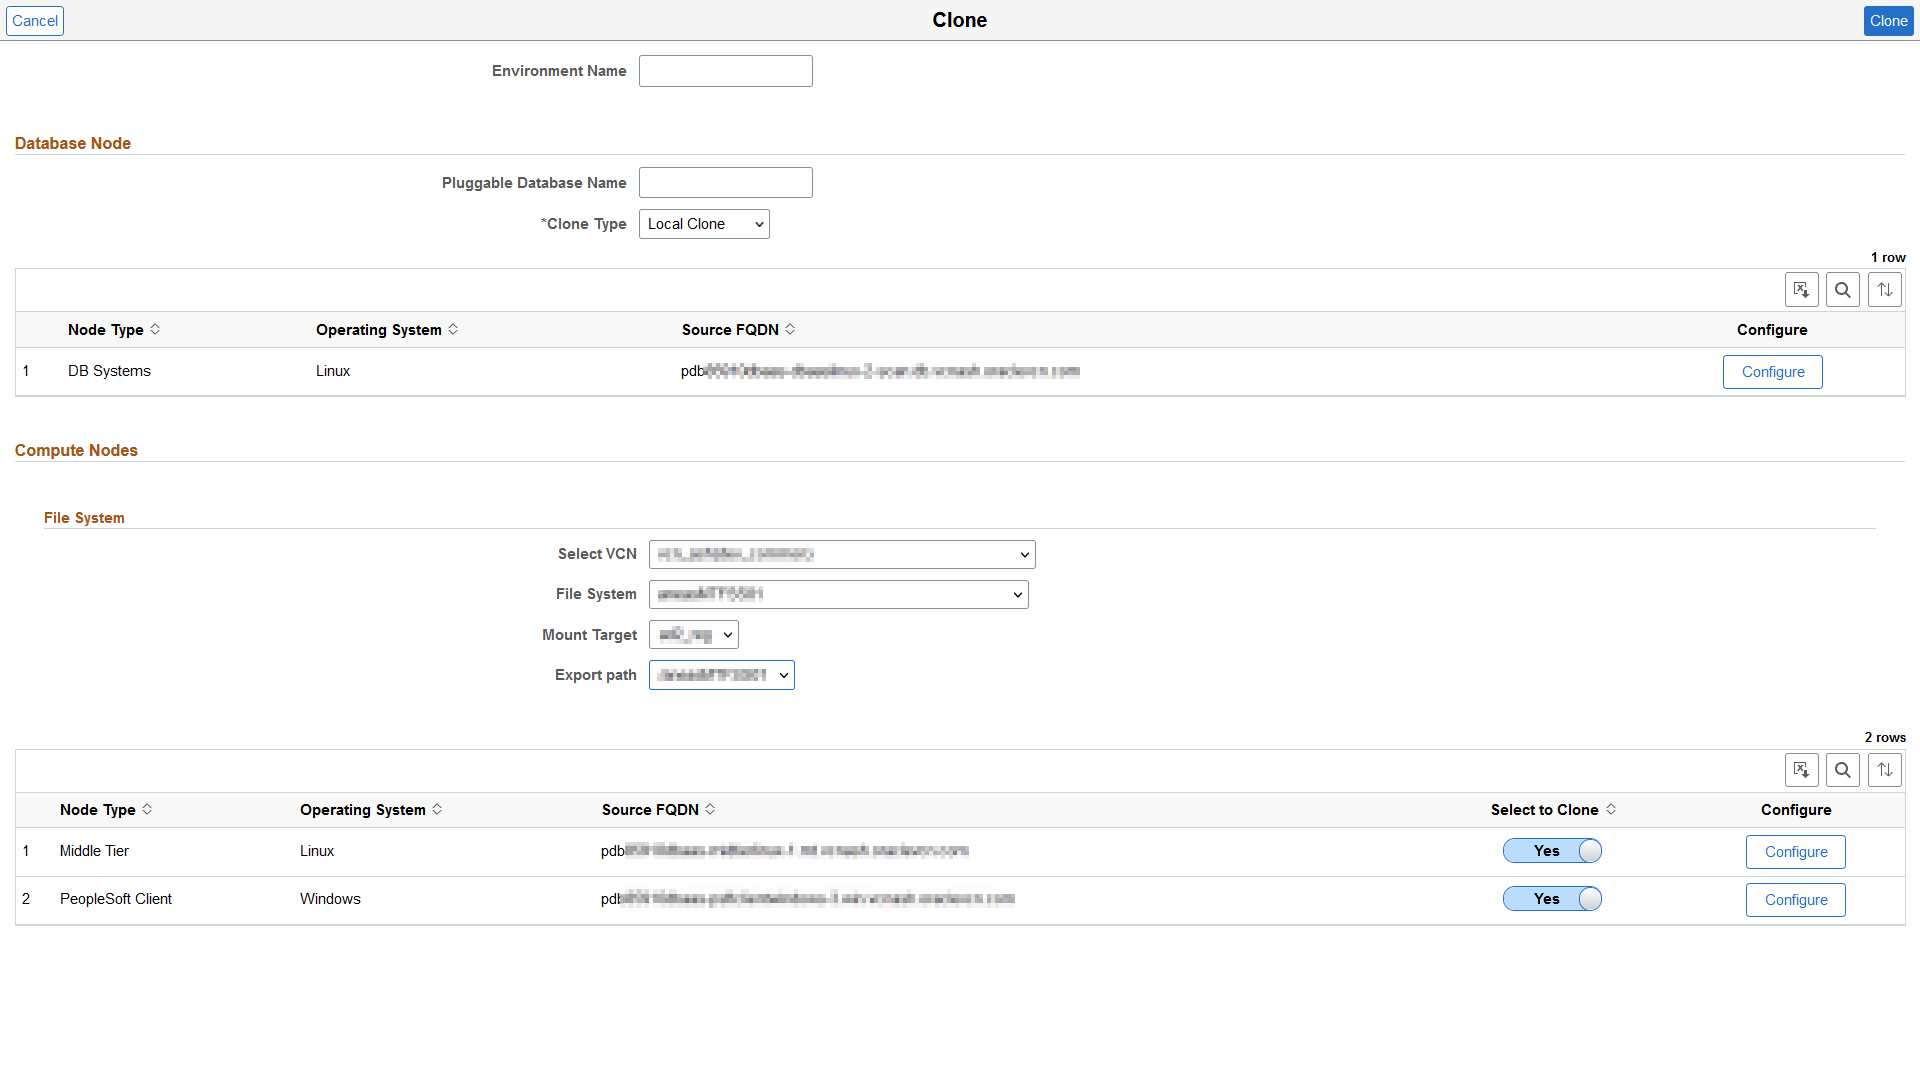
This example illustrates the fields and controls on the Clone page for an environment where the database is running as a service, with File System details included as part of the Compute Nodes section and Middle Tier using the File System service. You can find definitions for the fields and controls later on this page.
Field or Control
Description
Environment Name
Enter the name for the new environment.
Pluggable Database Name
Enter the name of the pluggable database to be cloned.
Clone Type
Select the type of cloning you wish to perform on the PDB. The default option is Local Clone. The other available options are Remote Clone and New DBS.
Select VCN
Select the Virtual Cloud Network that contains the desired Mount Target for the file system.
File System
Select the name of the file system.
Mount Target
Select the Mount Target from the drop down list.
Export path
Select the Export path from the drop down list.
Select to Clone
Select No to exclude an instance in the source environment from being cloned to the target environment. Select Yes to include the instance in the target cloned environment.
Enter a new Environment Name.
Enter a name for the Pluggable Database.
Select a Clone Type from the drop down menu.
Click the Configure button corresponding to the database instance.
For the Local Clone type, the Network Configuration and General Settings fields are not editable.
This example illustrates the fields and controls on the Clone page for a DB system instance when the Clone Type is selected as Local Clone. You can find definitions for the fields and controls later on this page.

Click Save to continue.
Remove any instance of your choice from the target clone environment by selecting No in the Select to Clone instance field corresponding to that environment.
Note: The option to select the field to be cloned is disabled for database instances, because they are essential to create the target environment.
Click the Configure button corresponding to the compute instance to configure the Network Configuration and General Settings. This option is enabled only on the compute instance that is selected to be cloned. The Clone page displays the same configuration details regardless of the Clone Type.
See the example in Cloning Compute Instances.
Click Save to save the changes.
Click the Clone button.
Select Yes to confirm. Cloning will initiate.
Note: The system validates available resources before starting the cloning process. See Validating Resources
Use the Refresh button to view the status. Status will change from Initiating to Provisioning and then to Running.
Remote Clone Type for DB System
Perform remote cloning by cloning a PDB to a remote CDB, which is in another DB system. This operation too does not create a new DB system.
Note: For remote cloning, the source and destination databases can be in different compartments and in different Virtual Cloud Networks (VCN). However, there must be a peer connection between the VCNs before you remotely clone a PDB across databases in different VCNs.
This diagram illustrates cloning the PDB to an existing CDB in a remote DB system.
To clone an environment, with Remote Clone type, where the database is running in DBS and other nodes are on compute:
From the Cloud Manager Homepage, select the Environments tile.
Click on the Related Actions button corresponding to the DBS environment to be cloned and select Clone Environment.
The Clone window displays two sections, one for the Compute Nodes and one for the Database Node.
This example illustrates the fields and controls on the Clone page for an environment where the database is running as a service. You can find definitions for the fields and controls later on this page.
Field or Control
Description
Environment Name
Enter the name for the new environment.
Pluggable Database Name
Enter the name of the pluggable database to be cloned.
Clone Type
Select Remote Clone type. The other available options are Local Clone and New DBS.
Select to Clone
Select No to exclude an instance in the source environment from being cloned to the target environment. Select Yes to include the instance in the target cloned environment.
Enter a new Environment Name.
Enter a name for the Pluggable Database.
Select a Clone Type from the drop down menu.
Click the Configure button corresponding to the database instance.
This example illustrates the fields and controls on the Clone page for a DB system instance when the Clone Type is selected as Remote Clone. You can find definitions for the fields and controls later on this page.
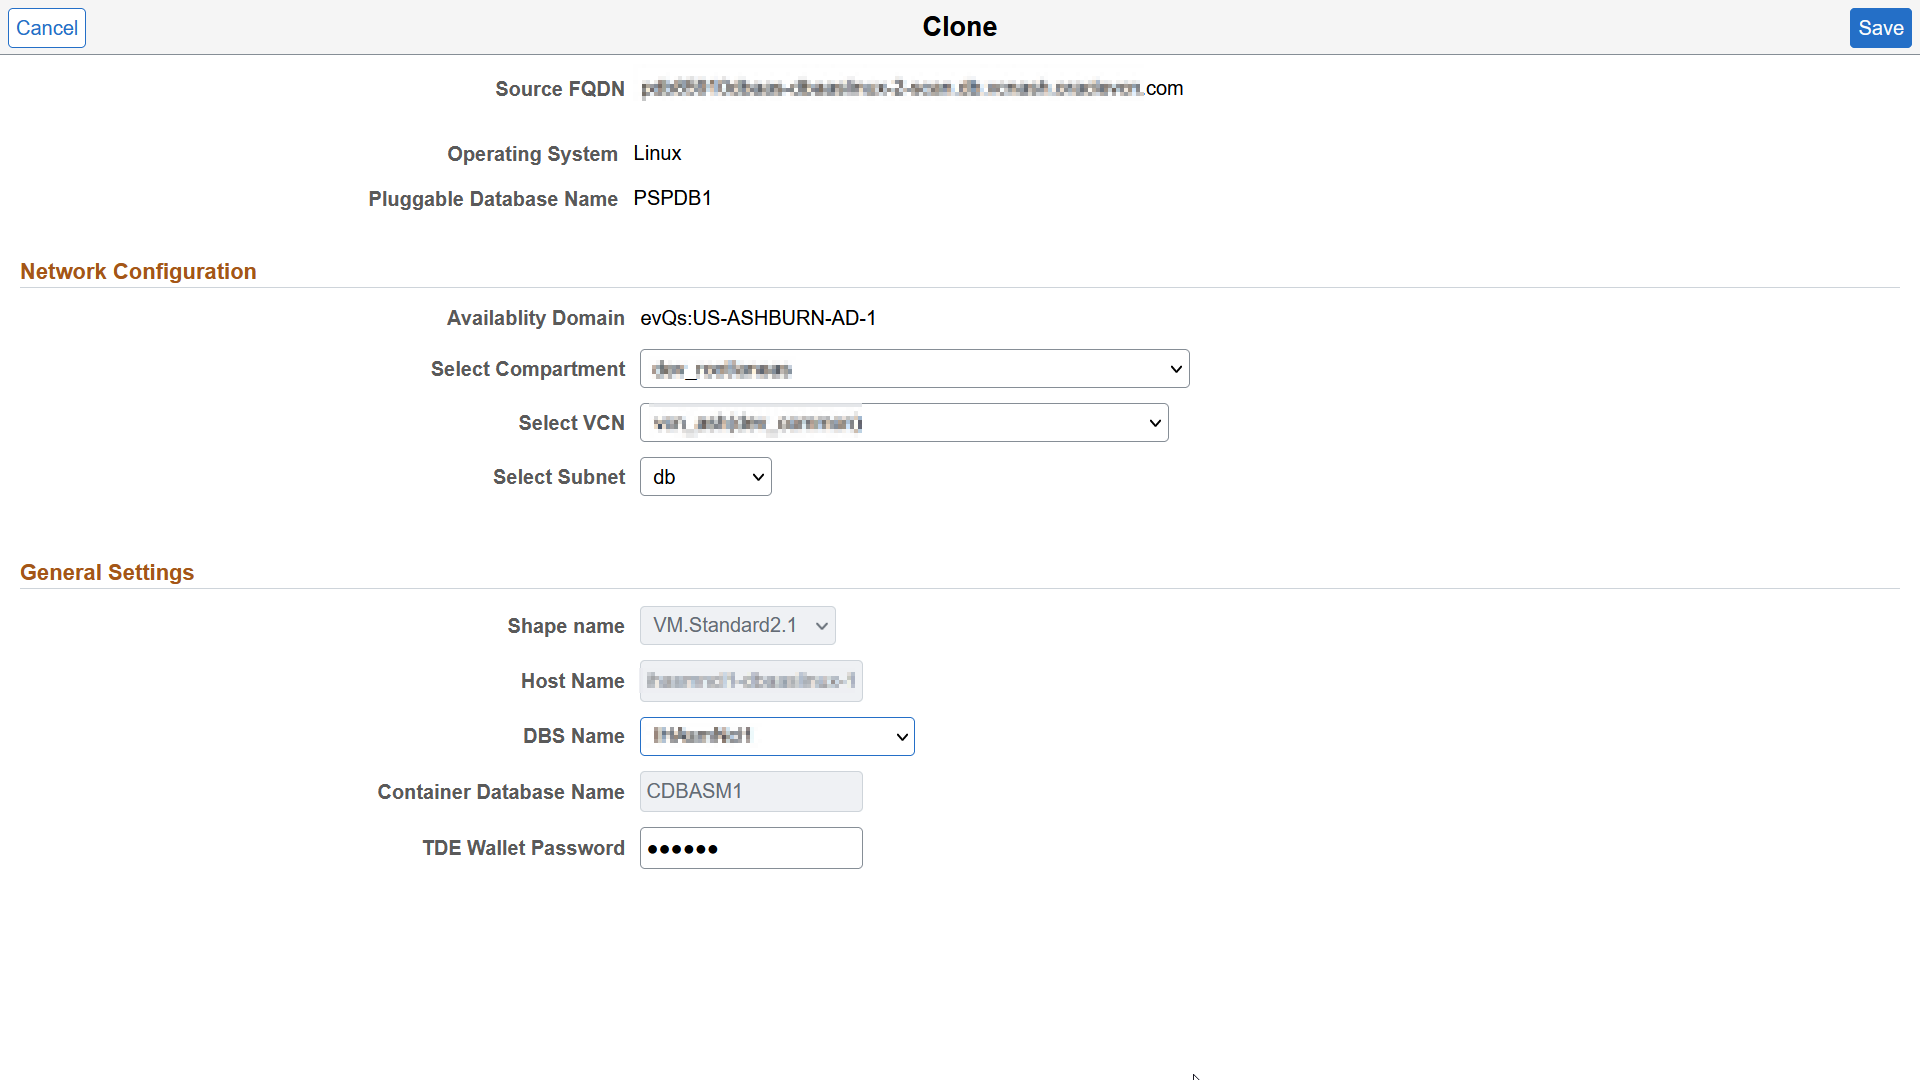
- Make the necessary changes for the cloned environment and click Save.
Field or Control
Description
Select Compartment
Select a compartment that contains a DB system to perform remote cloning.
Select VCN
Select a VCN in the selected compartment to use when creating the remote clone.
Select Subnet
Select a subnet within the VCN to use when creating the remote clone.
DBS Name
Select the name for the DB System to create by remote cloning.
TDE Wallet Password
Enter the TDE wallet password for the specified DB system to be created.
Remove any instance of your choice from the target clone environment by selecting No in the Select to Clone instance field corresponding to that environment.
Note: The option to select the field to be cloned is disabled for database instances, because they are essential to create the target environment.
Click the Configure button corresponding to the compute instance to configure the Network Configuration and General Settings. This option is enabled only on the compute instance that is selected to be cloned. The Clone page displays the same configuration details regardless of the Clone Type.
See the example in Cloning Compute Instances.
Click Save to save the changes.
Click the Clone button.
Select Yes to confirm. Cloning will initiate.
Note: The system validates available resources before starting the cloning process. See Validating Resources
Use the Refresh button to view the status. Status will change from Initiating to Provisioning and then to Running.
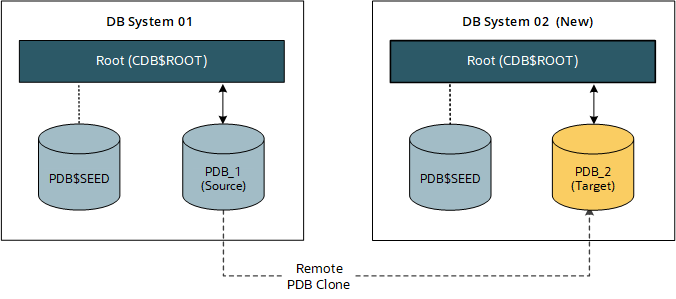
New DBS Clone Type for DB System
Create a new database environment as part of the clone operation and do a remote PDB clone in the new DB system.
This diagram illustrates creating a new DB system and a new CDB for cloning the PDB.
To clone an environment with New CDB clone type, where the database is running in DBS and other nodes are on compute:
From the Cloud Manager Homepage, select the Environments tile.
Click on the Related Actions button corresponding to the DBS environment to be cloned and select Clone Environment.
The Clone window displays two sections, one for the Compute Nodes and one for the Database Node.
This example illustrates the fields and controls on the Clone page for an environment where the database is running as a service. You can find definitions for the fields and controls later on this page.
Field or Control
Description
Environment Name
Enter the name for the new environment.
Pluggable Database Name
Enter the name of the pluggable database to be cloned.
Clone Type
Select New DBS clone type. The other available options are Local Clone and Remote Clone.
Select to Clone
Select to include an instance in the target cloned environment. Deselect the option to exclude an instance in the source environment from being cloned to the target environment.
Enter a new Environment Name.
Enter a name for the Pluggable Database.
Select a Clone Type from the drop down menu.
Click the Configure button corresponding to the database instance.
This example illustrates the fields and controls on the Clone page for a DB system instance when a new DB system is created for cloning. You can find definitions for the fields and controls later on this page.
- Make any necessary changes to the Network Configuration and General Settings, and then click Save.
Field or Control
Description
Select Compartment
Select a compartment that contains a DB system to perform remote cloning.
Select VCN
Select a VCN in the selected compartment to use when creating the remote clone.
Select Subnet
Select the subnet within the VCN to use when creating the remote clone.
Shape Name
Select the desired shape of the instance. You can select a standard or flexible shape.
OCPUs
Enter the number of Oracle CPUs required for the cloned environment. This field supports the creation of instances with flexible shapes during clone.
Memory (GB)
Enter the memory in GB required for the cloned environment. This field supports the creation of instances with flexible shapes during clone.
Host Name
Accept the default host name or enter a new host name.
Container Database Name
Enter the name of the new Container Database.
Remove any instance of your choice from the target clone environment by selecting No in the Select to Clone instance field corresponding to that environment.
Note: The option to select the field to be cloned is disabled for database instances, because they are essential to create the target environment.
Click the Configure button corresponding to the compute instance to configure the values of Shape Name and Host Name. This option is enabled only on the compute instance that is selected to be cloned. The Clone page displays the same configuration details regardless of the Clone Type.
See the example in Cloning Compute Instances.
Click Save to save the changes.
Click the Clone button.
Select Yes to confirm. Cloning will initiate.
Note: The system validates available resources before starting the cloning process. See Validating Resources
Use the Refresh button to view the status. Status will change from Initiating to Provisioning and then to Running.
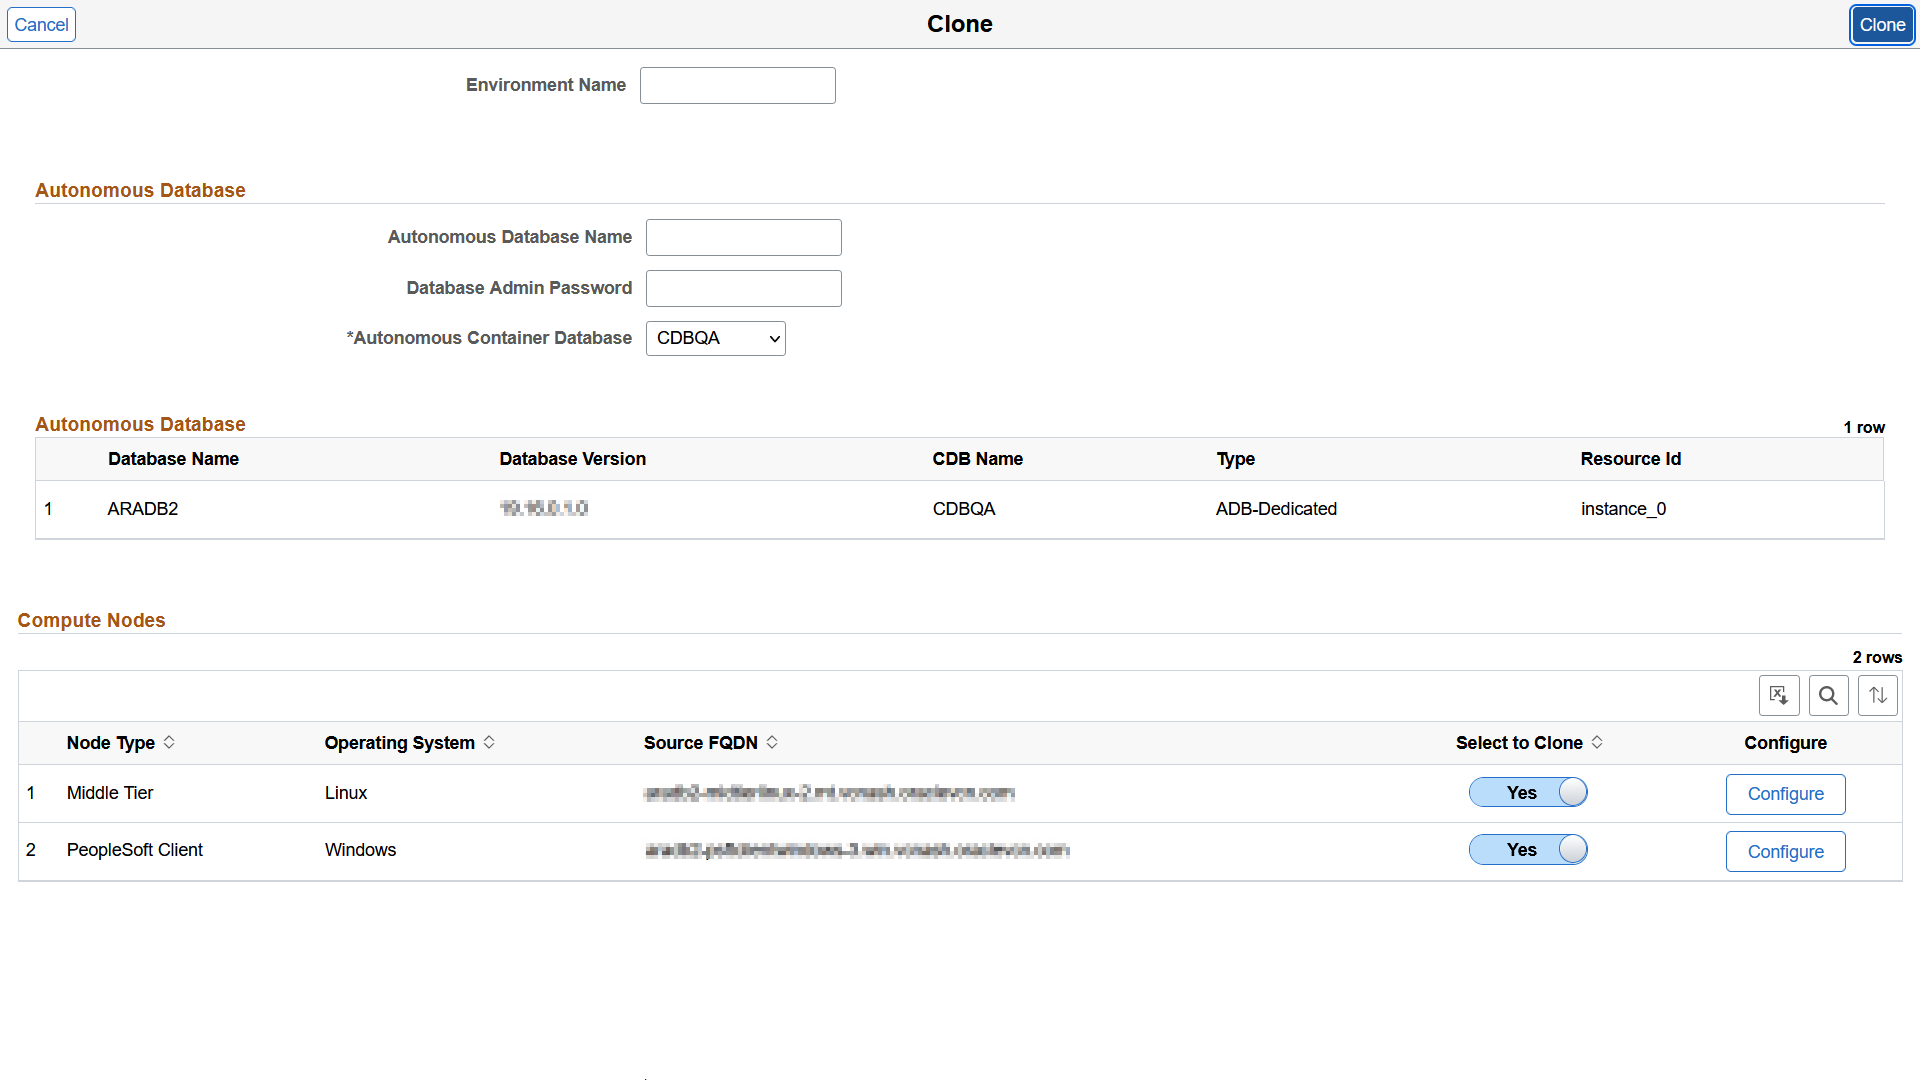
To clone an environment where the database is running on Autonomous Database (ADB-Shared or ADB-Dedicated) and other nodes are on compute:
From the Cloud Manager Homepage, select the Environments tile.
Click on the Related Actions button corresponding to the DBS environment to be cloned and select Clone Environment.
The Clone Window displays two sections, one for the Compute Nodes and one for the Autonomous Database.
This example illustrates the fields and controls on the Clone page for an environment where the database is running in Autonomous Database-Dedicated. You can find definitions for the fields and controls later on this page.
Field or Control
Description
Environment Name
Enter the name for the new environment.
Autonomous Database Name
Enter the name of the autonomous database to be cloned.
Database Admin Password
Enter the password for the admin user in autonomous database.
Autonomous Container Database
Select the name of the CDB that contains the autonomous database.
Select to Clone
Select No to exclude an instance in the source environment from being cloned to the target environment. Select Yes to include the instance in the target cloned environment.
Note: You can exclude any number of instances from the cloning process.
This example illustrates the fields and controls on the Clone page for an environment where the database is running in Autonomous Database-Shared. You can find definitions for the fields and controls later on this page.
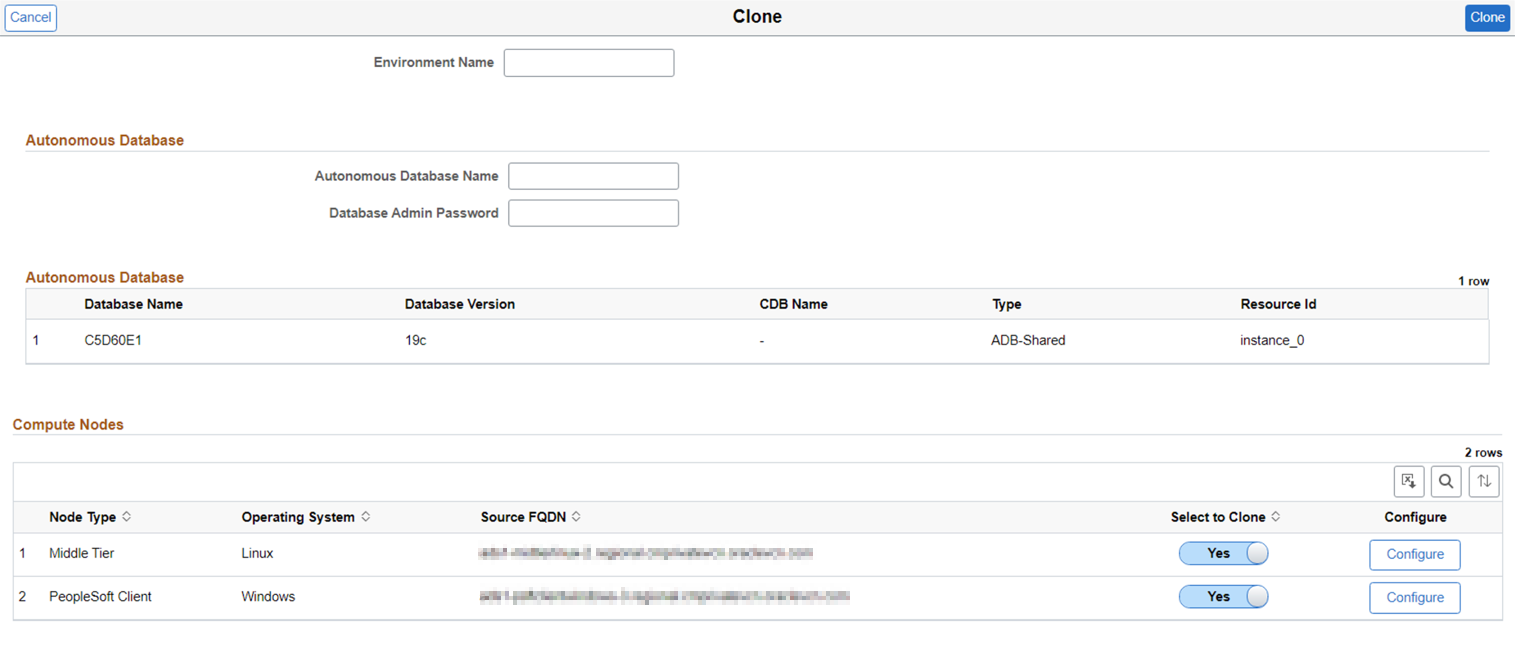
Field or Control
Description
Environment Name
Enter the name for the new environment.
Autonomous Database Name
Enter the name of the autonomous database to be cloned.
Database Admin Password
Enter the password for the admin user in autonomous database.
Select to Clone
Select No to exclude an instance in the source environment from being cloned to the target environment. Select Yes to include the instance in the target cloned environment.
Note: You can exclude any number of instances from the cloning process.
Enter a new Environment Name.
Enter a name for the Autonomous Database.
Enter the password for the admin user in autonomous database.
If the database type is ADB-Dedicated, select the name of the Autonomous CDB.
Click the Configure button corresponding to the compute instance to configure the values of Shape Name and Host Name.
This option is enabled only on the compute instance that is selected to be cloned. The Clone page displays the same configuration details regardless of the database type.
See the example in Cloning Compute Instances.
Click Save to save the changes.
Click the Clone button.
Select Yes to confirm. Cloning will initiate.
Note: The system validates available resources before starting the cloning process. See Validating Resources
Use the Refresh button to view the status. Status will change from Initiating to Provisioning and then to Running.
This section describes the three options available to clone an environment where the database is running on Exadata Database Service on Dedicated Infrastructure and other nodes are on compute. You can perform a local, remote, or new CDB clone.
You may also see Exadata Database Service on Dedicated Infrastructure referred to in this and other documentation as ExaCS, or Exadata Cloud Service. See Oracle Exadata Database Service on Dedicated Infrastructure Overview.
Briefly, the Exadata Database Service hosts Exadata clusters. An Exadata cluster is a collection of container databases (CDBs) on multiple VMs (nodes). Each CDB can have multiple pluggable databases (PDBs). The OCI requirements for Exadata PDBs are as follows:
PDB operations are supported only for Oracle Database 19c and later.
PDBs are backed up at the CDB level, and each backup includes all the PDBs in the database. OCI does not support the creation of backups for individual PDBs.
Restore operations are performed at the CDB level. OCI does not support restoring individual PDBs.
This section assumes that you have set up the Exadata cluster in OCI.
Local Clone Type for Exadata
When you choose the Local Clone type, the selected PDB will be cloned within the same CDB. Because you are cloning within the CDB, you do not have to provide the TDE wallet password.
This diagram illustrates cloning a PDB within the same CDB in an Exadata cluster.
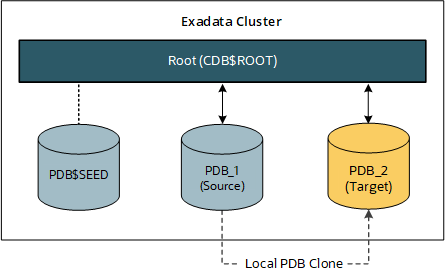
From the Cloud Manager Homepage, select the Environments tile.
Click on the Related Actions button corresponding to the Exadata environment to be cloned and select Clone Environment.
The Clone window displays two sections, one for the Compute Nodes and one for the Database Node.
This example illustrates the fields and controls on the Clone page for an environment where the database is running in Exadata. You can find definitions for the fields and controls later on this page.
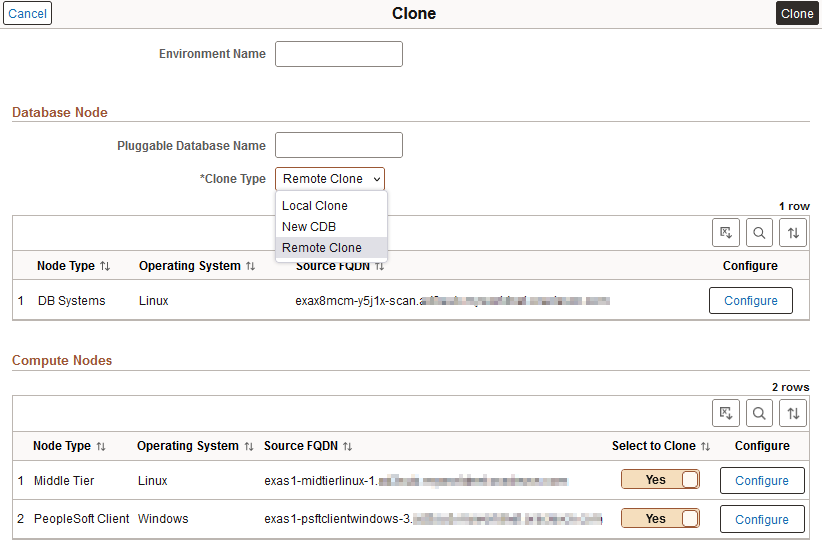
Field or Control
Description
Environment Name
Enter the name for the new environment.
Pluggable Database Name
Enter the name for the new PDB in the cloned environment.
Clone Type
Select Local Clone as the cloning type. The other options are Remote Clone and New CDB.
Select to Clone
Select No to exclude an instance in the source environment from being cloned to the target environment. Select Yes to include the instance in the target cloned environment.
Note: You can exclude any number of instances from the cloning process.
Configure
Click the Configure button to review or modify settings for the node.
Enter a new Environment Name.
Click the Configure button corresponding to the DB System node to review the Network Configuration and General Settings for the new PDB.
When you select the Local Clone type, none of the fields are editable.
This example illustrates the fields and controls on the Clone page for configuration for Local Clone type. You can find definitions for the fields and controls later on this page.
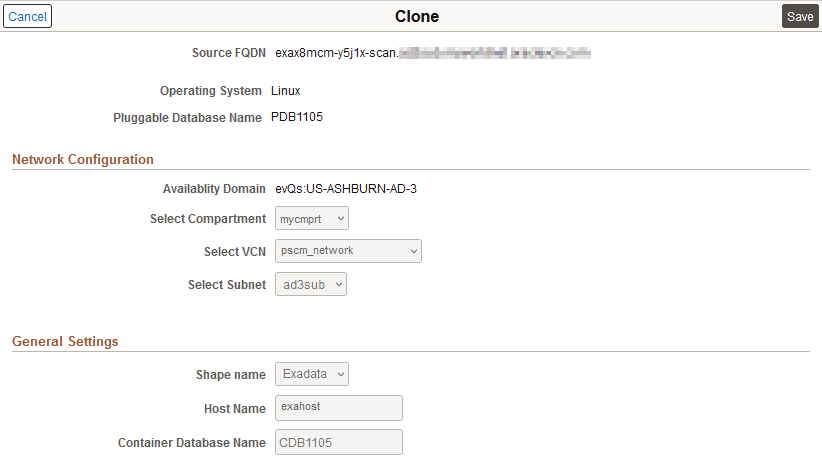
Field or Control
Description
Pluggable Database Name
The PDB that will be used as the source for cloning.
Network Configuration
This section lists the network objects used by the source and target PDBs.
Availability Domain
Compartment
VCN
Subnet
General Settings
This section lists the shape, host, and CDB name for the source and target PDBs.
Click Save, or Cancel to exit without saving.
Click the Configure button corresponding to the compute instance to configure networking and general settings.
This option is enabled only on the compute instance that is selected to be cloned. The Clone page displays the same configuration details regardless of the database type.
This example illustrates the fields and controls on the Clone page for configuration for a compute node. You can find definitions for the fields and controls later on this page.
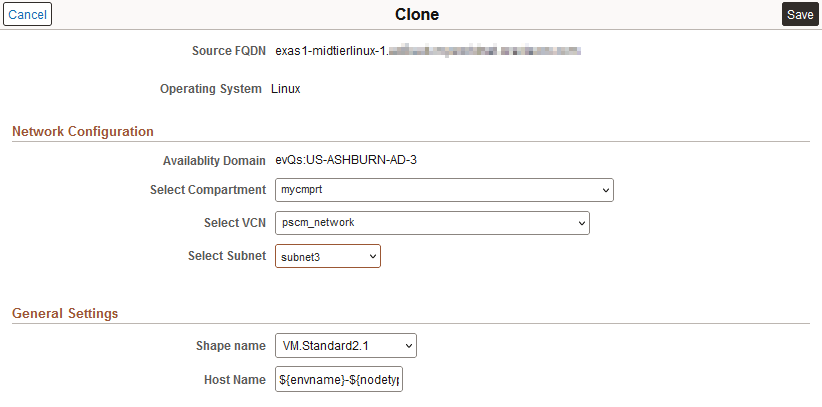
Make any necessary changes for the Network Configuration and General Settings for the cloned environment.
Field or Control
Description
Select Compartment
Select the compartment where the Virtual Cloud Network (VCN) resides.
Select VCN
Select a VCN in the selected compartment for the cloned compute instance.
Select Subnet
Select a subnet in the selected VCN for the cloned compute instance.
Shape Name
Select the desired shape of the instance.
Host Name
Accept the default host name or enter a new host name.
By default, the host name will have the following format: ${envname}-${nodetype}${ostype}-${instno}, where envname stands for Environment Name and instno stands for Instance Number.
Click Save
Click Clone.
Select Yes to confirm. Cloning will initiate.
Note: The system validates available resources before starting the cloning process. See Validating Resources
Use the Refresh button to view the status. Status will change from Initiating to Provisioning and then to Running.
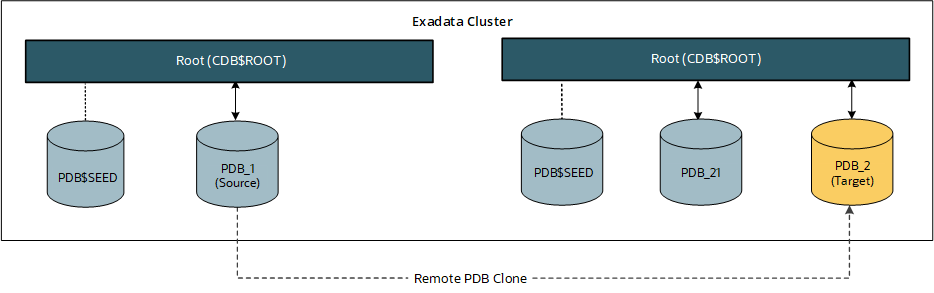
Remote Clone Type for Exadata
To clone a PDB to a different CDB, choose the Remote Clone type and select an existing CDB within the same Exadata cluster. You will need to provide the TDE Wallet password for the existing target CDB.
This diagram illustrates cloning a PDB to a different, existing CDB within an Exadata cluster.
Before cloning a PDB from a source CDB to a target CDB, access the target CDB and set the open_links parameter to a non-zero value with the following commands:
alter system set open_links=4 scope=spfile;
srvctl stop database -d <CDB Unique Name> -o immediate
srvctl start database -d <CDB Unique Name>
See the Oracle Database documentation for details on initialization parameters and using these commands.
To clone an environment with the Remote Clone type:
From the Cloud Manager Homepage, select the Environments tile.
Click on the Related Actions button corresponding to the Exadata environment to be cloned and select Clone Environment.
The Clone window displays two sections, one for the Compute Nodes and one for the Database Node.
See the illustration in Local Clone Type for Exadata.
Enter a new Environment Name.
Select Remote Clone as the cloning type.
Click the Configure button corresponding to the DB System node.
The Network Configuration settings (compartment, VCN, and subnet) and shape are not editable for remote cloning type.
This example illustrates the fields and controls on the Clone page for configuration for Remote cloning type. You can find definitions for the fields and controls later on this page.
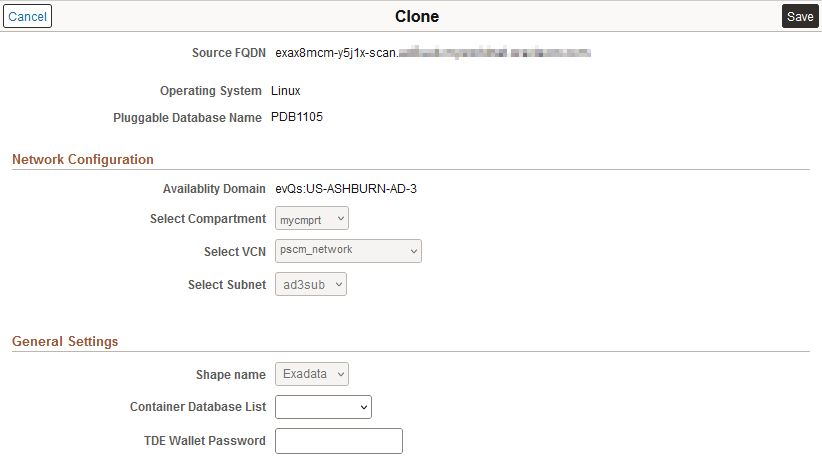
Make the desired changes to the General Settings and click Save.
Field or Control
Description
Container Database List
Select a CDB.
The list includes the CDBs in the Exadata cluster that hosts the source CDB.
TDE Wallet Password
Specify a TDE Wallet password for the existing, target CDB. This is mandatory.
Click the Configure button corresponding to the compute instance to configure networking and general settings.
This option is enabled only on the compute instance that is selected to be cloned. See the example in Local Clone Type for Exadata.
Make any desired changes to the networking configuration and general settings for the compute node and click Save.
Click the Clone button.
Select Yes to confirm. Cloning will initiate.
Note: The system validates available resources before starting the cloning process. See Validating Resources
Use the Refresh button to view the status. Status will change from Initiating to Provisioning and then to Running.
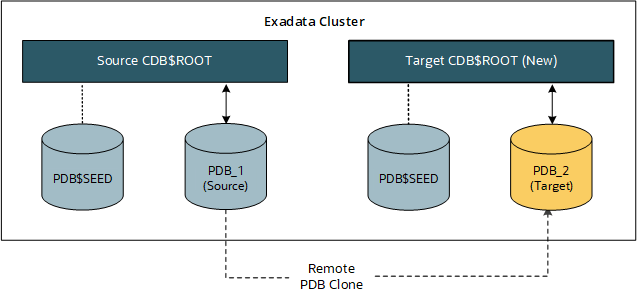
New CDB Clone Type for Exadata
When you choose the New CDB for Exadata, a new CDB will be created within the same Exadata cluster, and the selected PDB will be copied to it. The name you specify for the new CDB must be unique within the Exadata cluster. The new CDB will use the same CDB Administrator password as the source CDB.
This diagram illustrates cloning a PDB to a newly created CDB in an Exadata cluster.
From the Cloud Manager Homepage, select the Environments tile.
Click on the Related Actions button corresponding to the Exadata environment to be cloned and select Clone Environment.
The Clone window displays two sections, one for the Compute Nodes and one for the Database Node.
See the illustration in Local Cloning Type.
Enter a new Environment Name.
Select New CDB as the cloning type.
Click the Configure button corresponding to the DB System node.
The Network Configuration settings are not editable for the New CDB clone type.
This example illustrates the fields and controls on the Clone page for configuration for New CDB clone type.
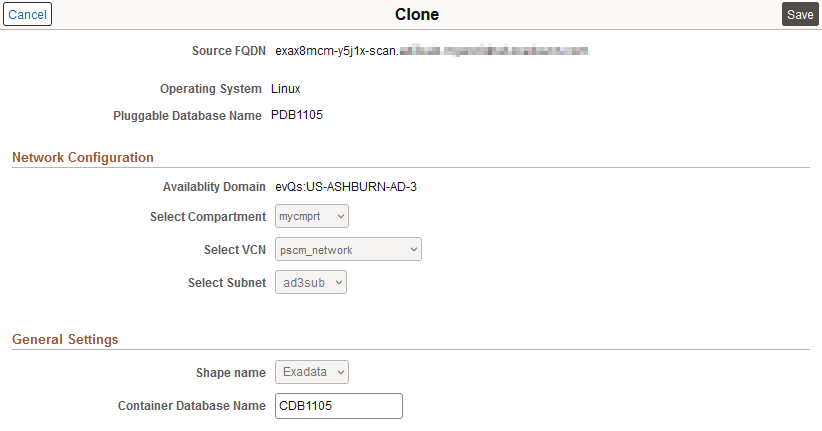
Enter a name for the new CDB that is unique within the Exadata cluster.
Click Save.
Click the Configure button corresponding to the compute instance to configure networking and general settings.
This option is enabled only on the compute instance that is selected to be cloned. See the example in Local Clone Type for Exadata.
Make any desired changes to the networking and general settings for the compute node and click Save.
Click the Clone button.
Select Yes to confirm. Cloning will initiate.
Note: The system validates available resources before starting the cloning process. See Validating Resources
Use the Refresh button to view the status. Status will change from Initiating to Provisioning and then to Running.
Creating Sparse Clones on Exadata Database
Exadata Sparse Clone is a native feature of Exadata that enables the creation of thinly provisioned databases for non-production purposes like development and testing. See Configuring Sparse Hierarchy Details.
After creating a test master on an Exadata database, you can create a sparse clone from the test master by enabling the Sparse Clone option on the Clone page. You can do this in the local CDB of the source environment, a remote CDB, or a new CDB.
This example illustrates the fields and controls on the Clone page for creating sparse clones.
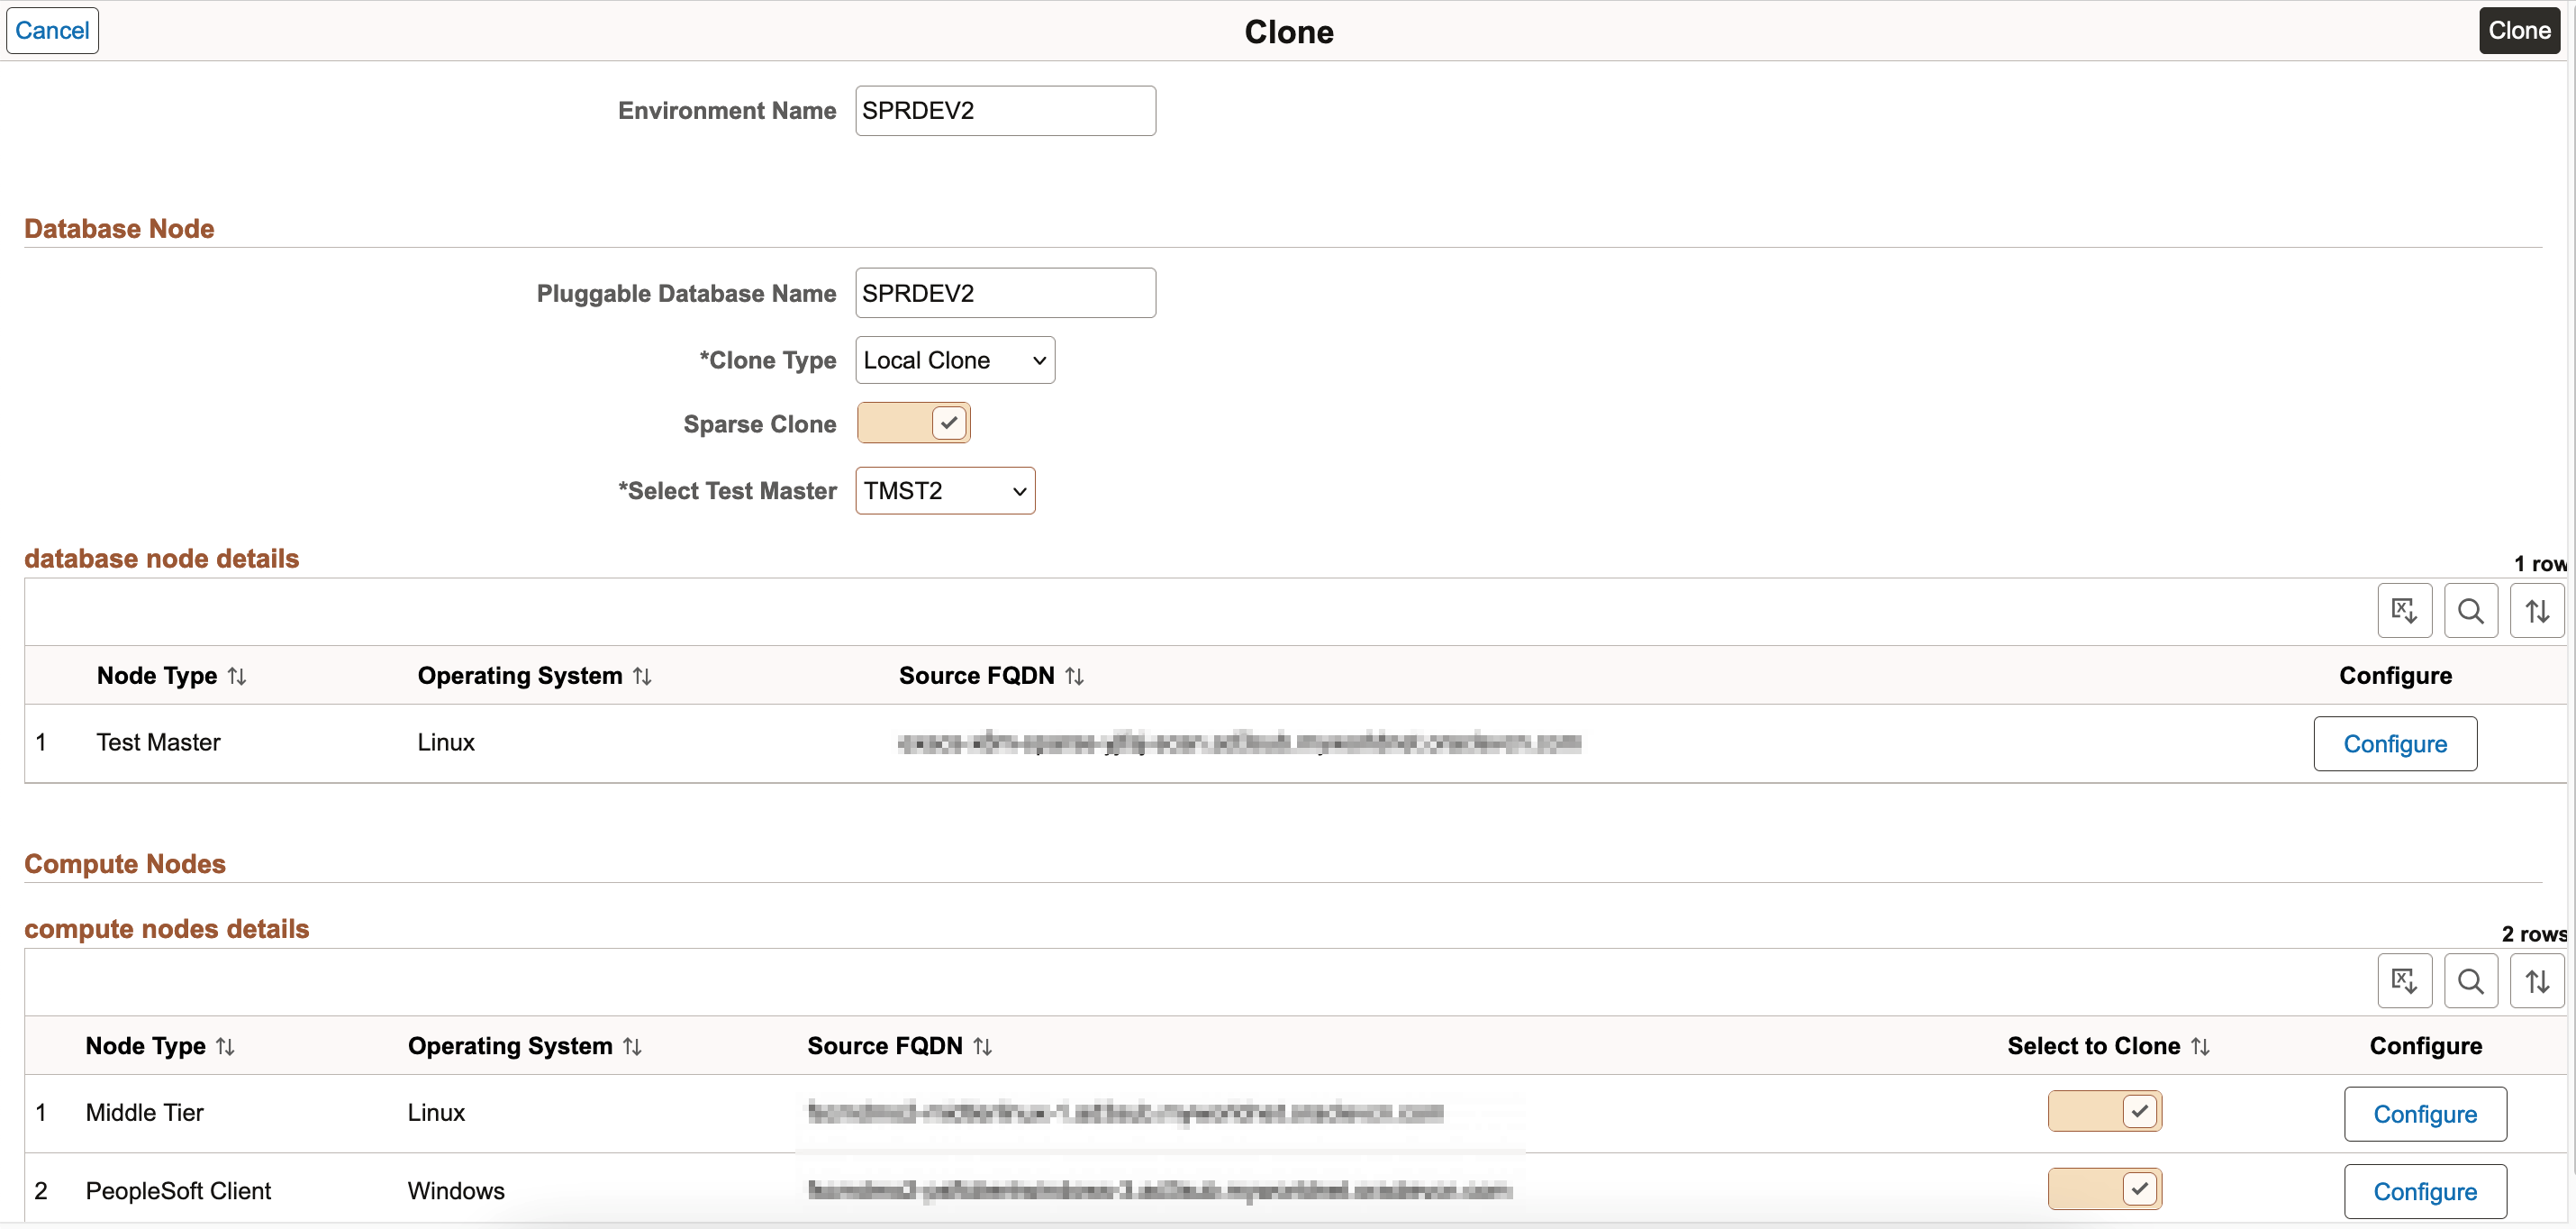
|
Field or Control |
Description |
|---|---|
|
Environment Name |
Enter the name for the new environment. |
|
Pluggable Database Name |
Enter the name of the pluggable Exadata database to be cloned. |
|
Clone Type |
Select Local Clone type. The other available options are Remote Clone and New DBS. |
|
Sparse Clone |
Select to enable sparse cloning of the Exadata database. |
|
Select Test Master |
Select a test master created on the Sparse Hierarchy Details page. |