Manually Updating Cloud Manager from N-2/N-3 Version to the Latest Version
It is highly recommended to update Cloud Manager as soon as a new update image is available. Cloud Manager Update Images up to three versions prior to the current update image can be upgraded to the latest update image.
The self upgrade process can be used to upgrade to the latest version of Cloud Manager (CM_N) from N-1 version. See Automatically Applying Updates Using Manage Updates.
Updating to the latest version from the Cloud Manager version before two or three releases (CM_N-3 or CM_N-2), involves the following two steps.
Upgrade PeopleTools version on Cloud Manager N-2/N-3 environment.
You must upgrade the PeopleTools version first, if there are any major differences in the PeopleTools version of the CM_N-2 or CM_N-3 environment and the CM_N environment. Otherwise, you can skip this step.
See Upgrading PeopleTools Version on Cloud Manager N-2/N-3 Environment.
Perform PUM upgrade on Cloud Manager N-2/N-3 environment.
For PUM Update process, we are leveraging the existing upgrade process and features in the following:
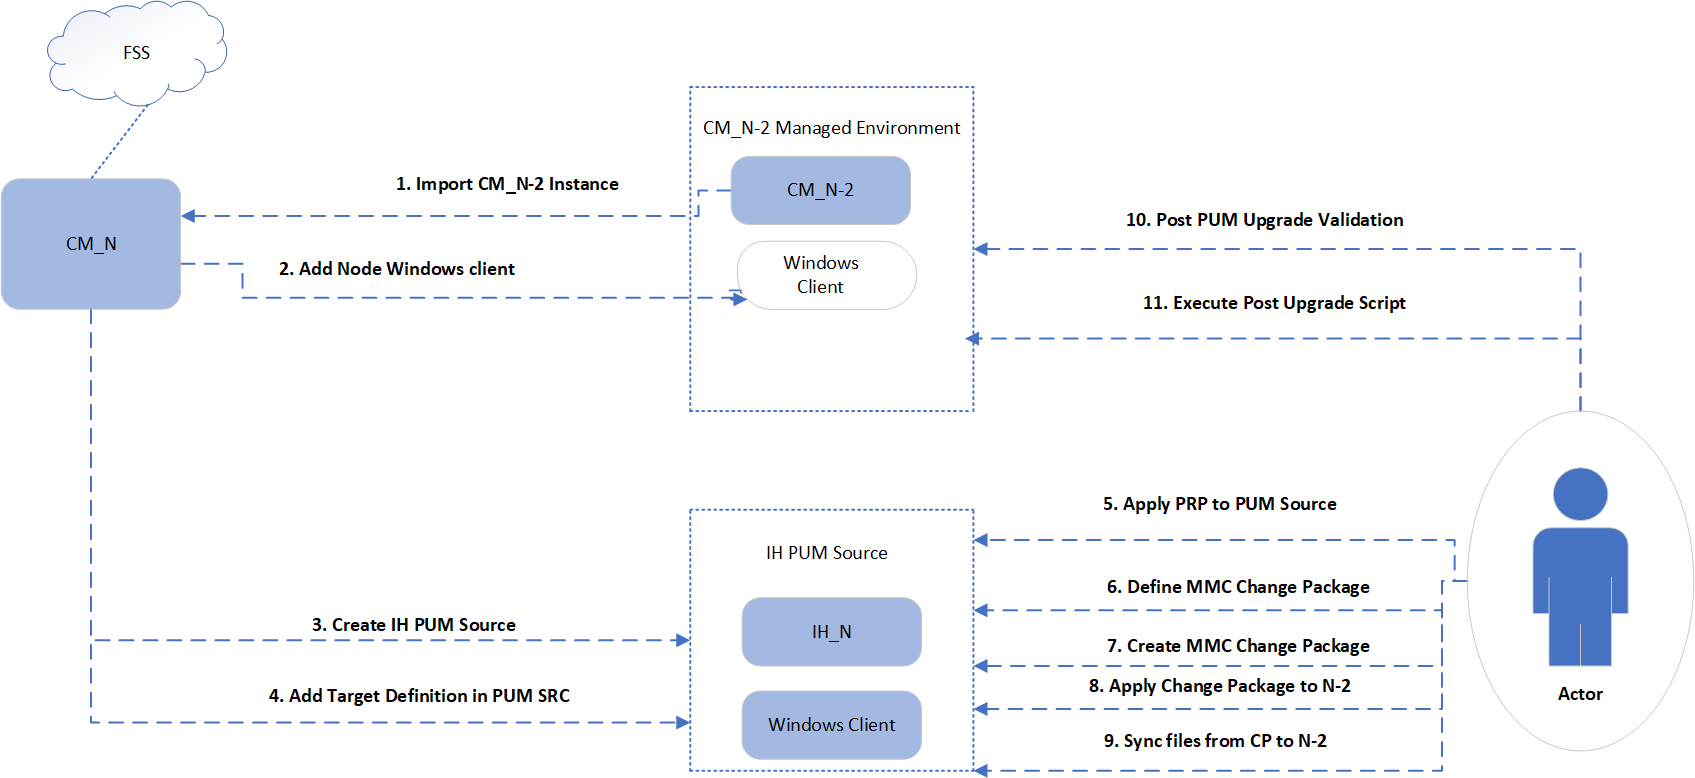
Cloud Manager (Import, Add Target, Apply PRP)
PeopleTools Update Manager and PUM Automated Updates (PAU) features to create Change Package (CP) definition for Cloud Manager (CM) product line
Manual Steps/Command-line utility for CP apply and file synchronisation
See Performing PUM Update on Cloud Manager N-2/N-3 Environment.
This example illustrates the PeopleTools Upgrade process.
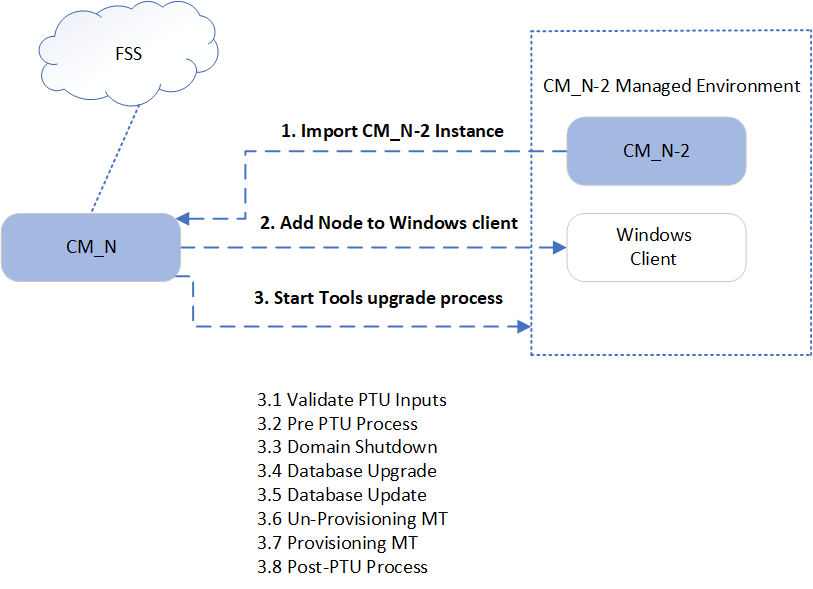
To upgrade the PeopleTools version on Cloud Manager, perform the following steps:
Create a new Cloud Manager host instance (CM_HOST) from a Cloud Marketplace update image, named as CM_N, where N is the PI version number. For example, CM_17.
Configure File Server and Infrastructure settings on CM_HOST. Ensure that PeopleTools channels, Integration Hub (IH), source PeopleTools version and target PeopleTools version channels are subscribed on CM_HOST.
Import the old Cloud Manager, which is the PUM_TARGET, having PI version less than CM_N. For example, CM_15.
Add the Windows client node to PUM_TARGET environment so that it becomes FT+Windows client environment. This step is mandatory for performing an upgrade operation in a managed environment.
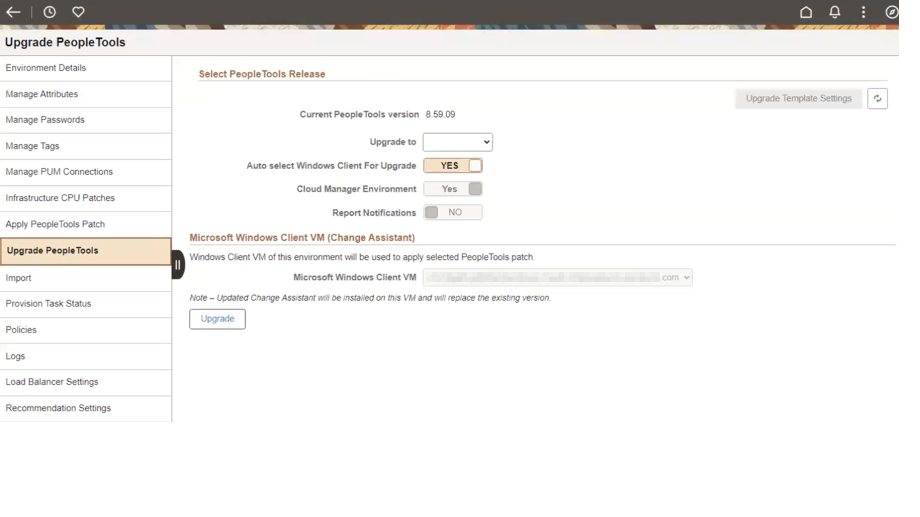
Upgrade PeopleTools in PUM_TARGET. Navigate to PUM_TARGET environment tile context menu > Details > Upgrade PeopleTools, and click Upgrade. This triggers the PUM_TARGET environment tools upgrade operation. The latest IH PUM DPK tools version is used as Upgrade to drop-down value and Report Notification option is disabled.
This example illustrates the Upgrade PeopleTools page.
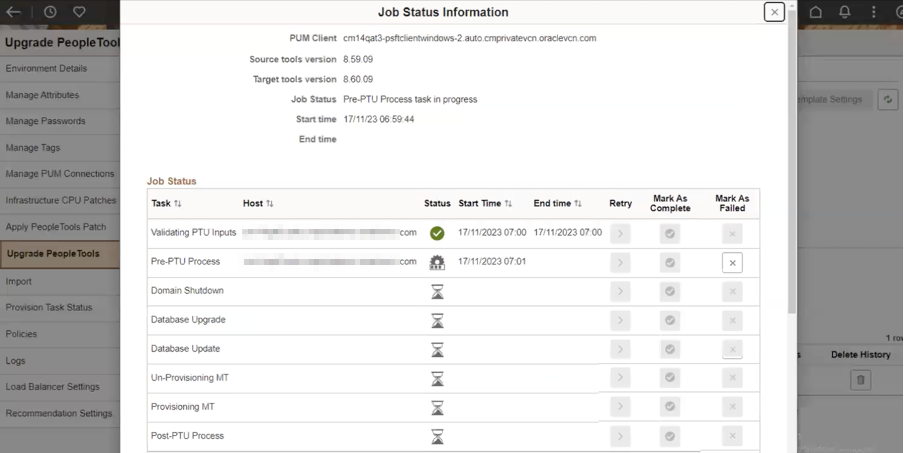
Click the Status link in Job grid, which displays the details of the tools upgrade process and current status.
Three new tasks are added for Cloud Manager PTU process:
Validate PTU Inputs
Pre-PTU Process
Post-PTU Process
This example illustrates the Job Status Information displayed on clicking the Status link.
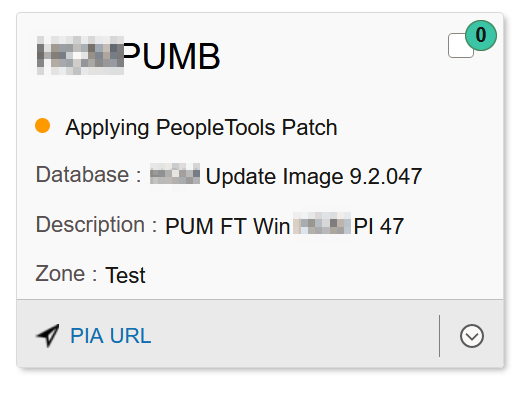
The environment status changes to Applying PeopleTools Upgrade. Once the Upgrade is complete, the status returns to Running state.
This example illustrates the environment status showing that PeopleTools Patch is applied.
After you upgrade PeopleTools to the latest version, you must update the PUM version (update image version) of PUM_TARGET.
This example illustrates the PUM Upgrade process.
To update Cloud Manager PUM/ Application, perform the following steps:
Create a new Cloud Manager host instance (CM_HOST) from Marketplace update image, named as CM_N, where N is the PI version number. For example, CM_17.
Configure File Server and Infrastructure settings on Cloud Manager host (CM_HOST). Ensure that PeopleTools channels, Integration Hub (IH), source PeopleTools version and target PeopleTools version channels are subscribed on CM_HOST.
Import the old Cloud Manager version, which is the PUM_TARGET, having PI version less than CM_N. For example, CM_15. CM_N-2 or CM_N-3 environment is used as PUM target (PUM_TARGET).
Create a new PUM Source (PUM_SOURCE) by provisioning a new IH environment with latest DPK. For example, IH_17. The environment must have a Full Tier instance and a Windows client.
Apply PRP to PUM_SOURCE instance using any of the following ways:
If the PUM_SOURCE is newly created, all the PRPs will be applied as part of provisioning use case.
Configure the PRP-Apply policy in PUM_SOURCE environment template creation. This will make sure all new PRPs will be applied to PUM_SOURCE automatically.
Create a new PRP-Apply policy using Policy Editor, which will make sure all the PRPs will be applied to PUM_SOURCE.
Manually log in to PUM_SOURCE PIA and use the PUM Automated Updates (PAU) feature for applying the PRPs to PUM_SOURCE.
Add PUM_TARGET environment as the Target database by navigating to PUM_SOURCE (IH_17) environment tile > Details > Managed PUM Connections. Only Windows CA support for PUM update.
Create a change package definition for CM product line in PUM_SOURCE by making use of Change Assistant Update Manager feature. To create a change package:
Log on to PUM_SOURCE PIA.
Confirm the target database name in Update Manager Tile > Confirm Select Target Database.
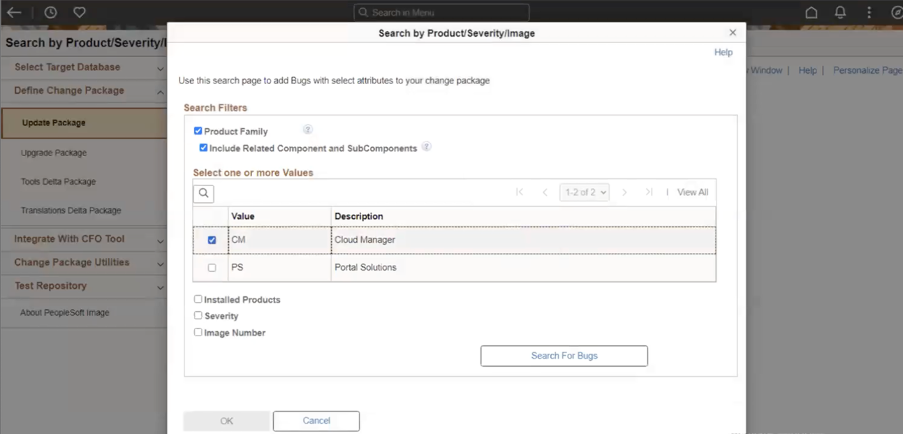
Navigate to Define Change Package > Update Change Package > All Other Search Criteria > "Product/Severity/Image" Link > Product Family and select "Cloud Manager". See the topic Defining an Upgrade Package in PeopleTools: Change Assistant and Update Manager.
This example illustrates selecting Cloud Manager while defining Change Package.
Create a change package from PUM source definition by making use of PeopleTools PAU feature. See the product documentation for PeopleTools: Change Assistant and Update Manager.
Log on to PUM_SOURCE PIA.
Update Lifecycle roles in Administrator metadata in PUM_TARGET environment by navigating to PeopleTools > Security > User Profile > User Profile (User ID: CLADM) > LifeCycle Tools Roles tab.
Update "Update Settings" information.
Update Scheduler > Define Job > Enable.
Define change package (Select "Search Scope" as "Previously Defined" ).
Create package.
Apply package.
Save and run the job.
This example illustrates the Job Monitor used to view the status of the job.
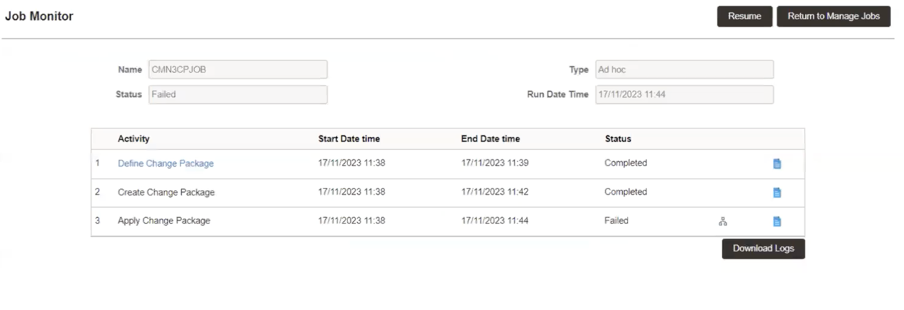
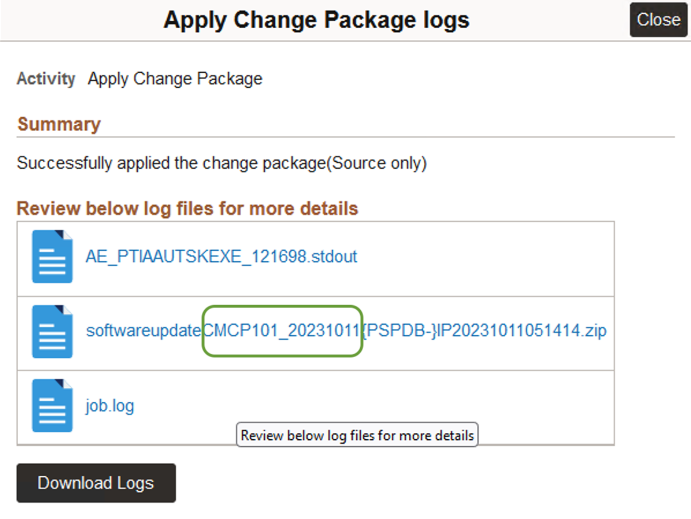
This example illustrates retrieving the change package name by clicking the log icon. Here the name of the change package is CMCP101_20231011.
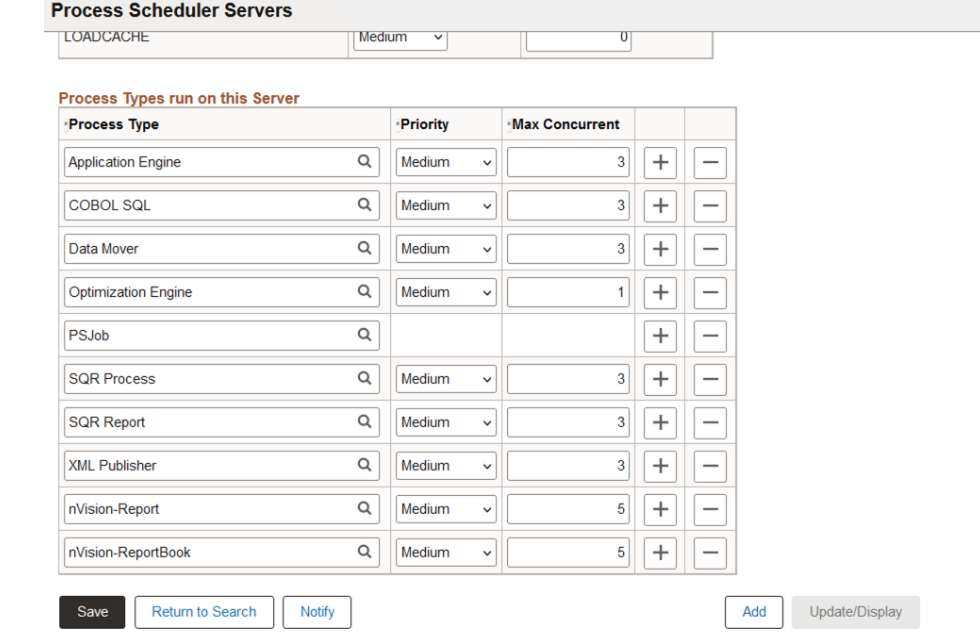
Cross check if the server configuration is applied correctly.
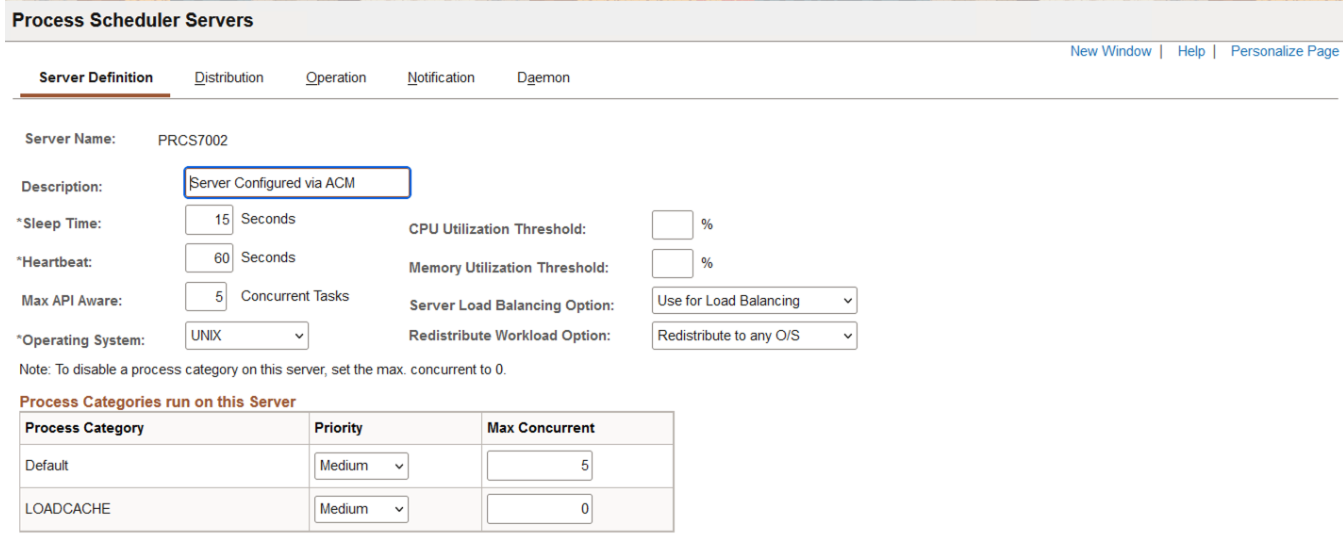
This example illustrates checking the process scheduler server configuration.
Apply change package to Cloud Manager target database and synchronise all change package files in the PUM_TARGET. The task pum_upgrade is used to perform a PUM Upgrade in Cloud Manager instance. The input values are given as response file. The format is:
run_cloud_manager_update -t pum_update -o <operation_name> -r <response_file.json>See the table provided in step 11 for operation/subtask details.
response_file.json:
{
  "file_server": {
    "mount_path": "<file server export mount path>"
  },
  "pum_source": {
    "windows_client": {
      "private_ip": "<windows_client private ip>",
      "remote_password": "<windows_client password",
      "psft_base": "<windows client psft base directory path>"
    },
    "full_tier": {
      "private_ip": "<full tier private ip>",
      "psft_base": "<full tier psft base directory path>",
      "tools_ver": "<pum source tools version>",
      "pi_number": "<pum source pi version>",
      "env_name": "<pum source environment name>"
    }
  },
  "pum_target": {
    "private_ip": "<full tier private ip>",
    "psft_base": "<full tier psft base directory path>",
    "db_name": "<pum target db name>",
    "tools_ver": "<pum target tools version>",
    "pi_number": "<pum target pi version>",
    "env_name": "<pum target environment name>",
    "access_id": "<access id>",
    "access_password": "<access password>"
  },
  "pum_update_data": {
    "change_package_name": "<change package name in pau"
  }
}
Run the following command to get the status:
$ run_cloud_manager_update -t PUM_UPDATE -o get_statusRun the following command to get more details and log information:
$ run_cloud_manager_update -t PUM_UPDATE -o get_status -vThe PUM_UPDATE task carries out the following steps:
Validate the PUM Update input values in response file.
Copy the change package created using PAU process (from PUM_SOURCE FT) to the PUM_SOURCE Windows client computer.
Apply the change package DB changes to PUM_TARGET.
Synchronise change package files to PUM_TARGET:
Copy the change package files from PUM_SOURCE Windows CA client to PUM_TARGET.
Synchronise CP files to PS_APP_HOME.
Restart PSFT domains.
Validate in PUM_TARGET post self update by checking that the UI is working fine in PUM_TARGET.
Run the post-upgrade script in Cloud Manager PUM_TARGET. Run the post_upgrade_script.sh as the root user. If all the information is correct on the upgrade configuration details, you can start the post-upgrade process by providing 'y' as input.
|
Task Name |
Operation Type |
Sample Command |
|---|---|---|
|
PUM Update |
execute |
run_cloud_manager_update -t pum_update -o execute -r /tmp/pum_update.json |
|
retry |
run_cloud_manager_update -t pum_update -o retry -r /tmp/pum_update.json run_cloud_manager_update -t pum_update -o retry |
|
|
mark_as_complete |
run_cloud_manager_update -t pum_update -o mark_as_complete -r /tmp/pum_update.json run_cloud_manager_update -t pum_update -o mark_as_complete |
|
|
mark_all_step_complete |
run_cloud_manager_update -t pum_update -o mark_all_step_complete -r /tmp/pum_update.json run_cloud_manager_update -t pum_update -o mark_all_step_complete |
|
|
get_status |
run_cloud_manager_update -t pum_update -o get_status run_cloud_manager_update -t pum_update -o get_status -v |