Adding Steps and Connectors to the Workflow Process
This task is a step in Defining a Workflow Process That Creates an Activity for a Sales Representative.
In this topic you add steps and connectors to the Workflow Process.
To add steps and connectors to the Workflow Process
In the Process Designer, open the Workflow Process you defined in Creating the Workflow Process.
-
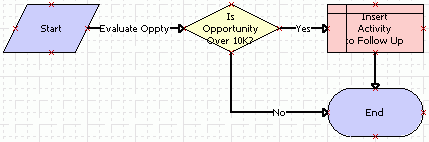
Add the following steps and connectors until your Workflow Process process resembles the flow illustrated in the following figure:
-
A Start step
-
An Is Opportunity Over 10K? decision step
-
An Insert Activity to Follow Up opearation step
-
An End step
-
The following Connectors:
-
An Evaluate Oppty connector between step (a) and (b).
-
A Yes connector between between step (b) and (c).
-
A No connector between step (b) and (d)
-
A connector between step (c) and (d).
-
For more information, see Adding Workflow Process Steps and Diagramming a Workflow Process.
-
Click the Is Opportunity Over 10 decision step and in the Properties pane, set the Name property to the value shown in the following table.
Property
Value
Name
Is Opportunity Over 10k?
The Properties pane is context-sensitive. If you click a step or connector in the Process Designer, then the properties for the step or connector appear in the Properties pane.
Click each remaining step in the Workflow Process in succession and use the Properties pane to change the Name property for each step according to the values shown in the following table.
Step Type
Name Property
Siebel Operation
Insert Activity to Follow Up
End
End
Click each connector in succession and use the Properties pane to change the Name property for the connector according to the values shown in the following table.
Connector
Name Property
Between the start step and the decision step
Evaluate Oppty
Between the decision step and the Siebel operation
Yes
Between the decision step and the end step
No
Tip: The Workflow Process Designer sets the name of the connector that emanates from the start step toConnector 0by default.