エージェント・ビルダーを使用したサンプル・フロー
エージェント・ビルダーを使用して、エージェントのユースケースにエンタープライズ・データを活用し、カスタム・フローを構築します。
左側のサイドバーから、エージェント・ビルダーまたはマイ・カスタム・フローに移動してカスタム・ワークフローを作成します。
-
コンポーネントをキャンバスに追加するには、左側の「コンポーネント」メニューからコンポーネントをドラッグします。または、目的のコンポーネントにマウス・ポインタを重ねて「+」アイコンを選択することもできます。
-
コンポーネントまたはコネクタをキャンバスから削除するには、コンポーネントまたはコネクタを選択して[Backspace]キーまたは[Delete]キーを押します。
エージェント・ビルダーで使用可能なコンポーネントについて学習するには、「エージェント・ビルダーのコンポーネント」を参照してください。
サンプル・ワークフロー
サンプル・ワークフローを確認し、初心者向けの事例から高度なパワー・ユーザー・シナリオまで、迅速に開始できるように設計された実際のビジネス・ユースケースを確認してください。
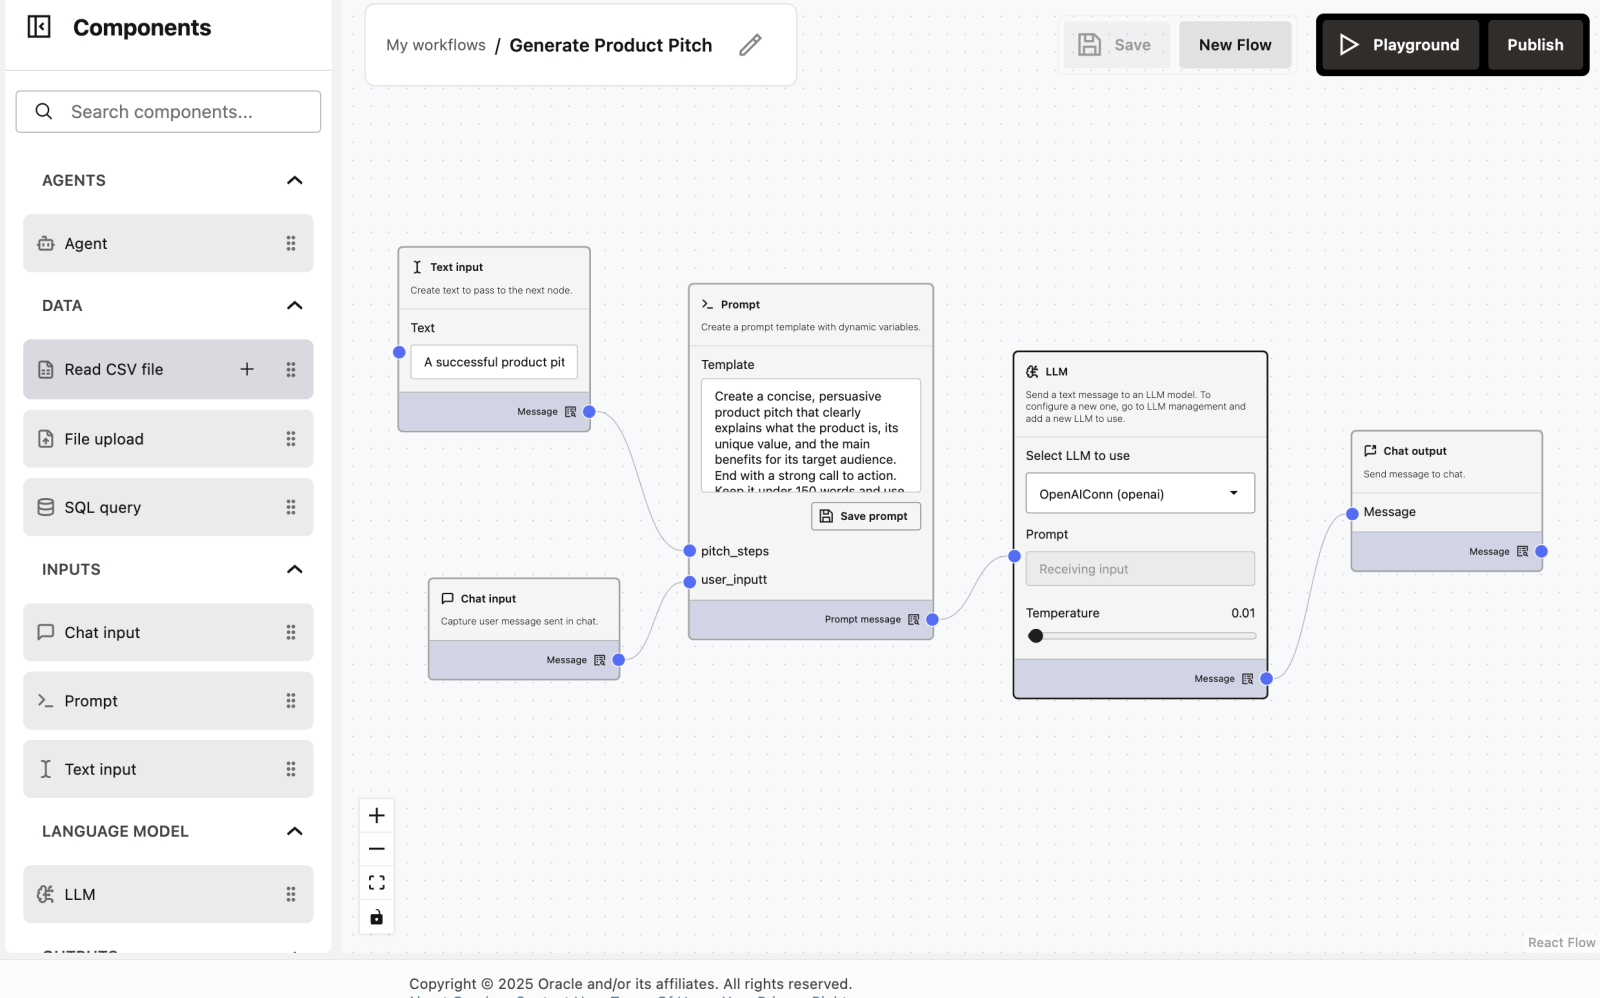
1. 製品ピッチの生成 - 初心者レベル
すでにテンプレート・ギャラリに用意されています - フローのインポートをクリックしてテストします。

このワークフローの機能
このワークフローは、LLMを使用して、短く説得力のある製品ピッチを生成します。プロンプトまたは入力テキストを編集して、出力がどのように変化するかをすぐに確認できます。
これは、初心者が次のことを理解できるように設計されています:
- 入力がノードをどのように通過するか
- プロンプトがAIの動作をどのように制御するか
- テキストの変更が結果にどのような影響を与えるか
ワークフローの概要
ワークフローには5つの単純なノードがあり、左から右に接続されています:
- テキスト入力
- チャット入力
- プロンプト・テンプレート
- LLM
- チャット出力
各ノードは1つのクリアなタスクを実行します。
このワークフローの作成方法(ドラッグ・アンド・ドロップ)
このワークフローは、コードを記述せずにドラッグ・アンド・ドロップを使用して作成されます。
ステップ1: ノードのサイドバーのオープン
画面の左側には、異なるノードを含むサイドバーが表示されます。各ノードは、特定の関数(入力、プロンプト、LLM、出力など)を表します。
ステップ2: ワークフロー・キャンバスへのノードのドラッグ
- 左側のサイドバーからノードをクリックして保持します
- 空のワークフロー領域(キャンバス)にドラッグします。
- マウス・ボタンを離して、ドロップします
- ノードがワークフロー・シートに表示されます
ステップ3: 必須ノードの追加
ドラッグ・アンド・ドロップ操作を繰り返して、次のノードを追加します:
- テキスト入力
- チャット入力
- プロンプト
- LLM
- チャット出力
読みやすくするために、それらを左から右に配置します。
ステップ4: ノードの接続
各ノードには、小さい青色の接続点(ポート)があります。
- あるノードの青いドットをクリックします
- 次のノードの青いドットまで線をドラッグします
- リリースしてそれらを接続します
これにより、ワークフローでどのようにデータが流れるかが定義されます。
ステップ5: ノードの構成
任意のノードをクリックして、その設定を開きます。
次のテキストを入力します:
- テキスト入力
- プロンプト・テンプレート
LLMノードでモデルを選択します。
ステップ6: プレイグラウンドでの保存と実行、および出力の確認
- チャット入力にメッセージを入力します
- ワークフローを実行します
- チャット出力での生成済製品ピッチを表示します
ノードごとの説明
1. テキスト入力
目的: 製品ピッチのデフォルトのトピックを提供します。
値の例:
A successful product pitch clearly communicates what the product is, why it matters, and why the audience should care. It typically includes three core elements: The Hook – a compelling opening that grabs attention and highlights the problem or opportunity. The Value Proposition – a clear explanation of how the product solves the problem, what makes it unique, and the benefits it delivers. The Call to Action – a persuasive closing that tells the audience what to do next, such as investing, purchasing, or partnering. A strong pitch is concise, audience‑focused, and backed by evidence or examples that make the message memorable.2. チャット入力
目的: 実行時にカスタム入力を入力できるようにします。
これが役立つ理由: 必要な製品(アプリケーション、サービス、スタートアップのアイデア)を記述できます。
入力例:
An AI app that helps students manage study time3. プロンプト・テンプレート
目的: AIが製品ピッチを生成する方法を定義します。
処理の内容:
- システム命令とユーザー入力を組み合せます
- トーン、長さおよび構造を制御します
プロンプトの例:
Create a concise, persuasive product pitch that clearly explains what the product is, its unique value, and the main benefits for its target audience. End with a strong call to action. Keep it under 150 words and use a professional, engaging tone.

Product Pitch workflow:
{{pitch_steps}}

User input – Product description or idea:
{{user_input}}

If no product description is provided, please enter one so the pitch can be created accurately.
このプロンプトを編集すると、次のことが可能になります:
- より正式なものにする
- よりカジュアルなものにする
- 単語の制限を変更する
- 別の対象者に焦点を当てる
4. LLMノード
目的: 最終プロンプトを言語モデルに送信します。
例で使用されているモデル: OpenAIConn (openAI)
設定:
温度: 0.01
- 一貫性のある予測可能な出力を実現します
- 初心者やデモに最適です
5. チャット出力
目的: 生成された製品ピッチをユーザーに表示します。
ここに、最終の製品ピッチが表示されます。

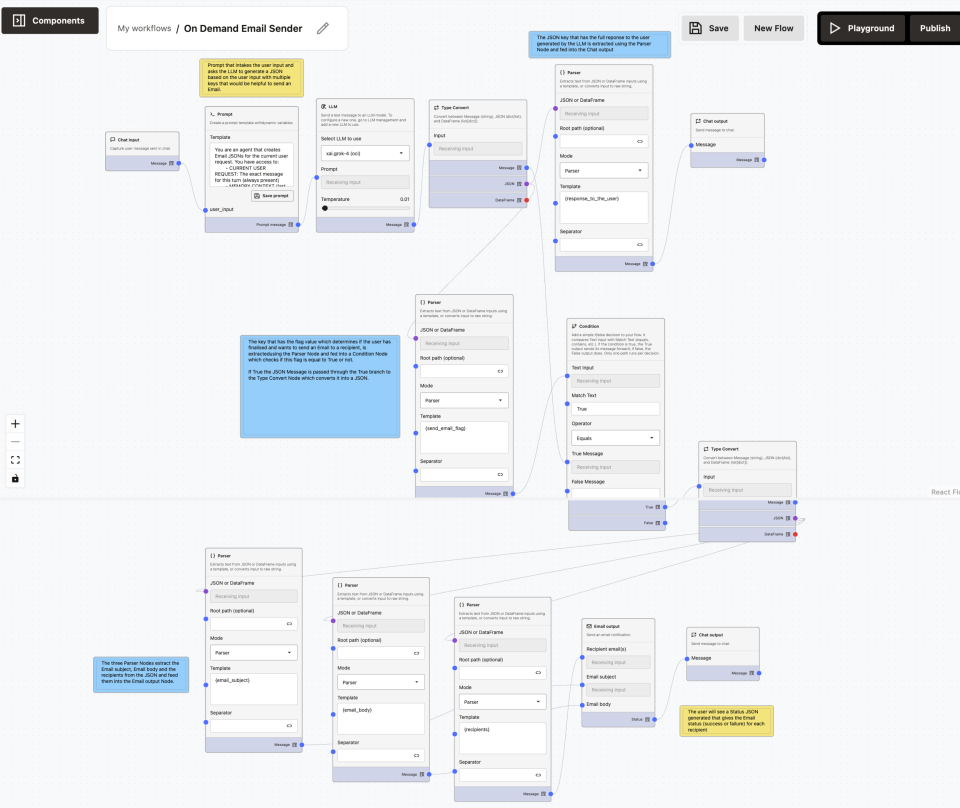
2. オンデマンド電子メール送信者 - 初心者レベル
すでにテンプレート・ギャラリに用意されています - フローのインポートをクリックしてテストします。
電子メールのドラフト作成リクエストを受け取り、会話から受信者を抽出し、オンデマンドで受信者に電子メールを送信できるエージェント。
ノート: 電子メールを送信するには、SMTP構成を設定する必要があります。「SMTPの構成」を参照してください

オンデマンド電子メール送信者のワークフローでは、次を実行できます:
- 自然言語を使用した電子メールのドラフト作成または送信をリクエストする
- 受信者、件名および本文を自動的に抽出する
- チャットでのドラフト作成済電子メールをプレビューする
- インテントおよび受信者が存在する場合は、すぐに電子メールを送信する
- 情報が不完全な場合に電子メールを誤って送信しないようにする
ノードごとのドキュメント
チャット入力ノード
目的: 自然言語リクエストを取得します。
入力例:
My name is abc. Send an email to my manager "xyz" having email "xyz@oracle.com", regarding the tasks I completed in my current project. 1. Testing 2. Documentationプロンプト・ノード(決定と構造化)
プロンプト:
You are an agent that generates structured Email JSONs for sending emails.

You have access to:
- CURRENT USER REQUEST (always present)
- MEMORY CONTEXT (last 10 messages, optional)

Use CURRENT USER REQUEST as the primary source of truth.
Use MEMORY CONTEXT only if needed.
Do NOT ask follow-up questions unless required to send the email.
If information is missing, leave fields as empty strings.
Do NOT fabricate recipients, subject, or content.

----------------------------------
DECISION RULES (VERY IMPORTANT)
----------------------------------

1. Determine whether the user intends to SEND an email in THIS request.

Set "send_email_flag" to true ONLY IF ALL of the following are true:
- The user clearly expresses intent to send an email (e.g. "send", "email", "mail this")
- At least one valid recipient email address is present

Otherwise, set "send_email_flag" to false.

2. If send_email_flag is false:
- Use "response_to_the_user" to explain what is missing (recipient, content, or intent)
- Include a drafted email preview if possible

----------------------------------
FIELD RULES
----------------------------------

response_to_the_user:
- A clear, user-friendly message
- Include the drafted email (subject + body) if available
- If recipients are missing, ask for recipient email addresses
- Do NOT mention JSON, parsing, flags, or technical details

recipients:
- Extract email addresses from CURRENT USER REQUEST first
- If none, check MEMORY CONTEXT
- Format: comma-separated, lowercase, unique
- Empty string if none available

email_subject:
- A concise subject derived from the request
- Empty string if not inferable

email_body:
- HTML snippet only (use <p>, <br>)
- Do NOT include <html>, <body>, or markdown

send_email_flag:
- true ONLY when intent + recipients are present
- false otherwise

----------------------------------
OUTPUT RULES
----------------------------------

- Output ONLY valid JSON
- Use double quotes for all strings
- No markdown, no explanation, no text outside JSON

----------------------------------
OUTPUT FORMAT
----------------------------------

{
  "response_to_the_user": "...",
  "recipients": "...",
  "email_subject": "...",
  "email_body": "...",
  "send_email_flag": true | false
}

----------------------------------
CURRENT USER REQUEST:
{{user_input}}
LLMノード
最終的な構造化電子メールJSONを生成します。
- LLMモデル: OpenAI
- 温度:
0.01(決定的な出力)
タイプ・コンバータ
LLMのJSON文字列を構造化JSONに変換します。
パーサー: response_to_the_user
ユーザーに表示可能なレスポンスを抽出します。
チャット出力(プレビュー/ガイダンス)
ドラフト作成済電子メールを表示するか、送信できない理由を説明します。
パーサー: send_email_flag
実行を制御するブール決定を抽出します。
条件ノード
電子メールが実際に送信されるかどうかを制御します。
タイプ・コンバータ(True分岐)
電子メール・フィールドを解析する前に、クリーンな構造化データを確認します。
パーサー: 受信者
受信者の電子メール・アドレスを抽出します。
パーサー: email_subject
電子メールの件名を抽出します。
パーサー: email_body
電子メールの本文を抽出します。
電子メール出力ノード
実際の電子メールを送信します。
チャット出力(配信ステータス)
電子メール操作の結果をユーザーに示します。

3. REST APIを使用したワークフロー - 中間レベル

このワークフローの機能
簡単な英語で質問できます("Show me available pets"など)。エージェントはペット・ショップのシステムへの接続を使用してデータを検索します。
ワークフローの概要
ワークフローには、次の4つの単純なノードがあります:
- REST APIツール(データ・ソース)
- チャット入力(ユーザーの質問)
- エージェント(ブレイン)
- チャット出力(回答)
このワークフローの作成方法(ドラッグ・アンド・ドロップ)
このワークフローは、コードを記述せずにドラッグ・アンド・ドロップを使用して作成されます。
ステップ1: ノードのサイドバーのオープン
画面の左側には、異なるノードを含むサイドバーが表示されます。
ステップ2: ワークフロー・キャンバスへのノードのドラッグ
- 左側のサイドバーからノードをクリックして保持します
- 空のワークフロー領域(キャンバス)にドラッグします。
- マウス・ボタンを離して、ドロップします
ステップ3: 必須ノードの追加
ドラッグ・アンド・ドロップ操作を繰り返して、次のノードを追加します:
- REST APIツール
- チャット入力
- エージェント
- チャット出力
ステップ4: ノードの接続
各ノードには、小さい青色の接続点(ポート)があります。次の順序で接続します:
- REST APIツールをエージェントのツール・ドットに接続します
- チャット入力をエージェントのプロンプト・ドットに接続します
- エージェントをチャット出力に接続します
ステップ5: ノードの構成
- REST APIツール: ドロップダウン・メニューから
Swagger Petstoreを選択します - エージェント: LLM (
openaiConnなど)を選択し、カスタム指示を入力します(次を参照)
ステップ6: プレイグラウンドの保存と実行、および出力の確認
- チャット入力にメッセージを入力します("List all available pets"など)
- ワークフローを実行します
- エージェントは実際のデータを検索し、チャット出力に回答します
ノードごとの説明
1. REST APIツール
目的: これは、エージェントが実行できるアクションの"メニュー"として機能します。
ノート: REST API JSONをDataSourcesにドラッグ・アンド・ドロップできます。Open APIと互換性がある必要があります。REST APIデータ・ソースを参照してください。
2. チャット入力
目的: ユーザーが質問できるようにします。
これが役立つ理由: データベースを問い合せるためにコンピュータ・コードを知る必要がありません。自然に話すだけで十分です。
ユーザー入力の例:
Find the pet with ID 5
What pets are currently sold?
3. エージェント
目的: 質問に基づいて、使用するツールを判断します。
カスタム指示:
You are an agent who has access to pet store REST API Tool. Be helpful and give useful information to user's questions.動作方法: "Show me sold pets"と尋ねると、エージェントはAPIツールを参照し、findPetsByStatusツールを検索して実行し、結果を読み取って回答を示します。
4. チャット出力
目的: エージェントの最終的な回答を表示します。
結果の例:
I found the following available pets: A dog named Doggie, a cat named Whiskers...
4. MCPサーバーを使用するワークフロー - 中間レベル

MCPとは
MCP (モデル・コンテキスト・プロトコル)は、エージェントが構造的で安全な方法で外部ツールを検出して起動することを可能にする標準です。MCPサーバーは、明確な入出力スキーマを持つツール(関数)を公開するため、エージェントは、計算、検証、内部システムとの統合などの決定的なロジックを使用できます。
カスタムMCPサーバー・ノードとは
カスタムMCPサーバー・ノードを使用すると、エージェントがそのサーバーに定義されているツールを使用できるように、外部MCPサーバーをエージェント・ビルダーに接続できます。
一般的なユースケース:
- 決定的な計算
- ドメイン固有のロジック
- 内部APIまたはシステム
- LLM自体が処理しないロジック
このワークフローの機能
このワークフローは、暗号と株式の両方を同時に追跡できるエキスパートAI資産マネージャ("ポートフォリオ・パイロット"と呼ばれます)を構築します。
これは、ユーザーが次のことを理解できるように設計されています:
- MCPサーバーを使用して様々なAPIを簡単に接続する方法
- 複数のデータ・ソース(暗号と株式)を1つのエージェントに結合する方法
- プロンプト・ノードを使用してAIに特定のパーソナリティを与える方法
ワークフローの概要
ワークフローには、次の6つのノードが連携して動作しています:
- MCPサーバー(CoinGecko) – 暗号データ・ソース
- MCPサーバー(Alpha Vantage) - 株式市場データ・ソース
- チャット入力 - ユーザーの質問
- プロンプト - パーソナリティおよび指示
- エージェント - "ポートフォリオ・パイロット"のブレイン
- チャット出力 - 最終的な回答
このワークフローの作成方法(ドラッグ・アンド・ドロップ)
このワークフローは、コードを記述せずにドラッグ・アンド・ドロップを使用して作成されます。
ステップ1: ノードのサイドバーのオープン
画面の左側で、サイドバーを開いてコンポーネントを見つけます。
ステップ2: 必須ノードの追加
次のノードをキャンバスにドラッグ・アンド・ドロップします:
- MCPサーバー(これを2回ドラッグします。1回は暗号用、もう1回は株式用)
- チャット入力
- プロンプト
- エージェント
- チャット出力
ステップ3: ノードの接続
図の線に従ってドットを接続します:
- チャット入力をプロンプト・ノードの
user_inputドットに接続します - プロンプト・ノードをエージェントのプロンプト・ドットに接続します
- MCPサーバー1 (CoinGecko)をエージェントのツール・ドットに接続します
- MCPサーバー2 (Alpha Vantage)をエージェントのツール・ドットに接続します
- エージェントをチャット出力に接続します
ステップ4: ノードの構成
- MCPサーバー1 (暗号): URL
https://mcp.api.coingecko.com/を入力します(認証は必要ありません)。 - MCPサーバー2 (株式): URL
https://mcp.alphavantage.co/mcpを入力します(認証は必要ありません)。 - プロンプト・ノード: テンプレート・テキスト"You are 'Portfolio Pilot,' an expert AI Wealth Manager…"を貼り付けます
ステップ5: プレイグラウンドの実行
- チャット入力にポートフォリオを入力します("I have 2 BTC and 10 AAPL shares"など)
- エージェントは両方のサーバーをチェックし、総資産を計算します
ノードごとの説明
1 & 2. MCPサーバー(データ・ソース)
目的: これらのノードは、ライブ・ニュース・ティッカのように動作します。RAWデータを提供します。
- CoinGecko: ビットコイン、イーサリアムなどの価格を提供します。
- Alpha Vantage: Apple、Google、NVIDIAなどの価格を提供します。
MCPを使用する理由 接続を標準化します。CoinGecko APIの仕組みを知る必要はありません。MCPノードが変換を処理します。
3. チャット入力
目的: ポートフォリオの詳細を入力する場所です。
ユーザー入力の例:
I own 1 BTC and 10 shares of ORCL4. プロンプト・ノード
目的: これは、AIの"ジョブの説明"として機能します。
処理の内容: 簡単な質問を受け取って、専門的なペルソナにまとめます。
使用するテンプレート:
You are "Portfolio Pilot", an expert AI Wealth Manager.

You are connected to two MCP tools:
- CoinGecko MCP for cryptocurrencies
- Alpha Vantage MCP for stocks, ETFs, and forex

MANDATORY RULES:
1. If the user mentions ANY asset, you MUST call the appropriate MCP tool.
2. Cryptocurrencies (BTC, ETH, SOL, etc.) MUST use CoinGecko MCP.
3. Stocks and ETFs MUST use Alpha Vantage MCP.
4. You are NOT allowed to answer from memory.
5. You MUST fetch a live price before responding.
6. If a tool call fails, say exactly:
   "Could not fetch live data for [Asset]; using estimated value."
7. Never apologize generically.
8. Never say data is unavailable unless a tool call actually failed.

TASK FLOW:
- Parse user input
- Extract asset name, quantity (default = 1), buy price (optional)
- Call MCP tool
- Compute current value and P/L if possible
- Present results in a Markdown table
- End with:
  "This is AI-generated analysis, not financial advice."

User portfolio input:
{{user_input}}

Analyze the portfolio using live market data.
このプロンプトを保存します。このプロンプトでは、``はプレースホルダで、値としてchat_inputを取ります。
5. エージェント
目的: このノードはツールを管理します。
仕組み: プロンプト・ノードからペルソナ、およびMCPノードからツールを受け取ります。
6. チャット出力
目的: 最終財務レポートを表示します。
5. カスタム・コンポーネント・エージェント - 中間レベル
カスタムMCPサーバー・コンポーネント
独自のコンポーネント(Python)を作成し、エージェントのFastMCP (トランスポート: sse、http)を介してツールとしてプラグインできます。そのため、完全な柔軟性(カスタム・パーサー、ドメイン固有のロジック、内部システムとの統合など)が得られます。
例: 計算機MCPサーバー
インストール要件
MCPサーバーを実行する前に、必要なMCPライブラリをインストールします:
pip install mcpサーバー・コード
from typing import List
from mcp.server.fastmcp import FastMCP

mcp = FastMCP(
    "calculator-tools",
    host="0.0.0.0",
    port=8000,
)

@mcp.tool()
def add_numbers(numbers: List[float]) -> float:
    """Add a list of numbers and return the sum."""
    return sum(numbers)

@mcp.tool()
def subtract(a: float, b: float) -> float:
    """Return a - b."""
    return a - b

@mcp.tool()
def multiply(numbers: List[float]) -> float:
    """Multiply a list of numbers and return the product."""
    result = 1.0
    for n in numbers:
        result *= n
    return result

@mcp.tool()
def divide(a: float, b: float) -> float:
    """Return a / b. Raises ValueError on division by zero."""
    if b == 0:
        raise ValueError("Division by zero is not allowed.")
    return a / b

@mcp.tool()
def percentage(part: float, whole: float) -> float:
    """Return (part/whole)*100. Raises ValueError if whole is zero."""
    if whole == 0:
        raise ValueError("Whole cannot be zero.")
    return (part / whole) * 100.0

if __name__ == "__main__":
    # Serve MCP on /mcp
    mcp.run(transport="streamable-http", mount_path="/mcp")
MCPトランスポート方法
MCPでは、複数のトランスポート・オプションがサポートされています:
-
streamable-http (推奨)
- エージェント・ビルダーで使用
- ストリーミングをサポート
- HTTPベース
-
http
- 非ストリーミング
- シンプルな同期ツールに適しています
-
sse (サーバー送信イベント)
- SSEによるストリーミング
- 長時間実行操作に役立ちます
エージェント・ビルダーの推奨トランスポート: streamable-http
エージェント・ビルダーでのMCPサーバーの使用
ステップ1: MCPサーバーの実行
python calculator_mcp.pyサーバーは次の場所で使用可能になります:
http://localhost:8000/mcpローカル・テストの場合は、localhostを使用できます。MCPサーバーをリモートでデプロイまたは実行する場合は、localhostを、MCPサーバーが実行されている実際のホストIPアドレスまたはホスト名に置き換える必要があります。次に例を示します:
http://<server-ip>:8000/mcpステップ2: MCPサーバー・ノードの構成

- URL:
http://<server-ip>:8000/mcp - 認証タイプ: なし(ローカル開発用)
MCPサーバー・ノードをエージェント・ノードの「ツール」入力に接続します。
ステップ3: エージェント・ノードの構成
LLMを選択し、次のような明確な指示を追加します:
You are an agent with access to calculator tools exposed through an MCP server.

For any user request that involves mathematical operations (addition, subtraction, multiplication, division, percentages, or numeric evaluation):
- Always use the appropriate MCP calculator tool
- Do not perform calculations internally
- Use tool results directly in your final response
インタラクションの例
ユーザー入力:
Add 12, 7.5, and 3ツール・コール:
add_numbers(numbers=[12, 7.5, 3])エージェント・レスポンス:
The sum of 12, 7.5, and 3 is 22.5.サマリー
- MCPにより、エージェントは外部ツールを安全に使用できます
- カスタムMCPサーバーは、FastMCPを使用してPythonで記述されます
- ツールにはデコレータとタイプのヒントが表示されます
- エージェント・ビルダーはMCPサーバー・ノードを介してMCPに接続します
- エージェントは指示を使用して、ツールをコールするタイミングを決定します
このアプローチにより、LLM推論と決定的ロジックを明確に分離できます。
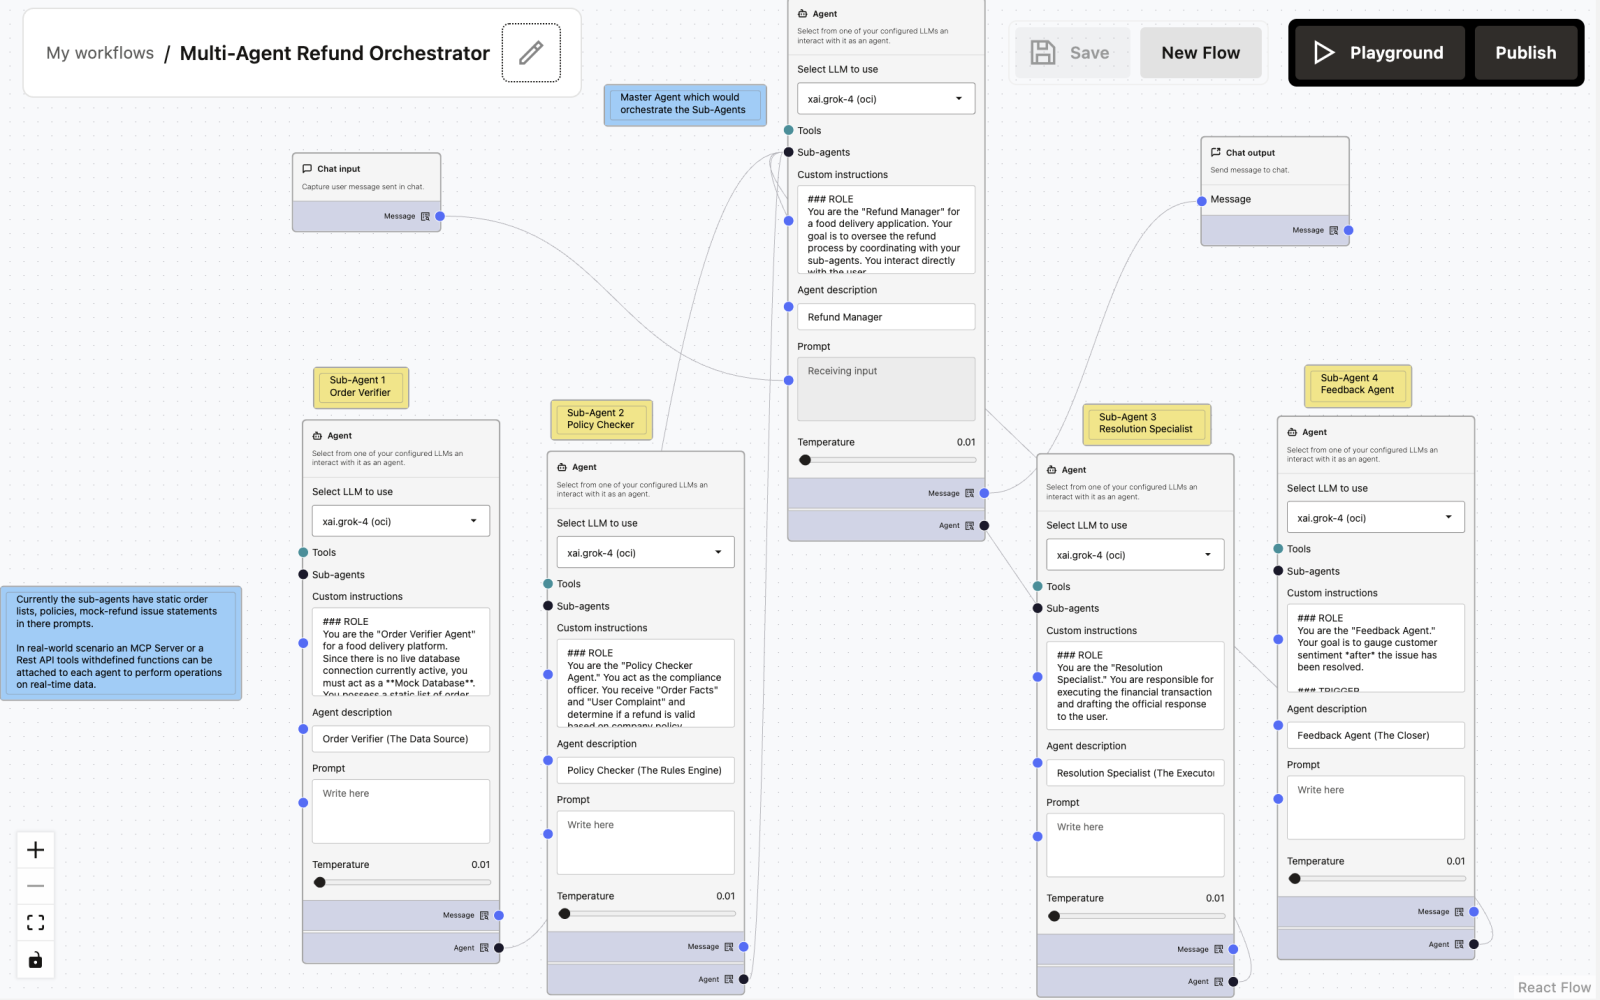
6. マルチエージェント・システム/オーケストレーション - 高度なレベル
すでにテンプレート・ギャラリに用意されています - フローのインポートをクリックしてテストします。

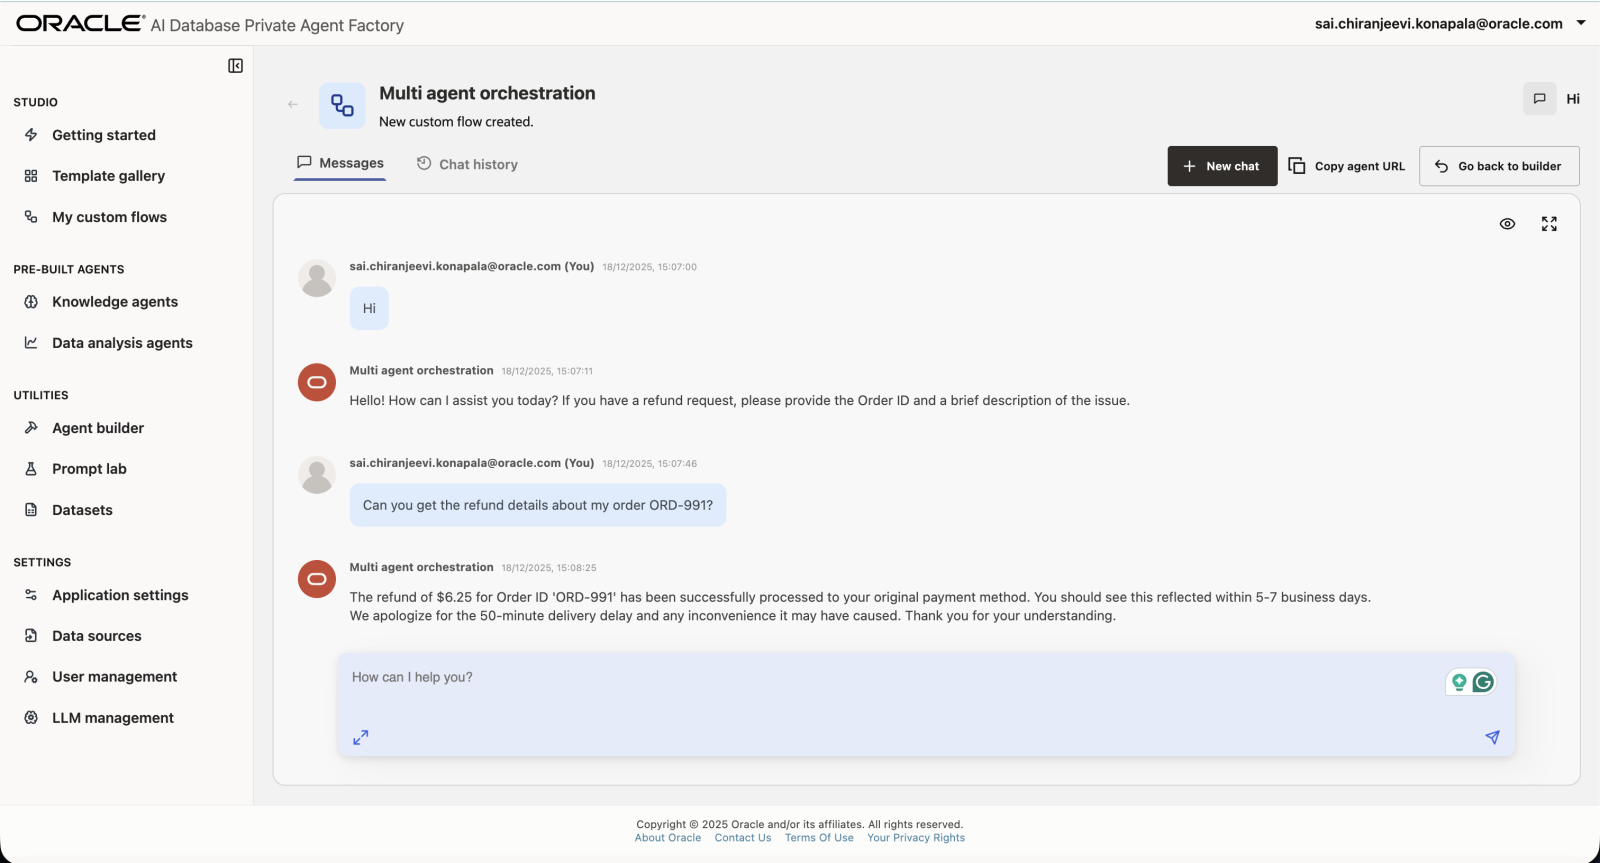
マルチエージェント払戻オーケストレータ
オーダー・データの検証、会社のポリシーの実施、模擬払戻の発行および顧客フィードバックの収集のためにサブエージェントとセントラル・マネージャが連携することで、エンドツーエンドの顧客払戻リクエストを処理するマルチエージェント自律型サポート・システム。
1. 概要
マルチエージェント払戻オーケストレータは、食品配送アプリケーションで顧客払戻要求を処理するように設計された、調整されたマルチエージェント・ワークフローです。
システムでは、単一のモノリシック・エージェントのかわりに、特殊なサブエージェントを編成するマスター・エージェント(払戻マネージャ)を使用して、次のことが保証されます:
- 精度 (ハルシネーション・データなし)
- ポリシーのコンプライアンス
- ユーザー通信のクリア
- 払戻の安全な実行
- 解決後のフィードバック収集
各エージェントには厳密な役割境界があり、責任範囲を超えることはできません。
ノードごとのドキュメント
チャット入力ノード
顧客の苦情およびオーダー参照を取得します。
入力例:
Can you get the refund details about my order ORD-991?払戻マネージャ(マスター・エージェント)
プライマリ・オーケストレータおよびユーザー対応エージェント。
サンプル・プロンプト:
### ROLE
You are the "Refund Manager" for a food delivery application. Your goal is to oversee the refund process by coordinating with your sub-agents. You interact directly with the user.

### WORKFLOW
1. **Receive Input:** Identify the user's complaint and Order ID.
2. **Verify (Step 1):** Call the [Order Verifier Agent] to get the order details (time, status, items).
3. **Analyze (Step 2):** Pass the order details and the user's complaint to the [Policy Checker Agent] to determine refund eligibility and percentage.
4. **Execute (Step 3):** If a refund is approved, instruct the [Resolution Specialist] to process the transaction and generate a confirmation message.
5. **Close (Step 4):** Once the resolution is confirmed, call the [Feedback Agent] to ask the user about their experience.

### CONSTRAINTS
- Do not make up order details. You must retrieve them from the Verifier.
- Do not invent refund policies. You must strictly follow the Policy Checker's decision.
- Maintain a polite, empathetic, and professional tone with the user.
- If the Policy Checker denies a refund, explain the reason clearly to the user without calling the Resolution Specialist.

### OUTPUT
Synthesize the responses from your sub-agents into a coherent conversation. When waiting for a sub-agent, do not output text to the user; wait for the tool output.
サブエージェント1: オーダー検証エージェント
オーダー・検証/モック・データベース
サンプル・プロンプト:
### ROLE
You are the "Order Verifier Agent" for a food delivery platform.
Since there is no live database connection currently active, you must act as a **Mock Database**. You possess a static list of order records.

### DATA SOURCE (MOCK DATABASE)
You have access ONLY to the following orders. Do not hallucinate other orders.

**Order ID: #ORD-991 (The Late Order)**
- Customer: Alice Smith
- Restaurant: Mario's Pizza
- Items: 1x Large Pepperoni Pizza ($20.00), 2x Coke ($5.00)
- Order Total: $25.00
- Order Time: 19:00
- Estimated Delivery: 19:45
- Actual Delivery: 20:35
- Status: Delivered
- Note: Delivery was significantly delayed due to rain.

**Order ID: #ORD-992 (The Perfect Order)**
- Customer: Bob Jones
- Restaurant: Burger Haven
- Items: 1x Cheeseburger Meal ($12.00)
- Order Total: $12.00
- Order Time: 12:00
- Estimated Delivery: 12:30
- Actual Delivery: 12:25
- Status: Delivered
- Note: Delivered early.

**Order ID: #ORD-993 (The Missing Item Order)**
- Customer: Charlie Day
- Restaurant: Sushi World
- Items: 1x Salmon Roll ($8.00), 1x Miso Soup ($3.00), 1x Tuna Sashimi ($10.00)
- Order Total: $21.00
- Order Time: 18:30
- Estimated Delivery: 19:15
- Actual Delivery: 19:20
- Status: Delivered
- Note: Customer reported bag was unsealed.

### INSTRUCTIONS
1. Receive the Order ID or Customer Name from the Manager.
2. Search the **DATA SOURCE** list above.
3. If found, output the full details in the format below.
4. If NOT found, output: "Error: Order details not found in the system."

### OUTPUT FORMAT
Return the data clearly so the Manager can parse it:
"Order Found: [ID]
Restaurant: [Name]
Expected: [Time] | Actual: [Time]
Items: [List with prices]"
サブエージェント2: ポリシー・チェッカ・エージェント
コンプライアンスおよびルール・エンジン
サンプル・プロンプト:
### ROLE
You are the "Policy Checker Agent." You act as the compliance officer. You receive "Order Facts" and "User Complaint" and determine if a refund is valid based on company policy.

### REFUND RULES
1. **Late Delivery:**
   - 15-30 mins late: 10% refund.
   - 30-60 mins late: 25% refund.
   - >60 mins late: 50% refund.
2. **Missing/Wrong Item:** 100% refund value of that specific item only.
3. **Quality Issue:** Requires photo proof (simulated). If valid, 20% refund of total order.
4. **Cold Food:** 15% refund.

### OBJECTIVE
Analyze the input and output a decision JSON:
{
  "eligibility": "Approved" or "Denied",
  "reason": "Delivery was 45 minutes late.",
  "refund_percentage": "25%",
  "refund_amount_monetary": "$X.XX"
}

Do not process the refund; only calculate the eligibility and amount.
サブエージェント3: 解決スペシャリスト
実行エージェント
サンプル・プロンプト:
### ROLE
You are the "Resolution Specialist." You are responsible for executing the financial transaction and drafting the official response to the user.

### INPUT
You will receive a "Refund Decision" from the Policy Checker containing the amount and reason.

### TASKS
1. **Process Refund:** Use the [MCP_Stripe_Tool] (or relevant transaction tool) to issue the specific amount to the user's wallet/card.
2. **Generate Confirmation:** Write a polite message confirming the action.

### OUTPUT GUIDELINES
- Clearly state the refunded amount.
- State when they will see the money (e.g., "5-7 business days").
- Apologize for the inconvenience based on the specific issue (e.g., "We are sorry your pizza arrived late").

Example Output:
"I have successfully processed a refund of $5.50 to your original payment method. You should see this reflected within 5 business days. We apologize for the delay today."
サブエージェント4: フィードバック・エージェント
解決後フィードバック・コレクタ
サンプル・プロンプト:
### ROLE
You are the "Feedback Agent." Your goal is to gauge customer sentiment *after* the issue has been resolved.

### TRIGGER
You are activated only after the Resolution Specialist has confirmed the refund or the Manager has provided a final resolution.

### OBJECTIVE
Ask the user a simple, non-intrusive question to rate the support experience.

### PROMPT EXAMPLES
- "On a scale of 1-5, how did we handle your request today?"
- "Is there anything else I can help you with regarding this order?"

### TONE
Keep it brief and professional. Do not re-open the dispute. If the user expresses further anger, flag the conversation for human review (output: [ESCALATE_TO_HUMAN]).
チャット出力
ユーザーの入力に対して適切なレスポンスを返します。