Configuring Actions in Policies
This section discusses how to configure display alert actions:
|
Page Name |
Definition Name |
Usage |
|---|---|---|
|
EOCF_DSPL_ALRT_CFG |
Define configuration details for the display alert action. |
|
|
RB_AAF_CTXT_BP_REL |
Use this setup page to define the relationship between context IDs and business processes and activities. |
|
|
RB_AAF_WRKFLOW_CFG |
Define general information about the workflow action. |
|
|
RB_RUNTIME_DELAY |
Configure notifications to run at specified times. |
|
|
RB_AAF_ACTNPRCS |
Select processes to run when the specified workflow action is triggered. |
|
|
RB_AAF_RULE_BIND |
Specify the value of any variables in the role query. |
|
|
RB_AAF_BUSPROJ_CFG |
Specify the business project to instantiate for the business project action. |
|
|
RB_AAF_BSCRIPT_CFG |
Specify the scripts to trigger for the branch script action. |
|
|
RF_IPRD_HIST_CFG |
Define the configuration details for the installed product history action. |
|
|
RSF_HIST_ACT_CFG |
Define the configuration details for the lead and opportunity history action. |
|
|
RG_HIST_ACTION_CFG |
Define the configuration details for the change request history action. |
|
|
RC_HIST_ACTION_CFG |
Define the configuration details for the case history action. |
|
|
RB_HIST_SOLUTN_CFG |
Define the configuration details for the solution history action. |
|
|
RC_CASE_ACTION_CFG |
Define the configuration details for the case update action. |
|
|
RC_CASE_SS_ACT_CFG |
Define the configuration details for the self service case update action. |
|
|
RC_LINK_ACTION_CFG |
Define the configuration details for the suggestion action in cases. |
|
|
RC_REL_ACTION_CFG |
Define the configuration details for the case relationship action. |
|
|
RC_ENT_ACTION_CFG |
Define the configuration details for the entitlement balance action. |
|
|
RC_UPSELL_CFG |
Specify the branch script to use for the case upsell action. |
|
|
RC_TASK_ACT_CFG |
Specify conditions to automatically create a task for the case based upon user defined conditions. |
|
|
RC_SURVEY_ACTN_CFG |
Specify conditions to automatically initiate a dialog to conduct surveys after a case is saved. |
|
|
RC_DISP_TMPL_CFG |
Specify configuration details for the case display template action. |
|
|
RSF_TASK_ACTION |
Configure sales task actions. |
|
|
RB_AAF_POSTPRCS |
Define post processes. |
|
|
HD_ACTCFG_CASE |
Define configuration details for the case creation action. |
Use the Display Alert Configuration page (EOCF_DSPL_ALRT_CFG) to define configuration details for the display alert action.
Navigation
Click the Add Actions or Edit Actions button. On the Build a Policy - Edit Actions page or Build a Policy - Add Actions page (EOCF_RULE_ACTION). Then click the Configure button on a row with Display Alert as the action type.
Image: Display Alert Configuration page
This example illustrates the fields and controls on the Display Alert Configuration page .
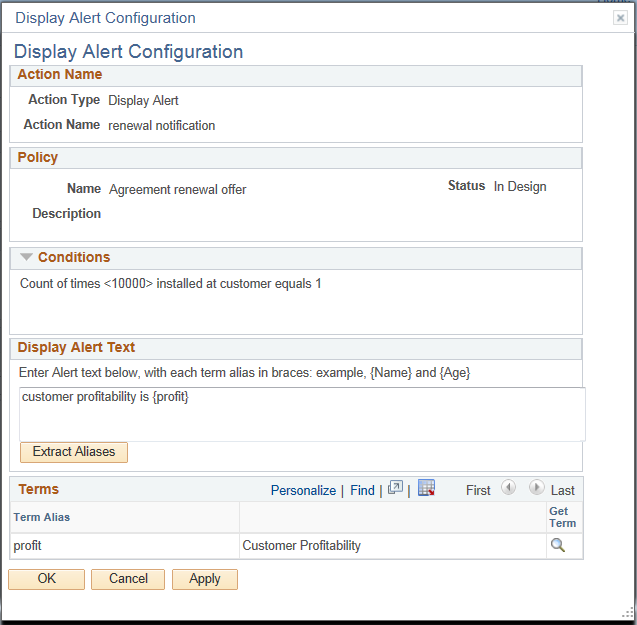
Use this page to define configuration details for the display alert action.
Use the Context Relationships page (RB_AAF_CTXT_BP_REL) to use this setup page to define the relationship between context IDs and business processes and activities.
Navigation
Set Up CRM, Common Definitions, Workflow, Context Relationships
Access the Context Relationships page (Set Up CRM, Common Definitions, Workflow, Context Relationships).
Image: Context Relationships page
This example illustrates the fields and controls on the Context Relationships page.
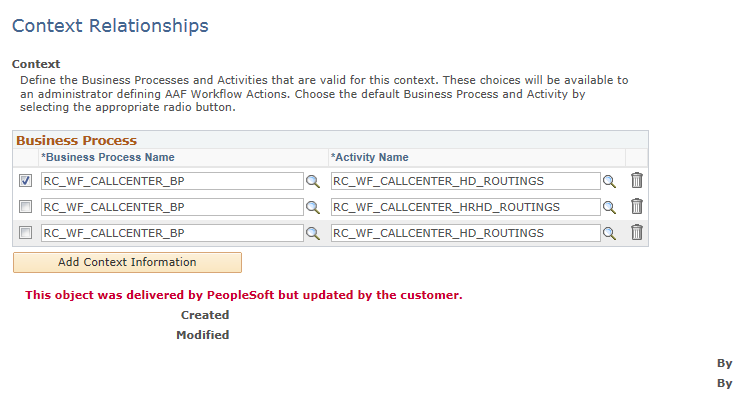
Use this setup page to define the relationship between business processes and activities that are valid for this context. Select the radio button that is associated with the business process and activity that you want the system to use as a default.
Note: If the page contains a one-to-one mapping between these fields, then the system populates the Business Process Name and Activity Name fields on the Workflow Configuration page, but hides the fields from the user. If it’s a one-to-many relationship, then the system displays these fields in drop-down list boxes and lists the available values. The relationships that you set up here can also appear on other action-type pages.
Use the Workflow Configuration page (RB_AAF_WRKFLOW_CFG) to define general information about the workflow action.
Navigation
Click the Configure button on the Build a Policy - Edit Actions page (EOCF_RULE_ACTION) on a row with Notifications & Workflow as the action type.
Image: Workflow Configuration page (1 of 2)
This example illustrates the fields and controls on the Workflow Configuration page (1 of 2).
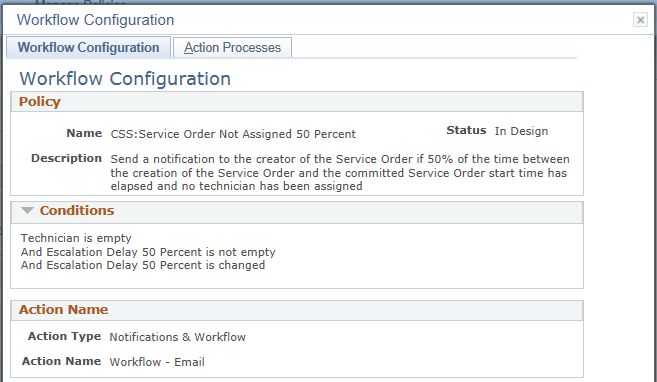
Image: Workflow Configuration page (2 of 2)
This example illustrates the fields and controls on the Workflow Configuration page (2 of 2).
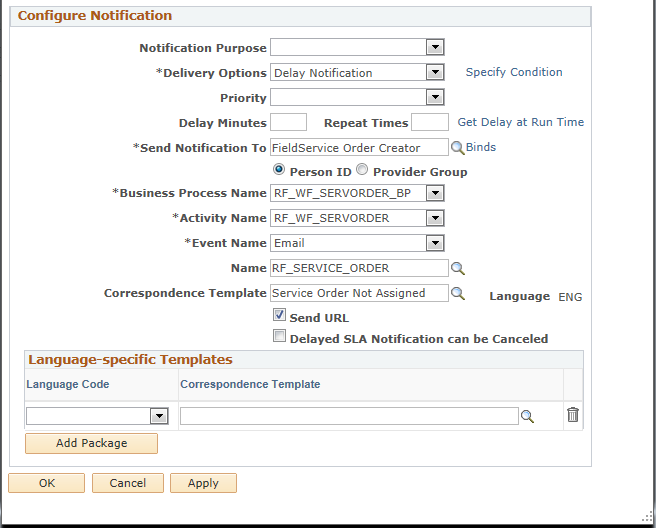
Configure Notification
|
Field or Control |
Definition |
|---|---|
| Notification Purpose |
Select the purpose of the notification. Options are: Approval Required, Escalation, FYI, Follow-Up Requested, Hold Notification, SLA Warning, Task Assignment Notification, and Update Notification. This field is optional for worklist or email notifications. In this release, task management uses this field as part of the post processing for its Notify Task Assignees workflow policy. To prevent the system from sending duplicate notifications to task assignees, the workflow post processing updates task management tables to indicate what notifications are sent after the policy action is triggered. The notification purpose for this policy is task assignment notification. |
| Delivery Options |
Select Delay Notification or Notify Immediately. If you select Delay Notification, make additional selections either in the Delay Minutes and Repeat Time fields, or by clicking the Get Delay at Run Time link. |
| Specify Condition |
Click to access the page to establish a condition for any asynchronous (delayed) action. When you specify a condition here, the action only takes place if the evaluation of the condition is true at the time that the action is scheduled to start. For example, service-level related workflow notifications (which are always sent after a specified delay) alert agents to impending deadlines. Consider an agreement that entitles a customer to one-hour guaranteed recovery time. This agreement is associated with a workflow action that reminds the assigned agent of this guarantee 30 minutes after a new case is created. The system schedules the notification when the case is created. But if the case is closed by the time 30 minutes have passed, the notification becomes irrelevant. An evaluation event can verify that the case is still open before sending the notification. Note: This link does not appear if you selected Notify Immediately in the Notification Options drop down list. |
| Priority |
Select High, Medium, or Low Used at run time, priority indicates the importance of the notification's contents. The priority also appears on the worklist grid. |
| Delay Minutes |
Enter the number of minutes after the triggering event occurs that the notification will be sent. If this field is blank, the process runs immediately. Enter this value if Delay Notification is selected as the process notification option. |
| Repeat Times |
Enter the number of notifications that need to be sent. The system reevaluates the policy conditions before sending repeat notifications. The notification is repeated until the conditions are no longer true. The system gets the delay time that is used between these notifications either in the Delay Minutes field or by capturing the value of the field that is specified in the Run Time Delay link (if the delay time needs to captured at runtime). |
| Get Delay at Run Time |
Click to access the Run Time Delay page, in which you then select one of two delay options: Record/Field: Specify the record name and the field that contains the delay time (in minutes). Term Name: Specify the term that represents the desired delay time (in minutes). An example would be: Send Notification at <percent> of the final notification time Term Configuration: When a term is configurable, you will see a word wrapped in the greater than and less than symbols (<>). The wrapped word is the configurable value of the term. When you select a configurable term, the system makes the term name a link when you return to the Get Delay at Run Time page. The system displays a field when you click this link. You can then enter a value. Click Done to save the new value in the term. |
| Send Notification To |
Select the role of the notification recipient. If the system does not find a recipient (for example, if the role is assigned to an agent but the case is unassigned), the system does not send the notification. For notifications that are sent to worklists, be sure that the role returns a list of user IDs. The role can be either a static user list role or a query role that returns user IDs. For notifications that are sent to email addresses, use a query role that returns a list of person IDs or fully qualified email addresses in the format <address>@<service>.<domain>. You should use roles that return person ID or provider group ID, which enables the workflow action to get more information about recipients, such as the their language preferences. |
| Person ID and Provider Group |
Select the recipient type of this workflow notification, person or provider group. The selection allows the query to return the appropriate ID (either for a person or a provider group) to which the notification should be sent. |
| Binds |
If the role is a query role (rather than a static user list), click this link to display the Binds Required page, where you enter the bind values for the query that is used in the query role. For every bind, information needs to be provided about how the data will be supplied. The data can come from either a level 0 record field or an alias. The alias is used if the data comes from a child scroll. This alias needs to be part of the context that pertains to the trigger point for which the policy is created. |
| Business Process Name and Activity Name |
The system populates these fields by default based on the context of the policy. To define the relationships between the context ID and the business process and activity name use the Context Relationship page (go to ). If the page contains a one-to-one mapping between these fields, then the system populates the Business Process Name and Activity Name fields but hides the fields from the user. If it’s a one-to-many relationship, then the system displays these fields in drop-down list boxes and lists the available values. A user can select a default business process and activity relationship in the setup page. This default relationship is initially populated in the drop-down list boxes. |
| Event Name |
Select the event that is appropriate for the notification channel (Worklist or Email). |
| Name |
Select the component interface that triggers the PeopleTools workflow event. This is required for delayed notifications to create the context for which notifications need to be sent. The component interface must contain a method called EvaluateCondition, which is used by the AAF asynchronous (delayed) workflow process to reevaluate the triggering event before a delayed or repeat invocation of the workflow action. The permission list that is required for accessing the component interface and the method is CRCI1000. By default, the system assigns the component interface that is specified on the policy. When such is the case, the Name field is not displayed unless there are multiple contexts for the policy. |
| Correspondence Template and Language |
Select a correspondence template that you want to use to create the content of the email notification. This is the default template that is used to send email notification if the correspondence template is not specified for the recipient's language in the Language Specific Template grid. The Language field displays the language used for the correspondence template. |
| Send URL |
Select to include the URL of the corresponding transaction to the email or worklist notification. Some features, such as task management, use their own mechanism to embed the transaction URL in workflow notification. In the case of task management, the URL is represented by a term in the workflow templates for task management. Clear this check box if you are configuring the notification and workflow action for policies that pertain to these features. Note: For the Case component: when the recipient opens the link contained within the email notification, the corresponding case page will be displayed, although the left hand navigation will remain collapsed. |
| Delayed SLA Notification can be Canceled |
Select this check box to indicate to the system that delayed SLA (service level agreements) can be canceled. |
Language-specific Templates
|
Field or Control |
Definition |
|---|---|
| Language Code and Correspondence Template |
Configure the AAF workflow to use different templates for different languages. If the role query of the specified role returns a person ID, the system derives the language from the person's record and identifies the correspondence template that is associated with the recipient's language in this grid. If no template is specified for that language, the system uses the default template to send the email notification. |
| Add Package |
Click to add a new row to the Language-specific Templates group box. |
Use the Run Time Delay page (RB_RUNTIME_DELAY) to configure notifications to run at specified times.
Navigation
Click the Get Delay at Run Time link on the Workflow Configuration page.
Image: Run Time Delay page
This example illustrates the fields and controls on the Run Time Delay page.
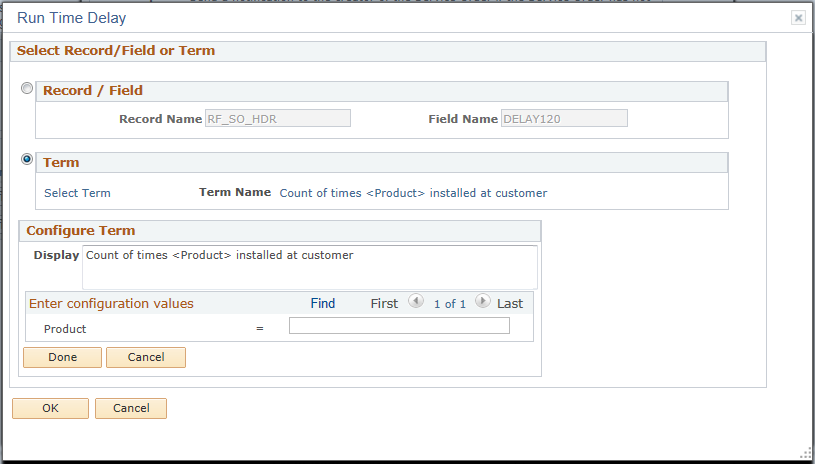
Select Record/Field or Term
|
Field or Control |
Definition |
|---|---|
| Record / Field |
Select this radio button if you want to use a record and field name to specify a run time delay for the action. |
| Record Name |
Select the record that contains the field that you want to use to specify a run time delay for the action. |
| Field Name |
Select the field that you want to use to specify a run time delay for the action. |
| Term |
Select this radio button if you want to use a term to specify a run time delay for the action. |
| Select Term |
Click this link to access the Term search page. Selecting a Term will cause the Notification Application Engine process to use the term instead of the record/field definition. |
| Term Name |
Displays the name of the term you selected. To enter a value for a term that includes a <percentage> or any other variable, click the link. The system displays the Configure Term section. |
Configure Term
|
Field or Control |
Definition |
|---|---|
| Display |
Displays the name of the term that you selected. |
Enter configuration values
|
Field or Control |
Definition |
|---|---|
| Percentage |
Enter a number to represent the amount of time that for which you want to delay the notification. |
Use the Action Processes page (RB_AAF_ACTNPRCS) to select processes to run when the specified workflow action is triggered.
Navigation
Click the Configure button on the Build a Policy - Edit Actions page on a row with Notifications & Workflow as the action type. Select the Action Processes page.
Image: Action Processes page
This example illustrates the fields and controls on the Action Processes page.
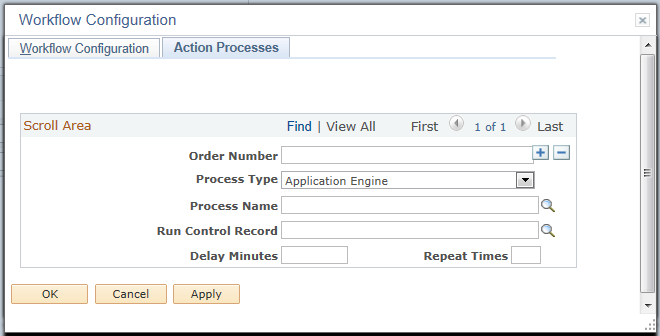
Use this page to run application engine or application class processes, with or without sending any workflow actions.
|
Field or Control |
Definition |
|---|---|
| Order Number |
If multiple processes are listed, enter a number to specify the order in which the processes run. |
| Process Type |
Select the type of process to run, Application Engine or Application Class. |
| Process Name |
Select the process to run. |
| Run Control Record |
The default run-control record that is used to run the processes is RB_RUN_CNTL_WF. This record uses OPRID and RUN_CNTL_ID as key values. If the processes that are associated with this action require a different run control record, enter that run control record here. |
| Delay Minutes |
Enter the number of minutes after the triggering event when the process will run. If this field is blank, the process runs immediately. |
| Repeat Times |
Enter the number of additional processes that need to run after the initial process. The system reevaluates the conditions each time that the process runs. The delay between the process runs is specified in theDelay Minutes field. The process stops if the policy conditions are no longer true. |
Use the Binds Required page (RB_AAF_RULE_BIND) to specify the value of any variables in the role query.
Navigation
Click the Binds link on the Workflow Configuration page.
Image: Binds Required page
This example illustrates the fields and controls on the Binds Required page.
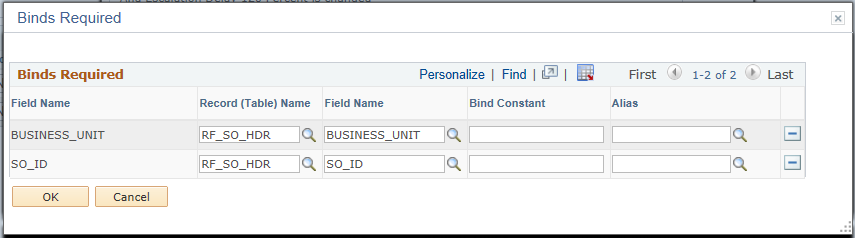
Use this page to specify how the input values are supplied to the bind variables that are needed for the role query.
|
Field or Control |
Definition |
|---|---|
| Field Name and Record (Table) Name |
Displays the field for which a value is required and the record (a parent record in the component at level 0) of the field. The system builds the list based on the query role that you select on the Workflow Configuration page. Use the Alias field if the input value comes from any other level. |
| Bind Constant |
If the value is a constant, enter the value in this field. |
| Alias |
Enter an alias that is used to supply data to the bind if the data comes from a child row. The alias becomes part of the context that pertains to the trigger point for which this policy is defined. |
Use the Business Project Configuration page (RB_AAF_BUSPROJ_CFG) to specify the business project to instantiate for the business project action.
Navigation
Click the Configure button on the Build a Policy - Edit Actions page on a row with Business Project as the action type.
Image: Business Project Configuration page
This example illustrates the fields and controls on the Business Project Configuration page.
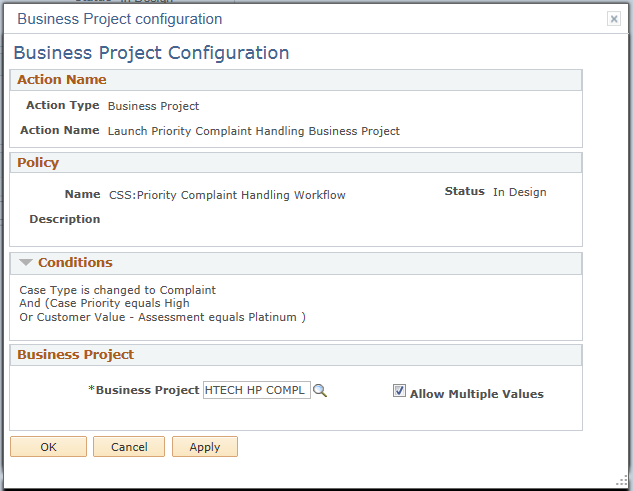
Select a business project that AAF instantiates when the evaluation of the policy conditions is true.
Use the Branch Script Configuration page (RB_AAF_BSCRIPT_CFG) to specify the scripts to trigger for the branch script action.
Navigation
Click the Configure button on the Build a Policy - Edit Actions page on a row with Recommend Branch Scripts as the action type.
Image: Branch Script Configuration page
This example illustrates the fields and controls on the Branch Script Configuration page.
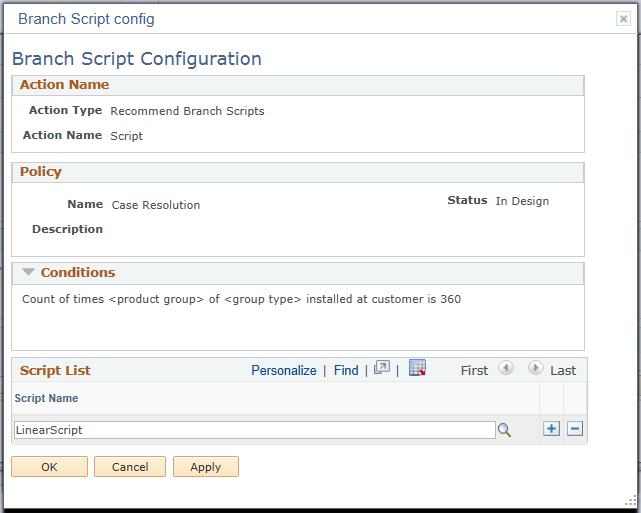
Select the scripts that AAF runs if the evaluation of the specified policy conditions is true.
Use the Installed Product History Configuration page (RF_IPRD_HIST_CFG) to define the configuration details for the installed product history action.
Navigation
Click the Configure button on the Build a Policy - Edit Actions page on a row with Installed Product History as the action type.
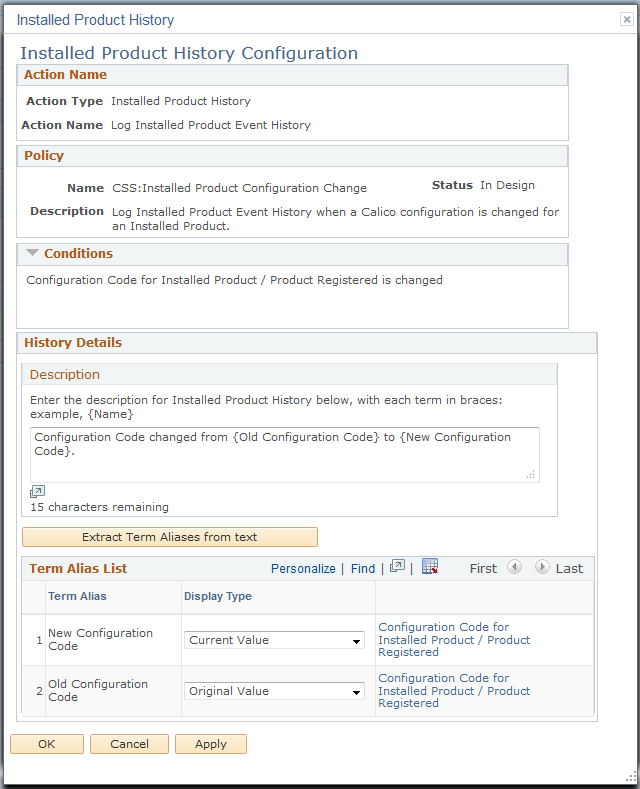
Image: Installed Product History Configuration page
This example illustrates the fields and controls on the Installed Product History Configuration page.
History Details
|
Field or Control |
Definition |
|---|---|
| Description |
Enter the text for the history entry that shows up on the history page of the corresponding CRM component (for example, case, lead, opportunity, or installed product). You can enter terms in angle brackets in the text that will be resolved into real data. |
| Extract Term Aliases |
Click to populate the grid at the bottom of the page with terms that you entered in the Description field. The term name in the text is an alias (it doesn't need to be the exact name of an existing term in the system). In the grid, specify a term that corresponds to each term alias using the Get Term link. |
| Display Type |
Select the type of value that the term displays. Options are original value, original value - description, current value and current value - description. For example, if the system enters history records for a change of status, the text is Status changed from {old status} to {new status}. The display type of {old status} can be the original value,, and {new status} the current value. |
Use the Sales History Configuration page (RSF_HIST_ACT_CFG) to define the configuration details for the lead and opportunity history action.
Navigation
Click the Configure button on the Build a Policy - Edit Actions page on a row with Lead History or Opportunity History as the action type.
Image: Sales History Configuration page
This example illustrates the fields and controls on the Sales History Configuration page.
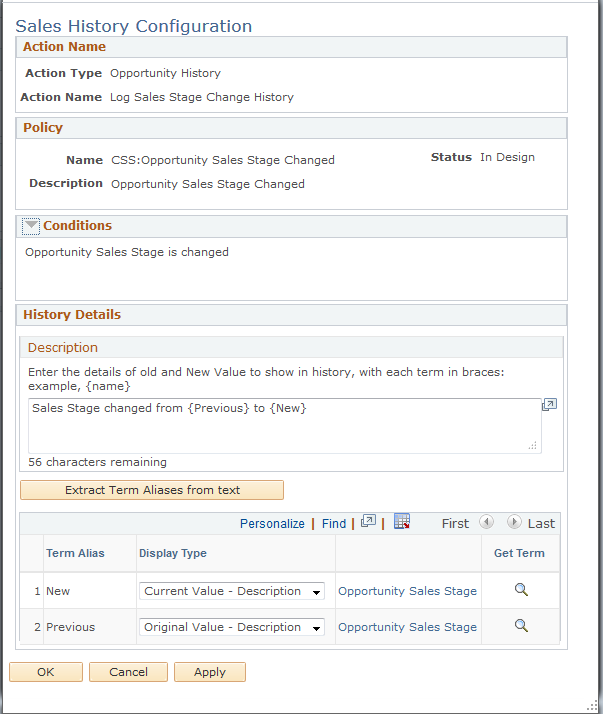
Use this page to define the configuration details for the lead and opportunity history action.
Use the Change Request History Configuration page (RG_HIST_ACTION_CFG) to define the configuration details for the change request history action.
Navigation
Click the Configure button on the Build a Policy - Edit Actions page on a row with Change Request as the action type.
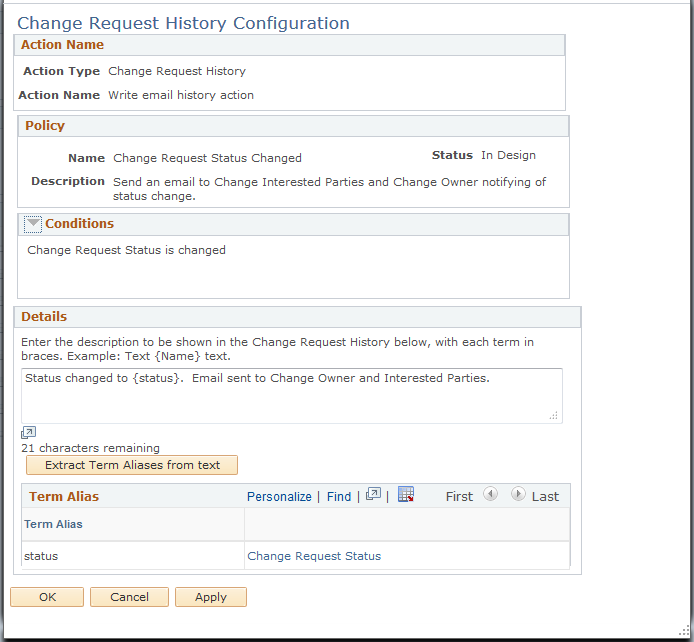
Image: Change Request History Configuration page
This example illustrates the fields and controls on the Change Request History Configuration page.
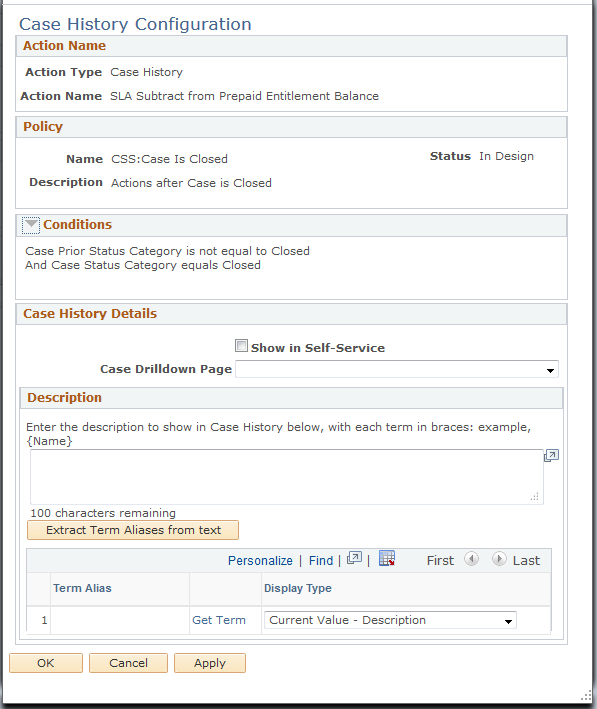
Use the Case History Configuration page (RC_HIST_ACTION_CFG) to define the configuration details for the case history action.
Navigation
Click the Configure button on the Build a Policy - Edit Actions page on a row with Case History as the action type.
Image: Case History Configuration page
This example illustrates the fields and controls on the Case History Configuration page.
|
Field or Control |
Definition |
|---|---|
| Show in Self-Service |
Select to give self-service users visibility to case history rows. |
| Page Name |
Select the page that appears when the user clicks the Details button on the Case History page. Values in this drop-down list box include all pages in the agent-facing Case component. Self-service users can view case history, but they cannot access a detail page. Consequently, the system does not display a self-service page. |
Use the Solution History Configuration page (RB_HIST_SOLUTN_CFG) to define the configuration details for the solution history action.
Navigation
Click the Configure button on the Build a Policy - Edit Actions page on a row with Solution History as the action type.
Image: Solution History Configuration page
This example illustrates the fields and controls on the Solution History Configuration page.
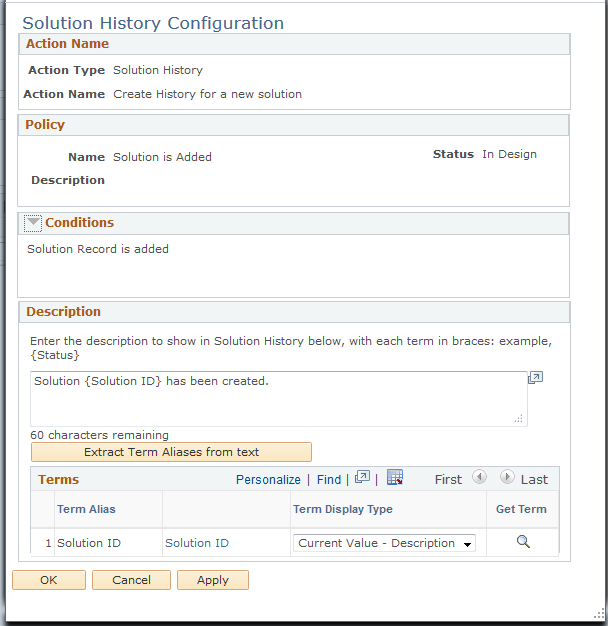
The Extract Term Aliases button works the same as the Merge Tokens button in other history configuration pages.
Use the Configure Case Update Action page (RC_CASE_ACTION_CFG) to define the configuration details for the case update action.
Navigation
Click the Configure button on the Build a Policy - Edit Actions page on a row with Case Update as the action type.
Image: Configure Case Update Action page (1 of 3)
This example illustrates the fields and controls on the Configure Case Update Action page (1 of 3).
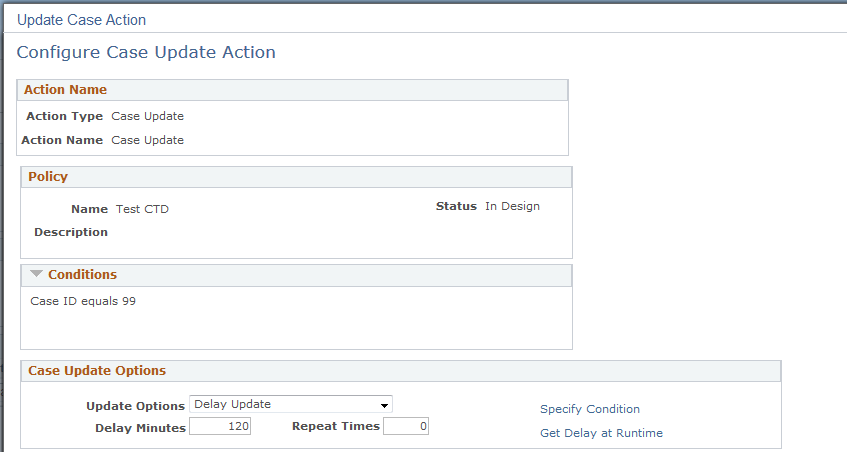
Image: Configure Case Update Action page (2 of 3)
This example illustrates the fields and controls on the Configure Case Update Action page (2 of 3).
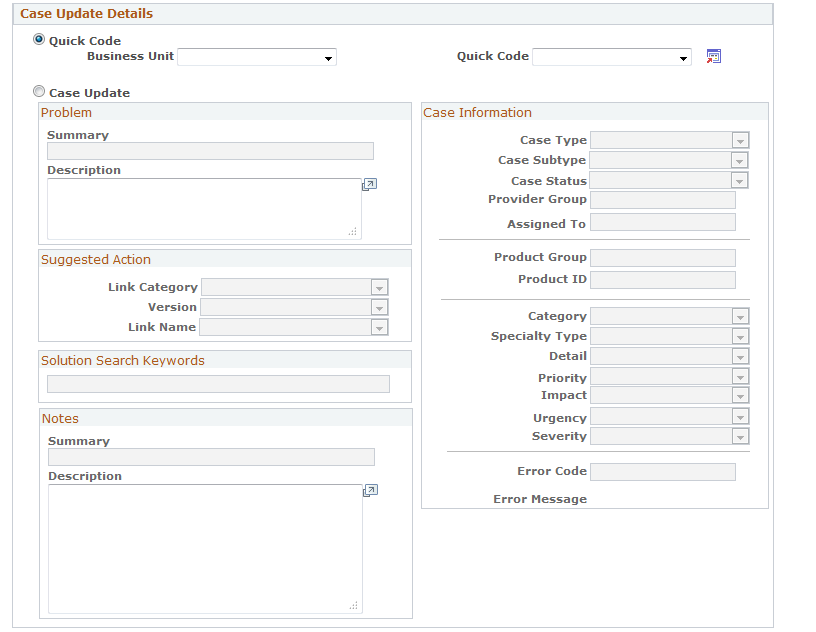
Image: Configure Case Update Action page (3 of 3)
This example illustrates the fields and controls on the Configure Case Update Action page (3 of 3).
Select the field values that you want the system to populate a case with when this action is invoked. You can configure the fields to update a case based on certain conditions. Many of these fields are a subset of the fields that are currently available on the Quick Code page.
Case Update Options
Using the options defined in this section, you can run the Case Update Action either synchronously or asynchronously.
|
Field or Control |
Definition |
|---|---|
| Update Options |
Select either Delay Update or Update Immediately. If you select Delay Update, the system displays the Delay Minutes, Repeat times, Specify Condition and Get Delay at Runtime fields. If you select Update Immediately the system hides these fields and the Case is updated when the action is triggered. |
| Delay Minutes, Specify Condition, and Get Delay at Runtime |
There are three options for specifying the delay minutes:
Note: The selected record field or term should be a numeric value that represents the amount of time in minutes that the attempted update of the Case will be delayed. Also, you can, select only one of the options for any given Case Update Action configuration. If the Delay Minutes field is blank and there is no term or record field specified, the system displays an error message indicating that one of these fields is required when the Update Options field is Delay Update. |
| Repeat Times |
Enter the number of times an attempt to update the case should occur. Only the first process for an update attempt is scheduled when the event is triggered. When the Delayed Case Update process runs, the system evaluates the delay condition. If the delay condition is true, the system updates the case and no further attempts to repeat the process occurs. If the delay condition is false and a value exists in this field, the number of times the process has been scheduled to attempt an update is compared to the number of requested repeat attempts. If the number of attempted case updates is less than the number specified in the Repeat Times field, then the system schedules a new Delayed Case Update process to run at a time determined by adding the current date and time to the delay minutes. For example, if the Delay Minutes field has a value of 240 minutes and the Repeat Times field has a value of 5 and the event is triggered at 8 am, the case update processes will run every 4 hours for 20 hours based upon the evaluation of the delay condition. Note: The system limits the number of Repeat Times to 10 so the load on the Process Scheduler does not lead to performance degradation. |
Case Update Details
You can use an existing quick code to populate the fields on the Case page. Select the Quick Code option and then a business unit. The system populates the Quick Code field with the values that are associated with the business unit.
You can also enter or select the values for each of the fields that you want the system to update the case with when the Case Update Action is invoked. Select the Case Update option and then enter or select values for each of the fields in the group box.
Note: You can use the Case Visibility Changed policy to update the Secured Case field when the Visibility field on the case is Internal, exclude Case Contact. When the case is made secured, agents who do not belong to the provider group cannot open the case. This prevents the agent from accidentally opening the grievance case from the 360 Degree View and discussing it with the employee in question.
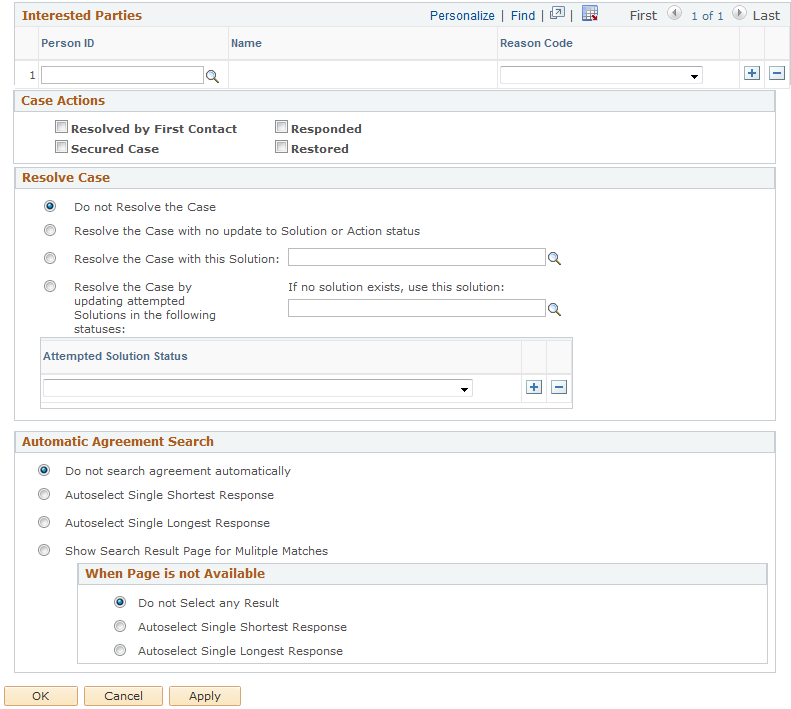
Interested Parties
Select the person ID of the interested party and the reason that they were selected. The system adds the person to the case when the Case Update Action is invoked.
Case Actions
|
Field or Control |
Definition |
|---|---|
| Resolved By First Contact |
Select to enable the Resolved by First Contact option on cases. |
| Secured Case |
Select to marks cases as secured cases. |
| Responded |
Select to set the Response Met DateTime on cases. The Response Indicator on cases is set to on time (Y) if the actual Response DateTime is less than the entitled Response DateTime. Service Level Agreement (SLA) exceptions are cancelled if the response occurs on time. |
| Restored |
Select to set the Restore Met DateTime on cases. The Restore Indicator on cases is set to on time (Y) if the actual Restore DateTime is less than the entitled Restore DateTime. SLA exceptions are cancelled if the restore occurs on time. |
Quick Code
Select a business unit and the quick code that you want the system to use when the Case Update action is invoked. The system copies the data present in the quick code instead of copying the data from this action.
Resolve Case
Select one of these options:
Do not Resolve the Case: The system will not take any action to update a solution to resolve the case.
Resolve the Case with no update to Solution or Action status: The system changes the case status to the value set for the resolved case status on the Business Unit - Case Defaults page.
Resolve the Case with this Solution: The system updates the Case Attempted Solutions field and changes the resolution status to Successful Resolution. If you select this radio button, you must also select a solution from the field to the right.
Resolve the Case by updating attempted Solutions in the following statuses: The system resolves the case when the case is in any one of the attempted solution statuses that you specify below this radio button. The system uses the solution that you select to the right of the radio button and sets it to Successful Resolution on the case. You must select at least one Attempted Solution Status.
Automatic Agreement Search
Select one of these options:
Do not search agreement automatically:
Select this option if you do not want the system to search for agreements automatically when the Case Update action is invoked.
Autoselect Single Shortest Response:
Select this option if you want the system to automatically search for agreements with the single shortest response time when the Case Update action is invoked.
Autoselect Single Longest Response:
Select this option if you want the system to automatically search for agreements with the single longest response time when the Case Update action is invoked.
Show Search Result Page for Multiple Matches:
Select this option if you want the system to display the agreement search page when there are multiple matches when the Case Update action is invoked. If you select this option, but the agreement search page is not available (for example, when the search is performed through a back-end process or Component Interface), select one of these options:
Do not Select any Result.
Autoselect Single Shortest Response.
Autoselect Single Longest Response.
Use the Configure Case Update Action (self-service) page (RC_CASE_SS_ACT_CFG) to define the configuration details for the self service case update action.
Navigation
Click the Configure button on the Build a Policy - Edit Actions page on a row with Case Self Service Update as the action type.
Image: Configure Case Update Action (self-service) page
This example illustrates the fields and controls on the Configure Case Update Action (self-service) page.
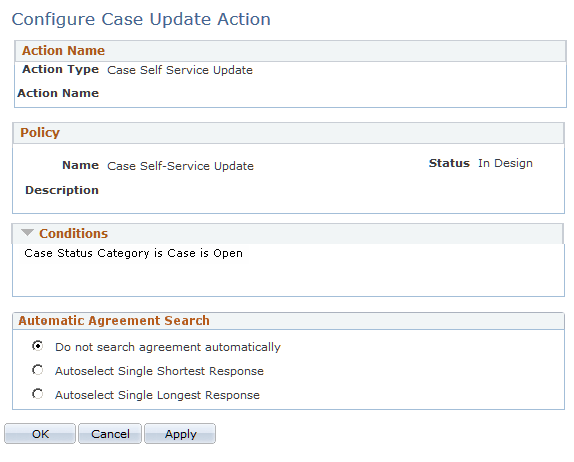
Automatic Agreement Search
Select one of these options:
Do not search agreement automatically:
Select this option if you do not want the system to search for agreements automatically when the Case Update action for self service cases is invoked.
Autoselect Single Shortest Response:
Select this option if you want the system to automatically search for agreements with the single shortest response time when the Case Update action for self service cases is invoked.
Autoselect Single Longest Response:
Select this option if you want the system to automatically search for agreements with the single longest response time when the Case Update action for self service cases is invoked.
Use the Configure Call Center Suggested Action page (RC_LINK_ACTION_CFG) to define the configuration details for the suggestion action in cases.
Navigation
Click the Configure button on the Build a Policy - Edit Actions page on a row with Case Suggest Action as the action type.
Image: Configure Call Center Suggested Action page
This example illustrates the fields and controls on the Configure Call Center Suggested Action page.
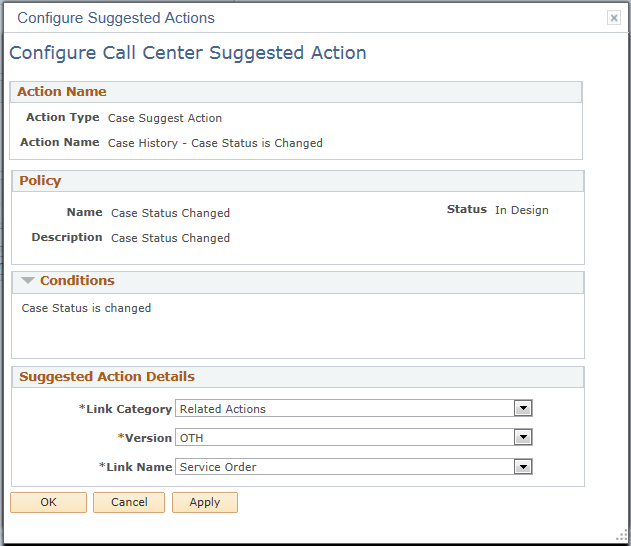
Suggested Action Details
|
Field or Control |
Definition |
|---|---|
| Link Category and Version |
Select a link category of the suggested action that you want to specify. Options include Benefits, Human Resources, Payroll, Related Actions, Stock, Training, and so on. Values in the Version field change based on the link category that you select. |
| Link Name |
Select a link definition that appears on the case record as suggested action. Values in this field change based on the link category that you select. |
Use the Configure Call Center Relationship Action page (RC_REL_ACTION_CFG) to define the configuration details for the case relationship action.
Navigation
Click the Configure button on the Build a Policy - Edit Actions page on a row with Case Relationship as the action type.
Image: Configure Call Center Relationship Action page
This example illustrates the fields and controls on the Configure Call Center Relationship Action page.
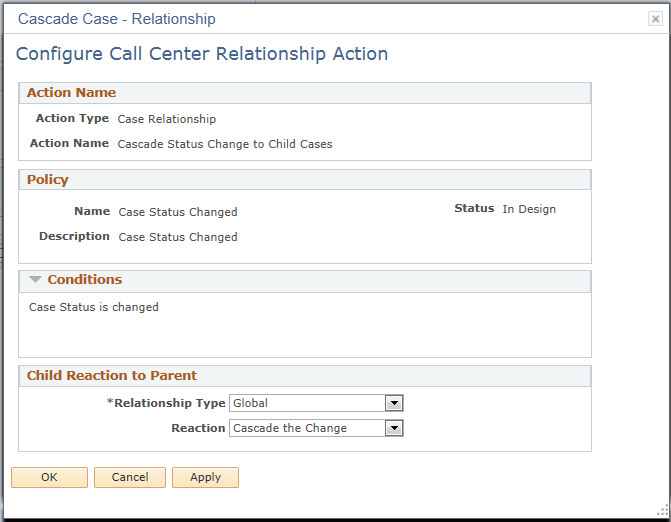
Child Reaction to Parent
|
Field or Control |
Definition |
|---|---|
| Relationship Type |
Select a relationship type, global, duplicate, or common. |
| Reaction |
Select Cascade to cascade data from a parent case to its child cases. Select No Change to deactivate the action. Case relationship actions are valid only for hierarchical case relationships. Data can cascade only from parent to child, not from child to parent and not from one case to an equivalent case. |
Use the Configure Call Center Entitlement Balance Action page (RC_ENT_ACTION_CFG) to define the configuration details for the entitlement balance action.
Navigation
Click the Configure button on the Build a Policy - Edit Actions page on a row with Case Entitlement Balance as the action type.
Image: Configure Call Center Entitlement Balance Action page
This example illustrates the fields and controls on the Configure Call Center Entitlement Balance Action page.
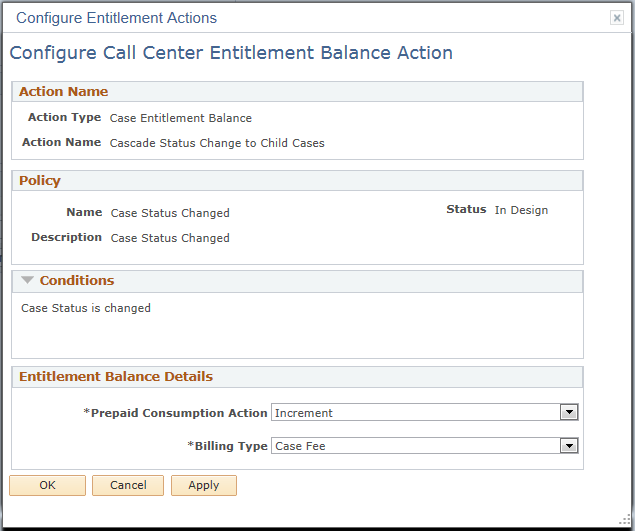
Entitlement Balance Details
|
Field or Control |
Definition |
|---|---|
| Prepaid Consumption Action |
Select Increment to add a unit to the prepaid support calls that are available to the customer. Select Decrement to subtract one from the balance. |
| Billing Type |
Select the billing type: Both by case and by time, Case fee, or Time. |
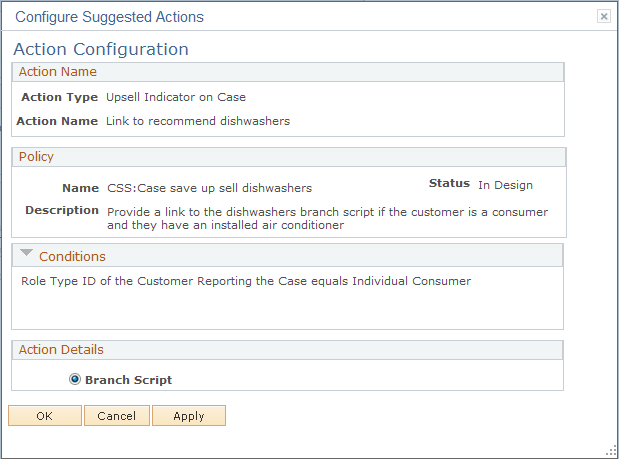
Use the Action Configuration page (RC_UPSELL_CFG) to specify the branch script to use for the case upsell action.
Navigation
Click the Configure button on the Build a Policy - Edit Actions page on a row with Upsell Indicator on Case as the action type.
Image: Action Configuration page
This example illustrates the fields and controls on the Action Configuration page.
|
Field or Control |
Definition |
|---|---|
| Action Detail |
Select a branch script to be used for the upsell activity. |
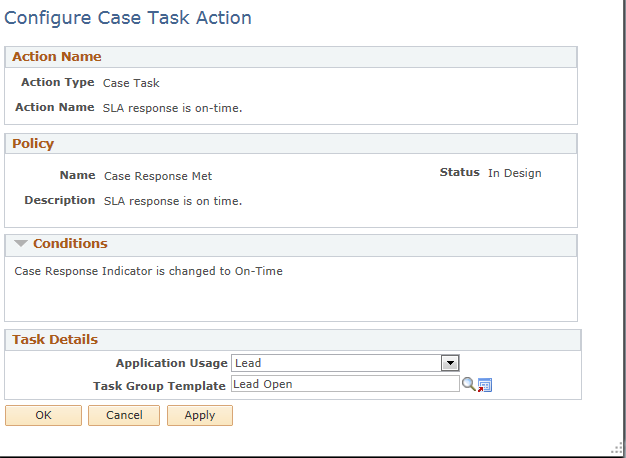
Use the Configure Case Task Action page (RC_TASK_ACT_CFG) to specify conditions to automatically create a task for the case based upon user defined conditions.
Navigation
Click the Configure button on the Build a Policy - Edit Actions page on a row with Case Task as the action type.
Image: Configure Case Task Action page
This example illustrates the fields and controls on the Configure Case Task Action page.
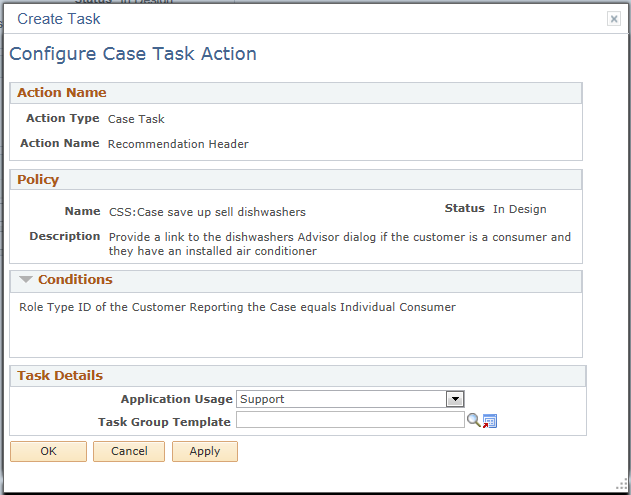
Select the application usage and Task Group Template that you want the system to use to create a task when this action is triggered.
This action is triggered only after an agent saves a Support case or after an agent saves a HelpDesk case. The new task is populated with the data from the Task Group Template.
In addition, if there is no owner specified on the Task Group Template, the user from the case that triggered the action will be the task owner. The system will default the agent from the case to the task invitee and assignee on the new task.
The system populates the task contact for the task using this criteria:
Company
The system defaults the customer contact from the case to the task contact.
Consumer or Employee
The system defaults the consumer or employee from the case to the task contact. If there is a contact on the case, the system will also default it to the task contact.
Use the Configure Case Survey Action page (RC_SURVEY_ACTN_CFG) to specify conditions to automatically initiate a dialog to conduct surveys after a case is saved.
Navigation
Click the Configure button on the Build a Policy - Edit Actions page on a row with Case Survey as the action type.
Image: Configure Case Survey Action page
This example illustrates the fields and controls on the Configure Case Survey page.
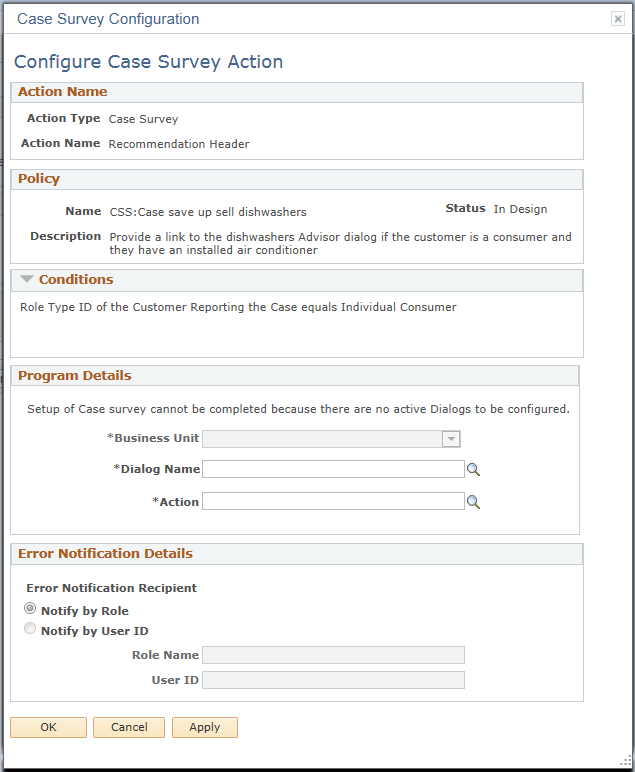
Program Details
|
Field or Control |
Definition |
|---|---|
| Dialog Name and Action |
Enter a dialog (available in the specified business unit) to be initiated (when the evaluation of corresponding policy is true) to conduct the survey. |
Error Notification Details
|
Field or Control |
Definition |
|---|---|
| Error Notification Recipient |
Select the recipient or the group of recipients (who share the same role) to receive notifications if the survey fails to initiate. |
| Role Name |
Enter a role name if you select Role in the Error Notification Recipient field. |
|
Field or Control |
Definition |
|---|---|
| User ID |
Enter the user ID of the recipient if you select User ID in the Error Notification Recipient field. |
Use the Configure Display Template Action page (RC_DISP_TMPL_CFG) to specify configuration details for the case display template action.
Navigation
Click the Configure button on the Build a Policy - Edit Actions page on a row with Case Display Template as the action type.
Image: Configure Display Template Action page
This example illustrates the fields and controls on the Configure Display Template Action page.
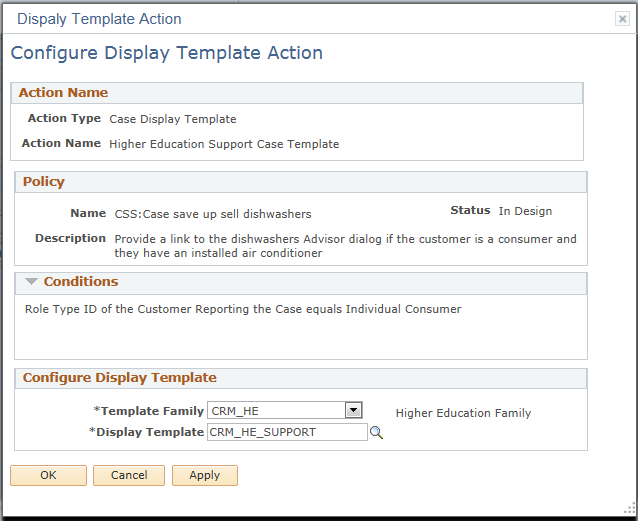
Configure Display Template
|
Field or Control |
Definition |
|---|---|
| Template Family |
Select a template family. Available values are based on licensed products that are found in the Installation record. |
| Display Template |
Select the display template to be used by the system to render the Case page. Available values are returned based on the component (derived from the context of the associated policy that uses this action) and the selected template family. |
Use the Configure Sales Task Action page (RSF_TASK_ACTION) to configure sales task actions.
Navigation
Click the Configure button on the Build a Policy - Edit Actions page on a row with Sales Task as the action type.
Image: Configure Sales Task Action page
This example illustrates the fields and controls on the Configure Sales Task Action page.
Task Details
|
Field or Control |
Definition |
|---|---|
| Application Usage |
Select a usage to refine the list of task group templates available for selection. |
| Task Group Template |
Select a task group template. At runtime, its associated tasks will be populated to the specified sales component (Lead or Opportunity) when the corresponding policy condition is met. |
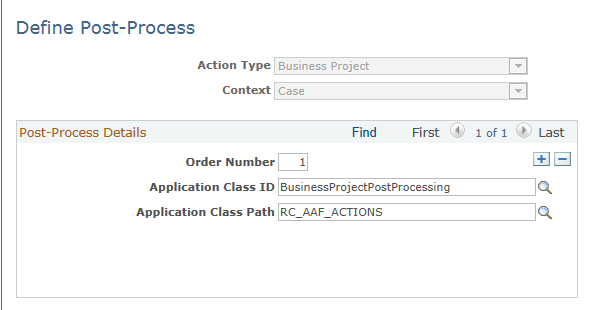
Use the Define Post-Process page (RB_AAF_POSTPRCS) to define post processes.
Navigation
Access the Define Post-Process page (Enterprise Components, Active Analytics Framework, Action Framework, Define Post-Processes, Define Post-Processes).
Image: Define Post-Process page
This example illustrates the fields and controls on the Define Post-Process page.
|
Field or Control |
Definition |
|---|---|
| Action Type |
Select the action type with which the post process associates. |
| Context |
Select the context with which the post process associates. |
| Application Class ID and Application Class Path |
Enter the method and the path of the application class built to execute the post process. |
Use the Create Case Configuration page (HD_ACTCFG_CASE) to define configuration details for the case creation action.
Navigation
Click the Configure button on the Build a Policy - Edit Actions page on a row with HHD – Create Cases as the action type.
Image: Create Case Configuration Page
This example illustrates the fields and controls on the Create Case Configuration Page.
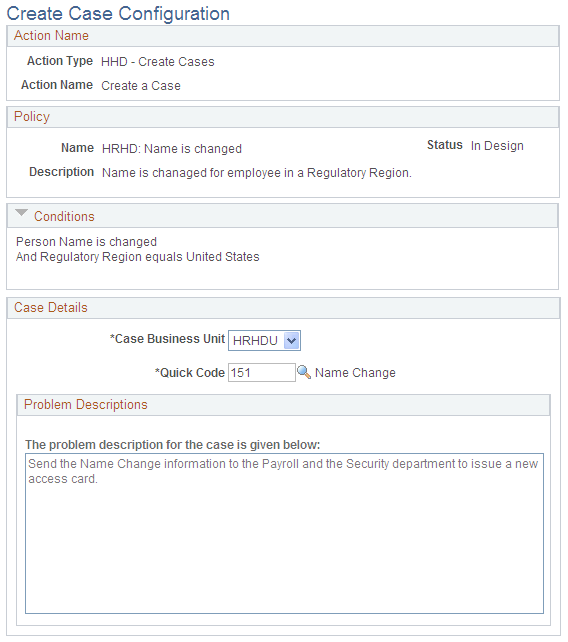
The Action Name, Policies and Conditions sections captures the summary of the policy for which you are configuring the case creation action. See for more information.
Case Details
|
Field or Control |
Definition |
|---|---|
| Case Business Unit |
Select the business unit for which you want to automatically create HR HelpDesk cases. Only those business units that are synchronized from CRM to HCM along with the quick codes are available for selection. |
| Quick Code |
Select the quick code you want to use for populating default values in cases that are created using the automatic case creation feature. Quick codes are effective dated and only the active ones at the time of setup are available for selection. |
| Problem Description |
Enter the text to be populated in cases in this field. By default, the field displays the problem description text from the definition of the selected quick code. The problem description remains read-only if the Overwrite option for the Description field was enabled in CRM while synchronizing the quick code. If the Overwrite option is disabled, enter text in this field. It will be used as the default problem description in cases that are created as a result of the execution of this AAF policy. |