Working with PeopleSoft CRM Worklists
This section discusses how to work with the PeopleSoft CRM worklist.
Note: The Worklist link in the PeopleSoft portal header region accesses the PeopleTools worklist, not the PeopleSoft CRM worklist. Although both worklist pages display data from the same records, the PeopleSoft CRM worklist displays more information about each entry and is therefore preferred. To avoid user confusion between the two worklists, you can set up security so that users do not have permissions for the WORKLIST component (the PeopleTools worklist). This prevents the Worklist link from appearing in the Portal header.
|
Page Name |
Definition Name |
Usage |
|---|---|---|
|
RB_WF_WORKLISTS |
Work with the PeopleSoft CRM worklist. You can also manage work notifications that are sent to you, to other workers that you supervise, or to groups that you belong to. |
|
|
RB_WL_USR_PREF_SEC |
Set worklist options and preferences. For example, you can set the default folder and the default transaction type for the My Worklist page. You can also delegate your worklist entries to another worker for a specified range of dates (for example, to cover your worklist while you are on vacation). |
|
|
RB_WL_COMMENTS_SEC |
Create, edit, and review comments that are associated with individual worklist entries. |
Use the My Worklist page (RB_WF_WORKLISTS) to work with the PeopleSoft CRM worklist.
You can also manage work notifications that are sent to you, to other workers that you supervise, or to groups that you belong to.
Navigation
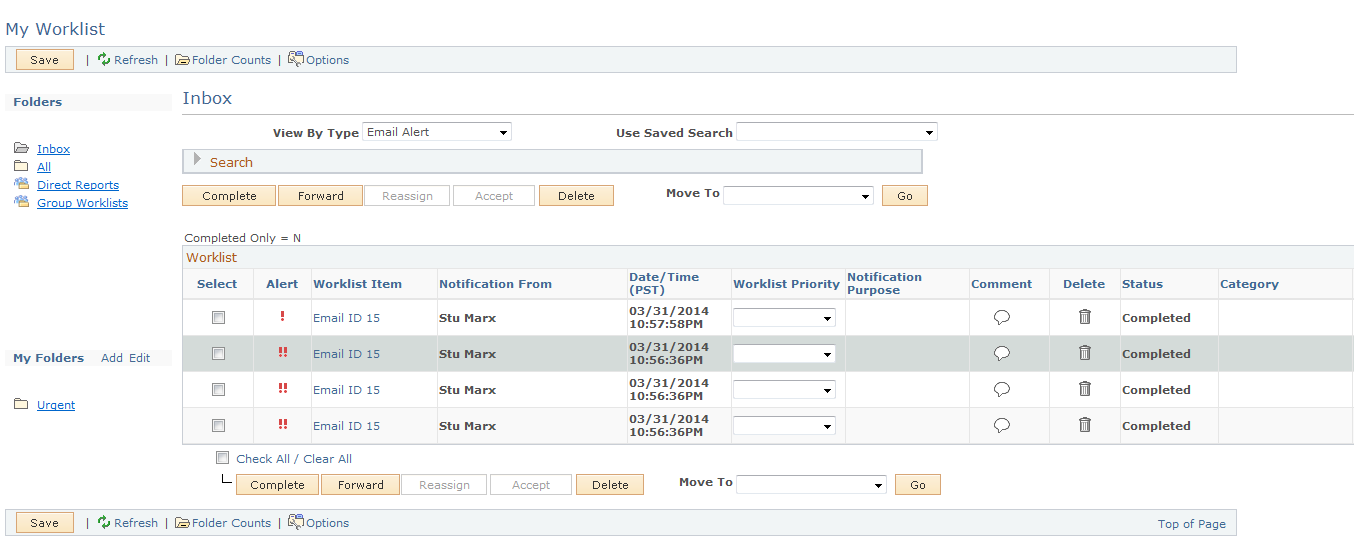
Image: My Worklist page [all transaction types] (1 of 2)
This is the first of two examples illustrating the fields and controls on the My Worklist page. In this example, all transaction types are shown.
![My Worklist page [all transaction types] (1 of 2)](img/i-42c12a96n-7741.png)
Image: My Worklist page, filtered to show only leads
This example illustrates the fields and controls on the My Worklist page, filtered to show only leads.
Toolbar
|
Field or Control |
Definition |
|---|---|
 Refresh Refresh |
Click to refresh the page to newly arrived worklist entries and other changes to your worklist contents. When viewing entries on group worklists, you must refresh to see changes that are caused by other group members. Other page actions, such as changing the View By field, also refresh the page; use the Refresh toolbar button to refresh without making other changes to how you are viewing the worklist. |
 Folder Counts Folder Counts |
Click to show the number of items in each folder. The folder count appears as a number in parentheses after the folder name. Dynamically updating folder counts can cause significant performance degradation. Therefore, folder counts disappear when the worklist is next refreshed. |
 Options Options |
Click to access the User Preferences page, where you can choose the default folder and transaction type for the worklist, or delegate a worklist. |
Formatting Conventions for Folders
Folder names have these formatting conventions:
Orange highlight indicates the currently selected folder.
A number in parentheses after the folder name indicates the total number of worklist items in the folder.
If you move the cursor over the folder name, pop-up text lists the number of unread entries in addition to the total number of entries.
Folders
|
Field or Control |
Definition |
|---|---|
| Inbox |
Click to display personal worklist entries that have not been moved to other folders. You can move worklist entries into folders from the Inbox view . You can also move worklist items from any previously created personal folder back to the Inbox or to another personal folder. |
| All |
Click to display all your personal worklist entries. The All folder only shows personal worklist items. |
| Direct Reports |
Click to display only the personal worklist entries of your direct reports (as defined on the worker record). This folder appears only if the current user has direct reports. When you use the direct reports view of your worklist, the Direct Reports drop-down list box appears so that you can further filter the worklist to display only entries for a specific person whom you supervise, or for all direct reports at once. |
| Group Worklists |
Click to display only worklist entries that are in group worklists to which you belong. This folder appears only if the current user belongs to at least one group worklist. When you use the group worklists view of your worklist, the Group Worklist drop-down list box appears so that you can further filter the worklist to display only entries for a specific group worklist to which you belong, or for all group worklists at once. |
| Delegated |
Click to display only worklist entries that have been delegated to you. This folder appears only if the current user has worklist items delegated to them from other users. When you use the delegated view of your worklist, the Owner drop-down list box appears so that you can further filter the worklist to display only entries for a specific person whose worklist has been delegated to you. |
My Folders
|
Field or Control |
Definition |
|---|---|
| Add |
Click to access the Worklist - Add Folders page, where you can name and create a new personal folder. |
| Edit |
Click to access the Worklist - Manage Folders page, where you can rename or delete a personal folder. |
| <Folder Name> |
Click to view the contents of a personal folder. |
Worklist Filtering
|
Field or Control |
Definition |
|---|---|
| View by Type |
Select a value to filter worklist entries according to their type. Values vary based on the current content of the folder that is being viewed. The system displays only those values for which worklist entries exist in the drop-down list box. The system displays values that are based on the type of folder. If a user selects the Personal, Inbox or All folder, the system displays in the All folder a combination of all types that exist in all personal folders. The system does not filter the transaction types down to the specific personal folder. If a user selects the Group Worklist, the system displays only those types of values that are associated with all group worklists to which the user is assigned. Similarly, when a user selects Direct Reports, the system displays all types for all of the user's direct reports. Select All to display all entries that are in the worklist, regardless of type. Select Notify to display all manual notifications, regardless of the originating component. Other values represent various PeopleSoft CRM transactions. See Transaction Types. |
| Search and Use Saved Search |
Expand the Search section to display search fields for further filtering worklist entries. The search fields vary depending on the value in the View by Type field. For example, if only support case entries are shown, the search includes case-specific fields such as Case Status and Case Type. Fields that pertain to the worklist entry itself (and not the underlying transaction) appear regardless of the transaction type that you are viewing. The search section on the My Worklist page is an implementation of the configurable search tool and includes the personalization options and the saved search features of that tool. Select saved searches from the Use Saved Search drop-down list box to perform the search without expanding the Search section. |
Fields for All Transaction Types
In general, these fields appear in the Worklist grid when the View by Type field is All and in the Search section regardless of the value in the View by Type field.
|
Field or Control |
Definition |
|---|---|
| Type |
The transaction type of the worklist entry. To filter by a single transaction type, using the View by Type drop-down list box is usually more efficient than using the Type field in the Search section. Use the search capabilities to filter by multiple transaction types using the in and not = operators. Note: The Type search field is only applicable when View By Type is equal to All. |
| Notification From |
The person who sent a manual notification, or the person who performed an action that triggered an automated notification. For manual notifications, displays the name of the person who sends the notification. For automatic notifications, the sender is the person who performs the action that triggers the notification. For example, if notifications are automatically sent when a service order is assigned, the person who reassigned the order is considered to have sent the notification. Notifications that are triggered by an Application Engine process are considered to be from the user ID under which the process runs. For example, an entry on the ERMS worklist is considered to be sent by the person who initiates the Unstructured Email process (the process that creates the worklist entry). |
| Date/Time |
The date and time that the entry arrived at the worklist. |
| Worklist Priority |
The priority of the entry itself, as opposed to the priority of the underlying transaction. Some worklist entries arrive without any priority. Others have the priority set by the AAF policy that triggers the workflow. Also, users can manually change the value of this field on the My Worklist page. This is the only action on the My Worklist page that requires a manual save. |
| Notification Purpose |
For manual notifications, the sender can optionally select a notification purpose. For automated notifications, the purpose is optionally set by the AAF policy that triggers the notification. Possible values include Approval Required, Assignment, Escalation, FYI , Follow-Up Requested, Hold Notification, SLA Exception, SLA Warning, Status Change, Task Assignment, and Update Notification. Not all values are relevant to all transaction types; the person or system that sends the notification selects from a relevant subset of possible values. This field appears only when the View by Type field is something other than All. |
|
Field or Control |
Definition |
|---|---|
| Completed Only |
This field appears only in the Search section, not in the Worklist grid. Use it to filter worklist entries according to whether they are marked completed. Select Yes to search for completed worklist entries. Select No to search for entries that are not complete. You cannot see both complete and incomplete entries simultaneously. |
Additional Elements in the Worklist Entry Grid
These fields appear only in the worklist grid, not as search fields.
|
Field or Control |
Definition |
|---|---|
| Select |
Select to identify entries that are to be included when you perform worklist actions such as forwarding, reassigning, or marking entries completed. Use the Check All and Clear All links to facilitate the selection process. |
   Alerts Alerts |
The Alerts column in the Worklist grid displays an optional icon that indicates the nature of the worklist entry:
|
| Worklist Item |
Click a link in this column to display the underlying application page that is related to the entry. The text of the link identifies the underlying transaction. Note: For the Case component: when the recipient opens the link contained within the worklist entry, the corresponding case page will be displayed, although the left hand navigation will remain collapsed. For manual notifications, clicking the link accesses the Notification page that, in turn, includes a link to the transaction where the notification originated. For automatic notifications, clicking the link takes you directly to the object from which the notification is sent. Note: You cannot drill down on completed items or on secured cases for which the user is not part of the provider group assigned to the underlying case. In these situations, the system disables the link. |
| Owner |
The name specified here indicates the owner of the worklist item. This field only appears when viewing the Direct Reports or Delegated worklist folders. |
Worklist Actions
|
Field or Control |
Definition |
|---|---|
| Complete |
Click to mark the selected entries as complete. For external business process worklist entries, the entry may require additional response data in order to be marked as complete. To provide required response data, you must access the corresponding outcome response page. Normally, completed entries do not appear in the Worklist grid. To view completed entries, expand the Search section, enter Yes in the Completed Only search field, and perform the search. Marking a worklist entry as complete does not change the status of the underlying transaction. Because email entries are tightly linked to the underlying email, those entries cannot be removed from the worklist unless the status of the underlying email is closed. |
| Forward |
Click to send the selected entries to one or more individuals or groups that you select on the Forward Worklist Item page. When you forward worklist entries, you indicate whether the entry should be deleted from your own worklist, marked as complete on your worklist, or left in its current state on your worklist. You can also set the priority and the notification purpose for the forwarded entry. You cannot, however, forward email and external business process worklist entries. |
| Reassign |
Click to reassign selected entries and their underlying transactions. This button is available only to reassign cases, service orders, and emails, and therefore is available only if the worklist is filtered to show only a reassignable transaction type. You complete the reassignment process on a reassignment page that is specific to the type of transaction that you are reassigning. Important! Reassigning modifies the underlying transaction. Use the Forward button to send someone a worklist entry without reassigning the underlying transaction. |
| Accept |
Click to assign selected ERMS worklist entries to yourself. Only email that is currently unassigned can be accepted, so this button affects only entries that are currently part of a group worklist, not an individual worklist. This button appears only when the worklist is filtered to show only email entries. When an email worklist entry is accepted, both the worklist entry and the underlying email are updated to reflect the assignment. The underlying email retains a record of the group worklist from which the email is accepted. |
| Delete |
Click to delete the selected worklist entries. Unlike entries that are marked complete, deleted entries are permanently removed from the system. You cannot delete email and external business process worklist entries, however. |
| Move To and Go |
Select a folder to which the selected worklist entries will be moved. Click the Go button to perform the move. Users can move entries only among personal folders (including the Inbox). The currently displayed folder is not listed in the drop-down list box. To create a new folder, select [New Folder] and click the Go button. The Add Folders page appears so that you can enter a folder name. When you complete the Add Folder page, the system moves the selected worklist entries to the newly created folder. The Move To field is not available when viewing entries from the Direct Reports or Delegated worklist folders. |
See PeopleTools: Workflow Technology
Use the User Preferences page for the CRM Worklist (RB_WL_USR_PREF_SEC) to set worklist options and preferences.
For example, you can set the default folder and the default transaction type for the My Worklist page. You can also delegate your worklist entries to another worker for a specified range of dates (for example, to cover your worklist while you are on vacation).
Navigation
Click the Options toolbar button on the My Worklist page.
Image: User Preferences page for the CRM Worklist
This example illustrates the fields and controls on the User Preferences page for the CRM Worklist.
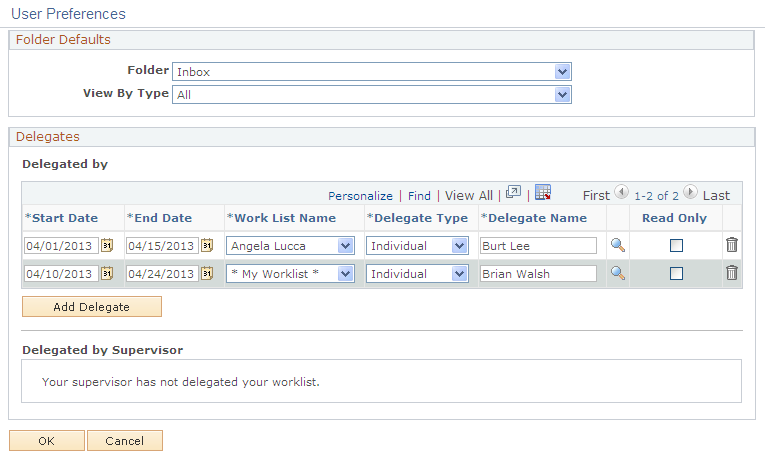
Folder Defaults
|
Field or Control |
Definition |
|---|---|
| Folder |
Select the folder that you want to see when you first access your worklist. The system displays only folders that are applicable to the user. That is, if the user is not assigned to any group worklist, then the system does not display the group worklist as an option |
| View By Type |
Select the type of transaction that you want to see when you first access your worklist. |
Delegates
Use the Delegated By [Name] grid to delegate your worklist entries to another worker or to a group worklist for a specified period of time. Supervisors may also delegate the worklist entries of their direct reports.
|
Field or Control |
Definition |
|---|---|
| Start Date |
Specify the start date for delegation of the worklist items. |
| End Date |
Specify the end date for delegation of the worklist items. |
| Worklist Name |
Indicate the worklist whose items you wish to delegate. Note: This field only appears for supervisors, and enables them to define delegation of their own worklist, the worklist of one of their direct reports, or the worklists of all of their direct reports. |
| Delegate Type |
Indicate if you are delegating worklist items to a group worklist or to an individual. |
| Delegate Name |
Specify the name of the group worklist or of the individual to whom you wish to delegate the worklist items. |
| Read Only |
Select this option to allow the delegated group worklist or individual read-only access to the worklist items. |
Use the Delegated By Supervisor grid to view any delegation(s) of your worklist that have been made for you by your supervisor. Workers cannot change these entries: they may only view them.
Use the Comments page (RB_WL_COMMENTS_SEC) to create, edit, and review comments that are associated with individual worklist entries.
Navigation
Click the Comment icon on the My Worklist page. Each worklist entry has its own worklist icon.
Image: Comments page for a Worklist Entry
This example illustrates the fields and controls on the Comments page for a Worklist entry.
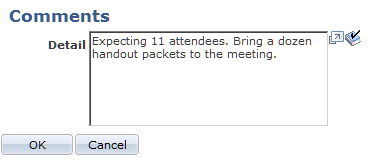
Note: You do not need to access this page to view comments. Instead, you can place the cursor over the Comments icon on the My Worklist page. The full comment text appears as popup text.