Setting Up the 360-Degree View Tree
To set up the 360-Degree View Tree, use the Define Node (RB_TD_NODE), Set Up Tree (RB_TD_TREE_DEFN), and Define Dynamic Grid (RB_TD_DYNGRD) components.
This topic lists prerequisites and discusses how to set up the 360–degree view tree.
|
Page Name |
Definition Name |
Usage |
|---|---|---|
|
RB_TD_NODE |
Define nodes that you can use to configure the 360-Degree View Tree. |
|
|
RB_TD_NDE_RELTOTRE |
View and access tree names that are related to the 360-Degree View node. |
|
|
Dynamic Grid Page |
RB_TD_DYNGRD_PG |
Define search criteria to associate to a node and component transfers for the grid. |
|
RB_APPLPKG_PG1 |
Search for and view the available application packages or classes that PeopleSoft CRM provides. |
|
|
RB_TD_TREE_DEFN |
Define the tree configuration (images that appear in the tree, image size, page size, and date filter). |
|
|
RD_TD_TREE_NDE |
Define the parent and child relationship of the tree nodes. |
|
|
RB_TD_TREE_TEST |
Test the 360-Degree View tree to ensure that you configured it correctly. |
|
|
Copy Tree As Page |
RB_TD_TREE_CLONE |
Copy an existing tree. |
Use the Define Node page (RB_TD_NODE) to define nodes that you can use to configure the 360-Degree View Tree.
Navigation
Image: Define Node page (1 of 3)
This example illustrates the fields and controls on the Define Node page (1 of 3).
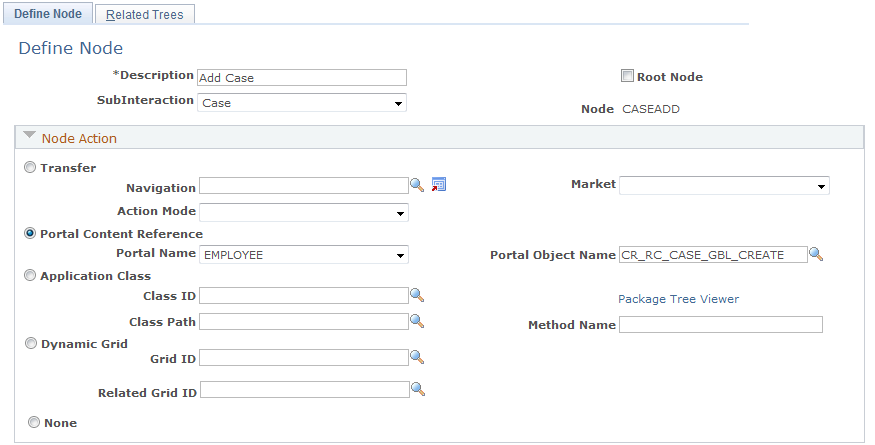
Image: Define Node page (2 of 3)
This example illustrates the fields and controls on the Define Node page (2 of 3).
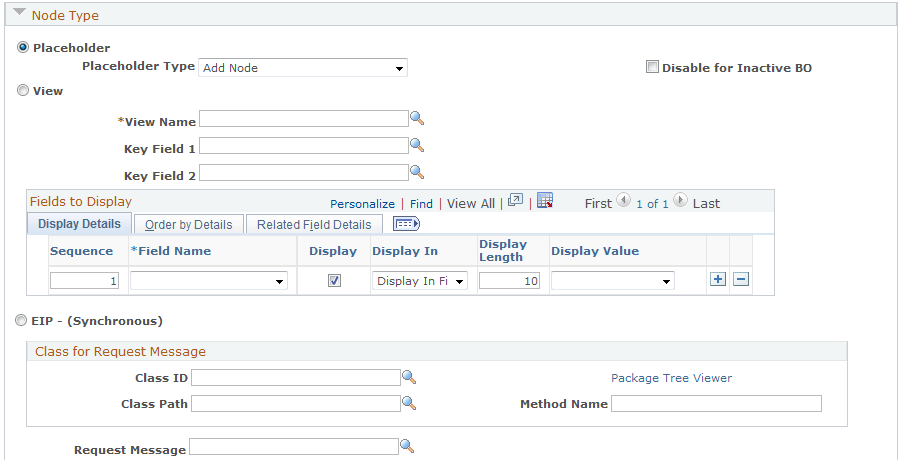
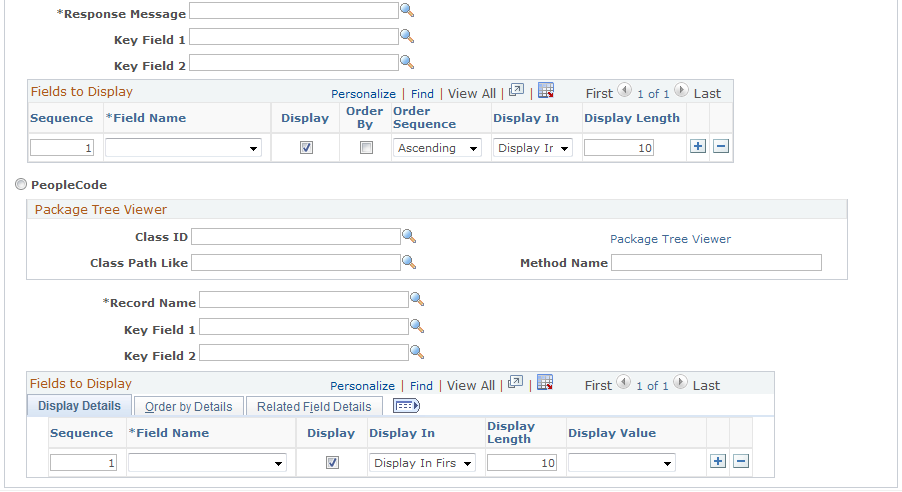
Image: Define Node page (3 of 3)
This example illustrates the fields and controls on the Define Node page (3 of 3).
|
Field or Control |
Definition |
|---|---|
| SubInteraction |
Select a subinteraction that corresponds to the transaction that is associated with the tree node. |
| Root Node |
Select if the node that you are defining is the root node. |
Node Action
For each tree node, specify the node action. Node actions are:
|
Field or Control |
Definition |
|---|---|
| Transfer |
Transfers the user to a PeopleSoft CRM component and page that you define. If you select Transfer, use the Navigation, Market, and Action Mode fields to select where you want the transaction to transfer. Define the transfer fields using the Component Navigation component. |
| Market |
Specify the name of the market with which the component is associated. A component is uniquely identified by its name and its market association. You can add records for each market, thus adding context to the node information. |
| Action Mode |
Select the mode in which to open this page for the transaction. Values are Add, Correction, Update, and Update/Display All. |
| Portal Content Reference |
Select to transfer to a PeopleSoft CRM portal page that you define. If you select Portal Content Reference, use the Portal Name and Portal Object Name fields to select the portal page to which you want to transfer. |
| Application Class |
Select to call a PeopleSoft CRM application class. If you select Application Class, use the Class ID, Class Path, and Method Name fields to enter the application class that you want the system to call. |
| Package Tree Viewer |
Click to search for and view the available application packages that PeopleSoft CRM provides. When you click this link, the Application Packages Lookup page appears. The information that you select on this page appears on the Define Node page after you click OK. |
| Dynamic Grid |
Click to associate a dynamic grid to the node. |
| Grid ID and Related Grid ID |
Defines the name of the primary grid and its related secondary grid. Prompts display the available Dynamic grids. If you have specified a Related Grid, you must select values in the fields under the No Context Selected Message, No Related Rows Found Message, and Search Fields for Related Grid sections. |
| No Context Selected Message |
Select a message to display in the secondary grid when no rows are selected from the Dynamic grid. |
| No Related Rows Found Message |
Select a message to display in the secondary grid when no rows are found for the selected row in the Dynamic grid. Select a message from the Message Catalog. |
| Search Fields for Related Grid |
Click the Add Search Field button to create a grid list of the search fields that are common to the primary and secondary grids that must be used to retrieve data in secondary grid. You must specify these fields if you have a related grid. |
| None |
Indicates that no action is associated with the node. |
Node Type
The fields in this section enable you to define the node type.
|
Field or Control |
Definition |
|---|---|
| Placeholder and Placeholder Type |
Select to indicate that this node is represented as a placeholder on the 360-Degree View tree. Specify the placeholder type. Values are:
|
| Disable for Inactive BO (disable for inactive business object) |
Select to prevent the action from being performed on business objects that are inactive. |
| View |
Select to define the information that appears in this node, then provide values for the following fields. |
| View Name |
Enter the view name that is associated with this node. |
| Key Field 1 and Key Field 2 |
Enter key fields for the view. Note: These fields must appear as the first part of the key structure: RB_TD_360_SBR. Additionally, the view should include the RB_TD_360P_SBR and RB_AUDIT_SBR subrecords in any order. |
| Fields to Display |
Indicate the fields that appear and the order in which the fields appear. When appearing under the node of the 360-Degree View tree, view information is divided into two sections. The first section can contain 20 characters, and the second can contain 30 characters. Specify which fields you want to appear in which sections, and in what order. Also, you can specify how the information is sorted. The two sections are separated by a hyphen. If two or more fields appear in one section, those field values are separated by a colon. For example, under an Orders node, you might see this information coming from a view: 2002-09-20 - Pending:d0e5061fcc. In this case, the capture date is defined for the first section, and the status code and capture ID is defined for the second section. |
| Sequence |
Enter a number in sequence. This number defines the order in which the fields appear in the different sections for the node. |
| Display |
Select to have this field appear for the node on the customer 360-Degree View tree. |
| Display In |
Select the section in which to display this field. Values are First, Second, and No Display. |
| Display Length |
Enter the length of the field. |
| Display Value |
Select the value that appears for this field. Values are: Long Translate, Related Display, Short Translate, and Value. If you select Related Display, use the Use SetID, Record Name, and Column Name fields on the Related Field Details tab to select the related field details. One of the fields of the record entered should include the selected field in the node view. If the value selected is based on setID, the node view should have a key field 2 of SETID or BUSINESS_UNIT. |
| Order By Details |
Select for the fields by which you want to sort the information. Then use the Order Sequence field to select how you want to sort the information. Values are Ascending and Descending. |
| EIP - (Synchronous) |
Select to indicate that the information that appears in this node is gathered from a PeopleSoft EIP. If you select this option, you must specify the EIP information and define how the information is to appear on the 360-Degree View tree. |
| Class ID, Class Path, and Method Name |
Enter the application class information for this EIP. The method that your assign here is used to create the request message and populate the node with the requested information. |
| Request Message |
Enter the application request message for this EIP. |
| Response Message, Key Field 1, and Key Field 2 |
Enter the response application message for the EIP and its keys. |
| PeopleCode |
Select to indicate that the information that appears in this node is gathered from executing PeopleCode If you select this option, you must specify the application class ID and method name. |
| Class ID, Class Path Like, and Method Name |
Enter the application class information for the PeopleCode class. |
| Record Name |
Enter the record name that contains the data. |
| Key Field 1 and Key Field 2 |
Enter the key fields for the record name. |
| Fields to Display |
The group boxes for EIPs and PeopleCode is the same as the Fields to Display group box for Views. Use these fields to control how the information appears under the node of the 360-Degree View tree that is associated with an EIP. |
Use the Related Trees page (RB_TD_NDE_RELTOTRE) to view and access tree names that are related to the 360-Degree View node.
Navigation
Image: Related Trees page
This example illustrates the fields and controls on the Related Trees page.
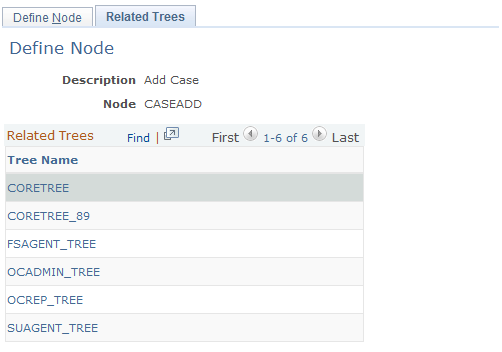
Use this page to view and access the trees that are related to the node being set up for the 360-Degree View. Click the link under the Tree Name field to access the Set Up Tree page.
Use the Set Up Tree page (RB_TD_TREE_DEFN) to define the tree configuration (images that appear in the tree, image size, page size, and date filter).
Navigation
Image: Set Up Tree page
This example illustrates the fields and controls on the Set Up Tree page.

|
Field or Control |
Definition |
|---|---|
| Market |
Select the market with which to associate the tree. |
| Default Tree |
Select to make this tree the default tree for the market selected above on the 360-Degree View. Select this check box to make this tree the default tree for the market selected above. This tree will then appear on the 360-Degree Views that are associated with this market. If you do not make this tree the default, the user might not be able to see any tree in the Activities section. |
Tree Configuration
|
Field or Control |
Definition |
|---|---|
| Expanded Image, Leaf Image Name, End Node Image, and Collapsed Image |
Enter the images that appear on the tree. The image appears in the Image Preview half of the group box. Default leaf image of the node is blank. |
| Image Height and Image Width |
Enter the size of the image that appears on the tree. The default size is 16 by 16. |
| Display Levels |
Enter the number of levels up to which the 360-Degree View tree is configurable. |
| Page Size |
Enter the page size for the 360-Degree View tree. This is the size of the HTML area where the 360-Degree View tree appears on the 360-Degree View. |
| Date Filter |
Select the filter for the tree. Values are:
Note: All date filters include the values for today. For example, select 2 - Yesterday to show information that is related to today and yesterday. |
| Max. Date Filter (maximum date filter) |
Select the maximum date filter, which is used as a restriction against the date field that the user actually enters. The system always looks at this filter when determining the information that appears on the 360-Degree View tree, regardless of what the user specifies in their date personalization settings. If this filter is not set, and if you select View All in the date personalization on the 360-Degree View, and if you select Enable Filtering on Date Range, then the system populates the start date with 01/01/1900 on the 360-Degree View. |
| Filter Dates By |
Select either Creation Date to filter dates by the entity's creation date or Last Modified Date to filter dates by the entity's last modification date. |
| Callback Interaction |
Select how the system should set the status of an interaction when a user clicks the Finish Interaction button. Values are Set Status to Complete and Do not Set Status to Complete |
| Footnote Icon |
Select an alternate symbol to indicate a footnote in the 360-Degree View. The system defaults this field to the dagger symbol. As an alternative symbol, you can select two asterisks (**). The footnote itself appears next to a node and indicates that the date filter is not applied to the node data. |
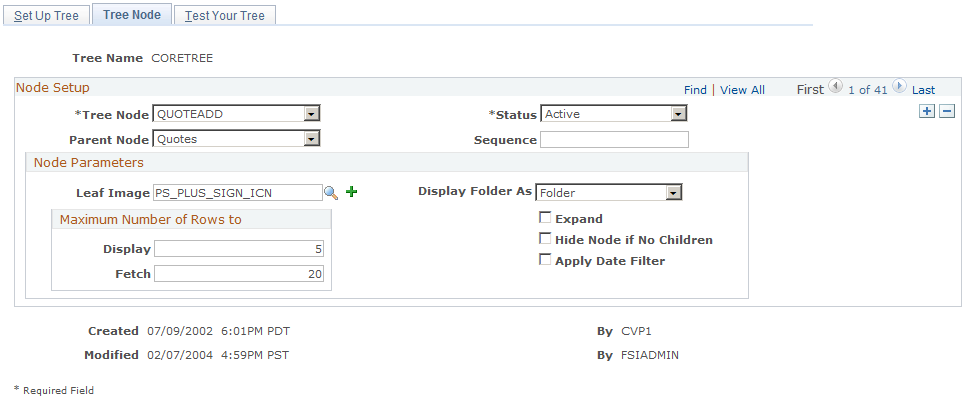
Use the Tree Node page (RD_TD_TREE_NDE) to define the parent and child relationship of the tree nodes.
Navigation
Image: Tree Node page
This example illustrates the fields and controls on the Tree Node page.
|
Field or Control |
Definition |
|---|---|
| Tree Node |
Select the child node for the 360-Degree View tree. |
| Parent Node |
Select the parent node under which this child node appears in the 360-Degree View tree. |
| Status |
Select the tree node's status, either Active or Inactive. Only active nodes appear on the tree. |
| Sequence |
Enter the order in which the child nodes appear on the tree. The sequencing is from low to high. |
Node Parameters
|
Field or Control |
Definition |
|---|---|
| Leaf Image |
Select the image for the leaf. The image appears next to the field. If you leave this field blank, the system uses the default tree leaf image. |
| Display and Fetch |
Enter the maximum number of rows that initially appear under the expanded node in the 360-Degree View Tree located in the Activities section of the page. Then enter the maximum number of rows to fetch, or retrieve, from the database and to display under the node when the user clicks View All on that tree node. The Display option is only valid for the View and EIP node types. If the field is blank for either of these node types, the system uses a default value of 5. Values in this field are ignored for other node types. The Fetch option is only valid for the View and Peoplecode node types. If the field is blank for either of these node types, the system uses a default value of 1000. Values in this field are ignored for other node types. Note: The Display and Fetch options do not apply to the Dynamic Grid node action, and they do not influence or control the number of rows generated in the dynamic grid. |
| Display Folder as |
Select whether you want the node to appear as a folder or a leaf. |
| Expand |
Select to expand the nodes on the tree when the tree initially appears on the 360-Degree View. |
| Hide Node if No Children |
Select to hide the node if there are no values. For example, if the customer has no cases, the Case node does not appear on the tree. |
| Apply Date Filter |
Select to apply a date range to the activities for the given node. This is selected by default. If cleared, the date range criteria does not apply to that node. |
Use the Test Your Tree page (RB_TD_TREE_TEST) to test the 360-Degree View tree to ensure that you configured it correctly.
Navigation
Image: Test Your Tree page
This example illustrates the fields and controls on the Test Your Tree page.
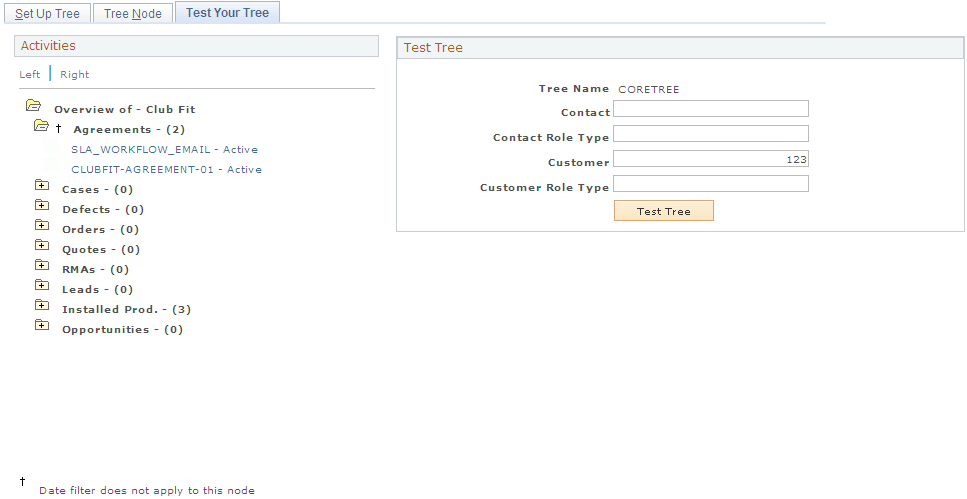
To test a tree:
Enter data into one or more of the fields in the Test Tree page region.
Click the Test Tree button.
The system verifies the tree configuration and a preview of the tree appears in the Activities group box.
Use the Application Packages Lookup page (RB_APPLPKG_PG1) to search for and view the available application packages or classes that PeopleSoft CRM provides.
Navigation
Click the Package Tree Viewer link on the Define Node page.
Image: Application Packages Lookup page
This example illustrates the fields and controls on the Application Packages Lookup page.
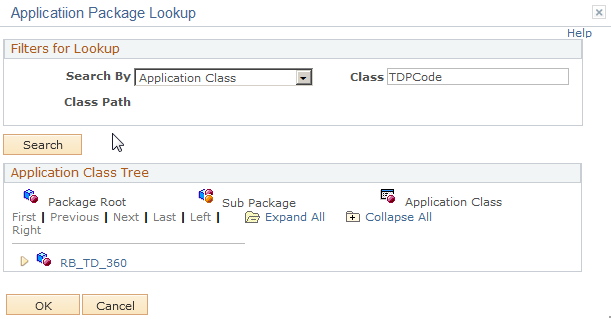
Click any tree node to select the application class, then click OK. The system returns the information to the page from which you transferred.
Filters For Lookup
Select either Class or Class Path in the Search By field and enter either an application class ID or application class path.
Application Class Tree
The tree for the application class appears in this portion of the page.