Setting Up Freight Integration
To define carriers, use the Carriers (CARRIER) component.
|
Page Name |
Definition Name |
Usage |
|---|---|---|
|
CARRIER |
Define carriers for integration with Order Capture. |
After you correctly install your third-party freight (carrier) application, perform these steps from within the PeopleSoft CRM application to set up freight integration:
Follow the instructions that are provided in the PeopleSoft CRM Installation Guide to properly configure your system.
Set up the freight calculation integration.
Add a freight calculation vendor to the business unit definition.
Test the freight calculation integration.
Define your carriers.
(optional) Construct tracking numbers.
PeopleSoft CRM integrates with ConnectShip to calculate freight charges. The freight calculation integration transfers the to address, carrier, and combined product weights data to ConnectShip.
To set up the freight calculation integration:
Activate the following application messages: RATE_REQUEST, RATE_REQUEST_XFRM, and RATE_RESPONSE.
Confirm that the ALLPAGES permission list has full permission to the FREIGHT channel.
Select and open the ALLPAGES permission list. Select the Message Monitor tab and look for an entry for FREIGHT. If not found, add a new entry for the FREIGHT channel, and grant it full access.
Activate the FREIGHT channel through the Message Monitor, on the Channels tab.
Activate the OutSync node transaction on the node, PSFT_XOUTBND, for the RATE_REQUEST transaction.
Select .
Activate the OutSync node transaction on the node, PSFT_XOUTBND, for the RATE_REQUEST_XFRM transaction.
Note: This transaction uses an HTTPTARGET override connector and allows you to specify the URL to connect to Progistics.
Replace the URL on the RATE_REQUEST_XFRM node transaction with your ConnectShip Progistics server URL, which uses the following format: http://<machine>/Progistics/XML_Processor/Server/XMLProcDLL.asp.
If you are not using port 80 on the ConnectShip Progistics server, indicate the port in this URL: <machine>:8080
Select and activate the RATE_REQUEST relationship.
On the Trans Modifier tab, select Edit and activate the RATE_REQUEST modifier.
When you test the integration, use UPS Ground as the carrier.
Note: To carry out the freight calculation test, you must have configured UPS Ground for your business unit on your ConnectShip Progistics server.
To test the freight calculation integration:
Open the Order Capture Business Unit definition in PeopleSoft CRM for the business unit that you set up.
Select .
Click the Test Freight Calculation button.
If an amount other than zero appears, you are set up correctly. If zero appears, check the display message to determine what is not correctly set up.
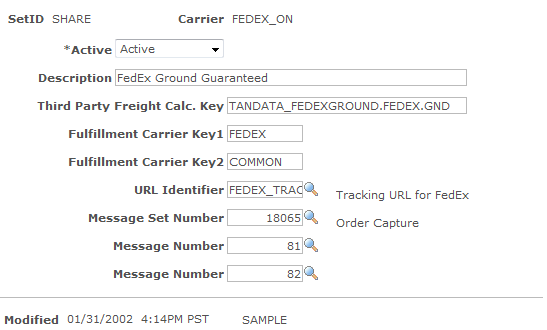
Use the Carriers page (CARRIER) to define carriers for integration with Order Capture.
Navigation
Image: Carriers page
This example illustrates the fields and controls on the Carriers page.
|
Field or Control |
Definition |
|---|---|
| Active |
Select Active or Inactive. If you select Inactive, the carrier does not appear:
|
| Description |
Enter a description that appears in several order capture locations where shipping information is defined. |
| Third Party Freight Calc. Key (third party freight calculation key) |
Enter the key that the third-party freight calculation system (for example, the ConnectShip Symbol) uses to identify this carrier. |
| Fulfillment Carrier Key1 and Fulfillment Carrier Key2 |
Enter keys that map the PeopleSoft CRM carriers to the equivalent carriers in the fulfillment system. For example, if you use PeopleSoft Order Management as your fulfillment system, key 1 would map to Carrier ID, while key 2 would map to Ship Via Method. |
| URL Identifier |
Use this URL to construct a link to the carrier's shipment tracking page. |
| Message Set Number |
Displays two message numbers. |
| Message Number |
Enter the message numbers that the system uses to construct the package tracking link. |
An order may consist of multiple shipments and, consequently, of multiple tracking numbers. Order Capture and Order Capture Self Service support the construction of a single tracking link, which displays all shipments at once.
To construct a tracking link:
Point the URL identifier to a URL definition.
This is the static (unchanging) portion of the carrier's tracking URL.
If there is more than one shipment to track, ensure that the first message catalog entry message number is appended to the URL.
Parameter %1 within the message is replaced by the package number (for example, 1 for the first package, 2 for the second package). The shipment's tracking number replaces Parameter %2. If only one shipment is being tracked, this message is not used in constructing the URL.
For the last package, append the second message catalog entry to the URL using the same parameter replacement rules as the first message number.
Note: You use the second message catalog entry only if a tracking link is constructed for one package. If the second message catalog entry is not present, then you use the first message catalog entry.
UPS Example
If two United Parcel Service (UPS) packages are tracked at once, this link would work:
http://wwwapps.ups.com/etracking/tracking.cgi?sort_by=status&track=Track&TypeOfInquiryNumber=T&InquiryNumber1=444&InquiryNumber2=555
Note: PeopleSoft CRM ships with the URL definition UPS_TRACK, which is defined as http://wwwapps.ups.com/etracking/tracking.cgi?sort_by=status&track=Track&TypeOfInquiryNumber=T. PeopleSoft CRM also ships with a single message catalog entry: 18065, 80. This contains &InquiryNumber%1=%2.
When you construct this link, the URL definition is initially appended with this message catalog entry. Replace %1 with the first shipment number (1) and %2 with the tracking number for the first shipment (444), which yields this string: http://wwwapps.ups.com/etracking/tracking.cgi?sort_by=status&track=Track&TypeOfInquiryNumber=T&InquiryNumber1=444. The next shipment is the final shipment, but because there is no defined second message catalog entry, the first entry is appended once more. This becomes the final link: http://wwwapps.ups.com/etracking/tracking.cgi?sort_by=status&track=Track&TypeOfInquiryNumber=T&InquiryNumber1=444&InquiryNumber2=555.
FedEx Example
This link tracks two Federal Express (FedEx) shipments (tracking numbers 444 and 555):
http://www.fedex.com/cgi-bin/tracking?action=track&tracknumbers=444,555.
The URL definition, FEDEX_TRACK, contains http://www.fedex.com/cgi-bin/tracking?action=track&tracknumbers=. The message catalog entry 18065, 81 is %2, (note the comma). The message catalog entry 18065,82 is simply %2.
Note: FedEx does not use the %1 parameter (which is the shipment number).
For these two packages, the URL definition is initially appended with the first message catalog entry and becomes http://www.fedex.com/cgi-bin/tracking?action=track&tracknumbers=444.
For the final package, the second message catalog entry is used and appended to the above string, resulting in http://www.fedex.com/cgi-bin/tracking?action=track&tracknumbers=444,555.
If only one package is tracked, the second message catalog entry is appended to the URL definition, yielding http://www.fedex.com/cgi-bin/tracking?action=track&tracknumbers=555.
Note: In the last example, the first message catalog entry was not used.