Creating and Using Extensions
Creating and using an Extension consists of the following steps. Each step will be described in detail in this section.
Define your extension requirements
Write the extension (a Java servlet compiled into class files or a PeopleCode Application class). If your extension is developed in People Code, you can skip Step 3.
Package your extension java class file in a jar file and supply the name of the jar file directory in the extensionsDir parameter (set on the Online Marketing Settings page).
Register the extension using Online Marketing.
For custom content extensions, insert the Online Marketing formatted syntax using the Merge Content page to choose an extension, then specifying any needed parameters and their values in the desired email or web document. For custom action extensions, insert the custom action in the dialog process, specifying any needed parameters and their values.
Test the extension in a development environment.
Test the extension on your Online Marketing production system, testing the dialog that uses the extension.
After the dialog is successfully tested, go live with the test dialog to a test audience.
Go live with the extension in a production dialog to the desired audience.
Every Extension is different, determined by the business needs of the person who will be using it. Before you begin work on an extension, ascertain your business needs. Determine what you want the extension to do, any particular needs or wishes you have, and what your expectations are (including expectations for error handling). Try to get as much specific detail as you can—the more you understand your needs, the more effectively you can meet them.
After you have determined your needs, create a detailed statement of work describing the extension, what it will do, the parameters it needs, and how you will implement it. Create a design for the extension before you begin writing it.
It is beyond the scope of this documentation to describe the general process for creating a Java servlet. However, there are some aspects of servlet creation specific to an Online Marketing Extension servlet. These are discussed in this section. Also, Online Marketing ships with three sample servlets named HelloWorld, SampleLiveExtension, and EXStockQuotes, which you can find in com.peoplesoft.crm.omk.examples.jar. You can use these servlets for custom content extension testing purposes and as a guide for creating your own servlets.
Servlet Imports
The servlet should include the following import statement to access the Extension framework:
import com.peoplesoft.crm.omk.external.GenericAnnuncioServlet
Note: The class of com.peoplesoft.crm.omk.external.GenericAnnuncioServlet is included in the jar file com.peoplesoft.crm.omk.jar, so you can use it to compile your extensions. This jar file can be found in the PeopleSoft Application Server install root/class directory.
Servlet Class Inheritance
The servlet class should be declared to extend the GenericAnnuncioServlet class. For example:
Public class myDemoServlet extends GenericAnnuncioServlet
This extension provides access to logging and tracing.
Note: Because the GenericAnnuncioServlet class is extended from Java servlets (not from HTTP servlets), the Extensions framework does not fully support HTTP protocol (such as HTTP sessions).
Output
Extension output for merge purposes can use the standard servlet ServletOutputStream provided with the servlet class via its response mechanism.
Note: Output is applicable only to custom content extensions; it will be ignored by custom action extensions.
Extension Framework Error Handling
The Extension framework handles errors for custom content extensions in the following ways, depending on the type of document:
|
Document Type |
Error Handling Method |
|---|---|
|
Web documents and single emails |
Communication is assumed to be synchronous. If asynchronous communication is used, no default values will be rendered. A configurable timeout period, global for all dialogs, ensures that if content is not returned in a specified period of time, a default is inserted in place of the content. (It is possible to insert one or more blank lines as a default.) The Online Marketing log files provide information to help diagnose why the original content was not returned. The timeout period can also be set for a specific function call. |
|
Broadcast email jobs |
A predefined timeout period ensures that if email content is not returned after this period, the entire remaining broadcast email job aborts. In the case of errors that prevent content from being properly inserted into the emails, the emails are not sent. A thrown VCSingleContactException will also result in an individual email not being sent. The Online Marketing log files provide information to help diagnose why the content could not be accessed. Whether because of timeout or other error, if any emails that are part of a broadcast email job are not sent, you can use the Online Marketing Control Center to identify which emails were not sent and then resend them. This does not happen automatically, as it might be necessary to investigate the problem before resending the emails. Note that timeouts and errors that occur when processing asynchronous extensions do not prevent email from being sent. This is in contrast to synchronous behavior. |
Extensions That Call Classes in External jar Files
If the custom extension needs to call classes in external jar files (such as CI methods or third-party methods), then these jar files must be added to the system classpath of the webserver to be available to the extensions. The procedures for doing so are as follows:
WebLogic:
Put the jar files in a known location (for example, C:\Jars\myci.jar).
Go to [PS_APP_HOME]\webserv\[DOMAIN]\applications\crm.
Open the setenv.cmd file.
Scroll to near the end, where you will see a line setting the CLASSPATH variable. For example:
SET CLASSPATH=%PSCLASSPATH%;%PLATFORM_PATCH%;%JAVA_HOME%\lib\tools.jar;%WL_HOME%\
server\lib\weblogic_sp.jar;%WL_HOME%\server\lib\weblogic.jar
Add your jar file location to the end of the CLASSPATH setting. For example:
SET CLASSPATH=%PSCLASSPATH%;%PLATFORM_PATCH%;%JAVA_HOME%\lib\tools.jar;%WL_HOME%\
server\lib\weblogic_sp.jar;%WL_HOME%\server\lib\weblogic.jar;c:\Jars\myci.jar
Restart the DES server.
WebSphere:
Go to the lib directory of the WebSphere installation.
Put the external jar file in this directory.
Restart the DES server.
It is beyond the scope of this documentation to describe the general process for creating a PeopleCode function. Refer to your PeopleCode documentation for more information.
Note: PeopleCode extensions can only be used as Custom Actions in the Online Marketing dialog flow.
Example PeopleCode Function
The following is an example extension, written in a PeopleCode extension class, that uses MessageBox to write its parameter names and values to the Application Server log:
import RY_DATAOBJS:*;
class CustomAction;
method CustomAction();
method actionMethod(¶ms As MapObj);
end-class;
method CustomAction
end-method;
method actionMethod
/+ ¶ms as RY_DATAOBJS:MapObj +/
Local string &msg;
Local array of string &keys;
Local integer &i;
&msg = "actionMethod(";
&keys = ¶ms.keys();
For &i = 1 To &keys.Len
If &i > 1 Then
&msg = &msg | ",";
End-If;
&msg = &msg | &keys [&i] | "=" | ¶ms.get(&keys [&i]).value;
End-For;
&msg = &msg | ");";
MessageBox(0, "", 0, 0, &msg);
end-method;
The custom action receives a single parameter of type RY_DATAOBJS:MapObj. This is a name/value map which maps parameter names to parameter values. All names are strings; all values are of type RY_DATAOBJS.StringObj.
To get a PeopleCode string from StringObj, use its value property. The contents of the map will consist of all parameters defined when the action was registered, any additional parameters added when the action was included in a dialog, plus any document/profile fields on the page that was submitted to cause the action to be invoked.
PeopleCode actions are invoked asynchronously, and need not return a value.
See the product documentation for PeopleTools: PeopleCode Language Reference and PeopleTools: Application Designer Developer's Guide.
If you have written a Java servlet for your Extension and compiled it as class files, perform the following installation steps:
Add the class file in a jar file with the full package path.
Set the jar file name on the Extension Registration page.
Put the jar file in a directory that includes other Extension jar files for Online Marketing. The directory name must be set to the value of the parameter extensionsDir on the Setting page.
If the DES and Mailcaster are installed on different machines, and the location of the extension jar file is not accessible from one of the machines, the extensionsDir value for individual service can be overwritten in the service's configuration file. For example, if the Extension jar can be accessed from DES, but not from all the Online Marketing other services (Mail service, WatchDog, and Email Response Processor), you should do the following:
Install the Extension jar file in a location accessible to DES. Set the jar location to extensionsDir in the DES Settings page.
Install the Extension jar file in a location where it is accessible to other Online Marketing services (such as Mailcaster).
For each services instance, add extensionsDir="extension jar dir" (see Step 2 above) in the relevant configuration file (for example, MCR.config for Mailcaster).
In this case, DES will load the Extension jar file by using the value of extensionsDir from settings, and the Mailcaster will load the Extension jar by using the value of extensionsDir from the MCR.config file.
For custom content extensions (used in web and email documents), merge content is used to specify an extension to be executed. The merge content format is similar to the Online Marketing merge content format. It is not necessary to create this Online Marketing formatted syntax for custom action extensions.
The basic format for custom content extensions is:
<pstag:extension name="<name>" default="<details of function>" id="<VC Reference ID>"/>
The merge content identifier that identifies the extension to execute is pstag: extension name=”<name>”, where
|
Field or Control |
Definition |
|---|---|
| pstag |
is the Online Marketing VC Tag identifier. |
| name=”<name>” |
The name of the extension. |
| default value |
If the extension has no result, specify a default value to be used in the document. |
| id |
The merge content reference identifier. |
This tag must appear first in the merge content syntax. For example:
<pstag:extension name="Hello" default="<details of function>" id="" />
Global Extension Parameters
The following parameters can also be used in Extensions, and can appear in any order. These parameters apply to both custom content and custom action extensions. They are set in the Settings feature.
|
Parameter |
Allowable Values |
|---|---|
|
timeout |
0 Indicates that the request is not subject to timeout management. 1 or higher Any valid integer greater than zero (0) indicates the number of seconds before timeout occurs. All other values including value parsing errors result in the system default timeout being used. The default value is 45. |
|
async |
true Indicates that this is an asynchronous request. The default value is false for custom content extensions (extensions inserted into documents) and custom action extensions (extensions inserted into the dialog process). The return value from an asynchronous extension is ignored. All other values including value parsing errors result in a synchronous request. Warning! PeopleSoft strongly recommends against using asynchronous communication for custom content extensions in broadcast emails, as the rendering of the extension might not keep pace with the speed of the Mailcaster. Synchronous communication can provide a “throttling” mechanism that prevents the extensions from using up all system resources. |
|
default |
any character string Indicates that the specified character string will be merged exactly as typed into the merge content. This is the default value. |
Notes on Designing Extensions
The following usage notes describe things you should be aware of when creating and using Extensions.
Caching Extensions
Because caching custom content extensions has a direct impact on the WebLogic or WebSphere Application Server memory usage, you may need to modify the memory settings of the webservers to support cache content. You should tune elements of the system based on usage; caching all extensions is not necessarily a good idea. Exceeding the memory size value can result in unpredictable DES behavior.
Checking for Timeout
The Extension framework cannot force a running servlet to stop when it is timed out—it can only request that the servlet stop processing and clean up after itself. Therefore, a well-behaved servlet should periodically check to see if it has been timed out, and stop processing if it has been.
The recommended way to do this is to check to see if the servlet's thread has been interrupted. This can be accomplished using the following call sequence:
import java.lang.Thread
...
boolean keepRunning = Thread.currentThread().isInterrupted();
if (!keepRunning)
{
	//... cleanup and exit code goes here
}
Note that default timeouts have an order of precedence depending on where they occur. The order in which they are used, from first to last, is:
The value specified in the merge content.
The value specified where the extension is registered
The global default value registered for the Extension framework
The internal, hard-coded default
A good rule to follow is that you should not specify a timeout in merge content unless it is very important to override the more general defaults.
Throwing Exceptions
If the extension is to be used by the Mailcaster, you have control as to whether the entire job or only a single email is aborted.
If you want to abort the entire job, the servlet should throw a ServletException. You should do this, for example, if there is some resource needed for all contacts that is unavailable. The user can then reschedule the mail job after the problem is corrected.
If you want to suppress the sending of mail to the single contact then a VCSingleContactException should be thrown. This would be useful in the case where a resource for a single end user was not available.
To register and configure the Extension, you must have Dialog Administrator permission or permission to change settings.
Follow these steps to register and configure extensions:
Navigate to Set Up CRM, Product Related, Online Marketing, Extension Summary.
The Extension page displays a list of current extensions.
In the Implementation field, specify if the extension you want to register is a Java servlet or a PeopleCode application class.
Click the Add Extension button.
Registering a Java Extension
Access the Extension Registration page (Navigate to Set Up CRM, Product Related, Online Marketing, Extension Summary).
Image: Extension Registration page - Java servlet
This example illustrates the fields and controls on the Extension Registration page - Java servlet.
|
Field or Control |
Definition |
|---|---|
| Name |
Specify a name for the extension. Spaces are allowed. |
| Description |
Enter a brief description of the extension's function. |
| Status |
Indicates whether the extension is ready for use by the system. An extension starts in the In Design status. You can change it to Active when it is ready to be used. Once an extension is Active, you can change it to Archived to prevent new references or usage in a document or flow. (Existing references will still continue to work.) |
| Implementation |
Indicates whether the extension is written in Java or PeopleCode. |
| Usage |
Select In Document if the extension is to be used to retrieve content for display in a document, or Process if the extension will perform a function as part of the dialog process. |
| Servlet Class Name |
Specify a class name for the Java servlet, using the fully qualified name of the servlet (for example, com.peoplesoft.crm.omk.external.HelloWorld). |
| Servlet Jar File Name |
Specify the name of the servlet's jar file. |
| Wait Return Before Process |
Select this check box if the extension is to be processed synchronously, or leave it cleared if the extension is to be processed asynchronously. |
| Timeout |
If specified, this value will override the global default specified in the extensionTimeout parameter set in the Settings component. |
| Custom Action Icon |
When you select In Process as the Usage, you can upload a custom icon that will appear in the dialog flow when the custom action is selected. Click Upload Image to specify an image, or Delete Image to remove a previously specified image. If you do not supply a custom icon, the default custom action icon is used. Icons used for custom actions must be a maximum of 20 × 20 pixels and must be in JPG format. |
| Parameters |
You can define a default list of parameters for the extension during registration. These values can be overwritten by individual references to the extension in the Custom Action or Custom Content objects. All the parameters and values from the registration page, along with the overwritten or additional parameters from the specific references are passed to the system for processing. You cannot use merge content syntax in the parameter or value fields on the registration page. |
| Add Parameter |
Click this button to add a new parameter to the list. |
Note: If your extension requires third-party classes that came in a separate jar file from the extension jar file, you must package the third-party classes in the extension jar or else ensure that the third-party jar is available in the web container's class path.
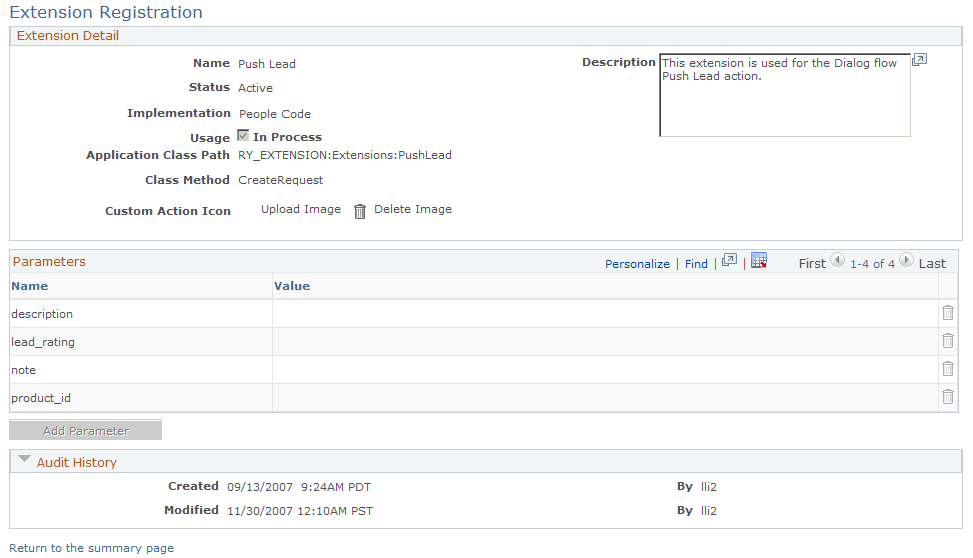
Registering a PeopleCode Extension
Registering a PeopleCode extension is similar to registering a Java extension, except that a PeopleCode extension cannot be used in the Dialog Process tree. Because of this, the Usage check box is selected and disabled.
Image: Extension Registration - PeopleCode function
This example illustrates the fields and controls on the Extension Registration - PeopleCode function.
|
Field or Control |
Definition |
|---|---|
| Application Class Path |
Enter the application package and class name for the PeopleCode function. |
| Class Method |
Enter the method of the application class. |
Managing Extensions
Only users with the role of Dialog Administrator can register extensions or change global settings. Once an extension is registered and its status set to Active, it cannot be deleted from system. However, the following modifications can be made, depending on the extension's status:
|
Extension Status |
Modifications |
|---|---|
|
In Design |
|
|
Active |
Note: You cannot change the extension's Name or Usage in this state. Also, when you make changes to an extension in Active state, you must restart the Dialog Execution Server for the changes to take effect. |
|
Archived |
This status is similar to Active, except that you cannot change the extension's Status. New references or usages are not allowed in either the Custom Content or Custom Action objects. |
Custom Action Error Troubleshooting
If your custom action extensions are not functioning correctly, the problem could be due to blocking in the Integration Broker queue. This problem can affect all custom action extensions, including the following delivered extensions:
SMS.
Correspondence.
Push Lead.
Access Marketing Event.
Credit Card Services.
To check for this, do the following:
Determine whether the domain is active by navigating to PeopleTools, Integration Broker, Quick Configuration.
Change the status to Active if it is not already activated.
Determine whether operations in error exist in the Integration Broker by navigating to PeopleTools, Integration Broker, Service Operations Monitor, Asynchronous Services.
Search for RY_XMSG_AREQ.
Click Detail, then click Cancel for each item with the status Error.
Refer to the PeopleTools 8.52: Integration Broker Service Operations Monitor for more information on asynchronous service operation services.
Three system extensions are delivered in this release:
Update Case Score
Access Case Information
Access Marketing Event
Credit Card Service
Update Case Score
The Update Case Score extension is used by Case Integration to update survey scores to Support and HelpDesk. You cannot modify the Update Case Score extension using the Extension Registration page, which is disabled for this extension.
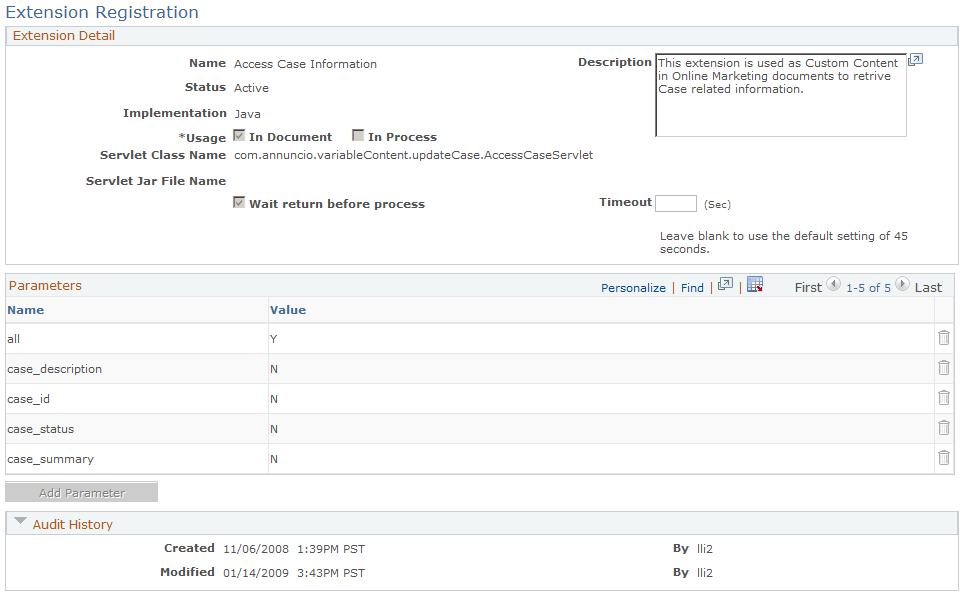
Access Case Information
The Access Case Information extension allows you to include information about a particular support case in a web or email document. You can choose to include the following information:
Case ID.
Case Status.
Case Summary.
Case Description.
All of the previous four parameters.
Note: The All option renders the four case parameters in table format, and the font information is not changeable. Because of this and also because this option is likely to retrieve a large amount of information, this option should be used only in HTML-formatted web and email documents. It should not be used for a single field (such as a button label or field default value).
Access Marketing Event
The Access Marketing Event custom content extension is used as custom content in Online Marketing documents to support Event Management.
Image: Access Marketing Event extension (1 of 2)
This example illustrates the fields and controls on the Access Marketing Event extension (1 of 2).
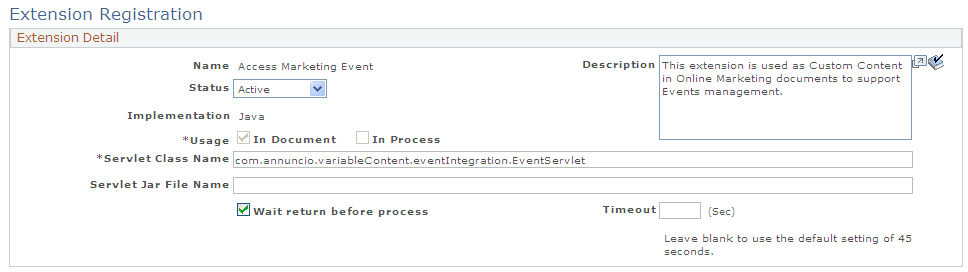
Image: Access Marketing Event extension (2 of 2)
This example illustrates the fields and controls on the Access Marketing Event extension (2 of 2).
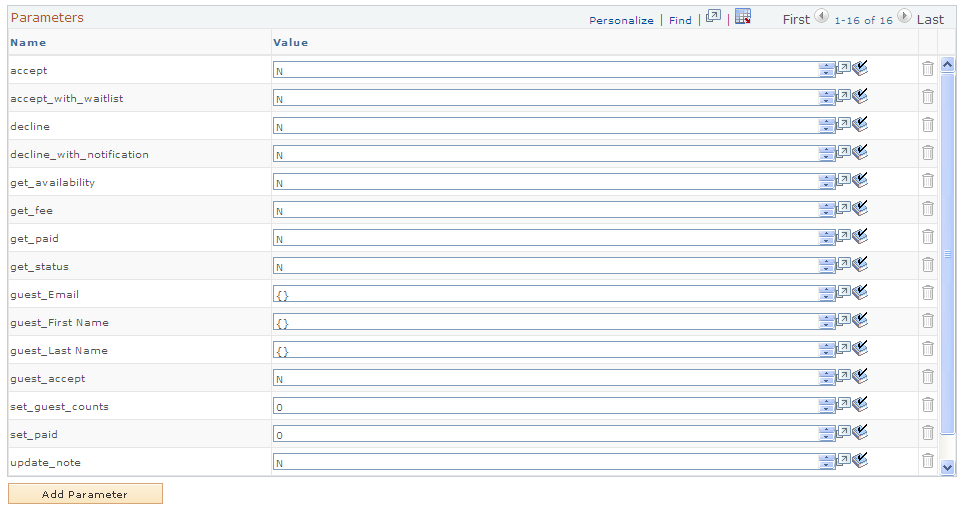
The extension includes the following parameters:
|
Parameter Name |
Description |
|---|---|
|
accept |
The extension checks the event's capacity. If the capacity has not yet been reached, the extension attempts to register the target by determining if he or she is already in the Participants table—if not, the extension adds the target to the table. The extension then marks the target as Registered in the Events table, and returns Registered. If the capacity has been reached, the extension returns Full. |
|
accept_with_waitlist |
The extension attempts to register the target. First, it determines whether the target is already in the Participants table—if not, the extension adds the target to the table. Next, it checks the capacity: if the capacity has not yet been reached, the extension marks the target as Registered in the Events table, and returns Registered. If the capacity has been reached, it marks the target as Waitlisted in the Participants table, and returns Full. |
|
decline |
The extension registers that the target has declined attendance. First it determines whether the target is already in the Events table—if not, it adds the target. It then marks the Registration Status as Declined and returns Declined. |
|
decline_with_notification |
The extension registers that the target has declined attendance. First it determines whether the target is already in the Events table—if not, it adds the target. It then marks the Registration Status as Declined, sets Future Notification, and returns Declined. |
|
get_availability |
The extension determines whether the event has reached its capacity. It returns the number of available slots; which is the total number of slots minus the sum of registered participants and their guest count. If this number is 0, then the event has reached capacity. |
|
get_fee |
The extension retrieves the correct fee from the Event table, based on the current date and time. The event can have many fees defined; for example, introductory fees that expire after a certain date. The extension returns the valid fee for the current date. If only one date/fee combination exists, then that fee is returned. (Note that the fees defined in the Event component are assumed to be in the currency defined in the Event component, and are returned without conversion.) As an example, consider that an event has two fees: an “Early Bird” fee of $1000 if the invitee pays before midnight on October 1, 2009, and a normal fee of $1500 if the attendee pays after that date. Thus, any attempt to get the fee for the event prior to midnight on October 1, 2009 would return the $1000 value, while any attempt to get it after that date would return the $1500 value. If the event's Start Date is after the last Respond By date, the most recent fee (after the last Respond By date) is used as the “Walk In” fee. |
|
get_paid |
The extension gets the amount actually paid. The event might have had different fee amounts based on when the target registered, so this will respond with the amount that the target actually paid. |
|
get_status |
The extension gets the current status of the target. It returns one of the following values: Registered, Declined, or Waitlisted. |
|
guest_Email |
The extension uses these parameters if the value of guest_accept is Y. Basic matching rules for Online Marketing require any two of these parameters to be set. |
|
guest_First Name |
|
|
guest_Last Name |
|
|
guest_accept |
If the value of guest_accept is Y, the extension performs the Register Event for Guest function as follows: The extension verifies whether the guest exists in CRM with the role of Consumer.
If the guest does not exist in CRM, the extension creates a person in CRM with the role of Consumer.
After the guest is identified or created, the extension performs the following:
The function will return one of the values — Registered, Waitlisted, or FailedFail. In case of an error, it returns a string “FailedFail” and logs the reason in the DES log file. |
|
set_guest_counts |
The extension sets the guest count to the specified number irrespective of the current status of the participant in the Events table. |
|
set_paid |
The extension sets the amount actually paid. If there are several date-related fees, it is important to note which fee is actually paid. |
|
update_note |
The extension determines whether the target is already in the Participants table—if not, it adds the target. The custom content then takes the parameter value and replaces any content in the Notes field of the Participants table with the parameter value. Note: If update_note is specified with guest_accept, the parameter value will be stored in the Notes field of the guest. |
|
waitlist |
The extension assigns the target Waitlisted status. |
The following table shows the possible return values for each of the parameters:
|
Parameter |
Possible Return Values |
|---|---|
|
accept |
Registered, Full |
|
accept_with_waitlist |
Registered, Full, Waitlisted |
|
decline |
Declined |
|
declined_with_notification |
Declined |
|
get_availability |
Number of available slots |
|
get_fee |
0 if no fee defined; otherwise, correct fee based on current date and time |
|
get_status |
Registered, Declined, Waitlisted |
|
guest_Email |
Email ID of the guest |
|
guest_First Name |
First name of the guest |
|
guest_Last Name |
Last name of the guest |
|
guest_accept |
Y, N |
|
update_note |
No return value |
|
set_paid |
No return value |
|
get_paid |
The amount actually paid at the time of the credit card charge |
|
waitlist |
Waitlisted |
For all parameters except set_paid, set_guest_counts, guest_Email, guest_First Name and guest_Last Name, the default value is N. For set_paid, the default is 0.
For all parameters except update_note, set_paid, guest_Email, guest_First Name and guest_Last Name, the extension implements the functionality of the first parameter from top to bottom (i.e., the first parameter it encounters) that has the value of any word beginning with “Y” or “y”.
Note: To identify a guest participant for an event or to create a new person for the guest in CRM, Online Marketing uses the basic Matching Rules. Hence, any changes to the Matching Rules need to be applied to the Access Marketing Event extension.
Note: For any new profile field in the Matching Rules, add a new profile field parameter name in the format guest_<profile field name> in the extension. Sample scenarios are:
If a new matching rule, for example, “Home Phone” of matching type “Individuals” is added to the Matching Rule page, add a new parameter guest_Home Phone = {} to the extension.
If you have a non-English language database, add three new parameters for the three profile fields Email, First Name, and Last Name. For example, if your database is Italian, add the new parameters as guest_ITAEmail, guest_ITAFirst Name and guest_ITALast Name.
See PeopleSoft Event Management documentation for a description of how to use the Access Marketing Event extension.
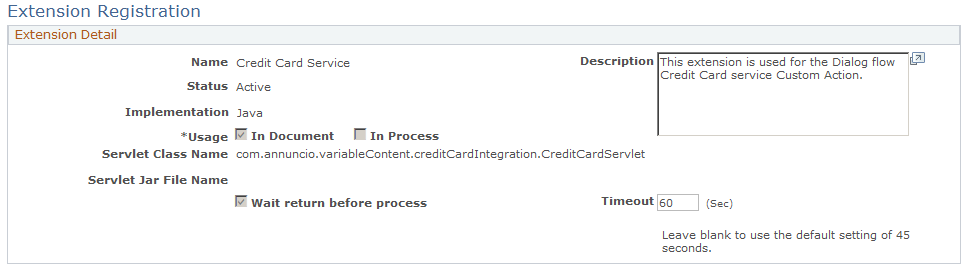
Credit Card Service
The Credit Card Service extension supports credit card “Authorization” and “Authorization and Bill” services. It can be used only in documents as a Custom Content Extension. Only one field, Timeout, is available for editing.
Note: With Hosted Order Pages, Credit Card Service extension is used only in rare cases. The method of making all payment processing on a third-party systems reduces the need for the merchant to duplicate or store the sensitive information related to credit cards.
To edit the Timeout field, access the Extension Registration page (Set Up CRM, Product Related, Online Marketing, Extension Summary, open the Credit Card Service extension).
Image: Credit Card Service extension
This example illustrates the fields and controls on the Credit Card Service extension.
|
Field or Control |
Definition |
|---|---|
| Timeout |
The total time for the extension execution and the access time to the CyberSource service (a third-party vendor used to process credit card transactions). The default is 45 seconds. |
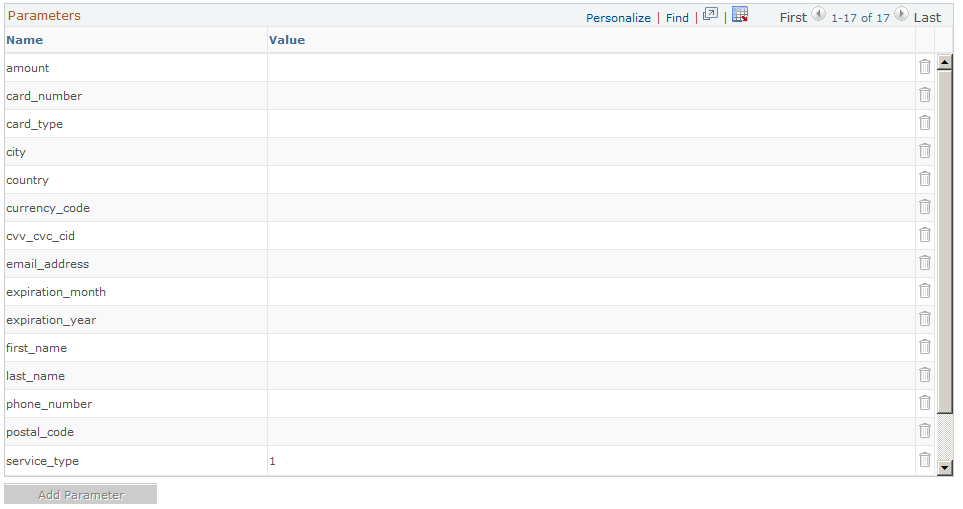
The extension includes several parameters which are entered when the credit card information is provided. All parameters are required unless specified as optional.
Image: Credit Card Service parameters
This example illustrates the fields and controls on the Credit Card Service parameters.
|
Field or Control |
Definition |
|---|---|
| amount |
The amount to be charged to the card in this transaction. |
| card_number |
The 16-digit credit card number. |
| card_type |
A two-digit number (for example 01, 02, 05) indicating the card type. Card types are user-specified on the Credit Card Types page (Enterprise Components, Component, Credit Card Interface, Credit Card Types). |
| city |
The credit card customer's city. |
| country |
The CRM country code. |
| currency_code |
The three-character ISO currency code. |
| cvv_cvc_cid |
The verification number for the credit card. This value is optional if the Credit Card Verification Number Required check box is not selected on the General Options page. If the option is selected, this value must be provided. The code type varies by credit card type:
|
| email_address |
The credit card customer's email address. |
| expiration_month |
A two-digit number (01–12) indicating the month in which the card expires. |
| expiration_year |
A four-digit number indicating the year in which the card expires. |
| first_name |
The customer's first name. |
| last_name |
The customer's last name. |
| phone_number |
The customer's phone number. |
| postal_code |
The customer's postal code. |
| service_type |
This value can be 1 or 2:
The default value is Authorize Only. |
| state |
This two-character value is required only for the United States and Canada. |
| street |
The credit card customer's street address. |
Credit Card Service Extension Execution
When the dialog containing the Credit Card Service extension is run, the following occurs:
The credit card data is validated.
An Authorize or Authorize and Bill request is sent to CyberSource.
The extension returns:
An authorization code if the authorization is accepted.
0 if authorization or data validation fails.
-1 if there is a system error for the document field.
The extension logs a transaction in the CRM Credit Card history table (PS_RB_CARD_HISTORY). You can review this history by navigating to Main Menu, Review Electronic Card History and selecting Online Marketing from the Card Owner ID list. Note that when you view the transaction in the History list, the credit card number will appear encrypted.
If you will be using custom actions to update profiles (for example, updating a profile value to a document field value or a fixed value), it is important to understand custom action runtime behavior.
The Update Profile custom action updates the profile data to the cache first. It saves the information to the database with other profile updates after all the actions are completed and before it displays the next page to the user.
If Custom Actions are used in updating user profiles (such as updating a user profile using values from document fields or fixed values), the Update Profile Custom Action updates the profile data in the cache first. The Custom Action saves to the database with all other profile updates after all of the actions are completed, and before returning the next page in the dialog flow.
Note that in the case where a Custom Action must read data from Custom Profiles (User Defined Profiles), or other Customer Data Model (CDM) profile data from database, a Page Submit action is required in order for the data to be saved to the database so that a Custom Action can read that data. To accomplish this, use an Intermediate Page Action to ensure that data is submitted to the database before the Custom Action occurs in your Dialog Flow. Custom Actions that occur before a Final Page action do not meet this requirement as the Final Page action has no Submit action.
Since profile data from Online Marketing web pages and Update Profile actions are saved to the database at the end of action execution, data from a Custom Action is saved only after it is executed. Therefore, it is recommended that in order for a Custom Action to access current profile data, it should make use of the Profile based Variable Contents in the Custom Action parameter.
Before attempting to deploy the Extension in a production environment, test it thoroughly in a development environment.
After you have configured the Extension, test it in a staging environment, within a test dialog, to a test audience. If possible, test in an independent development system that “mirrors” the production system because the impact to the system and the DES is unknown until the Extension has been tested.
First, you should go live with the Extension on your production system, using a test dialog and a test audience.
After completing testing of the extension, you are now ready to deploy it in a production dialog to your desired audience.