Including Opportunities in Forecasts
This topic discusses how to:
Use the forecast summary.
Copy products to the forecast.
Use recurring forecasts.
Specify revenue percentages for forecasting.
Include forecast items in compensation calculations.
|
Page Name |
Definition Name |
Usage |
|---|---|---|
|
RSF_OPP_DETAIL |
Enter information for the forecast summary. |
|
|
RSF_OPP_PROPOSE |
Include an opportunity in the forecast. |
|
|
Copy Products to Forecast Page |
RSF_OPP_COPYFCAST |
View and verify products to copy to forecasts. |
|
Distribute Recurring Revenue Page |
RSF_OPP_DISTRIB |
Enter recurring revenue. |
|
RSF_SENDTO_EIM_SEC |
Send forecast information to PeopleSoft Incentive Management. |
Use the Opportunity - Discover page (RSF_OPP_DETAIL) to enter information for the forecast summary.
Navigation
Image: Opportunity - Discover page (1 of 2)
This example illustrates the fields and controls on the Opportunity - Discover page (1 of 2).
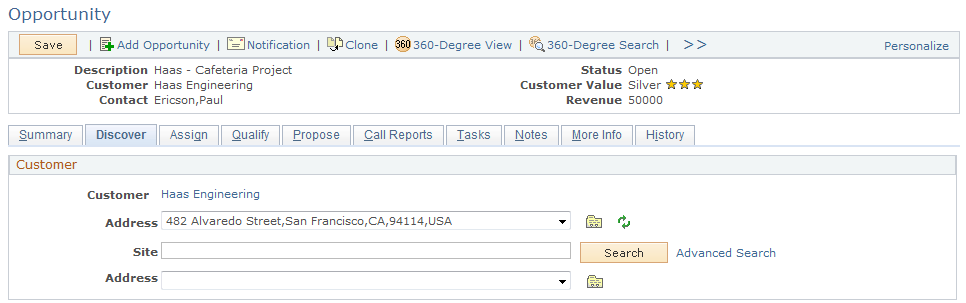
Image: Opportunity - Discover page (2 of 2)
This example illustrates the fields and controls on the Opportunity - Discover page (2 of 2).
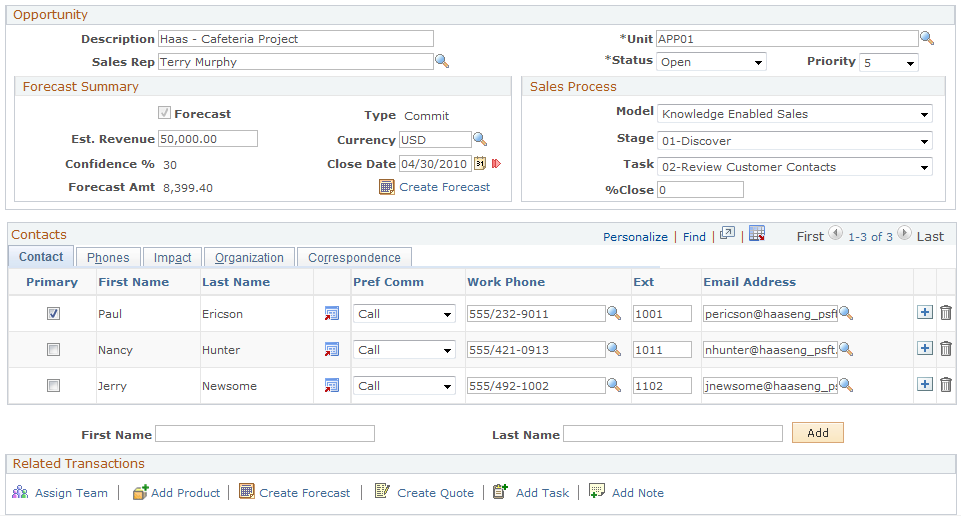
If you want to include an opportunity's revenue on a forecast but don't want to specify the actual products, you can use the Forecast Summary group box on the Opportunity - Discover page.
Forecast Summary
|
Field or Control |
Definition |
|---|---|
| Forecast |
Select to include this opportunity in generated forecasts. When you save the page, the system copies the estimated revenue into the Forecast Amount field on this page, and it adds the opportunity in the Forecast grid of the Opportunity - Propose page. |
| Type |
If you select Forecast, you must select the type of forecast to use. You define forecast types on the Forecast Type page. See Forecast Type Page. |
| Est. Revenue (estimated revenue) |
Enter the amount of revenue that is anticipated from the sale. |
| Currency |
Enter the currency code for the revenue. The default currency code is the code that is associated with the sales user on the Sales User page. If no products are associated with the opportunity, you can override the default currency code. Doing so changes the currency here and on the Product page. |
| Confidence % (confidence percentage) |
Displays the average degree of confidence (expressed as a percentage) that the assigned sales representative feels that the opportunity will result in a closed sale. If you have not entered product forecast rows on the Opportunity - Propose page, you can manually enter the confidence percentage here. After products are forecast, this field is display-only and shows the average of all confidence percentages for the opportunity from the Forecast grid of the Opportunity - Propose page. For example, if there are three products identified for forecasting from this opportunity—the first with a confidence of 70 percent, the second with 80 percent, and the last with 90 percent—the system calculates the average, as follows: (70 + 80 + 90) ÷ 3 = 80. The system displays that result here. |
| Close Date |
Enter a date for the amount that is forecast. |
| Forecast Amt (forecast amount) |
If you select the Forecast check box, a forecast amount must be specified. There are two ways that this can happen:
|
| Create Forecast |
Click this link to create a forecast on the Opportunity - Propose page. |
Use the Opportunity - Propose page (RSF_OPP_PROPOSE) to include an opportunity in the forecast.
Navigation
Image: Opportunity - Propose page
This example illustrates the fields and controls on the Opportunity - Propose page.
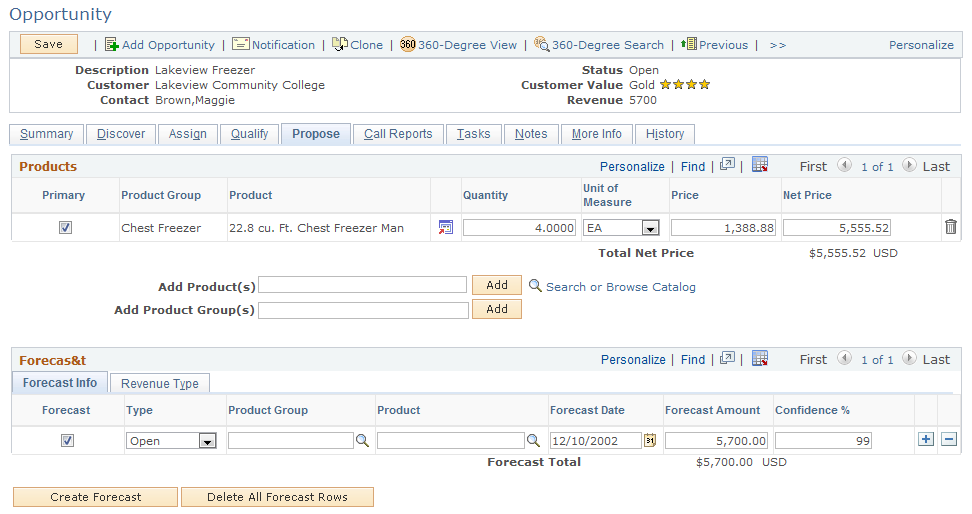
If you want to include an opportunity's products on a forecast, you can copy the products to the Forecast grid of the Opportunity - Propose page.
Click the Create Forecast button to access the Copy Products to Forecast page.
Note: If there is existing forecast information when you click the Create Forecast button, the system displays the existing forecast on the Copy Products to Forecast page. You cannot copy products to the forecast if the forecast already exists for the products.
Image: Copy Products to Forecast page
This example illustrates the fields and controls on the Copy Products to Forecast page.
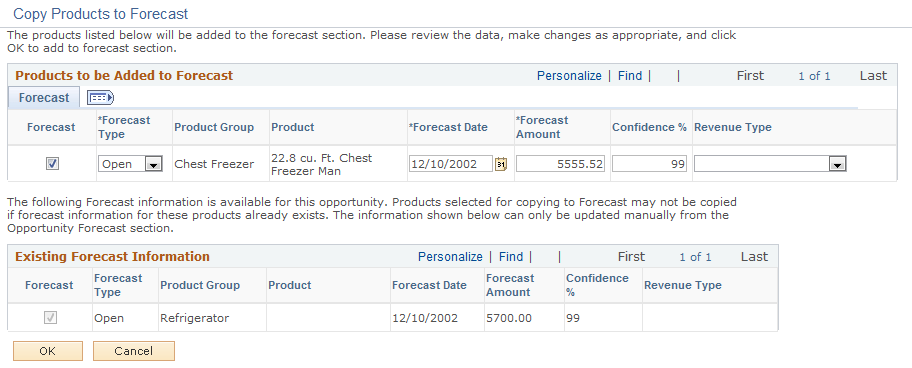
After you enter forecast information on the Copy Products to Forecast page and click OK, the system adds the information to the Forecast grid of the Opportunity - Propose page.
|
Field or Control |
Definition |
|---|---|
| Forecast |
Select this check box to include the revenue in the forecast. |
| Forecast Type |
Select a user-defined forecast type. See Forecast Type Page. |
| Forecast Amount |
Enter a forecast amount. |
| Confidence % (confidence percentage) |
Enter a whole number the specifies the probability that the forecast will become an actual sale. |
| Revenue Type |
(Optional) Select a user-defined revenue type. See Revenue Type Page. |
Access the Opportunity - Propose page (Sales, Search Opportunities, Propose).
If the product has recurring revenue, the system displays the following fields:
|
Field or Control |
Definition |
|---|---|
| Recurring Freq. (recurring frequency) |
Select the period of time for the recurring revenue. Values are Daily, Weekly, Monthly, Quarterly, and Yearly. |
| Recurring Price |
Enter the recurring revenue for each period of time. |
To create a forecast for recurring revenue, click the Create Forecast button to access the Copy Products to Forecast page, and select the Recurring tab.
Enter the forecast information, including the number of periods for the recurring revenue. You can click the Distribution link to access the Distribute Recurring Revenue page, where you can view or modify the distribution of recurring revenue over a period of time. If you do not access this page but you select the Forecast check box, the system populates the Forecast grid on the Opportunity - Propose page with recurring revenue based on the values specified on the Recurring tab.
Make any changes in the Distribution Details group box, and then click the Rebuild Revenue Periods button to refresh the data in the Revenue Periods grid. The system populates the first forecast date with the value in the Start Date field and then creates additional forecast dates based on the value in the Recurring Frequency field. Click the Calculate button to generate a value for the Recurring Total field.
If you change the forecast amount, then when you access the Recurring tab of the Copy Products to Forecast page, the system displays a Review link instead of the Distribute link to indicate that manual changes have occurred.
To enter nonrecurring revenue, select the Non-Recurring tab of the Copy Products to Forecast page.
The system populates the Forecast grid of the Opportunity - Propose page with both the recurring and nonrecurring revenue. The nonrecurring revenue does not have a value in the Recur Period field. This grid contains the data that system uses to populate the Forecast page when a sales representative uses the Add Forecast component or when a sales manager uses the Search Forecasts component to auto-forecast.
|
Field or Control |
Definition |
|---|---|
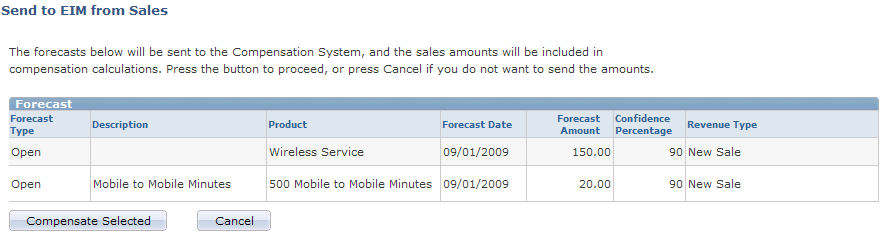
| Compensate Selected |
Click to send the selected forecasts to PeopleSoft Incentive Management. This button appears only if you have selected Incentive Management as an installation option. |
Use the Opportunity - Assign page (RSF_OPP_ASSIGN) to include an opportunity in the forecast.
Navigation
Note: The Revenue Percentage tab may be hidden in the Opportunities component, depending on the access profile of the user. Typically, only sales managers have access to this tab.
Image: Opportunity - Assign page: Revenue Percentage tab
This example illustrates the fields and controls on the Opportunity - Assign page: Revenue Percentage tab.
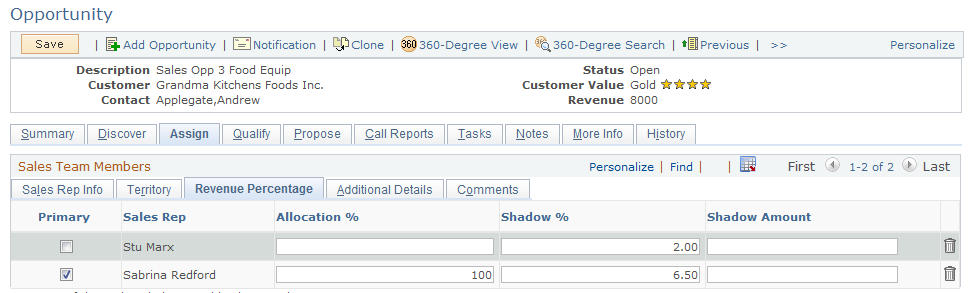
Note: Revenue allocations are required for the system to roll up an opportunity into pipelines and forecasts. Only opportunities can be rolled up into pipelines and forecasts. You cannot include leads in pipelines and forecasts. Therefore, the Revenue Percentage tab appears in the Opportunity component only. There is no equivalent tab in the Lead component.
|
Field or Control |
Definition |
|---|---|
| Allocation % (allocation percentage) |
Enter the percentage of the total revenue to allocate to this member of the sales team for forecasting. Often, 100 percent of the revenue is allocated to the primary member of the sales team, but it can also be distributed across two or more members of the team. The sum of the allocation percentages must total 100 percent. |
| Shadow % (shadow percentage) |
Enter the percentage of revenue that the individual is expected to earn. Note: The sum of the shadow percentages does not have to equal 100 percent. |
| Shadow Amount |
Enter a lump sum amount that the individual is expected to earn. |
Use the Send to EIM from Sales page (RSF_SENDTO_EIM_SEC) to send forecast information to PeopleSoft Incentive Management.
Navigation
On the Opportunity - Propose page, click the Compensate Selected button.
Image: Send to EIM from Sales page
This example illustrates the fields and controls on the Send to EIM from Sales page.
You can integrate PeopleSoft Incentive Management with PeopleSoft Sales to include opportunity revenues in compensation calculations. You can set up a single sign-on between the two databases and exchange opportunity forecasting data between PeopleSoft Sales and PeopleSoft Incentive Management. To enable Incentive Management, access the General Options page by navigating to Select the Incentive Management check box.
On the Send to EIM from Sales page, click the Compensate Selected button to send the forecasts to PeopleSoft Incentive Management.
See PeopleSoft Enterprise Components for PeopleSoft Enterprise Incentive Management 8.9 PeopleBook.