Setting Up Desktop Integration
This section discusses how to set up Desktop Integration.
|
Page Name |
Definition Name |
Usage |
|---|---|---|
|
IB_SERVICE |
Customize integration metadata to suit your particular business needs. However, note that integration metadata for this functionality (for example, service operations, routing definitions, service operations handlers, and so on) is delivered with your application; no additional configuration is required. |
|
|
WS_ACCESS_IB |
Define permissions and user access. Customize integration metadata to suit your particular business needs. |
|
|
EODI_SYSTEM_SETUP |
Configure Desktop Integration and the PeopleSoft system. |
Use the Service Operations - General page (IB_SERVICE) to customize integration metadata to suit your particular business needs.
However, note that integration metadata for this functionality (for example, service operations, routing definitions, service operations handlers, and so on) is delivered with your application; no additional configuration is required.
Navigation
Image: Service Operations - General page
This example illustrates the fields and controls on the Service Operations - General page. You can find definitions for the fields and controls later on this page.

To use Desktop Integration functionality, PeopleSoft Integration Broker must be set up and running.
Integration metadata for this functionality (for example, service operations, routing definitions, service operation handlers, and so on) is delivered with your application; no additional configuration is required. However, you can customize integration metadata to suit your particular business needs. All Desktop Integration service definitions have names that begin with EODI and are grouped by function. By default, the default local node receives all inbound integrations.
This product documentation contains all the information for configuring and setting up the Integration Broker.
See PeopleTools: PeopleSoft Integration Broker Administration
This product documentation describes how to create and modify integration metadata.
See PeopleTools: PeopleSoft Integration Broker
Use the Web Service Access page (WS_ACCESS_IB) to define permissions and user access.
Customize integration metadata to suit your particular business needs.
Navigation
Click the Service Operation Security link on the Service Operations - General page.
Image: Web Service Access page
This example illustrates the fields and controls on the Web Service Access page. You can find definitions for the fields and controls later on this page.

Oracle delivers these permission lists:
|
Field or Control |
Definition |
|---|---|
| EODI1000 |
Administrator level service operations for the queue. Select the access that you want for the user group:
EODI1000 is the permission list that contains all of the pages under the Desktop Integration menu. Administrators need access to this list. EODI_Administrator has EODI1000 defined as a role. |
| EODI2000 |
Service level service operations for the application classes. Select the access that you want for the user group:
EODI2000 is the permission list that contains all of the web services that Desktop Integration uses. Any user of the Microsoft Outlook and Word Add-Ins needs access to this list. The permission list contains a list of all Integration Broker services that the add-ins use to communicate with PeopleSoft applications. EODI_RemoteUser has EODI2000 defined as a role. |
Use the System Setup page (EODI_SYSTEM_SETUP) to configure Desktop Integration and the PeopleSoft system.
Navigation
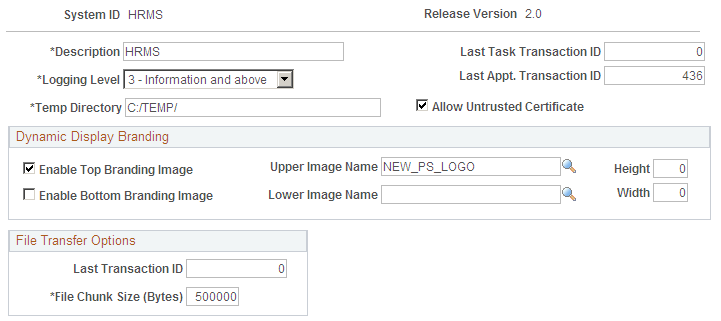
Image: System Setup page
This example illustrates the fields and controls on the System Setup page. You can find definitions for the fields and controls later on this page.
|
Field or Control |
Definition |
|---|---|
| System ID |
Enter a unique system ID. This ID must be unique across your organization to allow use across multiple data bases. After being set, this ID is used internally as a key on different pieces of information. For example, if you plan to connect to more than one PeopleSoft database, each database must have a unique ID. So if you have a Human Resources (HR) instance and a Financials/Supply Chain Management (FSCM) instance, each system should use a different system ID. When a transaction is passed to Microsoft Outlook, that transaction includes the system ID and the transaction ID from the database where it originated. Later, when the add-in needs to know the origin of that data, the information from the system ID and the transaction ID is used. |
| Release Version |
The version of the system identified by the system ID. This number is predefined. This number is used internally and is updated only when a new version of Desktop Integration is available. |
| Description |
A description of the system that the system ID identifies. Enter a unique description. The description can be a mixture of uppercase and lowercase with a maximum limit of 30 characters. This description is visible within the Microsoft Office applications server configuration. |
| Logging Level |
Specify the level of logging that you want. This controls the level of detail that is sent to the display log. Select a logging level from the drop-down list box. Values are:
|
| Last Task Transaction ID |
The transaction ID for the last task that keeps the tasks synchronous. This ID is auto incremented and should not normally be adjusted. |
| Last Appt. Transaction ID (last appointment transaction identifier) |
The date of the last appointment transaction. This is autogenerated, tracked, and used for synchronization. |
| Last Transaction ID |
This is autogenerated, tracked, and used for synchronization. |
| File Chunk Size (Bytes) |
The file size with which to move data to a temporary directory. This value is predefined. Administrators can set up chunking size for performance purposes. |
| Temporary Directory |
The temporary directory where you want to reassemble the data. Files are spooled to a temporary directory and reassembled there before completing. This directory must be available on all application servers that may process the incoming Desktop Integration Broker messages. |