29.6 Setting Up and Using Service Level Agreements

A service level agreement (SLA) is a contract between a service provider and a customer on the expected quality of service for a specified business period. An SLA consists of one or more service level objectives (SLOs) for different business calendars and different service periods for which define the service levels to be provided. Whether an SLA is satisfied or not is based on the evaluation of the underlying SLOs. Service level indicators (SLIs) allow SLOs to be quantified and measured. An SLO can have one or more SLIs.

SLOs define the service level objectives to be provided. An SLO is a logical grouping of individual measurable Service Level Indicators (SLIs). For example, an SLO can define the percentage of time a service is available to the user, how well the service is performing in terms of response time or volume, and so on. Service Level Indicators (SLIs) are quantifiable performance and usage metrics that can be used to evaluate the quality of a service.

To create an SLA, follow these steps:

  1. Log in to Enterprise Manager as a user with EM_ADMINISTRATOR role.
  2. From the Targets menu, select Services.
  3. Click on a Generic Service target on the list. The Service Home page is displayed.
  4. From the Generic Service menu, select Service Level Agreement, then select Configuration. The Service Level Agreement Configuration page appears.
  5. On this page, you will see a list of all the SLAs defined for the selected service. Select an SLA from the list to view the details in the Service Level Agreement Details table. You can create an SLA or make a copy of an existing SLA (Create Like).
  6. In the Service Level Agreement region, click Create. The Configure Service Level Agreement page appears.

    Figure 29-2 Create Service Level Agreement: Configure Service Level Agreement


    Configure Service Level Agreement

    Enter the following details:

    • Name and description of the SLA.

    • Name of the customer for whom the SLA is being created.

    • The Lifecycle Status of the SLA. When an SLA is being created, it will be in the Definition Stage. For more details on the Lifecycle Status, see Lifecycle of an SLA.

    • Specify the SLA Period. This is the contractual time period for which the SLA is determined and/or evaluated for compliance. (ie. quarterly, monthly, weekly SLA). Click the Select icon and select Monthly, Weekly, or Daily. Enter the Frequency which the SLA is to be evaluated and the date from which the SLA is to be evaluated. The SLA goals are reset when the SLA is evaluated.

      For example, if you specify the SLA Evaluation Period as Monthly, Frequency as 12 and the date as 09/01/12, the SLA will be evaluated on that date followed 11 consecutive evaluations in the months of October, November, and so on.

    • Specify the SLA Agreement Period. This is the From and To Date for which the recurring SLA periods are in effect. If you do not specify the To Date here, the SLA will have an Indefinite expiry date.

    • An SLO may sometimes not be evaluated due to planned downtime or blackouts that have been scheduled for a service. In the Service Level Agreement Evaluation Options region, select the Include blackout times (planned downtimes) in Service Level Objective evaluation checkbox and specify whether the blackout times are to be included in the SLO evaluation. You can choose to:

      • Include time as met

      • Include time as not met

      • Exclude the blackout time during the overall computation of the SLO.

      For example, if the blackout or planned downtime for the week is 1 day, then the weekly availability is (7-1) / (7-1) days which is still 100% availability.

      By default, the Include blackout times (planned downtimes) in Service Level Objective evaluation option is not selected.

  7. Click Next. In the Service Level Objectives page, define one or more SLOs that are to be part of the SLA. You can select the Evaluation Condition for the SLA which can be:
    • All Service Level Objectives must be met.

    • At least one Service Level Objective must be met.

    An SLA must have at least one SLO. More than one SLO can be active at any given time. You can either specify if all SLOs or at least one SLO should be met.

  8. Click Create to define a new SLO. See Creating a Service Level Objective for details.
  9. You can add more SLOs or edit the SLO you have defined. Click Next. In the Enable Service Level Agreement page, you can specify when the SLA is to be enabled. You can select:
    • Do Not Enable: If the SLA is not enabled, it will be in the Definition state and can be modified if required.

    • Enable Now: If the SLA is enabled, it cannot be modified as it will be in an Active state.

    • Enable Later: The SLA can be enabled later on a specified date.

  10. Click Next , review details of the SLA, and click Submit. The SLA will be enabled on the specified date and you will return to the Service Level Agreement Configuration page.

29.6.1 Actionable Item Rules for SLAs

The table below shows a list of actions that can be performed on an SLA based on its status.

Status of SLA Create Like Edit Enable Disable Delete

Definition

Yes

Yes

Yes

No

Yes

Scheduled

Yes

Yes

No

Yes

No

Active

Yes

No

No

Yes

No

Retired

Yes

No

No

No

Yes

  • An SLA in a Scheduled or Active state cannot be directly deleted. You have to disable the SLA before you can delete it.

  • When you edit an SLA in a Scheduled state, the status of the SLA changes to Definition.

29.6.2 Creating a Service Level Objective

A Service Level Objective measures the service level of one or more indicators for a specified measurement window. Service Level Objectives (SLOs) define the service levels to be provided. You can specify if the SLA is considered to be satisfied if:

  • All Service Level Objectives are met.

  • At least one Service Level Objective is met.

To create an SLO, follow these steps:

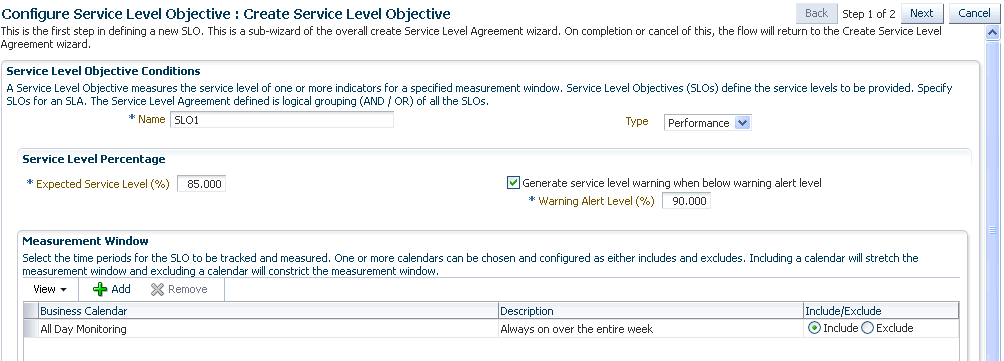
  1. Click Create in the Configure Service Level Objective page. The Create Service Level Objective page appears.

    Figure 29-3 Create Service Level Objective


    Create Service Level Objective

  2. Enter the following details:
    • Name of the SLO being defined.

    • Type of SLO: The SLO can be based on Availability or Performance metrics.

    • Expected Service Level%: This indicates the percentage of time the SLO conditions are met to ensure that the SLA is satisfied.

    • Warning Alert Level%: If the SLO conditions do not meet the specified threshold, a critical alert is generated.

      For example, if the Expected Service Level% is 90% and the Actual Service Level% is in the range of 90 to 99%, a Warning Alert is generated. If the Actual Service Level% is lesser than 90%, a Critical Alert is generated. This indicates that the SLA has been breached. If the Actual Service Level% is greater than 99%, it indicates that the SLA conditions have been satisfactorily met.

    • Measurement Window: The time periods during which the SLO is in effect. A measurement window can have more than one time period assigned. For example, a measurement window can be configured as weekday peak hours which are Monday to Friday, from 9AM to 6PM and the weekend peak hours as 10AM to 2PM.

      While creating an SLO, you can choose more than one Business Calendar for an SLO. For example, suppose you want to evaluate each SLO from 8AM to 5PM except at lunch time (12PM to 1PM). You can create two measurement windows and exclude the lunch time from being measured.

      Another example of merging two measurement windows is when you want to combine weekly evaluation with calendar evaluation. If you want to evaluate an SLO every Monday and on the 15th of every month, you can create two monitoring windows and include these conditions in both the windows.

      By default, there are 3 predefined business calendars. You can also create your own calendar. See Defining Custom SLA Business Calendars for details.

  3. Click Next. In the Create Service Level Indicators page, you can add one or more SLIs or conditions that allow the SLO to be measured.

    Figure 29-4 Create Service Level Indicators


    Create Service Level Indicators

    For example, if you are adding a performance SLI, you can specify that the Page Load Time should be less than or equal to 3 seconds. If this condition is not met, the SLI is considered to be violated. Specify the Evaluation Condition for the SLI:

    • All Service Level Indicators must be met.

    • At least one Service Level Indicator must be met.

  4. Click Add to add one or more metrics and specify the value and the evaluation condition. Click Submit to return to the Configure Service Level Objective page.

29.6.3 Lifecycle of an SLA

The following diagram shows the lifecycle of an SLA.

Figure 29-5 SLA Lifecycle
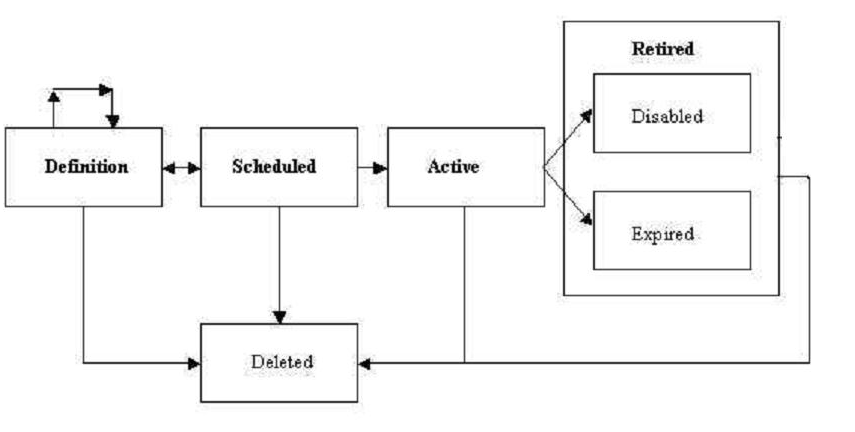

SLA Lifecycle

The SLA lifecycle consists of the following phases:

  • Definition: This is the stage where the SLA is created and the SLOs are defined. You can configure or edit the SLA definition till the SLA is activated.

  • Scheduled: This stage represents the period before the SLA is scheduled to go into effect at a future date.

  • Active: This is the stage where the start date of a scheduled SLA is reached, or when the SLA is manually enabled.

  • Retired: This is the stage when the SLA reaches the Expiry Date or the SLA is manually disabled.

  • Disabled: An SLA can be manually disabled before it reaches the Expiry Date. Once an SLA is disabled, it cannot be reactivated. You must use the Create Like option to create a similar SLA and enable it.

  • Expired: This is the stage where the SLA has reached the Expiry Date and is no longer active.

  • Deleted: An SLA can be deleted if it is the Definition or Retired stage. An SLA that is an Active or Scheduled stage cannot be deleted.

29.6.4 Viewing the Status of SLAs for a Service

You can view the status of all SLAs for a service. To view the current status of the SLAs for a service, follow these steps:

  1. From the Targets menu, select Services.
  2. Click on a Generic Service target on the list. The Service Home page is displayed.
  3. From the Generic Service menu, select Service Level Agreement, then select Current Status. The Service Level Agreement Current Status page appears.
  4. This page shows a list of all the active SLAs that have been defined for this service. For each SLA, the SLA Status, SLA Evaluation Period, and the Service Level Objectives are displayed.
  5. Select an SLA to view detailed information in the SLA. The following details are displayed:
    • Tracking Status: This is the instant status of the SLI. For an Availability SLO, it is the status of the target. For a Performance SLO, it is the value of the Performance or Usage metric at a specific point in time.

    • Service Level (%) : The percentage of time (from the beginning of the current evaluation period till the current date) the SLO conditions are met or the Tracking Status is true. If the Actual Service Level % is lesser than the Expected Service Level %, or the SLO conditions are met, the Service Level % graph is green.

    • Type: This is the type of SLOs that have been defined for the SLA. This can be based on Availability or Performance metrics. An Availability SLO is based on the Response Metric [ Service Target Availability]. It is specified in terms of the amount or percentage of time when the availability objective should be met. A Performance SLO gauges how well a service is performing. It includes measurements of speed and/or volume such as throughput or workload (ie. response times, transactions/hour). A Performance SLO can either be specified in terms of a set of SLIs, SLO conditions, and the amount or percentage of time when the objective should be met.

    • SLO Violation: The violation allowances for each SLA evaluation period.

      • Total: The duration of the Evaluation Period * ( Expected Service Level).

      • Actual: The time when the SLO is not met during the Evaluation Period.

      • Remaining: The time when the SLO could not be met without breaching the SLA. If the SLO is always met during the Evaluation Period, it indicates that there are no used allowances and the value in the Actual field will be 0.

29.6.5 Defining Custom SLA Business Calendars

Business Calendars are measurement windows that define a specific window of time in which the Service Level Objectives (SLO) are being measured. Out-of-the-box predefined business calendars are available. Apart from these, you can create custom business calendars. To create a custom business calendar, from the Targets menu, select Services. From the Services Features menu, select Business Calendars.

A list of business calendars that have been defined is displayed here. You can:

  • Create: Click Create to set up a business calendar. The Add / Edit Business Calendar page is appears.

  • Create Like: Select a calendar and click Create Like to make a copy of this calendar.

  • Edit: Select a calendar, click Edit and make the necessary changes in the Add / Edit Business Calendar page.

  • Delete: Select a calendar and click Delete to delete it. You cannot edit or delete a business calendar that is associated with one or more SLAs.

  • View Associated Service Level Agreements: A business calendar can be used by one or more SLAs. Select a business calendar and click View Associated Service Level Agreements to view the SLAs that are associated with this calendar.