You can append auto calculations to the data rows and columns of your grids. For example, you might want to calculate the total of rows or columns that expand and contain multiple dimensions.
When you define an auto calculation for a data row or column, a row or column is inserted at runtime that contains the calculated value. This calculation goes against all members in a row or column and is displayed when you print or preview the report.
You can apply several formatting options. For each auto calculation, you can specify a heading for the calculated row or column and a group heading. You can specify the location of the calculation row or column in relation to the member, and you can insert blank rows before and after calculation rows and group headings. You can also specify page breaks within rows of calculation and after a calculation row.
You can apply several of the formatting options provided with auto calculation but exclude the auto calculation function for a specified cell, row, or column.
You can define different types of calculation for each dimension or member in the row or column using one of the following functions:
Average—The average value of values in the segment in this dimension at runtime (ignores non-number values)
Average All—The average value of values in the segment in this dimension at runtime (assigns 0 to non-number values)
Count—The number of values in the segment in this dimension at runtime (ignores non-number values)
Count All—The number of values in the segment in this dimension at runtime (assigns 0 to non-number values)
Maximum—The largest value of the values in the segment in this dimension at runtime
Minimum—The smallest value of the values in the segment in this dimension at runtime
Product—This function multiplies all numbers or references in the segment in the dimension and returns the product at runtime
Total—The sum of the values in the segment in this dimension at runtime
You can use the formatting options without having calculation done. This enables you to retain the member grouping without calculations such as totals.
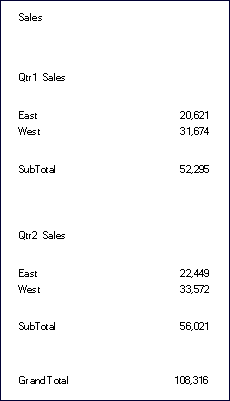
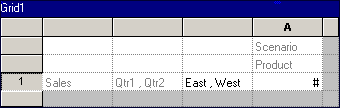
The following figure is an example of a grid where auto calculation is applied. In the grid, the columns Sales and Qtr1, Qtr2 and the rows Scenario and Product are hidden to achieve the desired presentation in the report:
 To add auto calculations to data rows or columns:
Select the heading cell of a row or column that contains multiple members.
In the Heading Row or Column Properties sheet, select Auto Calculation, then click Setup. The Insert an Auto Calculation Row / Column dialog box is displayed.
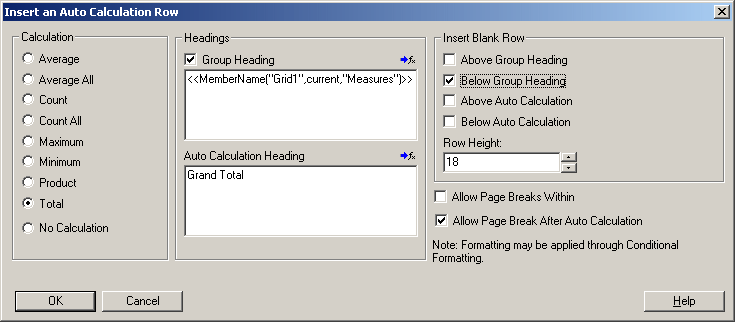
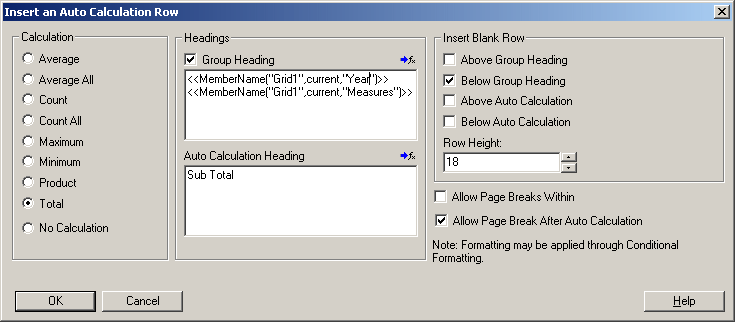
The following two figures illustrate the settings for the example report.
In the Calculation area, select a function for the type of calculation you want to perform. Select No Calculation to only include auto calculation formatting.
Optional: To add headings to the calculation or group rows or columns, take any of the following actions in the Headings area.
Select the Group Heading check box, then enter a custom heading to describe the row or column. To insert formulas in the headings, click the Functions button
 . For more information, see Using Text Functions to Display Information.
When using the MemberName function, you must enter “current” for the row/column/page parameters.
In the Auto Calculation Heading text box, enter a custom heading for the calculation row or column. To insert formulas in the headings, click the Functions button
. For more information, see Using Text Functions to Display Information.
Optional: To insert blank rows or columns before or after calculation rows or columns and group headings, select any check boxes in the Insert Blank Row /Column area.
To change the height or width of the inserted row or column, enter the unit in the Row Height or Column Width text box.
Select Allow Page Breaks Within to allow a page break within the rows of auto calculation. When deselected, the heading cell and the row are kept together. If the row is too long to fit on a page, the heading cell and the row is moved to the next page. If the auto calculation row is longer than one page, the option defaults to Allow Page Break Within.
Select Allow Page Breaks After Auto Calculation to allow a page break after the calculation row.
To view the report, select File, and then Print Preview. The example report resembles Figure 14, Example Report with Auto Calculation.
See Figure 15, Print Preview of Example Report with Applied Conditional Formatting to view the same report with applied conditional formatting.