Oracle® Enterprise Manager Ops Center
Use Complex Plans
12c Release 3 (12.3.0.0.0)
E60015-01
June 2015
This guide provides an end-to-end example for how to use Oracle Enterprise Manager Ops Center.
Introduction
This guide describes how to combine simple plans and profiles to create complex plans.
Complex plans let you consistently perform multi-step procedures. Each complex plan contains one or more steps, which can be profiles or other plans. The plan specifies the targets on which these tasks are run and in what order.
For example, this guide uses an Install Server plan, which includes an OS Provisioning and OS Configuration profile to create a new OS, a custom monitoring profile to apply to the new OS, and an operational profile that creates a new directory on the OS and modifies its access. Other complex plans can perform tasks such as installing LDoms on newly installed servers.
You will complete the following tasks:
-
Create an OS Provisioning profile
-
Create an OS Configuration profile
-
Create a new monitoring policy
-
Create an operational profile to create and modify a new directory
-
Create a complex plan to install a server, including installing the OS, applying the monitoring policy, and applying the operational profile
See Related Articles and Resources for links to related information and articles about profiles and plans.
What You Will Need
You will need the following:
-
Oracle Enterprise Manager Ops Center Enterprise Controller and Proxy Controller installed on an Oracle Solaris 11 OS.
-
One or more hardware assets
-
Oracle Solaris 11 Software Update Library with Oracle Solaris 11.1 SRU 9.6 content: The examples in this guide use an Oracle Solaris 11.1 OS. Creating a complex plan using another OS requires an image for that OS, and does not require that the Enterprise Controller or Proxy Controller be installed on Oracle Solaris 11.
-
A user with the Plan/Profile Admin role
Create an OS Provisioning Profile
You can use the default profiles, copy a default profile to create a new profile, or create a new profile. One of the advantages to copying a default profile is that the correct OS image, OS image version, and software group are pre-selected based on the image. This example shows how to copy a default profile to create a new profile. The default profile that we are copying is called default-profile-Oracle Solaris 11.1 SPARC-9.6-OracleSolarisDesktop.
-
Expand Plan Management in the Navigation pane, then select OS Provisioning in the Profiles and Policies tree.
A list of OS profiles appears in the center pane. Resize the column to view the entire profile name.
-
Select the default profile for the image. In this case,
default-profile-Oracle Solaris 11.1 SPARC-9.6-OracleSolarisDesktop. Click the Copy Profile icon in the center pane.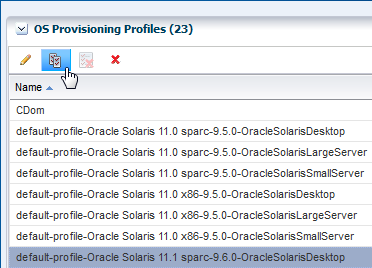
Description of the illustration osp_default_s11.png
-
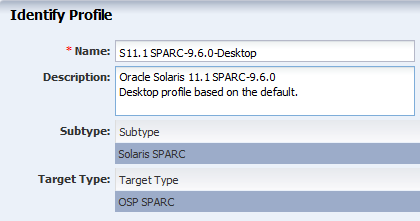
Rename the profile from the default profile name. Revise and expand the profile description, if needed. The subtype and target type are based on the image and are not editable. Click Next.
Description of the illustration osp_profile_id.png
-
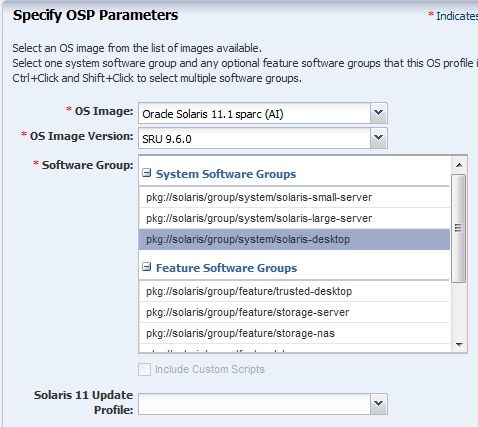
On the Specify OSP Parameters page, the OS image, OS Image Version, and Software group are already selected based on the image. This example does not use a Solaris 11 Update Profile, but one can be used during this step to add additional packages to the new OS. Click Next.
Description of the illustration osp_parameters.png
-
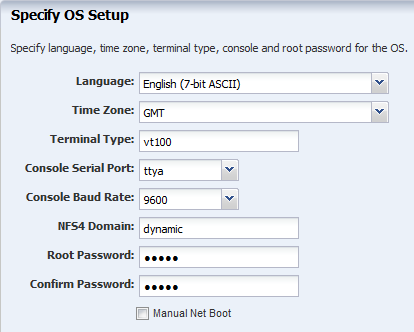
Specify the OS Setup parameters. Edit the default values, as needed. Click Next.
Description of the illustration osp_setup.png
-
Language: Select a language from the list.
-
Time Zone: Specify the time zone for the OS.
-
Terminal Type: Select a terminal type from the list.
-
Console Serial Port: To monitor the installation using a serial connection, select the correct console serial port device.
-
Console Baud Rate: To monitor the installation using a serial connection, select the correct serial port device baud rate.
-
NFS4 Domain: Enter the NFS4 domain name that the target system will use. The dynamic value for NFSv4 domain name enables the NFSv4 domain to be derived dynamically, at run time, based on the naming service configuration. You can also provide valid domain name to hard code the value for NFSv4 domain.
-
Password: Enter the root password for the root user on systems provisioned using this profile. Re-enter the password for confirmation. The default password is admin.
-
-
Specify the User Account details, then click Next.
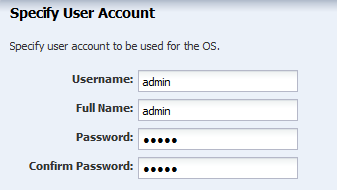
Description of the illustration osp_profile_useracct.png
-
Click Next. This example does not use an iSCSI Disk for OS provisioning.

Description of the illustration osp_iscsi_usage.png
-
Review and edit the default file system layout, then click Next.
This example uses the default file system layout. To specify changes to the default File System space, click the size field for the file system, and redefine.
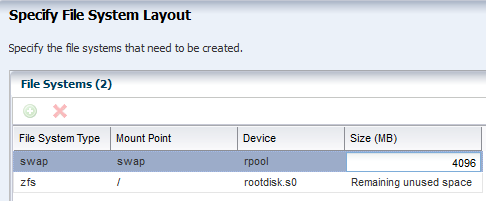
Description of the illustration osp_profile_fileys.png
-
Select None, then click Next to skip using a naming service.

Description of the illustration osp_profile_namesvc.png
To use a naming service, select the service and complete the required fields.
-
Review the parameters and click Finish to create the OS Provisioning profile for provisioning Oracle Solaris 11 operating system.
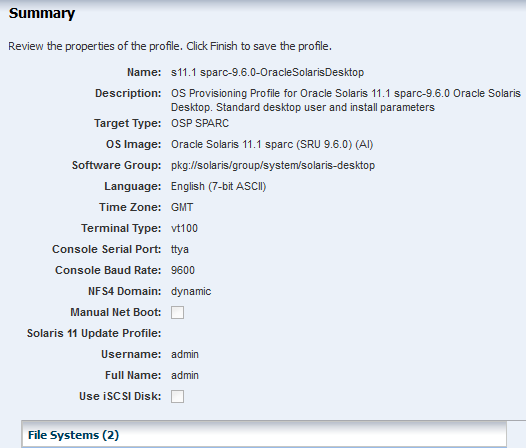
Description of the illustration osp_summary.png
The profile appears in the center pane and in the Profiles and Policies section of Plan Management.
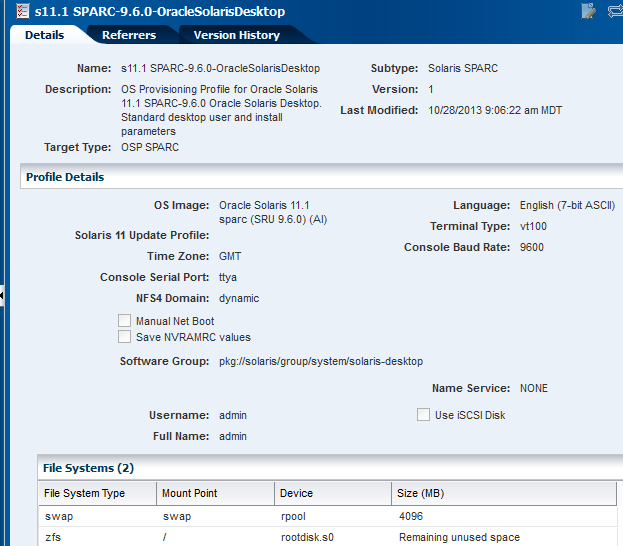
Description of the illustration osp_details.png
Create an OS Configuration Profile
This example shows how to create an OS Configuration profile to define how the OS is managed (with or without an agent) and the networking options. The profile is not SRU-specific.
-
Expand Plan Management in the Navigation pane.
-
Select OS Configuration in the Profiles and Policies tree. A list of existing OS Configuration profiles appears in the center pane.
-
Click Create Profile in the Actions or center pane.
-
Name the profile and enter a profile description. Select Solaris and OSP SPARC as the Subtype and Target Type. Click Next.
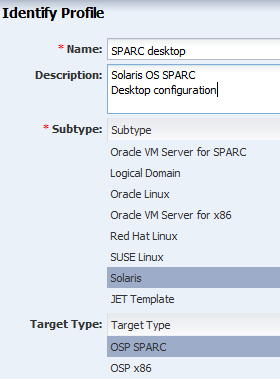
Description of the illustration osc_id_profile.png
-
The default setting is to automatically manage the OS with Oracle Enterprise Manager Ops Center and Deploy the Agent Controller. This option provides the most robust management capabilities. Deselect MPxIO for this example, as we do not want to enable SAN storage connectivity for the desktop system that is the target for this profile. Click Next.
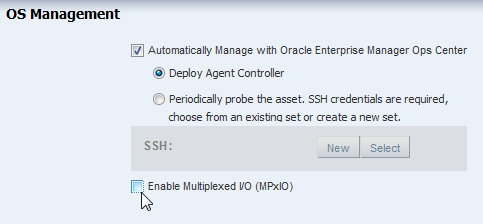
Description of the illustration os_mgmt.png
-
Select None for the Networking Services and click Next.
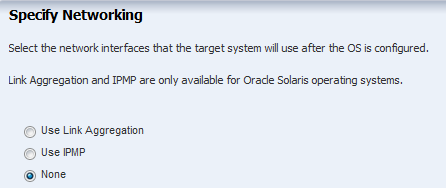
Description of the illustration osc_nw_none.png
-
Select a network interface that you want to use in the configuring process and Click Next.
The network interface is the interface that you want to use on the operating system. This example uses the default
net_0interface and Static IP Address Allocation. You define the IP address when you apply the OS provisioning plan to a target.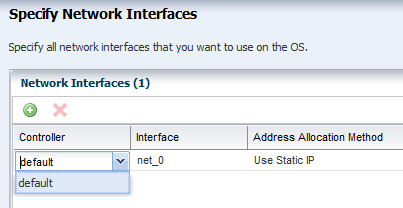
Description of the illustration osc_nw_interface.png
-
Review the summary of the parameters selected for configuring Oracle Solaris 11 operating system, then click Finish to create the OS Configuration profile.
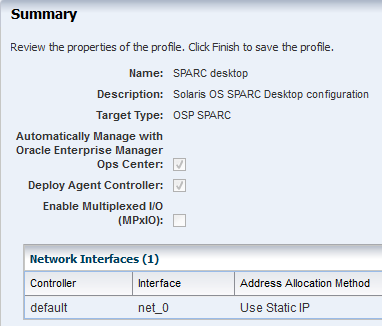
Description of the illustration osc_summary.png
Expand the Plan Management section. In the section OS Configuring of Profiles and Policies section you can select the OS configuration profile to view its details in the center pane.
Creating a Monitoring Policy
A monitoring profile sets the monitoring parameters for an asset. Oracle Enterprise Manager Ops Center generates an alert for an asset if one of the monitored properties, such as the file system usage or CPU usage, exceeds the values specified in the monitoring profile.
By default, pre-generated monitoring profiles are applied to assets. However, you can create modified versions of these profiles and apply them to assets. In this example, you copy the default OS monitoring policy and edit the file system usage threshold to create a new policy.
-
Expand Plan Management in the Navigation pane, then click Monitoring Policies.
-
Select the OC - Operating System policy, then click the Copy Policy icon.
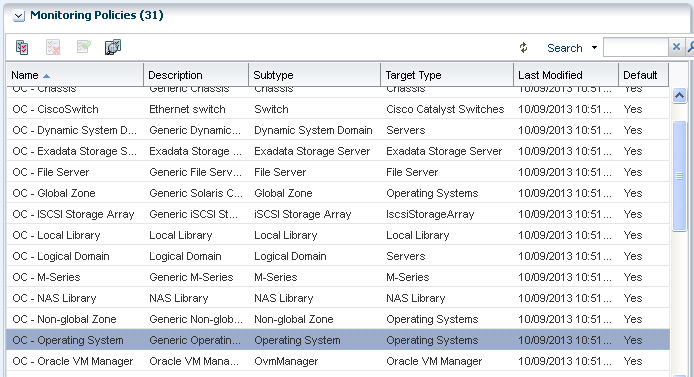
Description of the illustration monitoring_os.jpg
-
Enter a name and description for the new policy, then click Next. In this example, we use the name Operating System - Group 1.
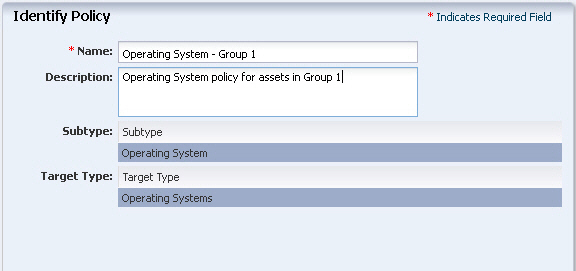
Description of the illustration monitoring_id.jpg
-
Review the details, then click Finish.
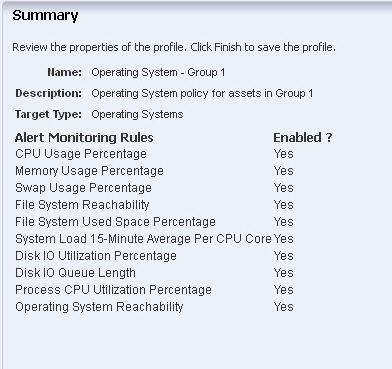
Description of the illustration monitoring_summary1.jpg
The new policy is displayed in the Monitoring Policies section.
-
Select the new policy.
The policy details are displayed.
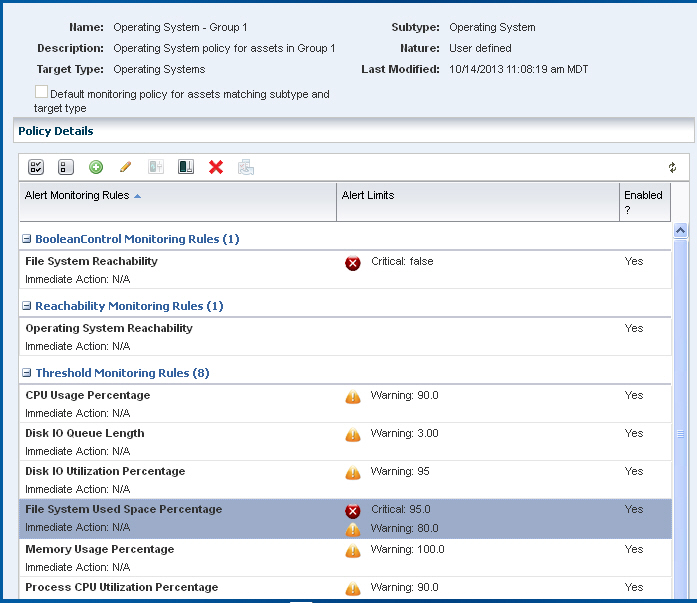
Description of the illustration monitoring_center.jpg
-
Select the File System Used Space Percentage rule and click Edit Alert Monitoring Rule Parameters.
-
Edit the value of the Critical Threshold to 85% and the value of the Warning Threshold to 70%, then click Apply.
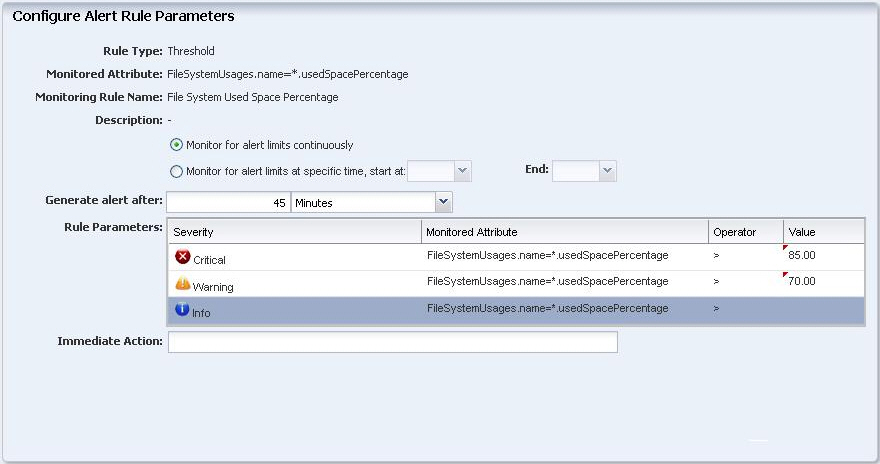
Description of the illustration monitoring_edit.jpg
Creating an Operational Profile
An Operational Profile performs specific operations, defined by a shell script, on a target system.
An operational profile can carry out any action that can be included in a shell script, such as deploying thresholds onto a managed resource, or performing state changing actions such as shutting down all logical domains and then shutting down an Oracle VM Server for SPARC. The scripts in an operational profile can run on any managed system that contains a remote agent. These scripts are executed with root permissions.
Perform the following steps to create an operational profile. In this example, the operational profile will create a new directory, then modify the directory's permissions.
-
Expand Plan Management in the Navigation pane, then click Operational Profiles.
-
Click Create Profile.
-
Name the new profile and add a description. In this example, use the name Add Company File. Select the Operating System subtype, then click Next.
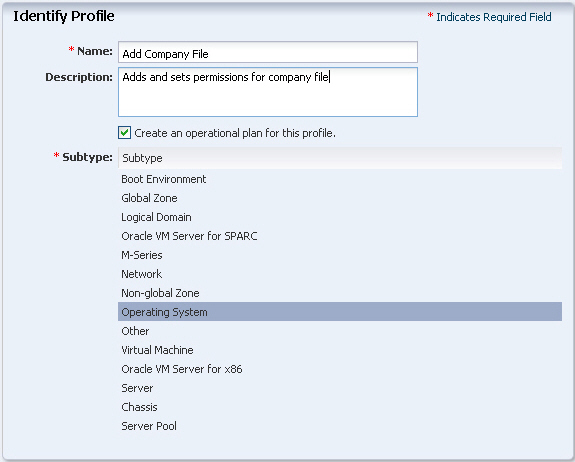
Description of the illustration op_prof_id.jpg
-
Define the script, then click Next.
-
Select the Remote Shell type.
-
Define the time out parameters.
-
Enter the script in the Script field:
#!/bin/bash
mkdir /var/tmp/company
chmod 776 /var/tmp/company
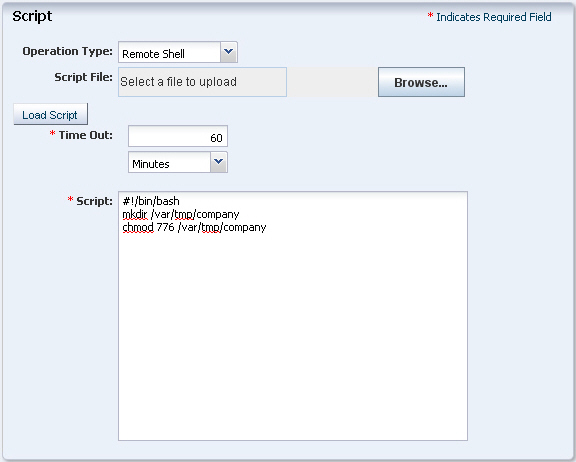
Description of the illustration op_prof_script.jpg
-
-
The Specify Additional Variables page is displayed. Click Next.
-
The Summary page is displayed. Review the profile, then click Finish.
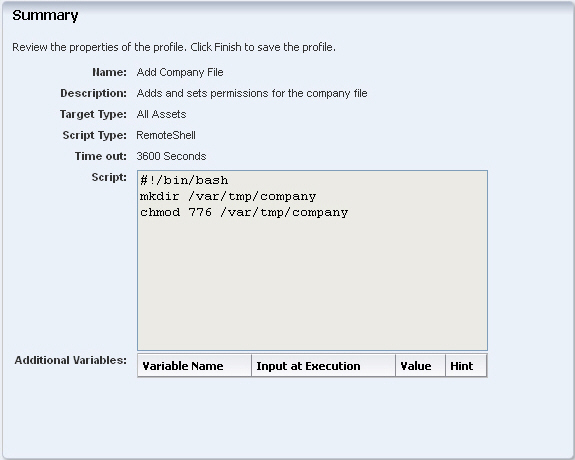
Description of the illustration op_prof_summary.jpg
Creating a Complex Plan
A complex plan combines multiple existing profiles and plans into a larger job.
In this example, we will create an Install Server plan, which will run first the OS Provisioning plan that we edited, followed by the edited monitoring profile, followed by the operational profile to add a directory and modify its permissions.
Perform the following steps to create this plan:
-
Expand Plan Management in the Navigation pane, then click Install Server in the Deployment Plans section.
-
Click Create Plan from Template in the Actions pane.
-
Name the new plan and add a description. Select Stop at Failure for the failure policy.
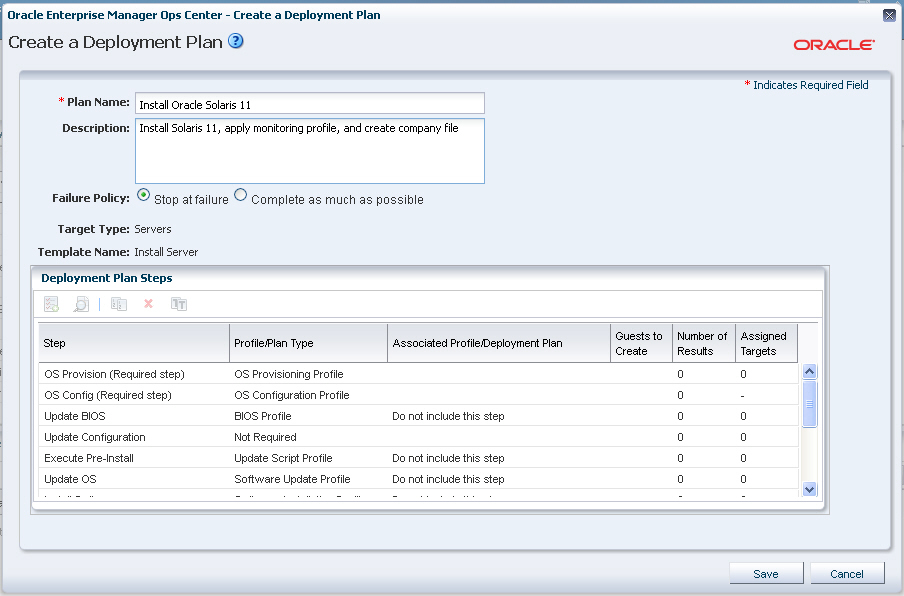
Description of the illustration install_server_name.jpg
-
In the OS Provision (Required step) row, select the S11.1SPARC-9.6.0-Desktop OS Provisioning profile.

Description of the illustration install_server_osp.jpg
-
In the OS Config (Required step) row, select the SPARC desktop OS Configuration plan.

Description of the illustration install_server_osc.jpg
-
In the Operation row, select the Add Company File operational profile.

Description of the illustration install_server_op_prof.jpg
-
In the Monitoring row, select the Operating System - Group 1 monitoring profile.

Description of the illustration install_server_monitor.jpg
-
Review the plan, then click Save.
Related Articles and Resources
See the Create Plans and Profiles in Oracle Enterprise Manager Ops Center Configure Reference for information about plans and profiles. This document is available in the Oracle Enterprise Manager Ops Center Documentation Library at http://docs.oracle.com/cd/E59957_01/index.htm.
See the Operate How To library at http://docs.oracle.com/cd/E59957_01/nav/operate.htmfor more information about using profiles and plans in your environment.
Documentation Accessibility
For information about Oracle's commitment to accessibility, visit the Oracle Accessibility Program website at http://www.oracle.com/pls/topic/lookup?ctx=acc&id=docacc.
Oracle customers that have purchased support have access to electronic support through My Oracle Support. For information, visit http://www.oracle.com/pls/topic/lookup?ctx=acc&id=info or visit http://www.oracle.com/pls/topic/lookup?ctx=acc&id=trs if you are hearing impaired.
Oracle Enterprise Manager Ops Center Use Complex Plans, 12c Release 3 (12.3.0.0.0)
E60015-01
Copyright © 2007, 2015, Oracle and/or its affiliates. All rights reserved.
This software and related documentation are provided under a license agreement containing restrictions on use and disclosure and are protected by intellectual property laws. Except as expressly permitted in your license agreement or allowed by law, you may not use, copy, reproduce, translate, broadcast, modify, license, transmit, distribute, exhibit, perform, publish, or display any part, in any form, or by any means. Reverse engineering, disassembly, or decompilation of this software, unless required by law for interoperability, is prohibited.
The information contained herein is subject to change without notice and is not warranted to be error-free. If you find any errors, please report them to us in writing.
If this is software or related documentation that is delivered to the U.S. Government or anyone licensing it on behalf of the U.S. Government, then the following notice is applicable:
U.S. GOVERNMENT END USERS: Oracle programs, including any operating system, integrated software, any programs installed on the hardware, and/or documentation, delivered to U.S. Government end users are "commercial computer software" pursuant to the applicable Federal Acquisition Regulation and agency-specific supplemental regulations. As such, use, duplication, disclosure, modification, and adaptation of the programs, including any operating system, integrated software, any programs installed on the hardware, and/or documentation, shall be subject to license terms and license restrictions applicable to the programs. No other rights are granted to the U.S. Government.
This software or hardware is developed for general use in a variety of information management applications. It is not developed or intended for use in any inherently dangerous applications, including applications that may create a risk of personal injury. If you use this software or hardware in dangerous applications, then you shall be responsible to take all appropriate fail-safe, backup, redundancy, and other measures to ensure its safe use. Oracle Corporation and its affiliates disclaim any liability for any damages caused by use of this software or hardware in dangerous applications.
Oracle and Java are registered trademarks of Oracle and/or its affiliates. Other names may be trademarks of their respective owners.
Intel and Intel Xeon are trademarks or registered trademarks of Intel Corporation. All SPARC trademarks are used under license and are trademarks or registered trademarks of SPARC International, Inc. AMD, Opteron, the AMD logo, and the AMD Opteron logo are trademarks or registered trademarks of Advanced Micro Devices. UNIX is a registered trademark of The Open Group.
This software or hardware and documentation may provide access to or information about content, products, and services from third parties. Oracle Corporation and its affiliates are not responsible for and expressly disclaim all warranties of any kind with respect to third-party content, products, and services unless otherwise set forth in an applicable agreement between you and Oracle. Oracle Corporation and its affiliates will not be responsible for any loss, costs, or damages incurred due to your access to or use of third-party content, products, or services, except as set forth in an applicable agreement between you and Oracle.