An Example of Using the Oracle E-Business Suite Adapter
Overview
To better understand how to use Oracle E-Business Suite services, this chapter describes an integration example through the use of Oracle E-Business Suite Adapter.
Sample Business Scenario
Take a PL/SQL API called Sales Order Services (OE_INBOUND_INT) as an example to explain the integration between the Oracle E-Business Suite Adapter and a trigger (source) connection in Oracle Integration Cloud Service.
In this example, the Oracle E-Business Suite Adapter is used as an invoke (target) connection for service invocation, and the REST Adapter is used as a trigger (source) connection to provide an inbound REST request. When the Oracle E-Business Suite Adapter receives a REST request message with input payload for order creation from the trigger (source) connection, the OE_INBOUND_INT REST service in Oracle E-Business Suite is then invoked to create the order.
Note: Any application adapters can be used as trigger (source) connections to create integrations for your business needs. In this example, the REST Adapter is used as a trigger (source) connection.
Once the integration is successfully executed at runtime, a sales order will be created in Oracle E-Business Suite.
Creating an Integration for Oracle E-Business Suite in Oracle Integration Cloud Service
Based on the integration scenario, the following tasks are included in this section:
-
Establishing the Connections for Oracle E-Business Suite and REST Services
-
Adding the Oracle E-Business Suite Adapter as an Invoke (Target) Connection
Establishing the Connections for Oracle E-Business Suite and REST Services
Before creating an integration, you need to cerate the following two connections:
-
Connection for Oracle E-Business Suite
Once the connection for an Oracle E-Business Suite instance is successfully established, you can then add Oracle E-Business Suite as an invoke (target) connection later for an integration.
-
Connection for REST services
Similar to the Oracle E-Business Suite connection, once the connection for REST services is established, you can then use it as a trigger (source) connection later for an integration.
Creating an Oracle E-Businss Suite Connection
Perform the following steps to establish the connection for Oracle E-Businss Suite in Oracle Integration Cloud Service:
-
Log in to Oracle Integration Cloud Service.
In the Integration Cloud Service toolbar, click Connections.
-
Click Create New Connection.
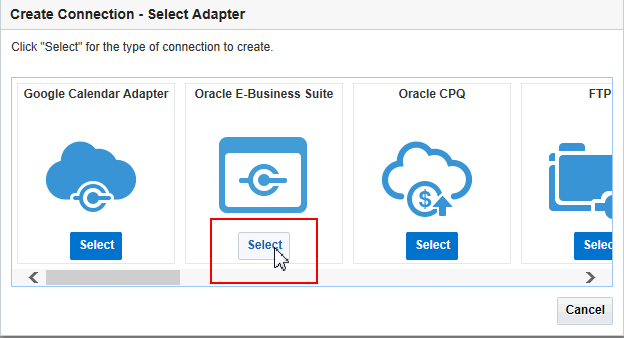
In the Create Connection - Select Adapter dialog appears. Click the Select button for Oracle E-Business Suite Adapter.
-
In the New Connection - Information dialog, enter "EBS1225" as the Connection Name. The same information is automatically populated in the Identifier field.
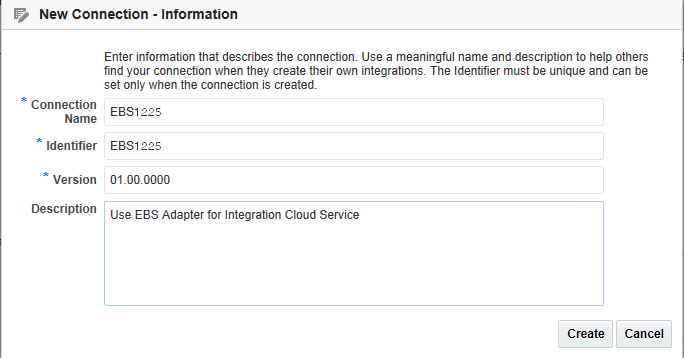
Click Create to create the connection.
-
Click Configure Connectivity to open the Connection Properties dialog where you enter a URL (http://<ebs host name>:<port>) to connect to an Oracle E-Busiess Suite instance.

Click OK to save your work.
-
Click Configure Credentials to open the Credentials dialog.
Enter operations as the username, and its associated password to access the Oracle E-Business Suite instance you specified earlier in the Connection Properties dialog.
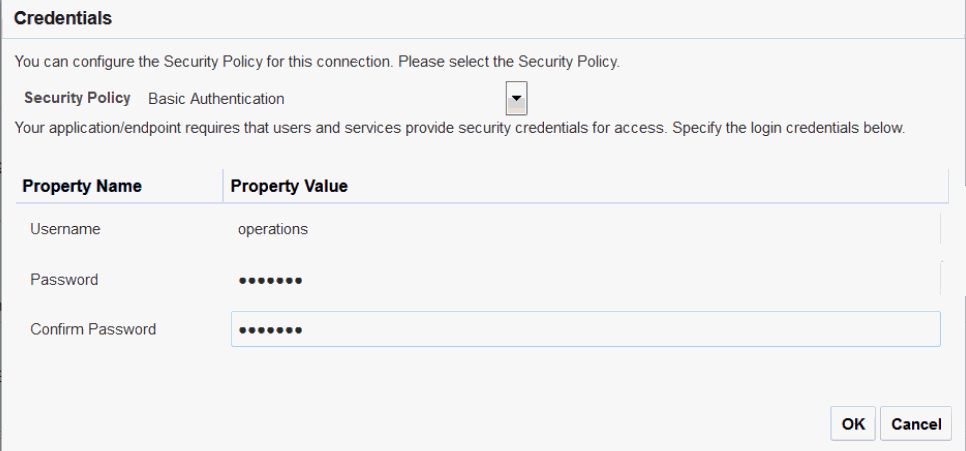
Click OK to save your work.
-
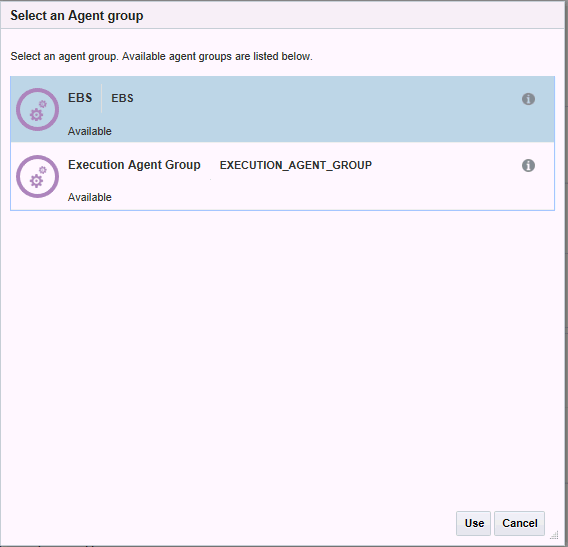
Click Configure Agents to display the Select an Agent group dialog. A list of available agent groups is automatically populated for your selection.
Select a desired agent group, such as EBS, and click Use to enable the selection.
-
After you specify the connection details for your connection EBS1225, the detailed information is populated.
-
Click Test to test the connection you just specified for Oracle E-Business Suite.
-
Click Save to save your connection.
Click Exit Connection.
The Oracle E-Business Suite connection "EBS1225" is now displayed in the Connections page.

Creating a Connection for REST Services
Perform the following steps to create the connection for REST APIs:
-
In Oracle Integration Cloud Service, click Create New Connection.
In the Create Connection - Select Adapter dialog appears. Click the Select button for REST Adapter.
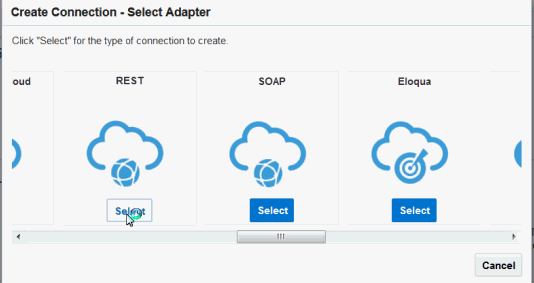
The New Connection - Information dialog appears.
Enter "GenericREST" as the Connection Name. The identifier value, GENERICREST, is automatically populated.
Enter a meaningful description for this connection, such as "The sample source REST endpoint".
-
Click Create to create the connection.
-
Click Configure Connectivity to open the Connection Properties dialog where you enter a REST Service URL (http://<ebs host name>:<port>/webservices/rest/orderMgmt) to connect to an instance for REST services.
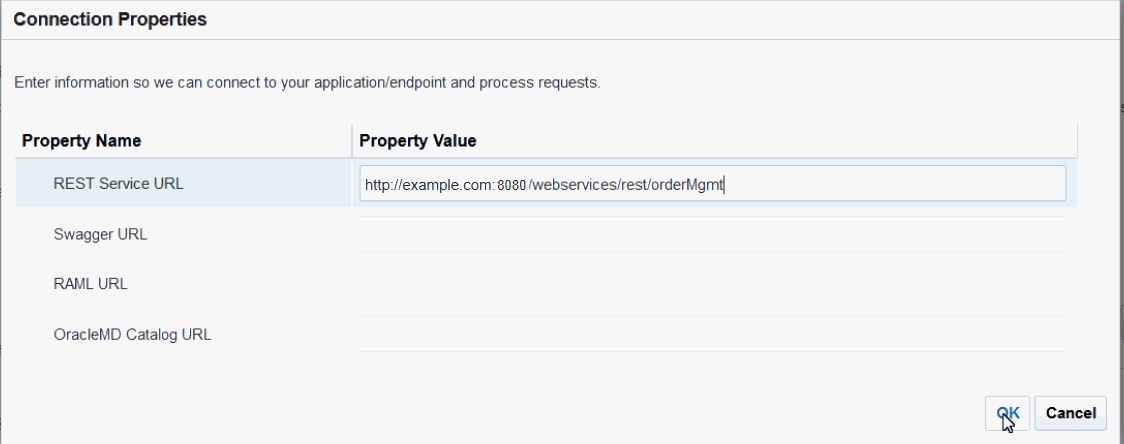
Click OK to save your work.
-
Click Configure Credentials to open the Credentials dialog.
Enter operations as the username, and its associated password to access the instance for REST services you specified earlier in the Connection Properties dialog.

Click OK to save your work.
-
Click Test to test the connection you just specified for REST services.
-
Click Save to save your connection.
Click Exit Connection.
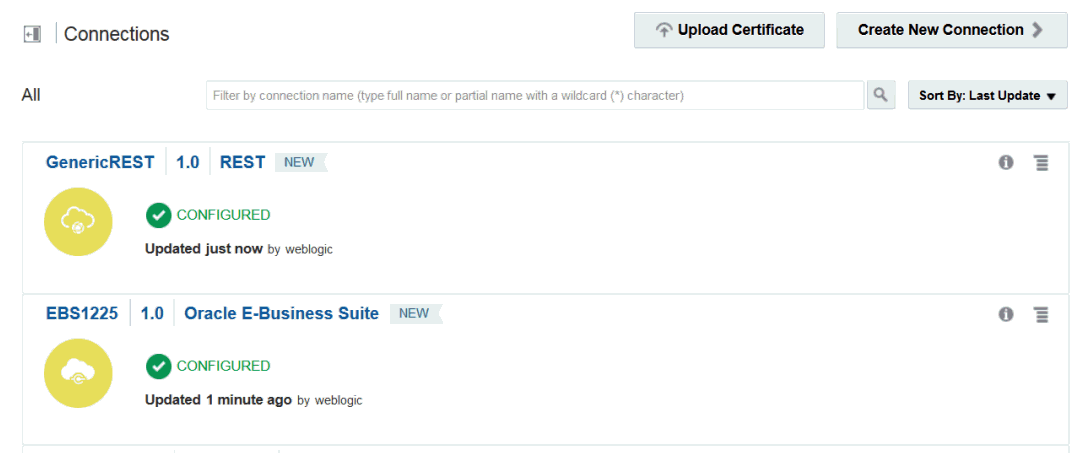
The connections for REST "GenericREST" is displayed in the Connections page, along with the Oracle E-Business Suite connection "EBS1225" that you created earlier.
Creating an Integration
Perform the following steps to create an integration between REST services and Oracle E-Business Suite:
-
In the Integration Cloud Service toolbar, click Designer.
-
In the Designer Portal, click Integrations.
-
In the Integrations page, click Create New Integration.
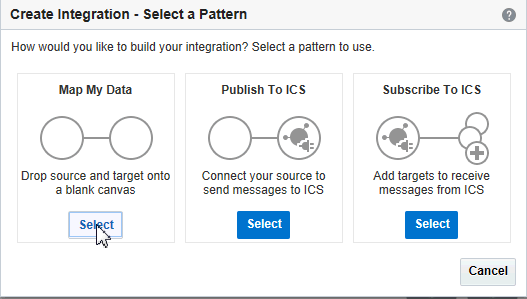
The Create Integration - Select a Pattern dialog appears.
-
Click Select for the "Map My Data" integration pattern to create an integration with a blank source and target.
-
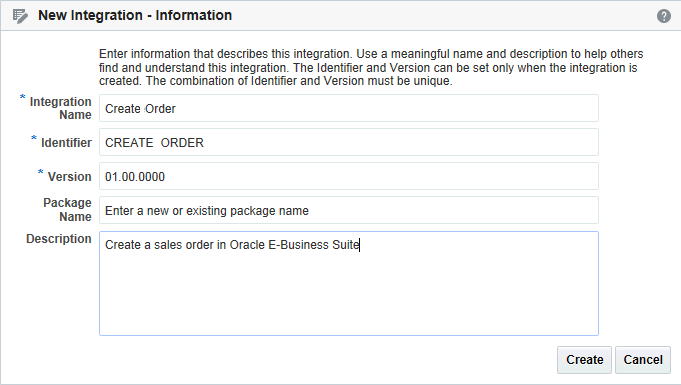
The New Integration - Information dialog appears. Enter the following information:
-
Integration Name: Enter "Create Order".
-
Identifier: Accept the default identifier value such as "CREATE ORDER".
-
Version: Accept the default version number.
-
Description: Enter description information for your integration, such as "Create a sales order in Oracle E-Business Suite".
-
-
Click Create and Save.
Adding the Oracle E-Business Suite Adapter as an Invoke (Target) Connection
Once the integration is created, you need to add the Oracle E-Business Suite connection "EBS1225" that you created earlier as an invoke (target) connection for your integration.
Perform the following steps to add the Oracle E-Business Suite Adapter as an invoke (target) connection:
-
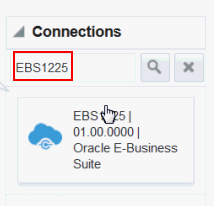
In the Create Order integration page, search the "EBS1225" connection that you created earlier from the Connections panel.
-
In the Integration Designer, drag EBS1225 from the Connections panel on the right to the Invoke (Target) area on the canvas.
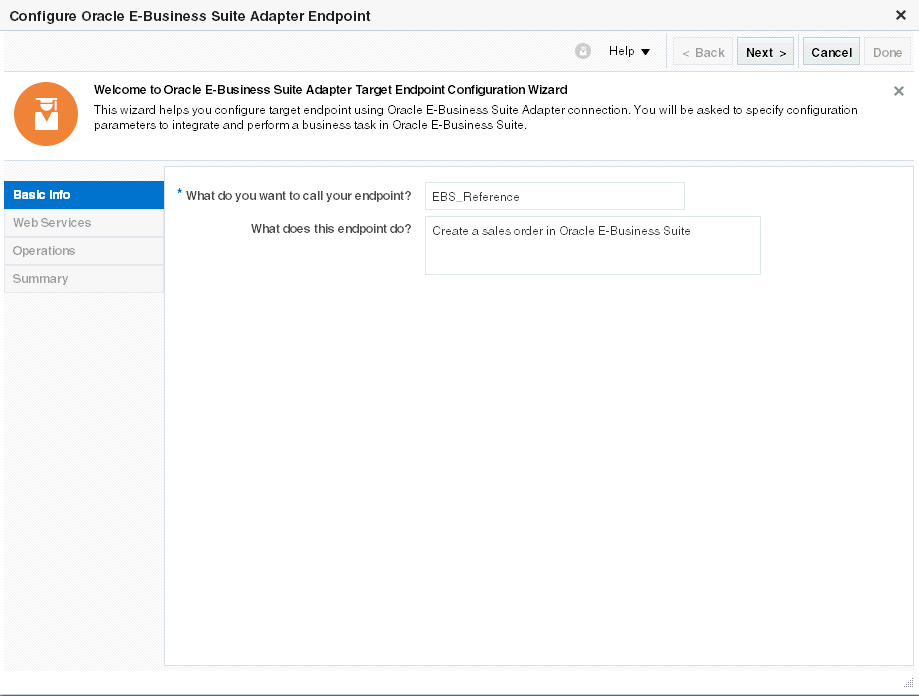
The Configure Oracle E-Business Suite Adapter Endpoint wizard appears.
-
In the Basic Info page, enter a meaningful name for your Oracle E-Business Suite integration endpoint, such as "EBS_Reference".
Enter the description for this integration in the "What does this endpoint do?" field. For example, Create a sales order in Oracle E-Business Suite.
Click Next.
-
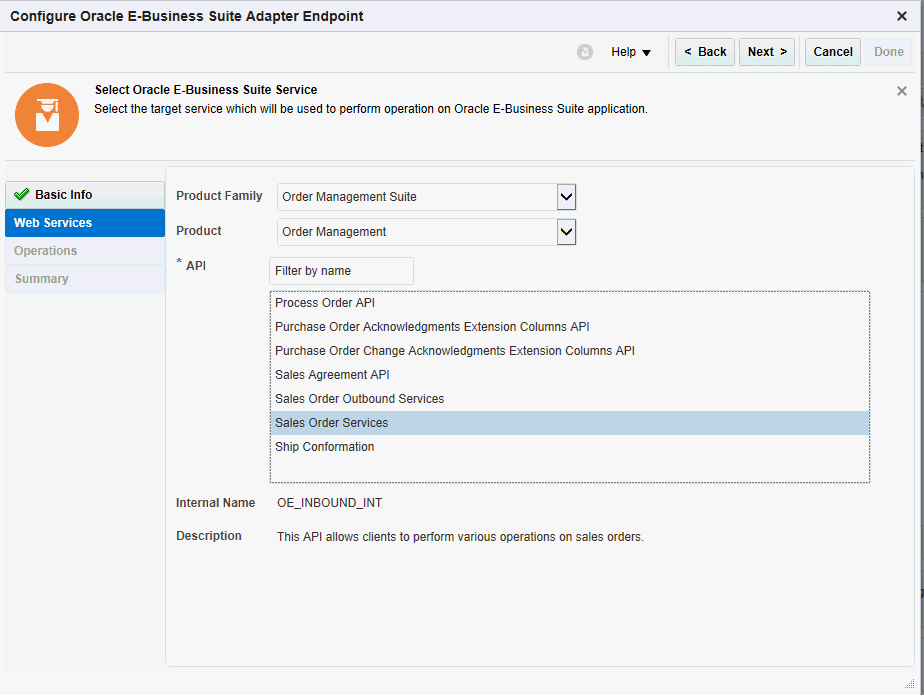
In the Web Services page, specify the following information for your target connection:
-
Product Family: Select "Order Management Suite" from the drop-down list.
-
Product: Select "Order Management".
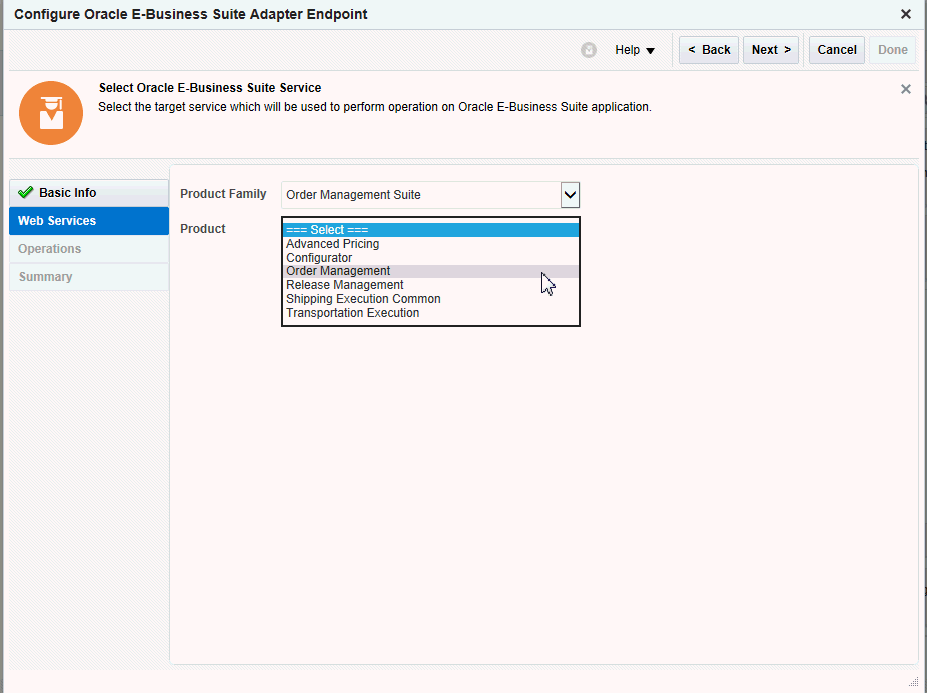
Once you select a desired product family and a product, a list of PL/SQL APIs, including Oracle seeded APIs and custom ones, contained in the selected product "Order Management" is then populated for further selection.
Select a desired API name, such as "Sales Order Services". The corresponding API information, including internal name (OE_INBOUND_INT) and description, is then populated.
Click Next.
-
-
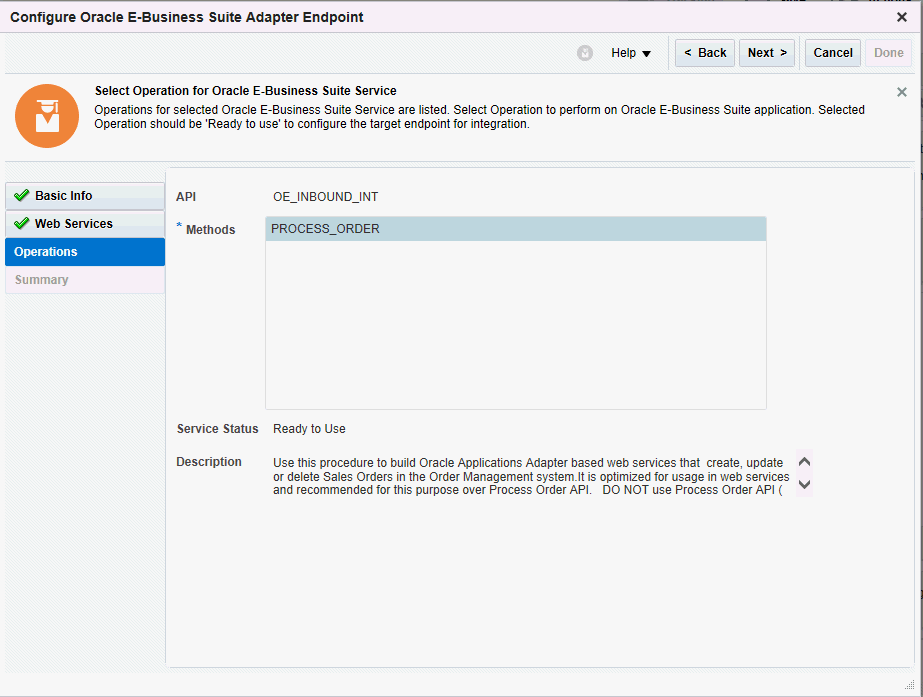
In the Operations page, the selected API internal name OE_INBOUND_INT is automatically populated.
Select a desired method name contained in the selected OE_INBOUND_INT API for this target connection. For example, PROCESS_ORDER.
Click Next.
-
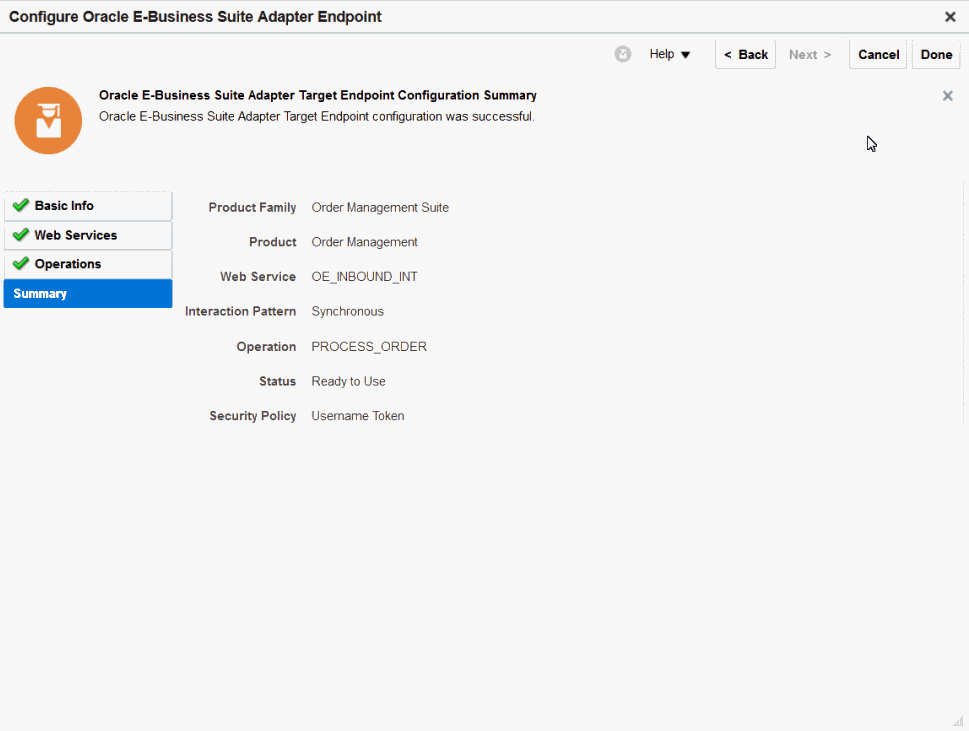
The Summary page displays all the selected interface details. The Oracle E-Business Suite Adapter Target Endpoint configuration is successfully created.
Click Done.
-
Click Save to save your work.
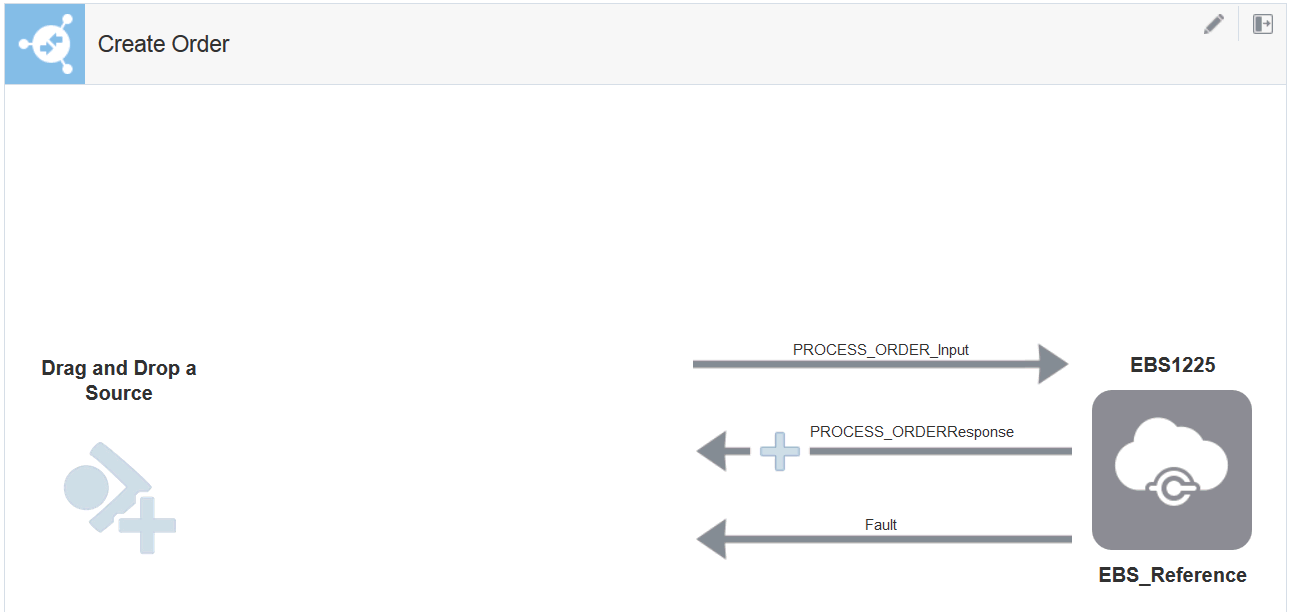
The target connection for Oracle E-Businses Suite is now displayed in the Invoke (Target) area on the canvas.
Adding the REST Adapter as a Trigger (Source) Connection
After adding the Oracle E-Business Suite as an invoke (target) connection, you need to add a trigger (source) connection for your integration as well. The trigger (source) connection can be any application adapters suitable for your integrations. In this example, the REST Adapter is used for this sample integration.
Perform the following steps to add the REST Adapter as a trigger (source) connection:
-
In the Create Order integration page, locate the "GenericREST" connection that you created earlier by entering "GenericREST" in the Connections field.

-
Drag GenericREST from the Connections panel on the right to the Trigger (Source) area on the canvas.
The Configure Oracle REST Endpoint wizard appears.
-
Enter the following information:
-
What do you want to call your endpoint? - Enter the name of this endpoint, such as "Source".
-
What does this endpoint do? - Enter the usage of this endpoint, such as "Provide REST endpoint with input payload for sales order creation".
-
What is the endpoint's relative resource URI? - Enter /process_order.
-
What action does the endpoint perform? - Select "POST" from the drop-down list.
-
Configure a request payload for this endpoint
-
Configure this endpoint to receive the response
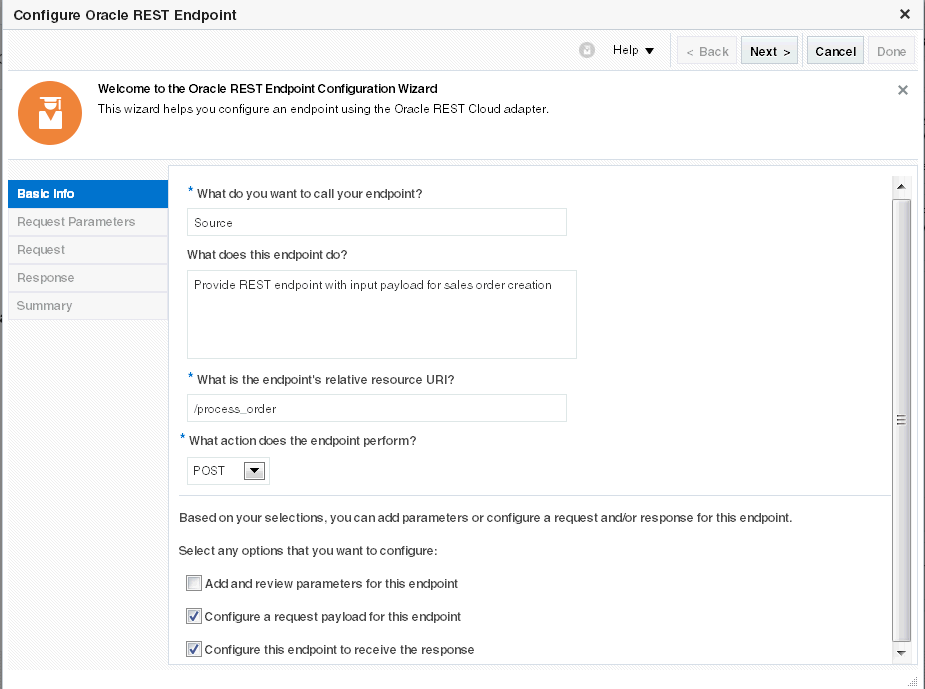
Click Next.
-
-
In the Request page, select the JSON Sample radio button.
Please note that the request payload file type can be either XML schmea or JSON format.
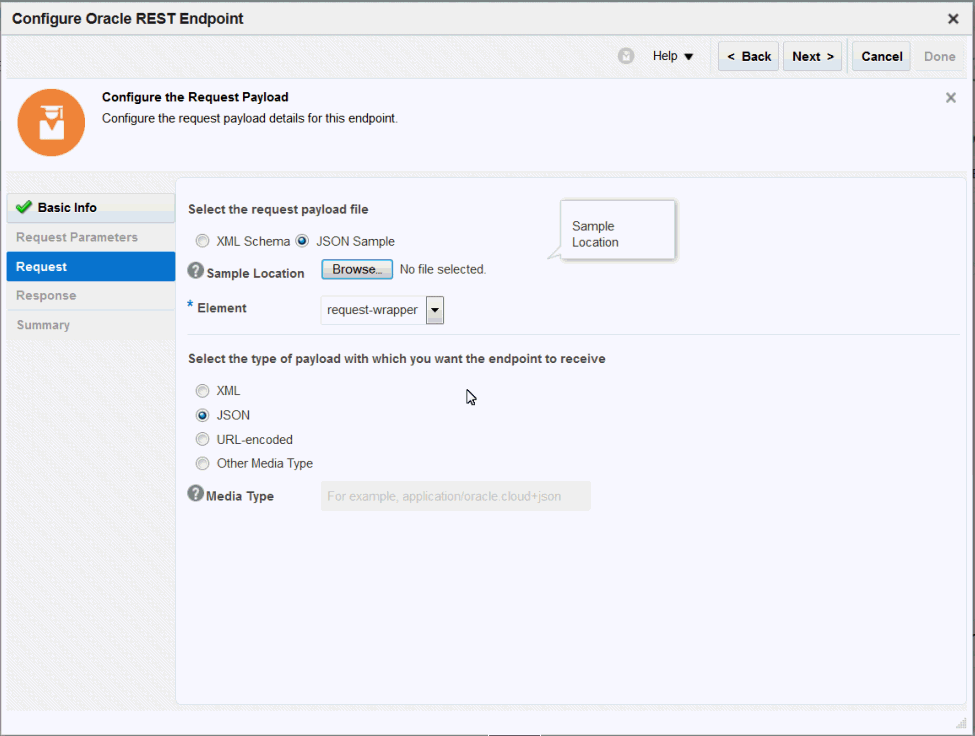
Click Browse to select a desired request payload file, such as "request.json". Click Open to attach the selected file.
Click Next.
-
In the Response page, select the JSON Sample radio button for this example.
Similar to the request, the response payload type can be either XML schema or JSON format.
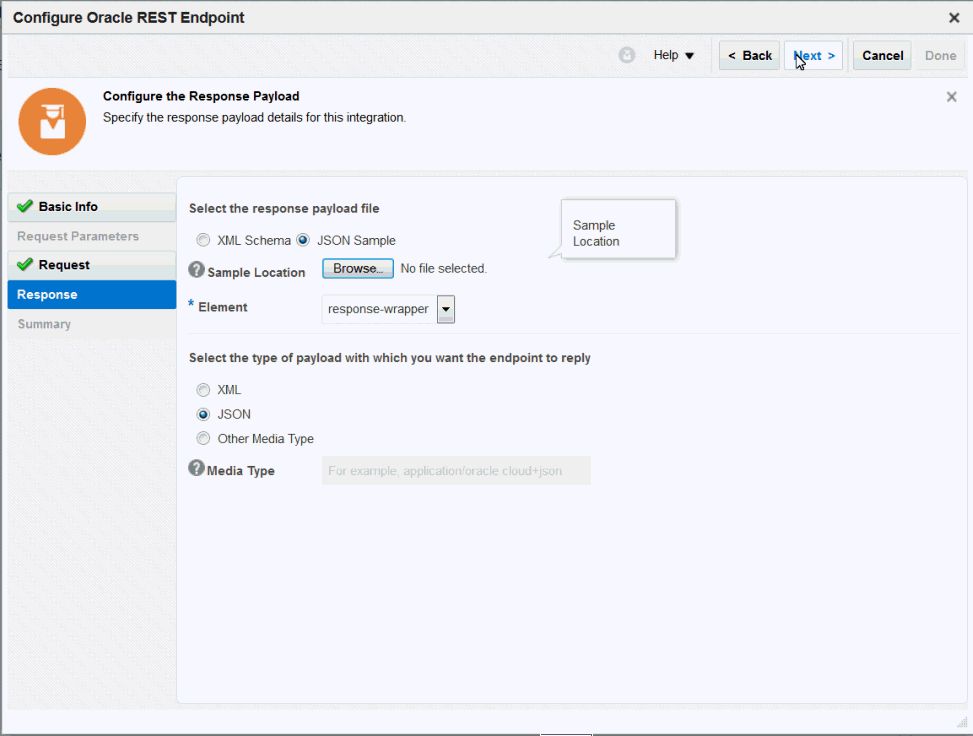
Click Browse to select a desired request payload file, such as "response.json". Click Open to attach the selected file.
-
Click Next to display the Summary page.
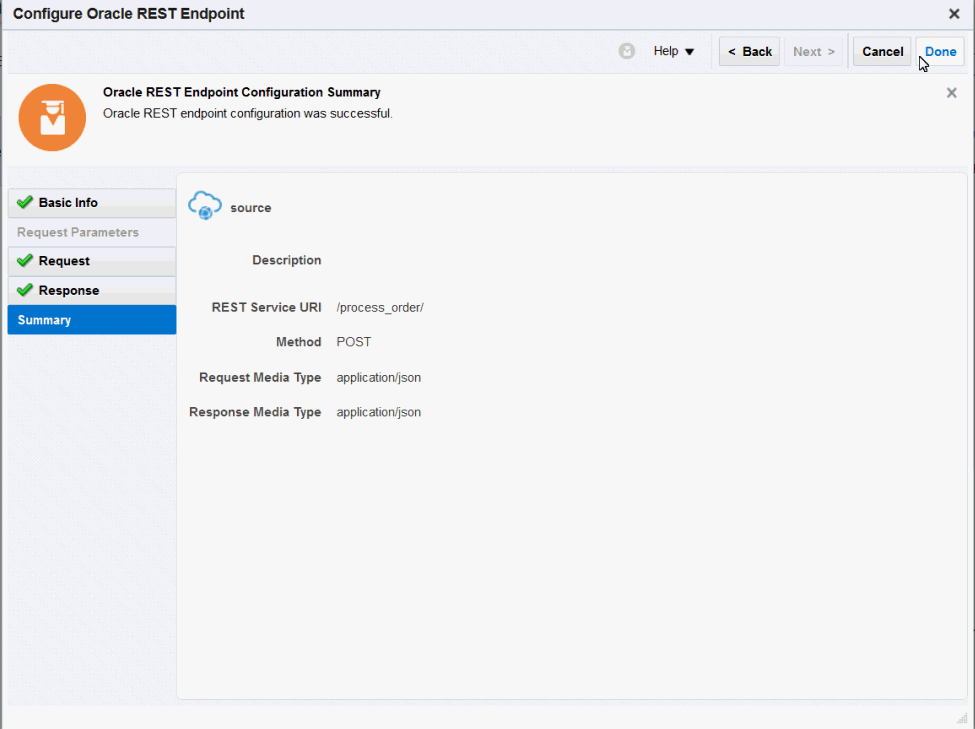
Click Done.
Click Save to save your work. The GenericREST connection is displayed in the Trigger (Source) area on the canvas, along with the "EBS1225" invoke (target) connection.
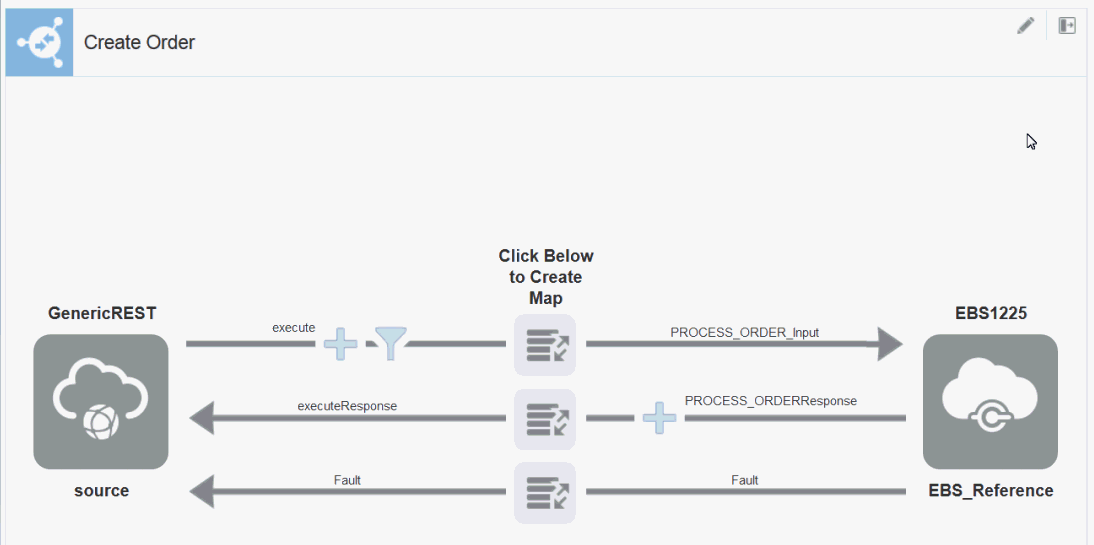
Creating Mappings
This step is to create mappings between the source and target data structures in the integration. It includes the following three mappings:
-
Map the data for the request message
-
Map the data for the response message
-
Map the data for the fault
Creating the first mapping for the request:
-
In the middle of the integration, click the Mapper icon for the request.
Click Create (the + icon) to display the Map page.

-
In the Map page, create the mappings between the source and target elements:
-
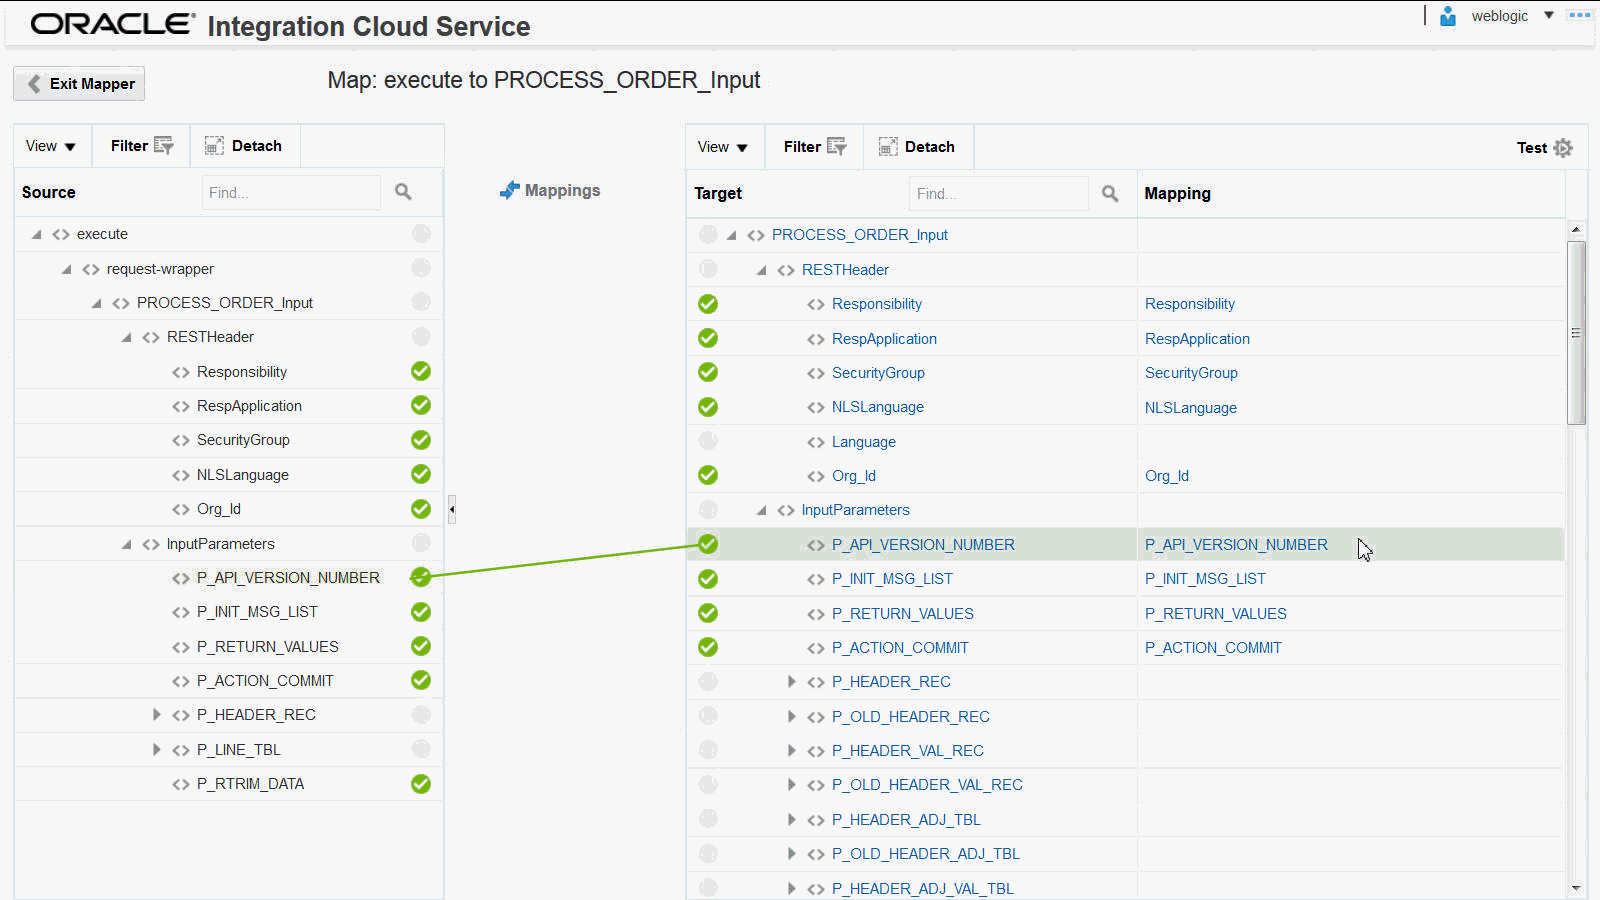
In the Source panel, expand the execute node, then the request-wrapper node, then the PROCESS_ORDER_Input node, and then the InputParameters node.
Select the P_API_VERSION_NUMBER element.
-
In the Target panel, expand the PROCESS_ORDER_Input node, and then the InputParameters node.
Select the P_API_VERSION_NUMBER element.
Drag the P_API_VERSION_NUMBER element from the Source panel to the P_API_VERSION_NUMBER element in the Target panel to map the data.
Similarly, use the same approach to complete the mappings for the rest of elements.
-
-
Once the mapping is complete, click Save to save your work.
-
Click Exit Mapper to return to the Integration page.
Creating the second mapping for the response:
-
In the middle of the integration, click the Mapper icon for the response.
Click Create (the + icon) to display the Map page.

-
In the Map page, create mappings to map the source and target elements.
-
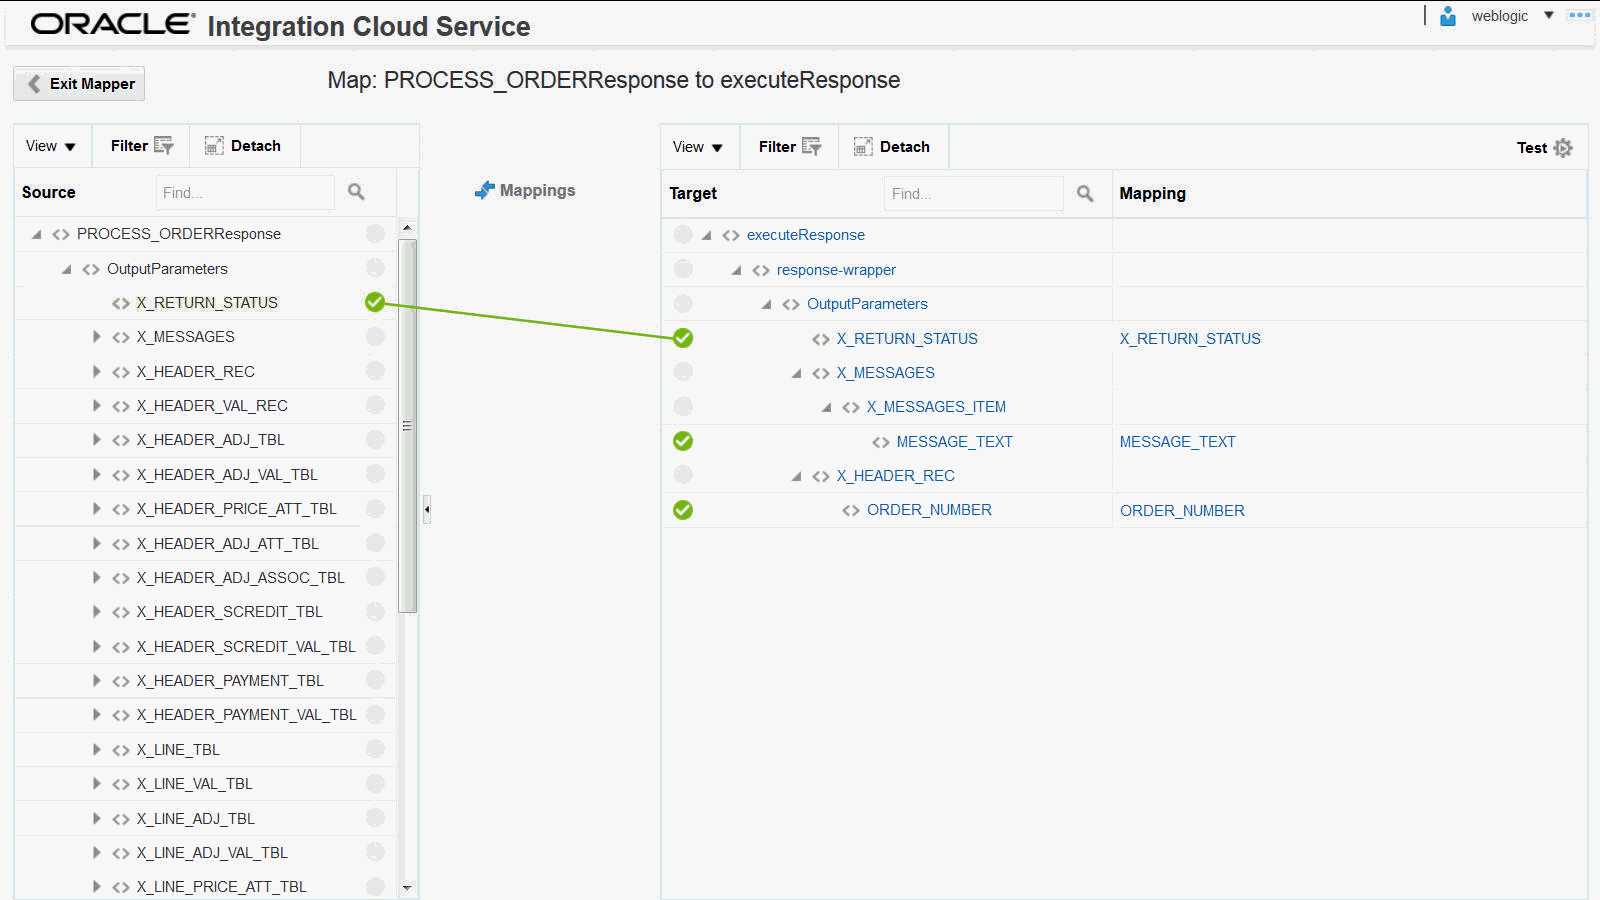
In the Source panel, expand the PROCESS_ORDERResponse node, and then the Output Parameters node.
Select the X_RETURN_STATUS element.
-
In the Target panel, expand the executeResponse node, then the response-wrapper node, and then the Output Parameters node.
Select the X_RETURN_STATUS element.
Drag the X_RETURN_STATUS element from the Source panel to the X_RETURN_STATUS element in the Target panel to map the data.
-
-
Use the same approach to complete the mappings for the rest of elements.
Notice that a green check mark icon appears for the element that has a mapping created. Additionally, the Mapping column appears in the Target panel to list the mapped data.
For example, the X_RETURN_STATUS element from the Source panel (PROCESS_ORDERResponse > Output Parameters) is now mapped to the X_RETURN_STATUS element in the Target panel (executeResponse > response-wrapper > Output Parameters > X_RETURN_STATUS).
Click Save to save your work.
-
Click Exit Mapper to return to the Integration page.
Creating the third mapping for the fault:
-
In the middle of the integration, click the Mapper icon for the fault.
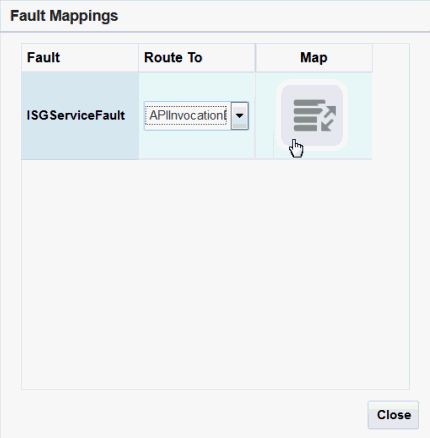
The Fault Mappings dialog appears.
-
Under the Route To, select "APIInvocationError" as the fault type.
-
Under Map, click the Mapper (+) icon to create mapping.
-
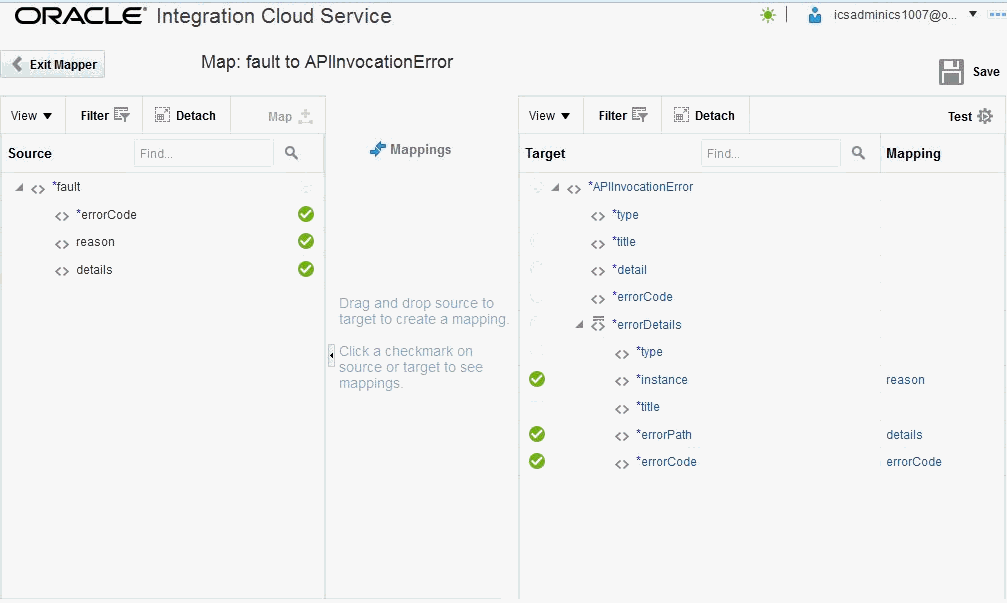
Create the mapping between the source and target elements:
-
In the Source panel, expand the fault node.
Select the errorCode element.
-
In the Target panel, expand the APIInvocationError node.
Select the errorCode element.
Drag the errorCode element from the Source panel to the errorCode element in the Target panel to map the data.
-
-
Repeat the previous step 4 to create another set of mapping with the following data:
-
In the Source panel, expand the fault node.
Select the reason element.
-
In the Target panel, expand the APIInvocationError node, and then the errorDetails node.
Select the instance element.
Drag the reason element from the Source panel to the instance element in the Target panel to map the data.
-
-
Use the same approach to create another set of mapping with the following data:
-
In the Source panel, expand the fault node.
Select the details element.
-
In the Target panel, expand the APIInvocationError node, and then the errorDetails node.
Select the errorPath element.
Drag the details element from the Source panel to the errorPath element in the Target panel to map the data.
-
-
Click Save to save your work and then click Exit Mapper.
The mappings for the request, response, and fault are all created successfully.

Click Save to save your work.
Assigning Business Identifier for Tracking
To effectively track payload fields in messages during runtime, you can specify up to three tracking fields to enable runtime tracking on messages.
-
In the Create Order Integration page, click Tracking.
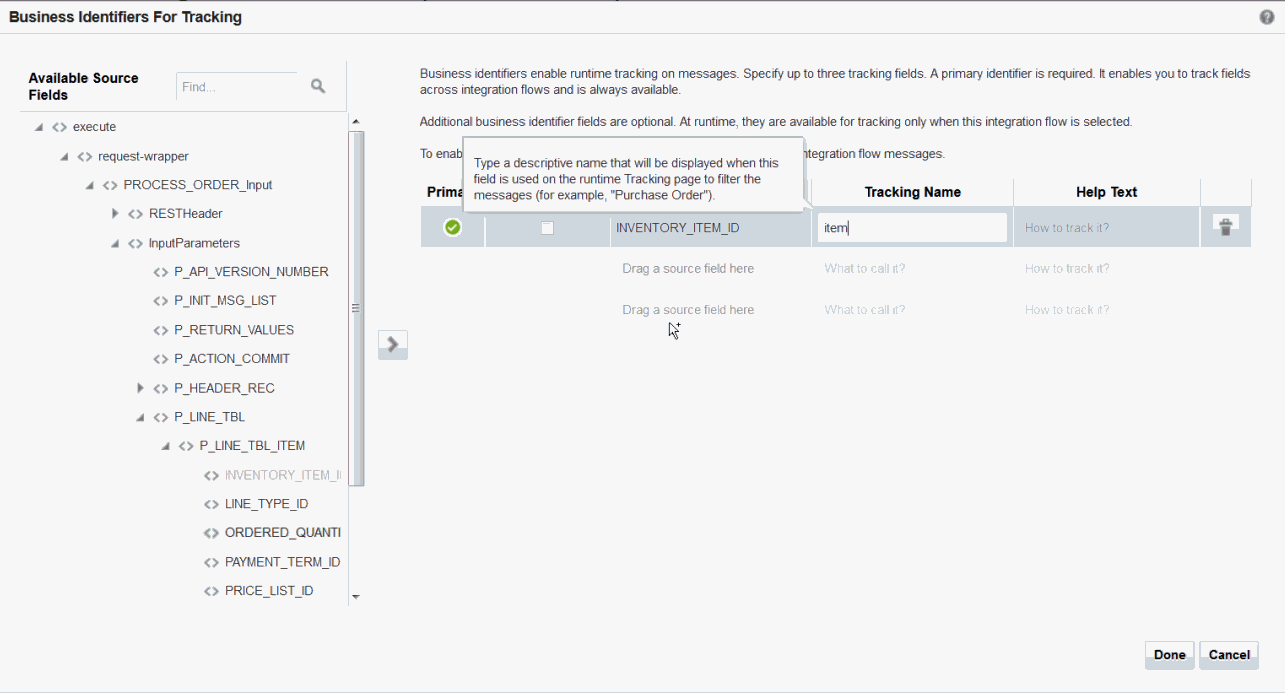
The Business Identifiers For Tracking dialog appears.
-
From the Available Source Fields section, drag the payload field that you want to track to the Tracking Field column.
For example, drag the INVENTORY_ITEM_ID element from the Available Source Fields section to the Tracking Field column in the table.
Enter "item" as the Tracking Name for the INVENTORY_ITEM_ID element.
-
Click Done.
Save your work and then click Exit Integration.
Activating and Testing the Integration
Activating the Integration
After you complete the integration with desired source and target connections and mappings, you can activate the "Create Order" integration.
Perform the following steps to activate the integration:
-
In the Integrations page, click Activate for the "Create Order" integration that you created earlier.

-
The Confirmation dialog appears. Click Activate.

Notice that the status of the "Create Order" integration changes to ACTIVE.
Testing the Integration
To view the activated "Create Order" integration, click the View icon. A pop-up dialog appears with the integration details.
You can copy the Endpoint URL (https://<hostname>:<port>/integration/flowapi/rest/CREATE_ORDER/v01/metadata) and open it in any REST client to invoke the REST service for order creation.
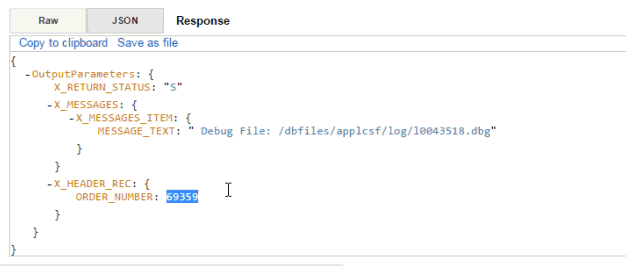
For example, an order number 69359 is created successfully after the service invocation, as shown in the Response tab.
Verifying Order Creation in Oracle E-Business Suite
Log in to Oracle E-Business Suite as a user who has the Order Management Super User, Vision Operations (USA) responsibility.
Select Order Returns and then Sales Order from the navigation menu to open the Sales Orders form.
Search for an order by pressing F11 key. In the Customer PO field, enter the order ID retrieved from the service invocation. For example, enter 69359 and press CTRL+F11 keys to execute the query. You should be able to find the order created in Oracle E-Business Suite.