Setting attribute metadata in data sets

You can set metadata properties on attributes to make a data set easier to search and navigate. Metadata properties include display names, attribute types, semantic types, tags, and notes. On added to a data set, these metadata values become searchable in the search box of Studio, and the metadata values display as new navigation options in the Catalog's Refine By menu.

For example, if you add a semantic type named Person to an attribute, you see a new navigation option in Catalog > Refine by > Attributes > Semantic type for Person.

You can set the metadata properties on a public data set in the Catalog and on a project data set. Metadata changes to public data sets display to all Studio users. Changes to projects with restricted access display only to users with project access.

Changes to attribute metadata that you make in one project do not affect other projects using the same data set. However, changes to attribute metadata that you make in a public data set is inherited by projects using that data set until you run a transform to modify the data set.

To set attribute metadata:

  1. From the Explore page:
    1. Select the Data Set from the bottom tabs.
    2. Locate the attribute you wish to modify.
    3. Click the arrow at the bottom of the frame to open the Attribute Details.
    4. Select the Details tab.
  2. From the Transform page:
    1. Select the Data Set from the bottom tabs.
    2. Locate the column for attribute you wish to modify and select the column.
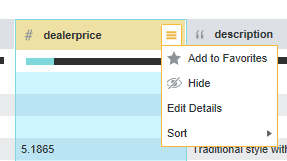
    3. In the attribute menu, click Edit Details.
      For example:
      Shows the attribute transform menu.

  3. To change the display name:
    1. Click the attribute name to enable the edit frame.
    2. Click to edit.
    3. Enter a new display name.
      To change a long name, press CTRL+A to select the entire text field.
    4. Click on another area of the Details panel to save the name.
      The new display name is used in place of the original attribute name.
  4. To add or change the semantic type:
    1. From the Semantic type list, choose an option that more finely describes the attribute.
      For example, this dealerprice attribute has a data type of number and also has a semantic type of currency:
      Show a dealerprice attribute with a semantic type added.

    2. Click on another area of the Details panel to save the semantic type.
  5. To add or remove tags:
    1. Mouse over the Tags area until the edit frame appears.
    2. Click to edit.
    3. To add a tag, type a tag name.
      For example, this dealerprice attribute has a tag of oem:
      Shows a dealerprice attribute with an oem tag.

    4. Click on another area of the Details panel to save the new tag.
    5. Repeat Steps a-d to add additional tags.
    6. To remove a tag, click the corresponding x icon.
  6. To add or remove a note:
    1. Mouseover the Notes area until the edit frame appears.
    2. Click to edit.
    3. Specify note text to describe the attribute.
    4. Click on another area of the Details panel to save the note.
      Notes include a "Last Modified" entry above the text field that indicates the username and time associated with the last edit.
    5. To remove a note, edit the field and remove any content.
      Press CTRL+A to select all text in a large note for deletion.
  7. Click x in the top of the Details pane to return to the Explore or Transform page.