Installing the Oracle Integration Cloud (OIC) Service for Eloqua app
There are two parts to installing the Integration Cloud Service for Eloqua. First you will need to get some information about your Integration Cloud Service for Eloqua, then you will use that information in the app configuration.
Important: Because deleting or deactivating the installer user account will impact installed apps, we recommend installing apps using a user account that is not tied to a specific person. The user account must have customer administrator rights.
Steps in this topic:
To get your Oracle Integration Cloud Service details:
-
Before you install and configure the Oracle Eloqua OIC App, your Oracle Identity Cloud Service admin must configure the Oracle Integration application on the OIC side. The integration requires OAuth 2.0. The following two OAuth 2.0 grant types need to be configured within the application:
- Refresh Token
- Authorization code
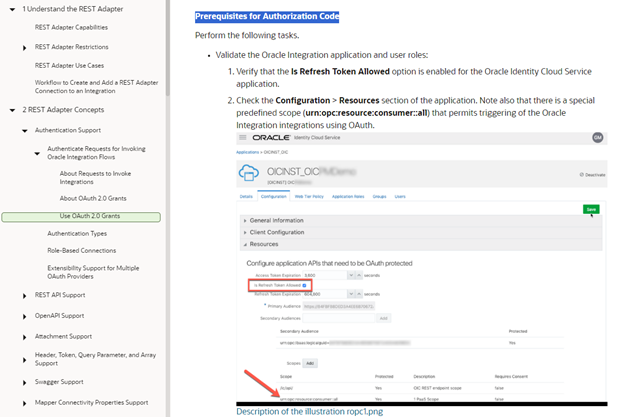
Instruct your admin to follow the steps outlined under the Prerequisites for All Grants and Prerequisites For Authorization Code as detailed in https://docs.oracle.com/en/cloud/paas/integration-cloud/rest-adapter.
-
Please instruct your Oracle Identity Cloud Service admin to enter Oracle Eloqua Callback URL in the Client section, while configuring a trusted application. This URL depends on your Eloqua pod number:
-
Once the app has been configured in Oracle Identity Cloud Service, you must copy the Client ID, Client Secret, and Scopes to use in the OAuth authentication screen in Eloqua.
-
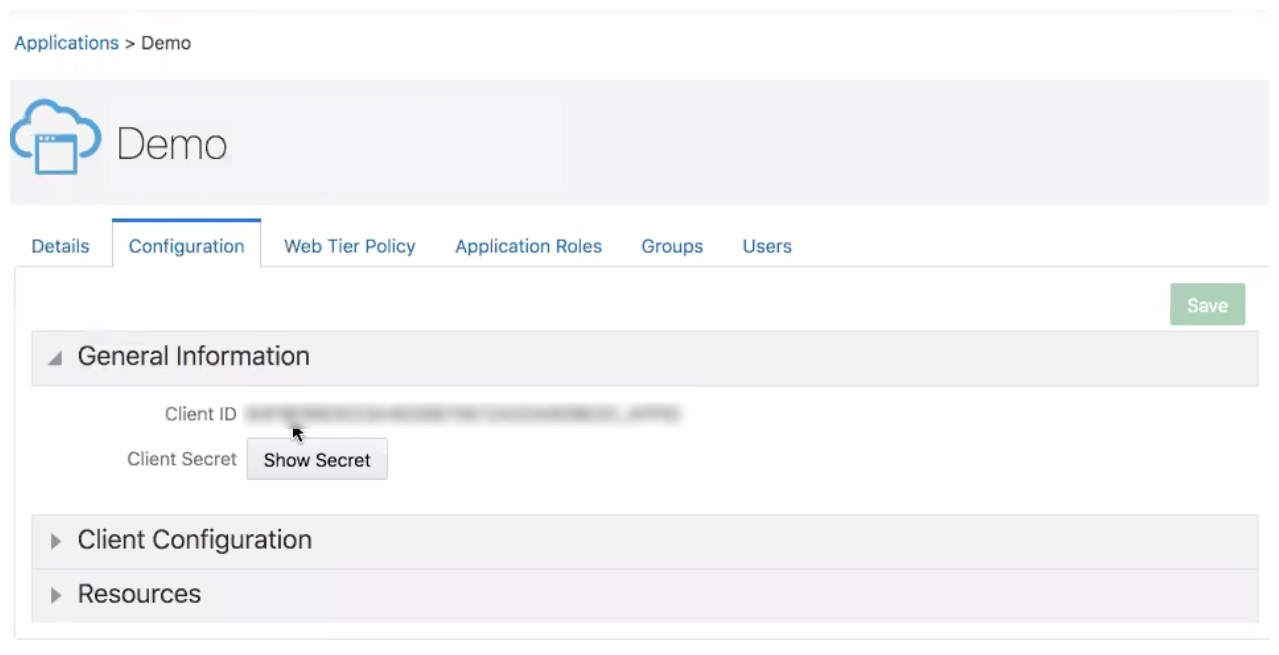
In Oracle Identity Cloud Service, go to the app, click on the Configuration tab > General Information, and copy the Client ID and Client Secret.
-
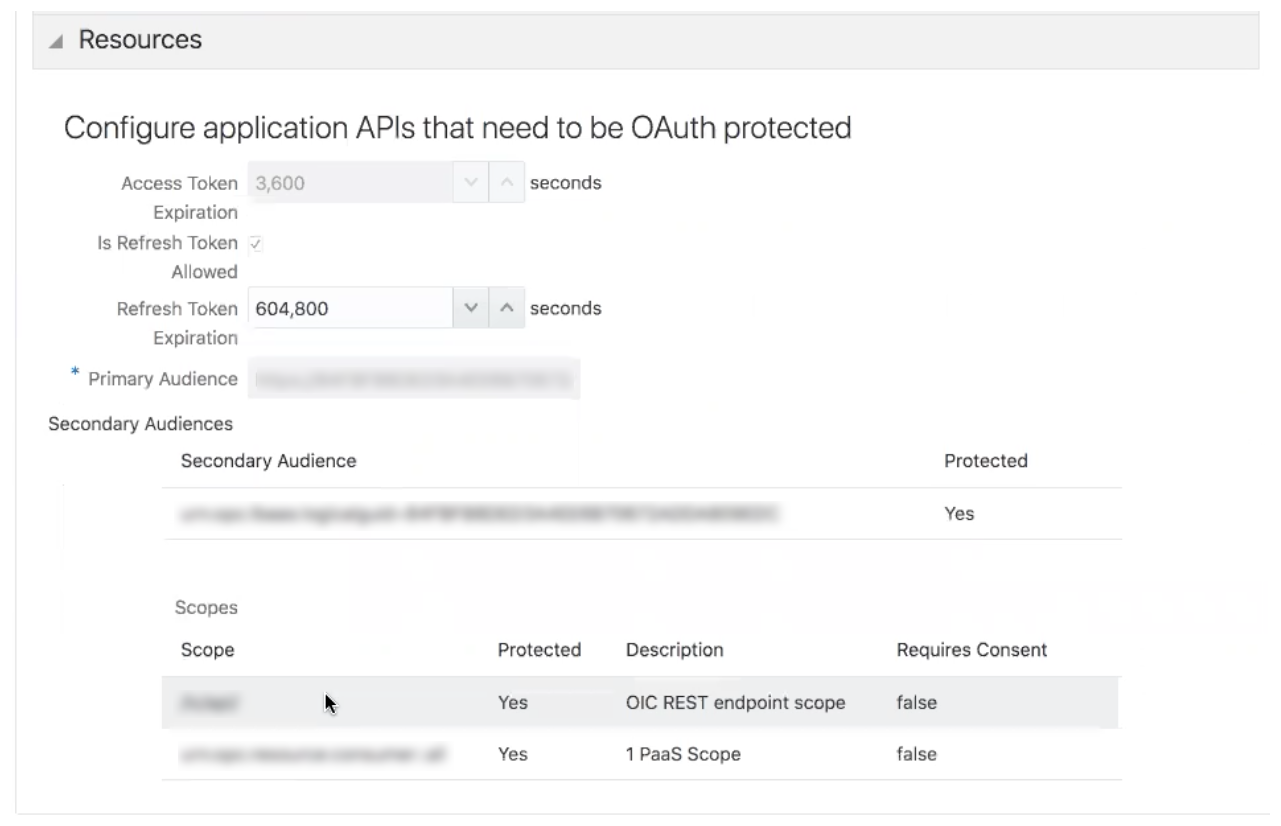
To gather the appropriate scopes, click on the Configuration tab > Resources and copy the scopes listed.
-
-
Obtain the Oracle Identity Cloud Service URL and Oracle Integration Cloud Service URL.
| Pod | Callback URL |
|---|---|
| Pod 1 | https://apps.p01.eloqua.com/eloqua/ics/callback |
| Pod 2 | https://apps.p02.eloqua.com/eloqua/ics/callback |
| Pod 3 | https://apps.p03.eloqua.com/eloqua/ics/callback |
| Pod 4 | https://apps.p04.eloqua.com/eloqua/ics/callback |
| Pod 6 | https://apps.p06.eloqua.com/eloqua/ics/callback |
| Pod 7 | https://apps.p07.eloqua.com/eloqua/ics/callback |
| Pod 8 | https://apps.p08.eloqua.com/eloqua/ics/callback |
To install the Integration Cloud Service for Eloqua app:
- Follow the URL provided:
https://cloudmarketplace.oracle.com/marketplace/app/AppOIC
Note: If you have IP allowlists enabled,
- Click Get App.
- Log in with your Eloqua credentials, if required.
- Click Accept and Install to add the app to your Apps list.
- Configure the app. All fields are required.

Select OAuth as the Authentication Type. If you are installing the app for the first time then you will not see the Basic option at all.
Enter the Identity Cloud Service URL, Integration Cloud Service URL, Client Key, Client Secret, and Scope(s).
Click Authenticate.
Important: Once you switch to OAuth, you cannot switch back to Basic authentication.
The app is now installed and can be viewed in your Apps list (Settings  > Apps, under the Platform Extensions section). Select an app to view a description, reinstall, or uninstall it. You can also check its status and dependencies.
Warning: Selecting the Reinstall option  for an app will force you to go through the entire installation process again. The app will be unavailable for all users during the reinstall.