Creating custom objects
Create a custom object to supplement standard contact and account records. Creating a custom object involves:
- Defining the custom object.
- Defining the custom object record fields that will be used to store the custom object record data.
Note: Opportunity, Purchase History, and Oracle CX Sales Leads custom objects are available for all trims. You can only create new custom objects with the Standard or Enterprise trims, or by purchasing the Oracle Eloqua Data Tools Cloud Service add-on. If you do not have the default custom objects, log in to My Oracle Support and create a service request.
To create a custom object:
-
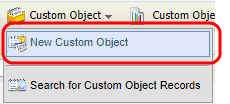
Navigate to Audience
 , then click Custom Objects.
 - Click Custom Object > New Custom Object.
The Custom Object page appears.

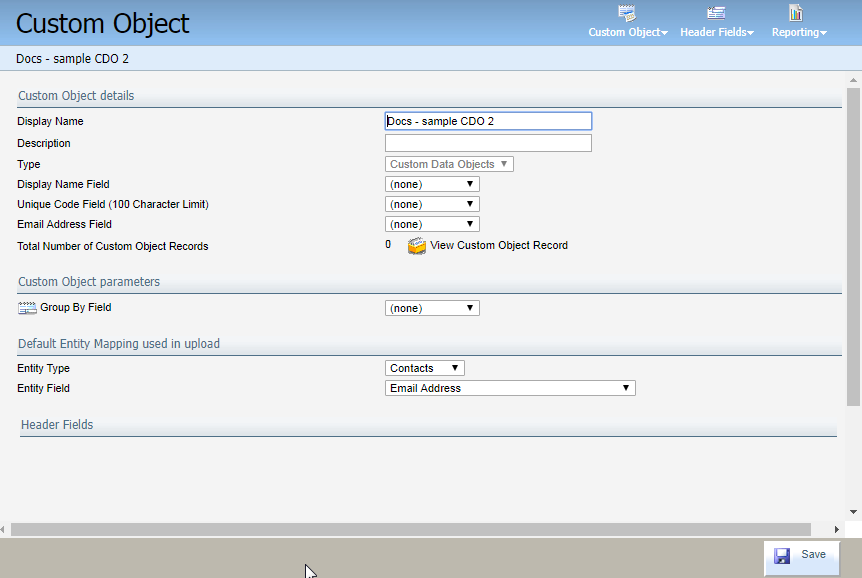
- Give the custom object a name and description and specify the folder to save the custom object to.
-
Select whether you want to automatically delete custom object records when a contact is deleted in the Custom Object Record Deletion section. If this option is selected at a later date, this deletion will not occur retroactively for previously deleted contacts. Deletion will occur only for contacts deleted after this box is checked.
Important: This feature is currently released under our Controlled Availability program. To request access to this feature, please log in to My Oracle Support and create a service request.
- Specify how to link the custom object to a contact or account using the Default Entity Mapping section.
Use the following to help complete these fields:
- Select whether the custom object will be linked to contacts or accounts from the Entity Type drop-down list. Your options are Contacts or Companies.
Note: The terms Companies and Accounts are used interchangeably in custom objects.
- Select the unique identifying field for the custom object from the Entity Type drop-down list. If you are linking your custom object to contact records, typically this would be the email address. If you are linking to account records, select the account field.
- Select whether the custom object will be linked to contacts or accounts from the Entity Type drop-down list. Your options are Contacts or Companies.
- Click Next.
- Add fields to your custom object by clicking the Custom Object Record Fields menu and choose the type of field you want to add to the custom object.
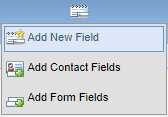
You can choose from the following field options:
- Add New Field: Allows you to add custom fields. Custom fields created and defined by your organization. These are fields that are not standard contact or account fields. Custom fields can be used to store the data required by your business needs. For example, on a purchase history custom object, there would be custom fields used to store information about the product (such as the product, purchase date, or serial number). Learn more about custom field data types and limitations.
- Add Contact or Account Fields: Allows you to add standard contact or account fields to the custom object. Adding these fields to a custom object allows you to draw a more complete profile of your liked contacts or accounts, and keep relevant data visible and consistent. For example, you could add the email address to your record making it easier to identify the custom object record and allowing you to update it whenever the custom object record is updated.
- Add Form Fields: Allows you to add fields from a specified form.
You can add any combination of field types to the custom object. You can add a maximum of 1024 fields to a single custom object.
- After you add all of your fields, click Next.
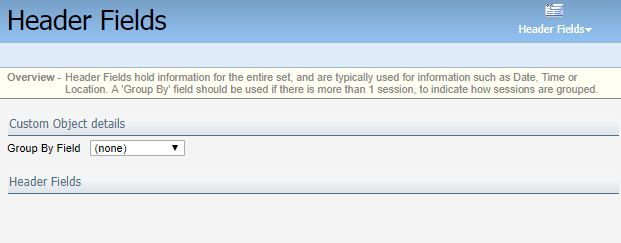
- Add any header fields and choose whether to group custom object records. Header fields are typically used in relation to events. For example, event information such as date, time or location. You can use the Group By Field if there is more than one session, to indicate how sessions are grouped. For example, if you want to aggregate multiple form submissions from a single contact by the Email Address or similar field.
- Click Next.
- Complete the remaining settings on the page.
- Display Name Field: The field that you want to use to display in the first column of the custom object record. For example, when you view the custom object records, this field displays first. Choose the field that will make it easiest to identify the record, such as email address.
- Unique Code Field: A field to use as a unique code. Only choose a field if you do not want to use the unique ID generated by Oracle Eloqua.
- Email Address Field: If applicable, this is the field in the custom object that contains the email address.
- When you have finished, click Save.
Uploading custom object records