Register your app
When you have developed an app and are ready to start testing it, you need to register it with Eloqua. By now, you will have already registered as an app provider in your Eloqua development instance. Now, you need to register your app and services.
Once registered, you can test your apps within your instance to make sure they work as expected, and release the apps selectively or to the general public.
Step 1: Register the app
To register your app, select Settings > AppCloud Developer.
If you have not yet registered any apps, you will see a “You currently have no apps” message, and the button.
If you have already registered an app, it will be listed alongside the button. To register your app, click .
App information
The Create App screen prompts you to fill in a number of fields that describe your app. Complete these fields with the relevant information. Current fields include Name, Description, and Icon.
Warning: the Name field is limited to 100 characters and the Description field is limited to 4000 characters.
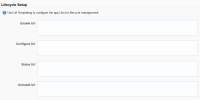
Lifecycle fields
- Enable URL:The URL called when the App is first installed or when it is reconfigured. This is a templated URL which should include, at a minimum, the
{InstallId},{AppId}, and{CallbackUrl}parameters. WIthout the callback URL you will not be able to complete the installation flow if your app requires configuring (for example, to use OAuth). - Configure URL: The URL called when the app is configured.
- Status URL:The URL called when a user checks the App’s connection. Learn how to respond when Eloqua calls the Status URL.
- Uninstall URL: The URL called when a user uninstalls the app. This allows Eloqua to notify the app provider when someone uninstalls their app from the appcloud catalog. This URL supports templated parameters such as
{InstallId},{AppId}, etc.
Authentication to Eloqua
Apps for the AppCloud use OAuth for authentication.
- OAuth Callback URL: the URL that the users should be redirected to after installing the app and authenticating with Eloqua.
To use OAuth, you'll need the following information which is displayed after you click Save:
- Client ID (app ID): Eloqua creates and assigns the app ID when you save your app.
- Client Secret: Eloqua generates the secret access token when you save your app. Click Show to view it.
Once you complete all the fields, click Save to finish configuring the app, or click Add Services to start registering services.
Step 2: Register services
Finally, you should register any service your app uses. The AppCloud developer platform currently supports 6 services: menus, firehose, content, actions, decisions, and feeders.
Apps can include zero services, as in the case of a portal app or if the integration not directly tied to one of the service types, or if it is tied to many services.
To define your app's services within Eloqua, navigate to Settings > AppCloud Developer then click on your app (see step 1 above for setup instructions) and select Add Services.
A modal opens listing the available service types. Select the service type you wish to register.
Then, fill out the service’s details: you will have different information you need to supply depending on the service you are implementing. For example, for a menu, you need to provide the action URL, specify the areas it supports and how Eloqua should present it, and provide the service’s icon URL, name, and description; for content, you will need to fill out instance configuration details, as well as configure content and notification settings, as well as the general service details. The following documents describe the service configuration page for each service type:
When you are done configuring your service, click Save. A green alert message will appear at the top of the page indicating the service has been successfully saved.
Step 3: View the app
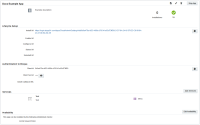
You can view the app information by clicking its name in the list. Here is an example of the App Details page for Docs Example App:
The App Details page shows all of the app information, including Services. When you register an app, it immediately becomes available in your instance of Eloqua so you can test it before releasing it to any other prospective users. When you are ready to release your app, or just to share it with a select few, check out the app publishing tutorial.


