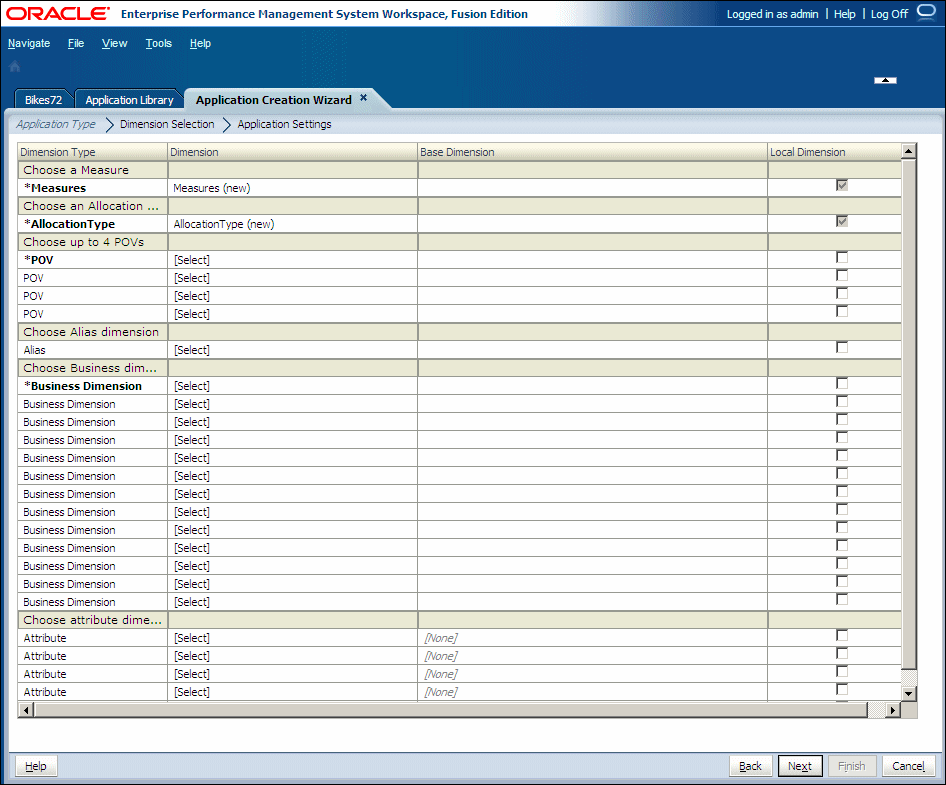
When you use the application wizard, all required dimensions are automatically displayed. If there is an exact match, it automatically populates the dimension column for the dimension type. The required dimension types for Profitability and Cost Management are automatically categorized and displayed with a shaded heading.
-
Measures Dimension (Standard applications only)
-
AllocationType Dimension (Standard applications only)
-
MeasuresDetailed (Detailed applications only)
-
Balance Dimension (Management ledger applications only)
-
Rule Dimension (Management Ledger applications only)
-
POV Dimension (at least one must be defined)
-
Business Dimension (at least one must be defined)
-
Alias Dimension (Optional)
-
Attribute Dimension (Optional)
If you selected Auto Create Local Dimensions when selecting the application type, new local dimensions are created for each required dimension. The name of each new dimension is the same as the dimension type, with (New) in parentheses. For example, Account (New).
|
Caution! |
Any business dimensions you want to include in the application, for example, Account, Entity, Time, or Country, must be added to the Dimension Library before creating the application; otherwise, the dimensions will not be available for the Application Wizard to select. See “Creating Dimensions.” |
-
On the Dimension Selection tab (Step 2 of the Application Wizard), under Dimension Type, review the required dimension types for your application type.
Note:
The required dimension types for Profitability and Cost Management applications are automatically categorized and displayed with a shaded heading.
-
For each existing dimension to be added for the application, under the Dimension column, click [Select] to display the drop-down list of available dimensions for that dimension type.
Only the dimensions for the associated dimension type are displayed. For example, if you are mapping a dimension to the Measures dimension type, only measure dimensions display in the list.
-
Optional: Create a new dimension, as follows:
-
In the Dimension column, click [Select] to display the drop-down list of available dimensions for that dimension type.
-
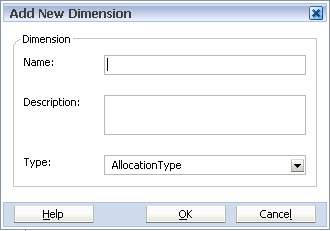
From the drop-down list, select [Create New Dimension].
The Add New Dimension dialog box is displayed.
-
Enter the Name and Description of the new dimension. The Type is automatically selected, based on the dimension type selected in the Dimension Type column.
-
Note:
When you create a dimension in the application wizard, it is always a local dimension and cannot be shared in the application wizard. If you want to share a dimension, you must use the Dimension Library.
-
-
Repeat step 3 and step 4 to select or create new dimensions as necessary.
Note:
All required dimensions must be mapped to a dimension or [None] before you can move to the next screen.
-
Optional: To set the dimension as a local dimension, select the Local Dimension check box at the end of each row.
-
The Application Settings screen is displayed.