Responsys登録Lightboxへの追加フィールドの追加
重要: この機能を使用できるのは、Oracle Maxymiserを所有しており、アカウントに対してこの機能が使用可能になっている場合のみです。
デフォルトでは、Eメール登録LightboxテンプレートにはEmailaddressフィールドのみが含まれます。Lightboxのコードを手動で編集して、名、姓、国などの機能を追加できます。
次の例は、Eメール登録Lightboxに「名」および「姓」フィールドを追加する方法を示します。
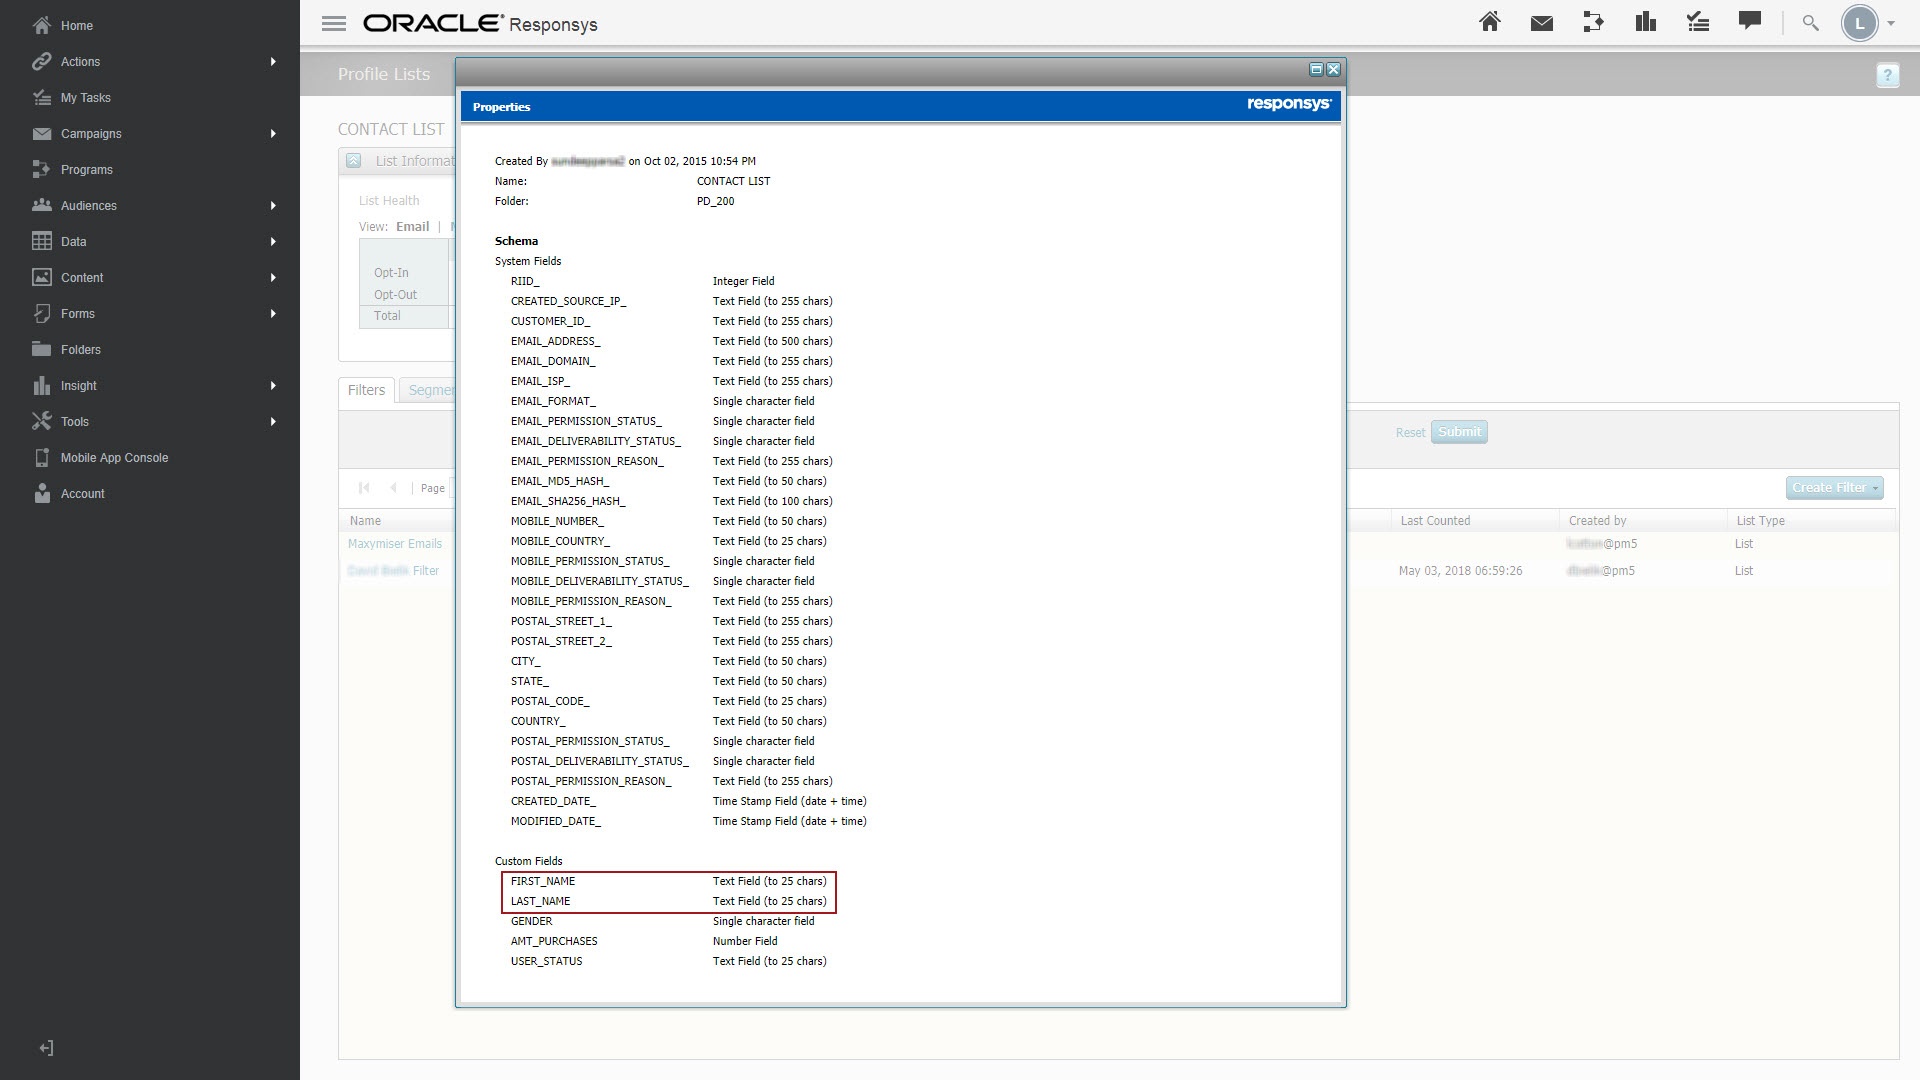
- Lightboxに追加するフィールドの名前はOracle Maxymiser Lightboxのフィールド名と一致する必要があるため、Responsysリスト・スキーマで、フィールドの名前をチェックします。この例では、フィールド名は次のとおりです。
FIRST_NAMELAST_NAME
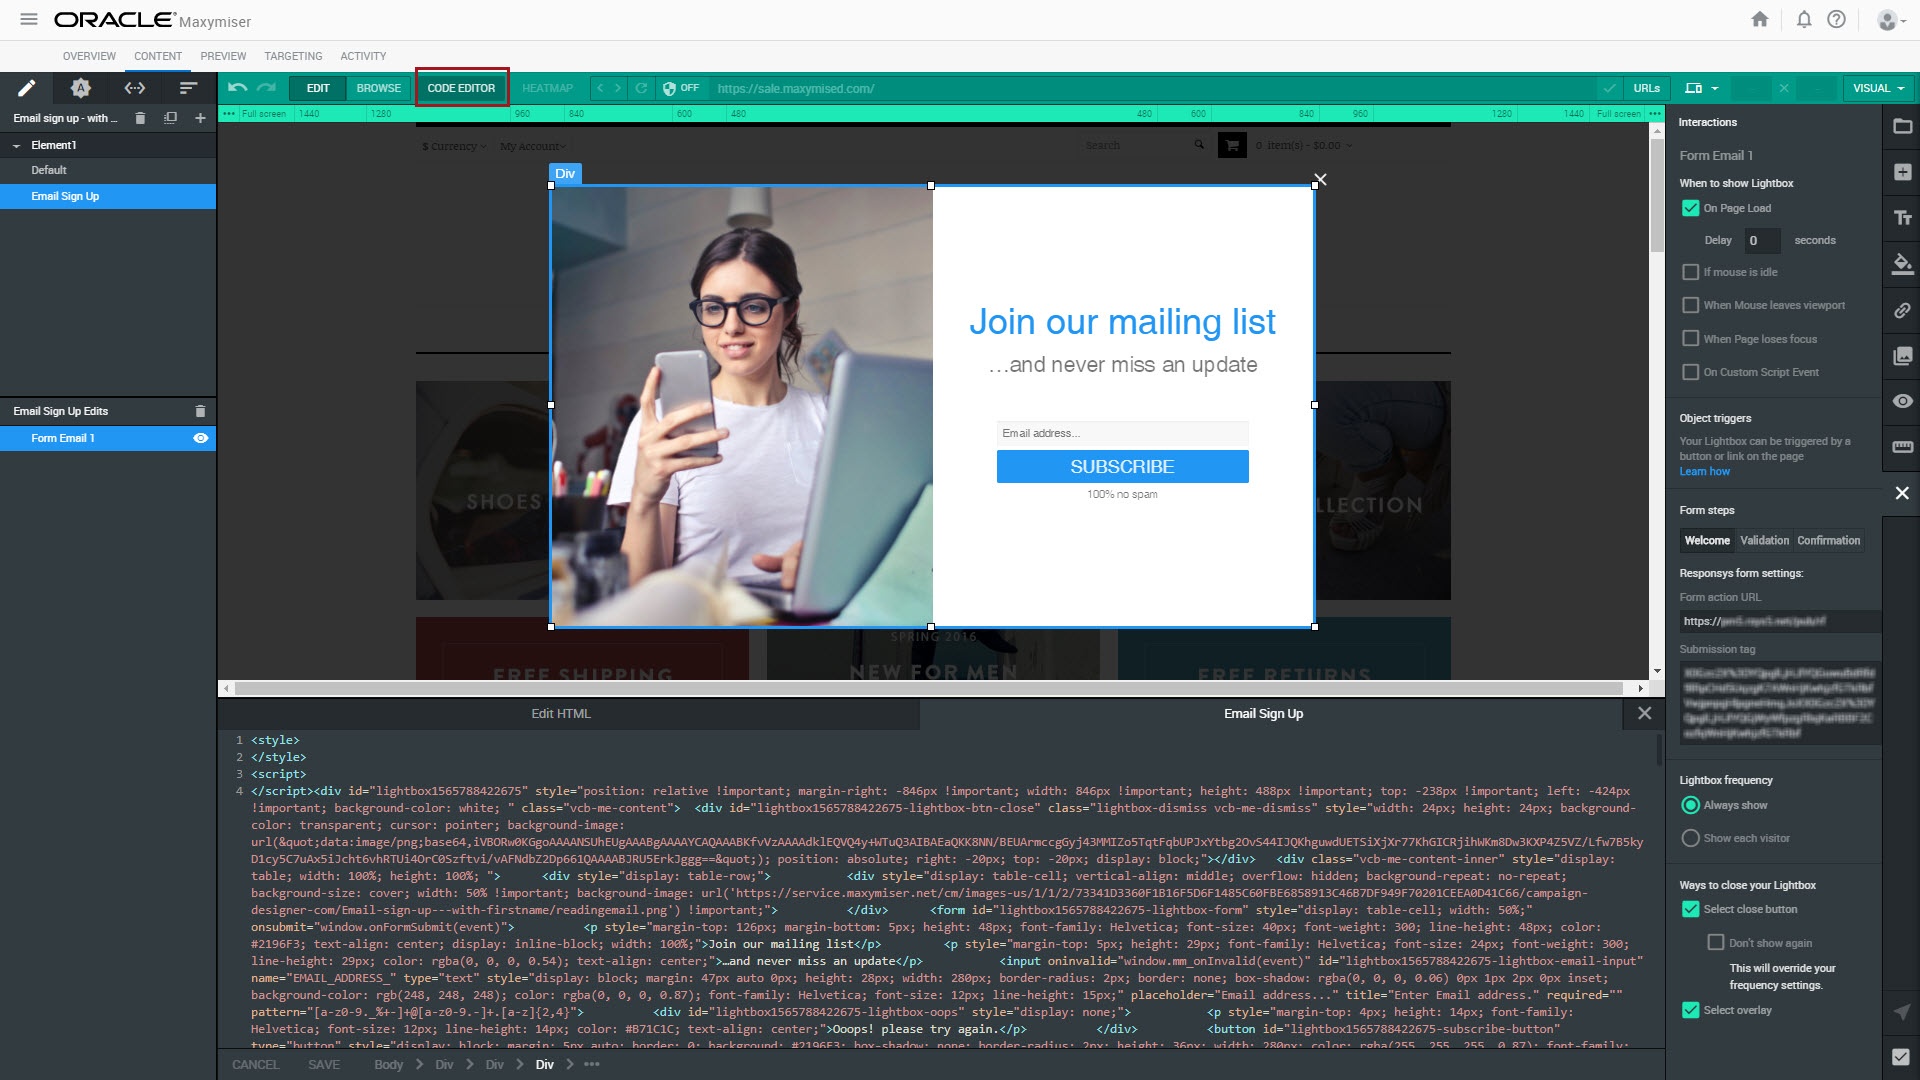
- Oracle Responsys登録Lightboxを作成します。
- 「コード・エディタ」をクリックします。
<form>タグの内側で次の処理を行います。emailaddressフィールドの<input>タグを検索します。- 前述のタグの後に、「名」用の新しい
<input>タグを追加します。 <input>の属性を次のように変更します。- Id: Lightbox IDおよび入力フィールド名とタイプから構成される一意のID。たとえば、次のとおりです。
lightbox1565788422675-lightbox-firstname-input - Name: ステップ1のResponsys表のフィールド名。
- Placeholder: テキスト・ボックスが空の場合に表示されるヒント・テキスト。
- Pattern: テキスト・ボックスに入力可能な文字を決定する正規表現。この例では、a-zまたはA-Zの範囲の文字が入力可能ですが、ハイフンや空白などの文字も許可できます。
- 「姓」用に別の
<input>タグを追加して変更します。
<input oninvalid="window.mm_onInvalid(event)" id="lightbox1565788422675-lightbox-email-input" name="EMAIL_ADDRESS_" type="text" style="display: block; margin: 47px auto 0px; height: 28px; width: 280px; border: none; box-shadow: rgba(0, 0, 0, 0.06) 0px 1px 2px 0px inset; background-color: rgb(248, 248, 248); color: rgba(0, 0, 0, 0.87); font-family: Helvetica; font-size: 12px; line-height: 15px;" placeholder="Email address..." title="Enter Email address." required="" pattern="[a-z0-9._%+-]+@[a-z0-9.-]+.[a-z]{2,4}"><input oninvalid="window.mm_onInvalid(event)" id="lightbox1565788422675-lightbox-firstname-input" name="FIRST_NAME" type="text" style="display: block; margin: 5px auto 0px; height: 28px; width: 280px; border-radius: 2px; border: none; box-shadow: rgba(0, 0, 0, 0.06) 0px 1px 2px 0px inset; background-color: rgb(248, 248, 248); color: rgba(0, 0, 0, 0.87); font-family: Helvetica; font-size: 12px; line-height: 15px;" placeholder="First name..." title="Enter First name." required="" pattern="^[a-zA-Z]+$">
注意: Lightboxを作成するとき、Lightboxの外部ディビジョンの属性または前述のEメール・フィールドのID属性の一部として検索できるように、一意のIDを指定します。
<input oninvalid="window.mm_onInvalid(event)" id="lightbox1565788422675-lightbox-lastname-input" name="LAST_NAME" type="text" style="display: block; margin: 5px auto 0px; height: 28px; width: 280px; border-radius: 2px; border: none; box-shadow: rgba(0, 0, 0, 0.06) 0px 1px 2px 0px inset; background-color: rgb(248, 248, 248); color: rgba(0, 0, 0, 0.87); font-family: Helvetica; font-size: 12px; line-height: 15px;" placeholder="Last name..." title="Enter Last name." required="" pattern="^[a-zA-Z]+$">
- フォームが送信されるとき、送信URLに新しい入力フィールドが追加されていることを確認します。
window.onFormSubmit関数を検索し、その中にある次のコード行を探します。- この行の下に次の行を追加して、名と姓を変数に格納します。
var emailInput = document.getElementById(id + '-lightbox-email-input');
var firstnameInput = document.getElementById(id + '-lightbox-firstname-input');
var lastnameInput = document.getElementById(id + '-lightbox-lastname-input');
これらの変数に格納された値は、エラーのチェック時およびフォームの送信時に使用されます。
- エラー・チェック・コードは、「名」および「姓」フィールドの内容を検証するために更新する必要があります。
- この例では、既存のコードを置き換えます。
- 次のコードに置き換えます。
var re = /[a-z0-9._%+-]+@[a-z0-9.-]+.[a-z]{2,4}/;if (!re.test(emailInput.value)) {oops.style.display = 'block';
emailInput.style.cssText = emailInput.style.cssText.replace(/border:[^;]*;/, "border: 1px solid #B71C1C;");
emailInput.style.cssText = emailInput.style.cssText.replace(/border-radius:[^;]*;/, "border-radius: 2px;");
return;
}
var re = /[a-z0-9._%+-]+@[a-z0-9.-]+.[a-z]{2,4}/;var reName = /^[a-zA-Z]+$/;
emailInput.style.cssText = emailInput.style.cssText.replace(/border:[^;]*;/, "border: none;");
firstnameInput.style.cssText = firstnameInput.style.cssText.replace(/border:[^;]*;/, "border: none;");
lastnameInput.style.cssText = lastnameInput.style.cssText.replace(/border:[^;]*;/, "border: none;");
if (!re.test(emailInput.value) || !reName.test(firstnameInput.value) || !reName.test(lastnameInput.value)) {oops.style.display = 'block';
if (!re.test(emailInput.value)) {emailInput.style.cssText = emailInput.style.cssText.replace(/border:[^;]*;/, "border: 1px solid #B71C1C;");
emailInput.style.cssText = emailInput.style.cssText.replace(/border-radius:[^;]*;/, "border-radius: 2px;");
}
if (!reName.test(firstnameInput.value)) {firstnameInput.style.cssText = firstnameInput.style.cssText.replace(/border:[^;]*;/, "border: 1px solid #B71C1C;");
firstnameInput.style.cssText = firstnameInput.style.cssText.replace(/border-radius:[^;]*;/, "border-radius: 2px;");
}
if (!reName.test(lastnameInput.value)) {lastnameInput.style.cssText = lastnameInput.style.cssText.replace(/border:[^;]*;/, "border: 1px solid #B71C1C;");
lastnameInput.style.cssText = lastnameInput.style.cssText.replace(/border-radius:[^;]*;/, "border-radius: 2px;");
}
return;
}
- To ensure the new values get submitted when the visitor clicks the Subscribe button, find the following code:
- このコードの後に次の行を追加して、フォームの送信URLに名と姓を追加します。
- 「プレビュー」パネルに切り替えて、Lightboxに新規追加したフィールドをテストします。
注意: 「コード・エディタ」でLightboxコードを手動で編集するとき、「インタラクション」パネルに戻って変更を行うと、formSubmit関数への手動の変更が「インタラクション」パネルによって上書きされます。
parameters.push(encodeURIComponent('EMAIL_ADDRESS_') + '=' + encodeURIComponent(emailInput.value));
parameters.push(encodeURIComponent('FIRST_NAME') + '=' + encodeURIComponent(firstnameInput.value));parameters.push(encodeURIComponent('LAST_NAME') + '=' + encodeURIComponent(lastnameInput.value));

関連項目
統合されたMaxymiser-Responsysキャンペーンの開始
Oracle Responsys統合(Oracle Maxymiserヘルプ・センター)